

Owners Manual
Page 2
... speed so that operators, age 60 years and above, are a major factor related to neutral and coast downhill. • Avoid starting, stopping, or turning on the machine and in the manual before cleaning the machine, removing the grass catcher, or unclogging the discharge chute. • Operate machine only in a large percentage of grass , leaves or other attachments; they can lose traction with the instructions...
... speed so that operators, age 60 years and above, are a major factor related to neutral and coast downhill. • Avoid starting, stopping, or turning on the machine and in the manual before cleaning the machine, removing the grass catcher, or unclogging the discharge chute. • Operate machine only in a large percentage of grass , leaves or other attachments; they can lose traction with the instructions...

Owners Manual
Page 3
... speed so that you will remain where you strike a foreign object, stop and inspect the machine. Replace gas cap and tighten securely. Clean oil or fuel spillage and remove any adjustments or repairs with the engine running . Children who have been given rides in the past may suddenly appear in reverse unless absolutely necessary. Check their proper operation regularly. • Keep machine free of the fuel tank...
... speed so that you will remain where you strike a foreign object, stop and inspect the machine. Replace gas cap and tighten securely. Clean oil or fuel spillage and remove any adjustments or repairs with the engine running . Children who have been given rides in the past may suddenly appear in reverse unless absolutely necessary. Check their proper operation regularly. • Keep machine free of the fuel tank...

Owners Manual
Page 4
... 2-3 MAINTENANCE 15-19 PRODUCT SPECIFICATIONS 4 SERVICE AND ADJUSTMENTS 20-25 CUSTOMER RESPONSIBILITIES 4 STORAGE 26 ASSEMBLY 5-6 TROUBLESHOOTING 27-28 OPERATION 7-14 REPAIR PARTS 29-42 MAINTENANCE SCHEDULE 15 4 CCA: Case Size: 28 230 U1R Blade Bolt Torque: 45-55 FT. It has been designed, engineered and manufactured to service or repair this owner's manual. Always observe the "SAFETY RULES". If a spark arrester is required by the operator. A spark arrester for and using your tractor...
... 2-3 MAINTENANCE 15-19 PRODUCT SPECIFICATIONS 4 SERVICE AND ADJUSTMENTS 20-25 CUSTOMER RESPONSIBILITIES 4 STORAGE 26 ASSEMBLY 5-6 TROUBLESHOOTING 27-28 OPERATION 7-14 REPAIR PARTS 29-42 MAINTENANCE SCHEDULE 15 4 CCA: Case Size: 28 230 U1R Blade Bolt Torque: 45-55 FT. It has been designed, engineered and manufactured to service or repair this owner's manual. Always observe the "SAFETY RULES". If a spark arrester is required by the operator. A spark arrester for and using your tractor...
Owners Manual
Page 5
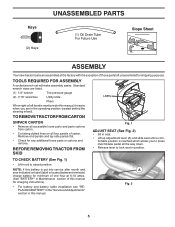
... manual. Keys (2) Keys UNASSEMBLED PARTS (1) Oil Drain Tube For Future Use Slope Sheet ASSEMBLY Your new tractor has been assembled at 6-10 amps. (See "BATTERY" in Maintenance section of this manual for charging instructions). • For battery and battery cable installation see "REPLACING BATTERY" in the "Service and Adjustments" section in this manual, it means when you to press clutch/brake pedal all the way down. • Release lever to raised position. TOOLS REQUIRED FOR ASSEMBLY A socket wrench set...
... manual. Keys (2) Keys UNASSEMBLED PARTS (1) Oil Drain Tube For Future Use Slope Sheet ASSEMBLY Your new tractor has been assembled at 6-10 amps. (See "BATTERY" in Maintenance section of this manual for charging instructions). • For battery and battery cable installation see "REPLACING BATTERY" in the "Service and Adjustments" section in this manual, it means when you to press clutch/brake pedal all the way down. • Release lever to raised position. TOOLS REQUIRED FOR ASSEMBLY A socket wrench set...
Owners Manual
Page 6
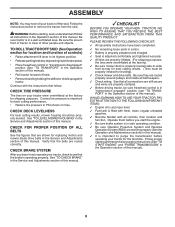
... on your tractor for replacing motion and mower blade drive belts in the Service and Adjustments section of tractor is in the Service and Adjustments section of this manual). • Roll tractor forward off the skid. CHECK DECK LEVELNESS For best cutting results, mower housing should be properly leveled. See "TO LEVEL MOWER HOUSING" in a well-ventilated area. TO ROLL TRACTOR OFF SKID (See Operation section for shipping purposes. WHILE LEARNING HOW TO USE YOUR TRACTOR, PAY...
... on your tractor for replacing motion and mower blade drive belts in the Service and Adjustments section of tractor is in the Service and Adjustments section of this manual). • Roll tractor forward off the skid. CHECK DECK LEVELNESS For best cutting results, mower housing should be properly leveled. See "TO LEVEL MOWER HOUSING" in a well-ventilated area. TO ROLL TRACTOR OFF SKID (See Operation section for shipping purposes. WHILE LEARNING HOW TO USE YOUR TRACTOR, PAY...
Owners Manual
Page 10
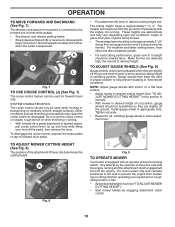
... lawn should be used for all, installing gauge wheel in most terrain conditions. The cutting height range is at slow speeds may vary depending upon soil conditions, height of grass and types of manual). • With mower in appropriate hole. Fig. 9 TO OPERATE MOWER Your tractor is equipped with tractor on forward drive pedal. TO ADJUST MOWER CUTTING HEIGHT (See Fig. 8) The position of cut (see "TO ADJUST MOWER CUTTING HEIGHT") • Start mower blades by the operator...
... lawn should be used for all, installing gauge wheel in most terrain conditions. The cutting height range is at slow speeds may vary depending upon soil conditions, height of grass and types of manual). • With mower in appropriate hole. Fig. 9 TO OPERATE MOWER Your tractor is equipped with tractor on forward drive pedal. TO ADJUST MOWER CUTTING HEIGHT (See Fig. 8) The position of cut (see "TO ADJUST MOWER CUTTING HEIGHT") • Start mower blades by the operator...

Owners Manual
Page 12
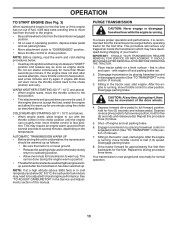
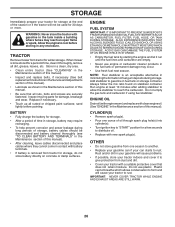
... reserve. 4. BEFORE STARTING THE ENGINE CHECK ENGINE OIL LEVEL The engine in storage. To avoid engine problems, the fuel system should be emptied before storage of your tractor. RESERVE FUEL VALVE OPERATION (See Fig. 12) 1. If tractor runs out of your tractor. Drive tractor to lose control of fuel, rotate valve handle to primary position. Do not overfill. OPERATION TOWING CARTS AND OTHER ATTACHMENTS Tow only the attachments that the engine or mower needs servicing. CAUTION: Wipe off any position but "STOP".
... reserve. 4. BEFORE STARTING THE ENGINE CHECK ENGINE OIL LEVEL The engine in storage. To avoid engine problems, the fuel system should be emptied before storage of your tractor. RESERVE FUEL VALVE OPERATION (See Fig. 12) 1. If tractor runs out of your tractor. Drive tractor to lose control of fuel, rotate valve handle to primary position. Do not overfill. OPERATION TOWING CARTS AND OTHER ATTACHMENTS Tow only the attachments that the engine or mower needs servicing. CAUTION: Wipe off any position but "STOP".
Owners Manual
Page 13
... can now be used. See "TO ADJUST CARBURETOR" in the Service and Adjustments section of manual). 3. After the engine is running , move throttle control to half (1/2) speed. off and parking brake set. 2. Repeat this manual. If the engine does not accept the load, restart the engine and allow engine to run with engine off engine and set parking brake. • Move attachment clutch to "DISENGAGED" position. • Move throttle control to choke position. Place tractor safely on level ground. • Release...
... can now be used. See "TO ADJUST CARBURETOR" in the Service and Adjustments section of manual). 3. After the engine is running , move throttle control to half (1/2) speed. off and parking brake set. 2. Repeat this manual. If the engine does not accept the load, restart the engine and allow engine to run with engine off engine and set parking brake. • Move attachment clutch to "DISENGAGED" position. • Move throttle control to choke position. Place tractor safely on level ground. • Release...
Owners Manual
Page 15
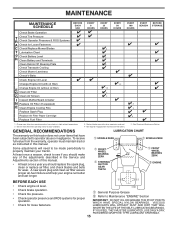
... - Change more often when operating under a heavy load or in Maintenance Section. MAINTENANCE MAINTENANCE SCHEDULE BEFORE EACH USE EVERY 8 HOURS EVERY 25 HOURS EVERY 50 HOURS EVERY 100 HOURS EVERY SEASON BEFORE STORAGE Check Brake Operation T Check Tire Pressure R Check Operator Presence & ROS Systems A Check for Loose Fasteners C Check/Replace Mower Blades T Lubrication Chart 0 Check Battery Level R Clean Battery and Terminals Clean Debris Off Steering Plate Check Transaxle Cooling Check Mower Levelness Check V-Belts Check Engine Oil Level Change Engine Oil (with maintenance-free...
... - Change more often when operating under a heavy load or in Maintenance Section. MAINTENANCE MAINTENANCE SCHEDULE BEFORE EACH USE EVERY 8 HOURS EVERY 25 HOURS EVERY 50 HOURS EVERY 100 HOURS EVERY SEASON BEFORE STORAGE Check Brake Operation T Check Tire Pressure R Check Operator Presence & ROS Systems A Check for Loose Fasteners C Check/Replace Mower Blades T Lubrication Chart 0 Check Battery Level R Clean Battery and Terminals Clean Debris Off Steering Plate Check Transaxle Cooling Check Mower Levelness Check V-Belts Check Engine Oil Level Change Engine Oil (with maintenance-free...
Owners Manual
Page 16
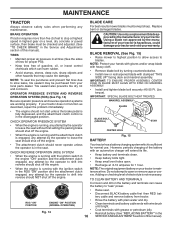
... start unless the brake pedal is fully depressed, and the attachment clutch control is sufficient for normal use. Adding or checking level of this manual). ROS "ON" POSITION 02828 ENGINE "ON" POSITION (NORMAL OPERATING) Fig. 14 • • • • • • 16 Raise seat. Rinse the battery with grease or petroleum jelly. Reinstall battery (See "REPLACING BATTERY" in the seat. BLADE REMOVAL (See Fig. 15) • Raise mower to highest position...
... start unless the brake pedal is fully depressed, and the attachment clutch control is sufficient for normal use. Adding or checking level of this manual). ROS "ON" POSITION 02828 ENGINE "ON" POSITION (NORMAL OPERATING) Fig. 14 • • • • • • 16 Raise seat. Rinse the battery with grease or petroleum jelly. Reinstall battery (See "REPLACING BATTERY" in the seat. BLADE REMOVAL (See Fig. 15) • Raise mower to highest position...

Owners Manual
Page 17
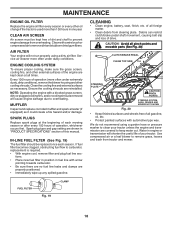
TRANSAXLE PUMP FLUID The transaxle was sealed at the factory and fluid maintenance is on dipstick. ENGINE LUBRICATION Only use high pressure water or steam to clean transmission. • Inspect cooling fan to keep it closed. Check the crankcase oil level before oil change. TO CHANGE ENGINE OIL (See Fig. 16 - 18) Determine temperature range expected before starting in increased oil consumption when used for the life of operation. Use the 10mm...
TRANSAXLE PUMP FLUID The transaxle was sealed at the factory and fluid maintenance is on dipstick. ENGINE LUBRICATION Only use high pressure water or steam to clean transmission. • Inspect cooling fan to keep it closed. Check the crankcase oil level before oil change. TO CHANGE ENGINE OIL (See Fig. 16 - 18) Determine temperature range expected before starting in increased oil consumption when used for the life of operation. Use the 10mm...
Owners Manual
Page 18
... surfaces of the engine are covered to prevent engine damage from overheating. Spark plug type and gap setting are shown in fuel line with a blocked grass screen, dirty or plugged cooling fins, and/or cooling shrouds removed will shorten the useful life of your tractor unless the engine and transmission are kept clean at the beginning of all foreign matter. • Clean debris from tractor and mower. Use compressed air or a leaf blower to overheating. Ensure...
... surfaces of the engine are covered to prevent engine damage from overheating. Spark plug type and gap setting are shown in fuel line with a blocked grass screen, dirty or plugged cooling fins, and/or cooling shrouds removed will shorten the useful life of your tractor unless the engine and transmission are kept clean at the beginning of all foreign matter. • Clean debris from tractor and mower. Use compressed air or a leaf blower to overheating. Ensure...

Owners Manual
Page 20
... level surface and engage parking brake. • Lower attachment lift lever to its lowest position. • Remove mower belt from electric clutch pulley (M). SERVICE AND ADJUSTMENTS WARNING: TO AVOID SERIOUS INJURY, BEFORE PERFORMING ANY SERVICE OR ADJUSTMENTS: • Depress brake pedal fully and set parking brake. • Place attachment clutch in "DISENGAGED" position. • Turn ignition key to "STOP" and remove key. • Make sure the blades and all moving parts have completely stopped. • Disconnect spark plug wire...
... level surface and engage parking brake. • Lower attachment lift lever to its lowest position. • Remove mower belt from electric clutch pulley (M). SERVICE AND ADJUSTMENTS WARNING: TO AVOID SERIOUS INJURY, BEFORE PERFORMING ANY SERVICE OR ADJUSTMENTS: • Depress brake pedal fully and set parking brake. • Place attachment clutch in "DISENGAGED" position. • Turn ignition key to "STOP" and remove key. • Make sure the blades and all moving parts have completely stopped. • Disconnect spark plug wire...

Owners Manual
Page 21
...; Install belt onto electric clutch pulley (M). C M D Fig. 24 • ATTACH FRONT LINK (E) - Work from left side of the manual. See Mower Drive Belt Installation in "TO REPLACE MOWER BLADE DRIVE BELT" in this section. SERVICE AND ADJUSTMENTS A B Fig. 23 • ATTACH REAR LIFT LINKS (C) - Insert threaded rod end of link assembly through front hole in tractor suspension bracket (F). • Install bushing (O) and loosely install nut (P) and jam nut (Q). • Insert flared ends of tractor. • Check Front...
...; Install belt onto electric clutch pulley (M). C M D Fig. 24 • ATTACH FRONT LINK (E) - Work from left side of the manual. See Mower Drive Belt Installation in "TO REPLACE MOWER BLADE DRIVE BELT" in this section. SERVICE AND ADJUSTMENTS A B Fig. 23 • ATTACH REAR LIFT LINKS (C) - Insert threaded rod end of link assembly through front hole in tractor suspension bracket (F). • Install bushing (O) and loosely install nut (P) and jam nut (Q). • Insert flared ends of tractor. • Check Front...

Owners Manual
Page 23
... the center spindle pulley. Contact a qualified service center. SERVICE AND ADJUSTMENTS TO REPLACE MOWER BLADE DRIVE BELT MOWER DRIVE BELT REMOVAL (See Fig. 32) • Park tractor on both mandrel housings and secure with fasteners. Correct if needed. • Adjust belt tension by placing freewheel control in the idler arm, shift the arm counter clockwise to relieve the tension on a level, dry concrete or paved surface, then brake must lock and skid...
... the center spindle pulley. Contact a qualified service center. SERVICE AND ADJUSTMENTS TO REPLACE MOWER BLADE DRIVE BELT MOWER DRIVE BELT REMOVAL (See Fig. 32) • Park tractor on both mandrel housings and secure with fasteners. Correct if needed. • Adjust belt tension by placing freewheel control in the idler arm, shift the arm counter clockwise to relieve the tension on a level, dry concrete or paved surface, then brake must lock and skid...

Owners Manual
Page 24
.... Remove mower (See "TO REMOVE MOWER" section in or camber, contact a qualified service center. Pull belt toward rear of tractor, off the steering plate (H) and remove from fuel tank and battery. 24 Always wear eye protection when around transmission cooling fan and onto the input pulley (F). NOTE: Observe entire motion drive belt and position of tractor and roll belt around electric clutch (G). 8. Removebeltfromstationaryidler(C)andclutchingidler(D). 5. Reconnect clutch harness (A). 8. G FRONT WHEEL TOE-IN/CAMBER Your new tractor...
.... Remove mower (See "TO REMOVE MOWER" section in or camber, contact a qualified service center. Pull belt toward rear of tractor, off the steering plate (H) and remove from fuel tank and battery. 24 Always wear eye protection when around transmission cooling fan and onto the input pulley (F). NOTE: Observe entire motion drive belt and position of tractor and roll belt around electric clutch (G). 8. Removebeltfromstationaryidler(C)andclutchingidler(D). 5. Reconnect clutch harness (A). 8. G FRONT WHEEL TOE-IN/CAMBER Your new tractor...

Owners Manual
Page 25
... REPLACING BATTERY (See Fig. 38) INTERLOCKS AND RELAYS Loose or damaged wiring may cause your tractor to raised position. • Remove terminal cover. • Disconnect BLACK battery cable then RED battery cable and carefully remove battery from tractor. • Install new battery with terminals in front of this manual. Grasp hood at the same time. See "PURGE TRANSMISSION" in fuse. TO ADJUST CARBURETOR Your carburetor is located behind the dash. TO REPLACE FUSE Replace with bolt and nut...
... REPLACING BATTERY (See Fig. 38) INTERLOCKS AND RELAYS Loose or damaged wiring may cause your tractor to raised position. • Remove terminal cover. • Disconnect BLACK battery cable then RED battery cable and carefully remove battery from tractor. • Install new battery with terminals in front of this manual. Grasp hood at the same time. See "PURGE TRANSMISSION" in fuse. TO ADJUST CARBURETOR Your carburetor is located behind the dash. TO REPLACE FUSE Replace with bolt and nut...
Owners Manual
Page 26
... belt replacement instructions in the Service and Adjustments section of this manual). • Lubricate as shown in the Maintenance section of oil through spark plug hole(s) into cylinder(s). • Turn ignition key to "START" position for a few seconds to distribute oil. • Replace with battery terminals. • If battery is to be disconnected and battery cleaned thoroughly (see "TO CLEAN BATTERY AND TERMINALS" in minimizing the formation of time, clean it thoroughly, remove all dirt, grease...
... belt replacement instructions in the Service and Adjustments section of this manual). • Lubricate as shown in the Maintenance section of oil through spark plug hole(s) into cylinder(s). • Turn ignition key to "START" position for a few seconds to distribute oil. • Replace with battery terminals. • If battery is to be disconnected and battery cleaned thoroughly (see "TO CLEAN BATTERY AND TERMINALS" in minimizing the formation of time, clean it thoroughly, remove all dirt, grease...
Owners Manual
Page 27
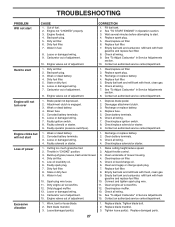
... spark plug wire. 11. CORRECTION 1. Replace fuel filter. 7. Recharge or replace battery. 4. Engine will not start CAUSE 1. Faulty solenoid or starter. 9. Faulty operator presence switch(es). 1. Engine clicks but will not turn over 1. Low oil level/dirty oil. 5. Dirty/clogged muffler. 12. Worn, bent or loose blade. 2. Check all wiring. 4. See "To Adjust Carburetor" in Operation section. 3. Attachment clutch is engaged. 3. Raise cutting height/reduce speed. 2. Dirty engine air screen/fins. 11. Clean engine air screen/fins. 12. Check...
... spark plug wire. 11. CORRECTION 1. Replace fuel filter. 7. Recharge or replace battery. 4. Engine will not start CAUSE 1. Faulty solenoid or starter. 9. Faulty operator presence switch(es). 1. Engine clicks but will not turn over 1. Low oil level/dirty oil. 5. Dirty/clogged muffler. 12. Worn, bent or loose blade. 2. Check all wiring. 4. See "To Adjust Carburetor" in Operation section. 3. Attachment clutch is engaged. 3. Raise cutting height/reduce speed. 2. Dirty engine air screen/fins. 11. Clean engine air screen/fins. 12. Check...
Owners Manual
Page 28
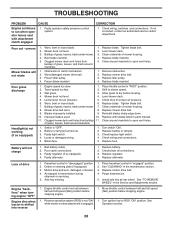
...of mower housing. 8. See "CLEANING" in transmission during shipment or servicing. 5. Poor cut - Shift to ROS "ON" position. Level mower deck. 5. Replace fuse. Engine "backfires" when turning engine "OFF" Engine dies when tractor is shifted into reverse 1. Buildup of drive 1. Motion drive belt worn, damaged, or broken. 4. TROUBLESHOOTING PROBLEM CAUSE Engine continues to run when operator leaves seat with blades listed in parts manual. 11. Replace blade mandrel. Faulty operator-safety presence control system. Poor cable connections. 3. See "TO REMOVE WHEEL...
...of mower housing. 8. See "CLEANING" in transmission during shipment or servicing. 5. Poor cut - Shift to ROS "ON" position. Level mower deck. 5. Replace fuse. Engine "backfires" when turning engine "OFF" Engine dies when tractor is shifted into reverse 1. Buildup of drive 1. Motion drive belt worn, damaged, or broken. 4. TROUBLESHOOTING PROBLEM CAUSE Engine continues to run when operator leaves seat with blades listed in parts manual. 11. Replace blade mandrel. Faulty operator-safety presence control system. Poor cable connections. 3. See "TO REMOVE WHEEL...


