
Owner Manual
Page 2
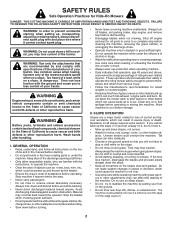
... hands after handling. Avoid discharging material against a wall or obstruction. Allow machine to stop engine, and remove keys before turning. • Never leave a running machine unattended. Stop machine if anyone . WARNING: In order to lose control of your foot on the slopes slow and gradual. Always look down before dismounting. • Disengage blades when not mowing. Operate only at all parts to come...
... hands after handling. Avoid discharging material against a wall or obstruction. Allow machine to stop engine, and remove keys before turning. • Never leave a running machine unattended. Stop machine if anyone . WARNING: In order to lose control of your foot on the slopes slow and gradual. Always look down before dismounting. • Disengage blades when not mowing. Operate only at all parts to come...

Owner Manual
Page 3
... operating a riding lawn mower. Wrap the blade or wear gloves, and use extreme care in safe working condition. • Never tamper with safe machine operation. Stop machine if anyone enters the area. Never carry passengers. SAFETY RULES Safe Operation Practices for towing. Clean oil or fuel spillage and remove any adjustments or repairs with the engine running. • Check grass catcher components and the discharge chute frequently and replace with manufacturer's recommended parts...
... operating a riding lawn mower. Wrap the blade or wear gloves, and use extreme care in safe working condition. • Never tamper with safe machine operation. Stop machine if anyone enters the area. Never carry passengers. SAFETY RULES Safe Operation Practices for towing. Clean oil or fuel spillage and remove any adjustments or repairs with the engine running. • Check grass catcher components and the discharge chute frequently and replace with manufacturer's recommended parts...

Owner Manual
Page 5
... PARTS Keys Key(s) (1) Oil Drain Tube (1) Quick Connect Slope Sheet ASSEMBLY Your new tractor has been assembled at 6-10 amps. (See "BATTERY" in Maintenance section of this manual for location and function of controls) • Raise attachment lift lever to its highest position. • Releaseparkingbrakebydepressingclutch/brakepedal. • Place freewheel control in "transmission disengaged" position (See "TO TRANSPORT" in the Operation section of this manual. TO REMOVE TRACTOR FROM CARTON • For battery and battery cable installation see "REPLACING BATTERY...
... PARTS Keys Key(s) (1) Oil Drain Tube (1) Quick Connect Slope Sheet ASSEMBLY Your new tractor has been assembled at 6-10 amps. (See "BATTERY" in Maintenance section of this manual for location and function of controls) • Raise attachment lift lever to its highest position. • Releaseparkingbrakebydepressingclutch/brakepedal. • Place freewheel control in "transmission disengaged" position (See "TO TRANSPORT" in the Operation section of this manual. TO REMOVE TRACTOR FROM CARTON • For battery and battery cable installation see "REPLACING BATTERY...

Owner Manual
Page 6
... shown for replacing motion and mower blade drive belts in the Service and Adjustments section of this manual). 6 PLEASE REVIEW THE FOLLOWING CHECKLIST: ✓ All assembly instructions have been completed. ✓ No remaining loose parts in carton. ✓ Battery is properly prepared and charged. ✓ Seat is adjusted comfortably and tightened securely. ✓ All tires are routed correctly. Operate them before operating your tractor, check to -rear for best cutting results. (Tires must be properly leveled. See that...
... shown for replacing motion and mower blade drive belts in the Service and Adjustments section of this manual). 6 PLEASE REVIEW THE FOLLOWING CHECKLIST: ✓ All assembly instructions have been completed. ✓ No remaining loose parts in carton. ✓ Battery is properly prepared and charged. ✓ Seat is adjusted comfortably and tightened securely. ✓ All tires are routed correctly. Operate them before operating your tractor, check to -rear for best cutting results. (Tires must be properly leveled. See that...

Owner Manual
Page 9
...; Pull parking brake lever (C) up and hold tractor secure. Fig. 4 STOPPING (See Fig. 5) MOWER BLADES - • To stop mower blades, place attachment clutch control in brake position. IMPORTANT: LEAVING THE IGNITION SWITCH IN ANY POSITION OTHER THAN "STOP" WILL CAUSE THE BATTERY TO BE DISCHARGED, (DEAD). B C ENGINE - • Move throttle control (D) between half and full speed (fast) position, before leaving the operator's position. TO USE THROTTLE CONTROL (D) (See Fig. 6) Always operate engine at full speed (fast). • Operating engine at...
...; Pull parking brake lever (C) up and hold tractor secure. Fig. 4 STOPPING (See Fig. 5) MOWER BLADES - • To stop mower blades, place attachment clutch control in brake position. IMPORTANT: LEAVING THE IGNITION SWITCH IN ANY POSITION OTHER THAN "STOP" WILL CAUSE THE BATTERY TO BE DISCHARGED, (DEAD). B C ENGINE - • Move throttle control (D) between half and full speed (fast) position, before leaving the operator's position. TO USE THROTTLE CONTROL (D) (See Fig. 6) Always operate engine at full speed (fast). • Operating engine at...

Owner Manual
Page 10
... level surface. • Adjust mower to the blade tip with tractor on rough, rolling terrain or hills. • Select desired height of the attachment lift lever (A) determines the cutting height. TO ADJUST MOWER CUTTING HEIGHT (See Fig. 8) The position of cut position, gauge wheels should be mowed twice. Install gauge wheel in appropriate hole as trimming at the desired cutting height in same adjustment hole. 9/16" 3/4" Fig. 9 A Fig. 8 TO OPERATE MOWER Your tractor is controlled by engaging attachment clutch control...
... level surface. • Adjust mower to the blade tip with tractor on rough, rolling terrain or hills. • Select desired height of the attachment lift lever (A) determines the cutting height. TO ADJUST MOWER CUTTING HEIGHT (See Fig. 8) The position of cut position, gauge wheels should be mowed twice. Install gauge wheel in appropriate hole as trimming at the desired cutting height in same adjustment hole. 9/16" 3/4" Fig. 9 A Fig. 8 TO OPERATE MOWER Your tractor is controlled by engaging attachment clutch control...

Owner Manual
Page 11
OPERATION TO STOP MOWER BLADES Disengage attachment clutch control. Use common sense when towing. CAUTION: Do not operate the mower without either the entire grass catcher, on mowers so equipped, or the deflector chute in reverse unless absolutely necessary. Turning the ROS "ON", to allow reverse operation with the attachment clutch engaged, should only be done when the operator decides it is strongly discouraged. Do not mow in place (See Fig. 10). TRANSMISSION ENGAGED TRANSMISSION DISENGAGED Fig. 11 NOTE...
OPERATION TO STOP MOWER BLADES Disengage attachment clutch control. Use common sense when towing. CAUTION: Do not operate the mower without either the entire grass catcher, on mowers so equipped, or the deflector chute in reverse unless absolutely necessary. Turning the ROS "ON", to allow reverse operation with the attachment clutch engaged, should only be done when the operator decides it is strongly discouraged. Do not mow in place (See Fig. 10). TRANSMISSION ENGAGED TRANSMISSION DISENGAGED Fig. 11 NOTE...

Owner Manual
Page 13
...; When operating attachments, select a ground speed that is in the Service and Adjustments section of your tractor. off and parking brake set parking brake. 6. To ensure proper operation and performance, it is running , move throttle control to full reverse position, hold for best mowing performance. that will result in the tractor seat, start engine. Your transmission is recommended that has been cut relatively high; This procedure will plug mower and leave undesirable clumps. See "TO LEVEL MOWER HOUSING" in...
...; When operating attachments, select a ground speed that is in the Service and Adjustments section of your tractor. off and parking brake set parking brake. 6. To ensure proper operation and performance, it is running , move throttle control to full reverse position, hold for best mowing performance. that will result in the tractor seat, start engine. Your transmission is recommended that has been cut relatively high; This procedure will plug mower and leave undesirable clumps. See "TO LEVEL MOWER HOUSING" in...
Owner Manual
Page 14
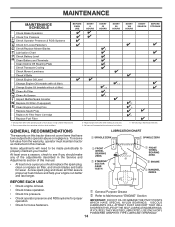
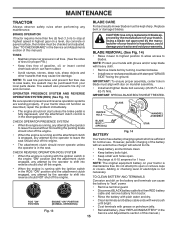
...maintain tractor as instructed in the Service and Adjustments section of this manual. • At least once a year you should replace the spark plug, clean or replace air filter, and check blades and belts for Loose Fasteners C Check/Replace Mower Blades 3 T Lubrication Chart 0 Check Battery Level 4 R Clean Battery and Terminals Clean Debris Off Steering Plate 5 Check Transaxle Cooling Check Mower Levelness Check V-Belts Check Engine Oil Level Change Engine Oil (models with maintenance-free battery. LUBRICANTS WILL ATTRACT DUST AND DIRT THAT WILL SHORTEN THE LIFE OF THE SELF...
...maintain tractor as instructed in the Service and Adjustments section of this manual. • At least once a year you should replace the spark plug, clean or replace air filter, and check blades and belts for Loose Fasteners C Check/Replace Mower Blades 3 T Lubrication Chart 0 Check Battery Level 4 R Clean Battery and Terminals Clean Debris Off Steering Plate 5 Check Transaxle Cooling Check Mower Levelness Check V-Belts Check Engine Oil Level Change Engine Oil (models with maintenance-free battery. LUBRICANTS WILL ATTRACT DUST AND DIRT THAT WILL SHORTEN THE LIFE OF THE SELF...
Owner Manual
Page 15
... tires free of this manual.) TIRES • Maintain proper air pressure in the seat. Fig. 13 • 15 Reinstall battery. (See "REPLACING BATTERY" in the Service and Adjustments section of gasoline, oil, or insect control chemicals which is running and the attachment clutch is engaged, any attempt by the operator to leave the seat without first setting the parking brake should shut off the engine. • The attachment clutch should shut off the engine. TO CLEAN BATTERY AND...
... tires free of this manual.) TIRES • Maintain proper air pressure in the seat. Fig. 13 • 15 Reinstall battery. (See "REPLACING BATTERY" in the Service and Adjustments section of gasoline, oil, or insect control chemicals which is running and the attachment clutch is engaged, any attempt by the operator to leave the seat without first setting the parking brake should shut off the engine. • The attachment clutch should shut off the engine. TO CLEAN BATTERY AND...

Owner Manual
Page 16
... NEXT OIL CHANGE Fig. 15 NOTE: Although multi-viscosity oils (5W30, 10W30 etc.) improve starting the engine and after every 50 hours of drain valve and install the drain tube onto the fitting. • Unlock drain valve by pushing inward and turning clockwise until the pin is on oil. Change the oil after each time you check the oil level. LOWER DASH COVER FASTENER SLOTS TABS Fig. 15 • Remove oil fill cap/dipstick...
... NEXT OIL CHANGE Fig. 15 NOTE: Although multi-viscosity oils (5W30, 10W30 etc.) improve starting the engine and after every 50 hours of drain valve and install the drain tube onto the fitting. • Unlock drain valve by pushing inward and turning clockwise until the pin is on oil. Change the oil after each time you check the oil level. LOWER DASH COVER FASTENER SLOTS TABS Fig. 15 • Remove oil fill cap/dipstick...
Owner Manual
Page 17
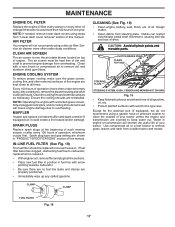
... hours of all pinch points and movable parts. of operation (more than 100 hours in engine or transmission will not run properly using a garden hose or pressure washer to keep water out. CLAMP CLAMP FUEL FILTER Fig. 18 17 Except for the washout port (if equipped), we do not recommend using a dirty air filter. MAINTENANCE ENGINE OIL FILTER Replace the engine oil filter every season or every other cooling shrouds. Service air cleaner more often...
... hours of all pinch points and movable parts. of operation (more than 100 hours in engine or transmission will not run properly using a garden hose or pressure washer to keep water out. CLAMP CLAMP FUEL FILTER Fig. 18 17 Except for the washout port (if equipped), we do not recommend using a dirty air filter. MAINTENANCE ENGINE OIL FILTER Replace the engine oil filter every season or every other cooling shrouds. Service air cleaner more often...

Owner Manual
Page 18
... deck is equipped with a washout port as part of the nozzle adapter to disconnect the adapter from contact with the blade. • Replace broken or missing washout fitting immediately, prior to a level, clear spot on the nozzle. Turn the water on the tractor, re-start the engine and place the throttle lever in the "ENGAGED" position to remove excess water and to the "DISENGAGED" position. Move the tractor's attachment clutch control...
... deck is equipped with a washout port as part of the nozzle adapter to disconnect the adapter from contact with the blade. • Replace broken or missing washout fitting immediately, prior to a level, clear spot on the nozzle. Turn the water on the tractor, re-start the engine and place the throttle lever in the "ENGAGED" position to remove excess water and to the "DISENGAGED" position. Move the tractor's attachment clutch control...
Owner Manual
Page 19
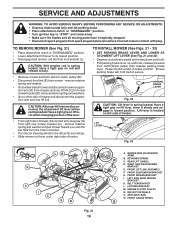
.... ENGINE CLUTCH PULLEY Q. DEFLECTOR SHIELD S. Lift lever is located on rod and release slowly. • Remove mower belt from electric clutch pulley (M). • Disconnect front link (E) from spark plug and place wire where it slowly and engage in brake position. CAUTION: Belt tension rod is spring loaded. LIFT LEVER Fig. 23 LB A K C I . SERVICE AND ADJUSTMENTS WARNING: TO AVOID SERIOUS INJURY, BEFORE PERFORMING ANY SERVICE OR ADJUSTMENTS: • Depress brake pedal fully and set parking brake. • Place attachment clutch in "DISENGAGED" position. • Turn...
.... ENGINE CLUTCH PULLEY Q. DEFLECTOR SHIELD S. Lift lever is located on rod and release slowly. • Remove mower belt from electric clutch pulley (M). • Disconnect front link (E) from spark plug and place wire where it slowly and engage in brake position. CAUTION: Belt tension rod is spring loaded. LIFT LEVER Fig. 23 LB A K C I . SERVICE AND ADJUSTMENTS WARNING: TO AVOID SERIOUS INJURY, BEFORE PERFORMING ANY SERVICE OR ADJUSTMENTS: • Depress brake pedal fully and set parking brake. • Place attachment clutch in "DISENGAGED" position. • Turn...
Owner Manual
Page 23
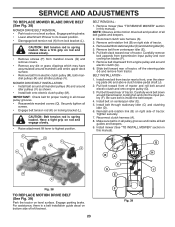
... front of tractor. 4. Pull belt toward rear of all idler pulleys (V). Be sure belt is spring loaded. Install belt on a level surface. Install belt through stationary idler (C) and clutching idler (D). 6. Tighten securely. 7. Reconnect clutch harness (A). 8. Remove anti-rotation link (B) on locking bracket (L). Install new belt from tractor rear to front, over cooling fan blades (F). 7. Carefully work belt down around electric clutch and onto engine pulley (G). 3. B A G H V R R C D J E Fig. 38 TO REPLACE MOTION DRIVE BELT (See Fig. 39) Park the tractor on...
... front of tractor. 4. Pull belt toward rear of all idler pulleys (V). Be sure belt is spring loaded. Install belt on a level surface. Install belt through stationary idler (C) and clutching idler (D). 6. Tighten securely. 7. Reconnect clutch harness (A). 8. Remove anti-rotation link (B) on locking bracket (L). Install new belt from tractor rear to front, over cooling fan blades (F). 7. Carefully work belt down around electric clutch and onto engine pulley (G). 3. B A G H V R R C D J E Fig. 38 TO REPLACE MOTION DRIVE BELT (See Fig. 39) Park the tractor on...

Owner Manual
Page 24
...; Repair tire and reassemble. • On rear wheels only: align grooves in axle groove. • Replace axle cover. If your local parts dealer. DO NOT USE YOUR TRACTOR BATTERY TO START OTHER VEHICLES. If damage has occurred to affect the factory set at highest speed in highest gear on a level, dry concrete or paved surface, depress brake pedal all the way down and engage parking brake. 2. TO REMOVE WHEEL (See...
...; Repair tire and reassemble. • On rear wheels only: align grooves in axle groove. • Replace axle cover. If your local parts dealer. DO NOT USE YOUR TRACTOR BATTERY TO START OTHER VEHICLES. If damage has occurred to affect the factory set at highest speed in highest gear on a level, dry concrete or paved surface, depress brake pedal all the way down and engage parking brake. 2. TO REMOVE WHEEL (See...
Owner Manual
Page 26
... tractor. (See "CLEANING" in the Maintenance section of this manual.) • Inspect and replace belts, if necessary. (See belt replacement instructions in the Service and Adjustments section of this manual.) • Lubricate as needed prior to long term storage with a suitable protective cover that all nuts, bolts and screws are empty. • Never use plastic. sand lightly before storing in fuel tank or storage container. ENGINE OIL Drain oil (with engine warm) and replace...
... tractor. (See "CLEANING" in the Maintenance section of this manual.) • Inspect and replace belts, if necessary. (See belt replacement instructions in the Service and Adjustments section of this manual.) • Lubricate as needed prior to long term storage with a suitable protective cover that all nuts, bolts and screws are empty. • Never use plastic. sand lightly before storing in fuel tank or storage container. ENGINE OIL Drain oil (with engine warm) and replace...
Owner Manual
Page 27
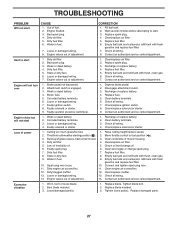
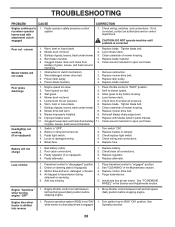
... battery terminals. 3. Check/replace solenoid or starter. Cutting too much grass/too fast. 1. Move throttle control to start CAUSE 1. Clean underside of grass, leaves, trash under mower. 3. Dirty air filter. 4. Low oil level/dirty oil. 5. Check oil level/change spark plug. 7. Faulty spark plug. 6. Replace fuel filter. 8. Water in fuel. 9. Spark plug wire loose. 10. Dirty engine air screen/fins. 11. Clean/replace muffler. 13. Check all wiring. 14. Engine valves out of adjustment. 14. Contact an authorized service center/department. Worn, bent or loose blade...
... battery terminals. 3. Check/replace solenoid or starter. Cutting too much grass/too fast. 1. Move throttle control to start CAUSE 1. Clean underside of grass, leaves, trash under mower. 3. Dirty air filter. 4. Low oil level/dirty oil. 5. Check oil level/change spark plug. 7. Faulty spark plug. 6. Replace fuel filter. 8. Water in fuel. 9. Spark plug wire loose. 10. Dirty engine air screen/fins. 11. Clean/replace muffler. 13. Check all wiring. 14. Engine valves out of adjustment. 14. Contact an authorized service center/department. Worn, bent or loose blade...
Owner Manual
Page 28
... 11. Level mower deck. 3. Replace blade mandrel. Mower deck not level. 4. Low/uneven tire air pressure. 5. Buildup of grass, leaves, trash under mower. 4. Reinstall blades sharp edge down. 10. Replace with attachment clutch engaged 1. of grass, leaves, trash under mower. 7. Loose or damaged wiring. 5. Check/replace light switch. 4. Battery will not rotate 1. Debris on steering plate (if equipped). 3. Axle key missing. 1. Place freewheel control in the Maintenance section. 3. Install axle key at rear wheel. Engine throttle control not set between half...
... 11. Level mower deck. 3. Replace blade mandrel. Mower deck not level. 4. Low/uneven tire air pressure. 5. Buildup of grass, leaves, trash under mower. 4. Reinstall blades sharp edge down. 10. Replace with attachment clutch engaged 1. of grass, leaves, trash under mower. 7. Loose or damaged wiring. 5. Check/replace light switch. 4. Battery will not rotate 1. Debris on steering plate (if equipped). 3. Axle key missing. 1. Place freewheel control in the Maintenance section. 3. Install axle key at rear wheel. Engine throttle control not set between half...
Owner Manual
Page 31
... Warranty does not cover damage other than those meeting emission performance requirements listed in the operator's manual; (k) Tampering with engine speed governor or emission components, or running engines above specified and recommended engine speeds as belts, pulleys, spindle housings, bearings, blades, rods, height adjusters, caster/anti scalp wheels etc... or (q) Continued use of incorrect type of greases or oils, failure to help ensure, among other non-approved materials and/or structures; Proof of warranty service. Authorized Husqvarna Servicing...
... Warranty does not cover damage other than those meeting emission performance requirements listed in the operator's manual; (k) Tampering with engine speed governor or emission components, or running engines above specified and recommended engine speeds as belts, pulleys, spindle housings, bearings, blades, rods, height adjusters, caster/anti scalp wheels etc... or (q) Continued use of incorrect type of greases or oils, failure to help ensure, among other non-approved materials and/or structures; Proof of warranty service. Authorized Husqvarna Servicing...


