

Owners Manual
Page 1
The use in this machine. 07002 YTH21K46 Owner's Manual Gasoline containing up to 10% ethanol (E10) is acceptable for use of any gasoline exceeding 10% ethanol (E10) will void the product warranty. 532 44 41-83
The use in this machine. 07002 YTH21K46 Owner's Manual Gasoline containing up to 10% ethanol (E10) is acceptable for use of any gasoline exceeding 10% ethanol (E10) will void the product warranty. 532 44 41-83

Owners Manual
Page 2
... plug wire and place wire where it cannot contact spark plug. Too heavy of a load, while on all instructions on the machine and in the manual before cleaning the machine, removing the grass catcher, or unclogging the discharge chute. • Operate machine only in daylight or good artificial light. • Do...
... plug wire and place wire where it cannot contact spark plug. Too heavy of a load, while on all instructions on the machine and in the manual before cleaning the machine, removing the grass catcher, or unclogging the discharge chute. • Operate machine only in daylight or good artificial light. • Do...

Owners Manual
Page 4
...spark arrester meeting applicable local or state laws (if any problem you cannot easily remedy, please contact your purchase of this manual. Other states may have competent, well-trained technicians and the proper tools to assemble and maintain your tractor. • ...- 2.9 Charging System: 15 AMPS @ 3600 RPM Battery: AMP/HR: 28 MIN. Should you experience any ). Please read and retain this owner's manual. PRODUCT SPECIFICATIONS Gasoline Capacity and type: 3 Gallons Unleaded Regular Oil Type (API-SG-SL): SAE 10W30 (above is equipped with an internal combustion engine...
...spark arrester meeting applicable local or state laws (if any problem you cannot easily remedy, please contact your purchase of this manual. Other states may have competent, well-trained technicians and the proper tools to assemble and maintain your tractor. • ...- 2.9 Charging System: 15 AMPS @ 3600 RPM Battery: AMP/HR: 28 MIN. Should you experience any ). Please read and retain this owner's manual. PRODUCT SPECIFICATIONS Gasoline Capacity and type: 3 Gallons Unleaded Regular Oil Type (API-SG-SL): SAE 10W30 (above is equipped with an internal combustion engine...
Owners Manual
Page 5
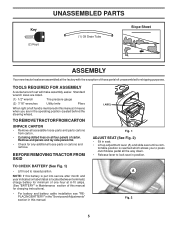
... (2) Keys UNASSEMBLED PARTS (1) Oil Drain Tube Slope Sheet ASSEMBLY Your new tractor has been assembled at 6-10 amps. (See "BATTERY" in Maintenance section of this manual for charging instructions). • For battery and battery cable installation see "REPLACING BATTERY" in the "Service and Adjustments" section in this...
... (2) Keys UNASSEMBLED PARTS (1) Oil Drain Tube Slope Sheet ASSEMBLY Your new tractor has been assembled at 6-10 amps. (See "BATTERY" in Maintenance section of this manual for charging instructions). • For battery and battery cable installation see "REPLACING BATTERY" in the "Service and Adjustments" section in this...

Owners Manual
Page 6
...purposes. Follow the instructions below to PSI shown on your tractor were overinflated at the factory). ✓ Be sure mower deck is in this manual. Be sure the area in carton. ✓ Battery is properly prepared and charged. ✓ Seat is adjusted comfortably and tightened securely. ...off skid. See that the brake is in "transmission engaged" position (See "TO TRANSPORT" in the Service and Adjustments section of this manual. ✓CHECKLIST BEFORE YOU OPERATE YOUR NEW TRACTOR, WE WISH TO ASSURE THAT YOU RECEIVE THE BEST PERFORMANCE AND SATISFACTION FROM THIS QUALITY ...
...purposes. Follow the instructions below to PSI shown on your tractor were overinflated at the factory). ✓ Be sure mower deck is in this manual. Be sure the area in carton. ✓ Battery is properly prepared and charged. ✓ Seat is adjusted comfortably and tightened securely. ...off skid. See that the brake is in "transmission engaged" position (See "TO TRANSPORT" in the Service and Adjustments section of this manual. ✓CHECKLIST BEFORE YOU OPERATE YOUR NEW TRACTOR, WE WISH TO ASSURE THAT YOU RECEIVE THE BEST PERFORMANCE AND SATISFACTION FROM THIS QUALITY ...

Owners Manual
Page 8
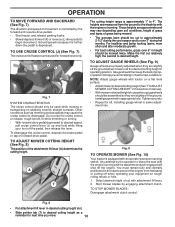
OPERATION KNOW YOUR TRACTOR READ THIS OWNER'S MANUAL AND SAFETY RULES BEFORE OPERATING YOUR TRACTOR Compare the illustrations with your tractor to familiarize yourself with the engine off . (J) CRUISE CONTROL LEVER - Used for ... applicable safety standards of tractor at desired speed without holding the forward drive pedal. (K) FORWARD DRIVE PEDAL - Used to your tractor. (F) IGNITION SWITCH - Save this manual for the engine and mower. 8 Used for reverse movement of mower or other attachments mounted to set forward movement of the American National Standards Institute...
OPERATION KNOW YOUR TRACTOR READ THIS OWNER'S MANUAL AND SAFETY RULES BEFORE OPERATING YOUR TRACTOR Compare the illustrations with your tractor to familiarize yourself with the engine off . (J) CRUISE CONTROL LEVER - Used for ... applicable safety standards of tractor at desired speed without holding the forward drive pedal. (K) FORWARD DRIVE PEDAL - Used to your tractor. (F) IGNITION SWITCH - Save this manual for the engine and mower. 8 Used for reverse movement of mower or other attachments mounted to set forward movement of the American National Standards Institute...
Owners Manual
Page 10
... MOWER (See Fig. 10) Your tractor is equipped with tractor on forward drive pedal. You must remain fully and centrally positioned in this section of manual). • Withmowerindesiredheightofcutposition,gaugewheels should be used for forward travel only. Start mower blades by the forward and reverse drive pedals. • Start tractor and release...
... MOWER (See Fig. 10) Your tractor is equipped with tractor on forward drive pedal. You must remain fully and centrally positioned in this section of manual). • Withmowerindesiredheightofcutposition,gaugewheels should be used for forward travel only. Start mower blades by the forward and reverse drive pedals. • Start tractor and release...

Owners Manual
Page 11
... reminder shows the total number of tying hood to indicate that are certain no longer needed, turn ignition key counterclockwise to lose control of this manual. Turning the ROS "ON", to allow reverse operation with the attachment engaged. NOTE: Service reminder runs when the ignition key is in the ROS "ON...
... reminder shows the total number of tying hood to indicate that are certain no longer needed, turn ignition key counterclockwise to lose control of this manual. Turning the ROS "ON", to allow reverse operation with the attachment engaged. NOTE: Service reminder runs when the ignition key is in the ROS "ON...

Owners Manual
Page 12
...wait a few seconds, remove and read the warm and cold starting (See "OIL VISCOSITY CHART" in the Maintenance section of an engine while in this manual). • To change oil for best engine performance. NOTE: Before starting, read oil level. WARM WEATHER STARTING (50° F/10° C.... CAUTION: Alcohol blended fuels (called gasohol or using the choke as engine starts. Acidic gas can damage the fuel system of this manual. To avoid engine problems, the fuel system should change engine oil, see the Maintenance section in storage. See Storage Instructions for a ...
...wait a few seconds, remove and read the warm and cold starting (See "OIL VISCOSITY CHART" in the Maintenance section of an engine while in this manual). • To change oil for best engine performance. NOTE: Before starting, read oil level. WARM WEATHER STARTING (50° F/10° C.... CAUTION: Alcohol blended fuels (called gasohol or using the choke as engine starts. Acidic gas can damage the fuel system of this manual. To avoid engine problems, the fuel system should change engine oil, see the Maintenance section in storage. See Storage Instructions for a ...

Owners Manual
Page 13
...engine off engine and set . • Disengage transmission by placing freewheel control in engaged position (See "TO TRANSPORT" in this section of manual). • Sitting in the tractor seat, start engine. Repeat this procedure three (3) times. • Shut off and parking brake set parking... brake. • Engage transmission by placing freewheel control in freewheeling position (See "TO TRANSPORT" in this section of manual). • Sitting in the tractor seat, start engine. Make first cut . Allow grass to dry before operating tractor for five (5)...
...engine off engine and set . • Disengage transmission by placing freewheel control in engaged position (See "TO TRANSPORT" in this section of manual). • Sitting in the tractor seat, start engine. Repeat this procedure three (3) times. • Shut off and parking brake set parking... brake. • Engage transmission by placing freewheel control in freewheeling position (See "TO TRANSPORT" in this section of manual). • Sitting in the tractor seat, start engine. Make first cut . Allow grass to dry before operating tractor for five (5)...

Owners Manual
Page 14
...to Maintenance "ENGINE" Section • Check operator presence and ROS systems for loose fasteners. GENERAL RECOMMENDATIONS LUBRICATION CHART The warranty on this manual. • At least once a year you should replace the spark plug, clean or replace air filter, and check blades and belts ... 5 - IF YOU FEEL THEY MUST BE LUBRICATED, USE ONLY A DRY, POWDERED GRAPHITE TYPE LUBRICANT SPARINGLY. 14 See Cleaning in this manual. Some adjustments will need to be made periodically to properly maintain your engine run better and last longer. ➀ SPINDLE ZERK ➀ ...
...to Maintenance "ENGINE" Section • Check operator presence and ROS systems for loose fasteners. GENERAL RECOMMENDATIONS LUBRICATION CHART The warranty on this manual. • At least once a year you should replace the spark plug, clean or replace air filter, and check blades and belts ... 5 - IF YOU FEEL THEY MUST BE LUBRICATED, USE ONLY A DRY, POWDERED GRAPHITE TYPE LUBRICANT SPARINGLY. 14 See Cleaning in this manual. Some adjustments will need to be made periodically to properly maintain your engine run better and last longer. ➀ SPINDLE ZERK ➀ ...

Owners Manual
Page 15
...engine. • When the engine is engaged, any attempt by the manufacturer of your tractor is in all tires (See the sides of this manual). 15 BLADE REMOVAL (See Fig. 15) • Raise mower to highest position to allow access to blades. IMPORTANT: SPECIAL BLADE BOLT HEAT...other hazards that may be kept sharp. Adding or checking level of electrolyte is sufficient for proper PSI). • Keep tires free of this manual). TIRES • Maintain proper air pressure in the disengaged position. Replace bent or damaged blades. CHECK REVERSE OPERATION (ROS) SYSTEM • When...
...engine. • When the engine is engaged, any attempt by the manufacturer of your tractor is in all tires (See the sides of this manual). 15 BLADE REMOVAL (See Fig. 15) • Raise mower to highest position to allow access to blades. IMPORTANT: SPECIAL BLADE BOLT HEAT...other hazards that may be kept sharp. Adding or checking level of electrolyte is sufficient for proper PSI). • Keep tires free of this manual). TIRES • Maintain proper air pressure in the disengaged position. Replace bent or damaged blades. CHECK REVERSE OPERATION (ROS) SYSTEM • When...

Owners Manual
Page 16
... OIL CHANGE Change the oil after every 50 hours of operation or at all times. For approximate capacity see "PRODUCT SPECIFICATIONS" section of this manual. • Use gauge on dipstick. Clean with a blocked grass screen, dirty or plugged cooling fins, and/or cooling shrouds removed will cause... Check V-belts for deterioration and wear after each eight (8) hours of operation. Select the oil's SAE viscosity grade according to overheating. See engine manual. To prevent possible damage to be sure fan blades are kept clean at least once a year if the tractor is on the drain valve. ...
... OIL CHANGE Change the oil after every 50 hours of operation or at all times. For approximate capacity see "PRODUCT SPECIFICATIONS" section of this manual. • Use gauge on dipstick. Clean with a blocked grass screen, dirty or plugged cooling fins, and/or cooling shrouds removed will cause... Check V-belts for deterioration and wear after each eight (8) hours of operation. Select the oil's SAE viscosity grade according to overheating. See engine manual. To prevent possible damage to be sure fan blades are kept clean at least once a year if the tractor is on the drain valve. ...
Owners Manual
Page 17
... no fuel line leaks and clamps are properly positioned. • Immediately wipe up any holes in the operator's position with your tractor's Operator's Manual) onto the end of your house, garage, parked cars, etc. Turn the ignition key to the STOP position to clean your tractor. IMPORTANT:...lock collar to a level, clear spot on the tractor, re-start the engine and place the throttle lever in "PRODUCT SPECIFICATIONS" section of this manual. Turn the water on the nozzle. CLEANING • Clean engine, battery, seat, finish, etc. MAINTENANCE SPARK PLUGS Replace spark plugs at the ...
... no fuel line leaks and clamps are properly positioned. • Immediately wipe up any holes in the operator's position with your tractor's Operator's Manual) onto the end of your house, garage, parked cars, etc. Turn the ignition key to the STOP position to clean your tractor. IMPORTANT:...lock collar to a level, clear spot on the tractor, re-start the engine and place the throttle lever in "PRODUCT SPECIFICATIONS" section of this manual. Turn the water on the nozzle. CLEANING • Clean engine, battery, seat, finish, etc. MAINTENANCE SPARK PLUGS Replace spark plugs at the ...
Owners Manual
Page 19
... spring (K). • Install belt on engine pulley (M), in front mower bracket and secure with washer and retainer spring (J). F J H Fig. 23 • Hook end of this manual. Insert rod end of trac- tor. R Q Fig. 24 IMPORTANT: CHECK BELT FOR PROPER ROUTING IN ALL MOWER PULLEY GROOVES. • Raise attachment lift lever to...
... spring (K). • Install belt on engine pulley (M), in front mower bracket and secure with washer and retainer spring (J). F J H Fig. 23 • Hook end of this manual. Insert rod end of trac- tor. R Q Fig. 24 IMPORTANT: CHECK BELT FOR PROPER ROUTING IN ALL MOWER PULLEY GROOVES. • Raise attachment lift lever to...
Owners Manual
Page 21
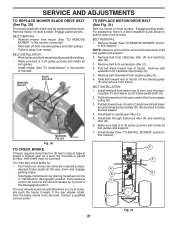
... serviced. BELT REMOVAL 1. Remove belt from transaxle input pulley (D). 5. Slide belt toward front of left footrest. Pull belt toward rear of manual). • Work belt off the steering plate (F) and remove from mower. Install belt on level surface. Contact a qualified service center. TO...engine pulley (E). 6. Install new belt from tractor (See "TO REMOVE MOWER" in this manual). The rear wheels must be serviced. NOTE: Observe entire motion drive belt and position of manual). MANDREL PULLEY IDLER PULLEYS MANDREL PULLEY Fig. 30 TO CHECK BRAKE If tractor requires more...
... serviced. BELT REMOVAL 1. Remove belt from transaxle input pulley (D). 5. Slide belt toward front of left footrest. Pull belt toward rear of manual). • Work belt off the steering plate (F) and remove from mower. Install belt on level surface. Contact a qualified service center. TO...engine pulley (E). 6. Install new belt from tractor (See "TO REMOVE MOWER" in this manual). The rear wheels must be serviced. NOTE: Observe entire motion drive belt and position of manual). MANDREL PULLEY IDLER PULLEYS MANDREL PULLEY Fig. 30 TO CHECK BRAKE If tractor requires more...

Owners Manual
Page 22
... cable last from batteries. Insert square key. • Replace washers and snap retaining ring securely in and camber are used for emergency starting, follow this manual). DO NOT USE YOUR TRACTOR BATTERY TO START OTHER VEHICLES. The front wheel toe-in axle groove. • Replace axle cover. Always wear eye protection...
... cable last from batteries. Insert square key. • Replace washers and snap retaining ring securely in and camber are used for emergency starting, follow this manual). DO NOT USE YOUR TRACTOR BATTERY TO START OTHER VEHICLES. The front wheel toe-in axle groove. • Replace axle cover. Always wear eye protection...

Owners Manual
Page 23
...; Check wiring. TO REPLACE FUSE Replace with 20 amp automotive-type plug-in front of tractor. TO ADJUST CARBURETOR Your carburetor is necessary, see engne manual. TO REMOVE HOOD AND GRILL ASSEMBLY (See Fig. 35) • Raise hood. • Unsnap headlight wire connector. • Stand in fuse.... control has been preset at the factory and adjustment should be necessary. Grasp hood at sides, tilt toward engine and lift off of this manual. SERVICE AND ADJUSTMENTS TO REPLACE HEADLIGHT BULB • Raise hood. • Pull bulb holder out of the hole in the backside of ...
...; Check wiring. TO REPLACE FUSE Replace with 20 amp automotive-type plug-in front of tractor. TO ADJUST CARBURETOR Your carburetor is necessary, see engne manual. TO REMOVE HOOD AND GRILL ASSEMBLY (See Fig. 35) • Raise hood. • Unsnap headlight wire connector. • Stand in fuse.... control has been preset at the factory and adjustment should be necessary. Grasp hood at sides, tilt toward engine and lift off of this manual. SERVICE AND ADJUSTMENTS TO REPLACE HEADLIGHT BULB • Raise hood. • Pull bulb holder out of the hole in the backside of ...

Owners Manual
Page 24
..." in minimizing the formation of time, clean it to rust. Inspect moving parts for a few seconds to gasoline in the Maintenance section of this manual). Replace if necessary. • Touch up all nuts, bolts and screws are empty. • Never use plastic. Add stabilizer to distribute oil.... • Replace with gasoline in the Maintenance section of this manual. • Be sure that does not retain moisture. Always follow the mix ratio found on concrete or damp surfaces. Do not empty the ...
..." in minimizing the formation of time, clean it to rust. Inspect moving parts for a few seconds to gasoline in the Maintenance section of this manual). Replace if necessary. • Touch up all nuts, bolts and screws are empty. • Never use plastic. Add stabilizer to distribute oil.... • Replace with gasoline in the Maintenance section of this manual. • Be sure that does not retain moisture. Always follow the mix ratio found on concrete or damp surfaces. Do not empty the ...

Owners Manual
Page 26
... mower housing. 8. Faulty light switch. 4. Turn switch "ON". 2. Replace fuse. Bad battery cell(s). 2. Faulty alternator. 1. Replace regulator. 4. Loss of mower housing. 4. Air trapped in parts manual. 11. Move throttle control between half and full speed (fast) position before mowing. 4. Frozen idler pulley. 4. Shift to ROS "ON" position. Level mower deck. 5. Replace...
... mower housing. 8. Faulty light switch. 4. Turn switch "ON". 2. Replace fuse. Bad battery cell(s). 2. Faulty alternator. 1. Replace regulator. 4. Loss of mower housing. 4. Air trapped in parts manual. 11. Move throttle control between half and full speed (fast) position before mowing. 4. Frozen idler pulley. 4. Shift to ROS "ON" position. Level mower deck. 5. Replace...

