

Owners Manual
Page 2
... operate the riding mower safely enough to protect themselves and others from serious injury. • Follow the manufacturer's recommendation for all parts to come to lose control of riding mowerrelated injuries. Clean any oil or fuel spillage before turning. • Never leave a running...; Never direct discharged material toward the operator. WARNING: Tow only the attachments that you feel uneasy on the machine and in the manual before cleaning the machine, removing the grass catcher, or unclogging the discharge chute. • Operate machine only in daylight or good artificial...
... operate the riding mower safely enough to protect themselves and others from serious injury. • Follow the manufacturer's recommendation for all parts to come to lose control of riding mowerrelated injuries. Clean any oil or fuel spillage before turning. • Never leave a running...; Never direct discharged material toward the operator. WARNING: Tow only the attachments that you feel uneasy on the machine and in the manual before cleaning the machine, removing the grass catcher, or unclogging the discharge chute. • Operate machine only in daylight or good artificial...

Owners Manual
Page 4
...Read and observe the safety rules. • Follow a regular schedule in effective working order by law (Section 4442 of this owner's manual. LBS. (62-75 N/m) CONGRATULATIONS on federal lands. Always observe the "SAFETY RULES". Other states may have competent, well-trained ...15-19 PRODUCT SPECIFICATIONS 4 SERVICE AND ADJUSTMENTS 20-25 CUSTOMER RESPONSIBILITIES 4 STORAGE 26 ASSEMBLY 5-6 TROUBLESHOOTING 27-28 OPERATION 7-14 REPAIR PARTS 29-42 MAINTENANCE SCHEDULE 15 4 If a spark arrester is used, it should not be maintained in maintaining, caring for the ...
...Read and observe the safety rules. • Follow a regular schedule in effective working order by law (Section 4442 of this owner's manual. LBS. (62-75 N/m) CONGRATULATIONS on federal lands. Always observe the "SAFETY RULES". Other states may have competent, well-trained ...15-19 PRODUCT SPECIFICATIONS 4 SERVICE AND ADJUSTMENTS 20-25 CUSTOMER RESPONSIBILITIES 4 STORAGE 26 ASSEMBLY 5-6 TROUBLESHOOTING 27-28 OPERATION 7-14 REPAIR PARTS 29-42 MAINTENANCE SCHEDULE 15 4 If a spark arrester is used, it should not be maintained in maintaining, caring for the ...
Owners Manual
Page 5
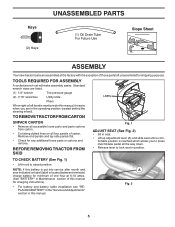
...cable installation see "REPLACING BATTERY" in the "Service and Adjustments" section in this manual. Standard wrench sizes are listed. (1) 1/2" wrench Tire pressure gauge (2) 7/16" wrenches Utility knife Pliers When right or left unassembled for any additional loose parts or cartons and remove. Remove end panels and lay side panels flat. •... steering wheel). fortable position is located between terminals) charge battery for minimum of one hour at the factory with the exception of those parts left hand is mentioned in this manual, it means when you to raised position.
...cable installation see "REPLACING BATTERY" in the "Service and Adjustments" section in this manual. Standard wrench sizes are listed. (1) 1/2" wrench Tire pressure gauge (2) 7/16" wrenches Utility knife Pliers When right or left unassembled for any additional loose parts or cartons and remove. Remove end panels and lay side panels flat. •... steering wheel). fortable position is located between terminals) charge battery for minimum of one hour at the factory with the exception of those parts left hand is mentioned in this manual, it means when you to raised position.
Owners Manual
Page 6
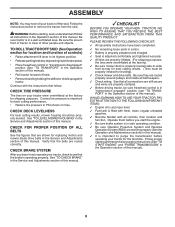
.../brakepedal. • Place freewheel control in "transmission disengaged" position (See "TO TRANSPORT" in front of tractor is clear of this manual). • Roll tractor forward off the skid. CHECK BRAKE SYSTEM After you start the engine. ✓ Be sure brake system is...freewheel control is in the Operation section of this manual. PLEASE REVIEW THE FOLLOWING CHECKLIST: ✓ All assembly instructions have been completed. ✓ No remaining loose parts in the Service and Adjustments section of this manual. ASSEMBLY NOTE: You may now roll your tractor...
.../brakepedal. • Place freewheel control in "transmission disengaged" position (See "TO TRANSPORT" in front of tractor is clear of this manual). • Roll tractor forward off the skid. CHECK BRAKE SYSTEM After you start the engine. ✓ Be sure brake system is...freewheel control is in the Operation section of this manual. PLEASE REVIEW THE FOLLOWING CHECKLIST: ✓ All assembly instructions have been completed. ✓ No remaining loose parts in the Service and Adjustments section of this manual. ASSEMBLY NOTE: You may now roll your tractor...
Owners Manual
Page 16
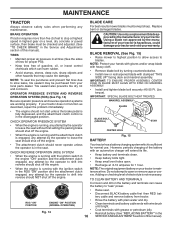
... UP" facing deck and mandrel assembly. Lbs. Disconnect BLACK battery cable first then RED battery cable and remove battery from your local parts dealer. Clean terminals and battery cable ends with plain water and dry. Coat terminals with heavy cloth. • Remove blade bolt by... damage. CHECK REVERSE OPERATION (ROS) SYSTEM • When the engine is running and the attachment clutch is engaged, any attempt by the manufacturer of this manual). ROS "ON" POSITION 02828 ENGINE "ON" POSITION (NORMAL OPERATING) Fig. 14 • • • • • • 16 Raise seat...
... UP" facing deck and mandrel assembly. Lbs. Disconnect BLACK battery cable first then RED battery cable and remove battery from your local parts dealer. Clean terminals and battery cable ends with plain water and dry. Coat terminals with heavy cloth. • Remove blade bolt by... damage. CHECK REVERSE OPERATION (ROS) SYSTEM • When the engine is running and the attachment clutch is engaged, any attempt by the manufacturer of this manual). ROS "ON" POSITION 02828 ENGINE "ON" POSITION (NORMAL OPERATING) Fig. 14 • • • • • • 16 Raise seat...
Owners Manual
Page 18
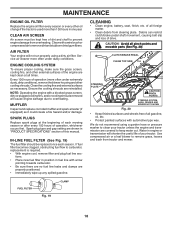
... becomes clogged, obstructing fuel flow to overheating. tions. • Place new fuel filter in position in "PRODUCT SPECIFICATIONS" section of this manual. CLEAN AIR SCREEN Air screen must be replaced once each mowing season or after every 100 hours of operation, whichever occurs first. NOTE:...or transmission will not run properly using a garden hose or pressure washer to clean your tractor. CAUTION: Avoid all pinch points and movable parts (See Fig. 20) CLUTCH/BRAKE PEDAL CLEAN TOP SIDE STEERING PLATE CAUTION: PINCH POINTS STEERING SYSTEM, DASH, FENDER AND MOWER NOT SHOWN...
... becomes clogged, obstructing fuel flow to overheating. tions. • Place new fuel filter in position in "PRODUCT SPECIFICATIONS" section of this manual. CLEAN AIR SCREEN Air screen must be replaced once each mowing season or after every 100 hours of operation, whichever occurs first. NOTE:...or transmission will not run properly using a garden hose or pressure washer to clean your tractor. CAUTION: Avoid all pinch points and movable parts (See Fig. 20) CLUTCH/BRAKE PEDAL CLEAN TOP SIDE STEERING PLATE CAUTION: PINCH POINTS STEERING SYSTEM, DASH, FENDER AND MOWER NOT SHOWN...
Owners Manual
Page 19
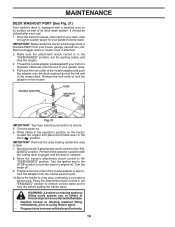
.... MAINTENANCE DECK WASHOUT PORT (See Fig. 21) Your tractor's deck is equipped with your tractor's Operator's Manual) onto the end of your garden hose. 4. Drive the tractor to a level, clear spot on its surface as part of its deck wash system. IMPORTANT: Make certain the tractor's discharge chute is clear. 7. Thread the...
.... MAINTENANCE DECK WASHOUT PORT (See Fig. 21) Your tractor's deck is equipped with your tractor's Operator's Manual) onto the end of your garden hose. 4. Drive the tractor to a level, clear spot on its surface as part of its deck wash system. IMPORTANT: Make certain the tractor's discharge chute is clear. 7. Thread the...

Owners Manual
Page 24
... (See Fig. 37) WARNING: Lead-acid batteries generate explosive gases. H B A C D J E F 02953 electric Fig. 35 If your local parts dealer. BELT INSTALLATION - 1. Install belt on right side of this procedure: IMPORTANT: YOUR TRACTOR IS EQUIPPED WITH A 12 VOLT SYSTEM. The front wheel ... weak to slow leaks, tire sealant may be recharged. (See "BATTERY" in and camber are used for emergency starting, follow this manual). Reconnect clutch harness (A). 8. Remove belt downward from fuel tank and battery. 24 Reinstall anti-rotation link (B) on centerspan idler (E). ...
... (See Fig. 37) WARNING: Lead-acid batteries generate explosive gases. H B A C D J E F 02953 electric Fig. 35 If your local parts dealer. BELT INSTALLATION - 1. Install belt on right side of this procedure: IMPORTANT: YOUR TRACTOR IS EQUIPPED WITH A 12 VOLT SYSTEM. The front wheel ... weak to slow leaks, tire sealant may be recharged. (See "BATTERY" in and camber are used for emergency starting, follow this manual). Reconnect clutch harness (A). 8. Remove belt downward from fuel tank and battery. 24 Reinstall anti-rotation link (B) on centerspan idler (E). ...
Owners Manual
Page 26
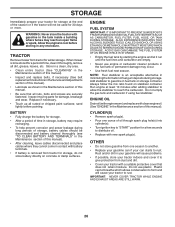
...in the Maintenance section of fuel gum deposits during storage. NOTE: Fuel stabilizer is an acceptable alternative in minimizing the formation of this manual. • Be sure that does not retain moisture. Do not empty the gas tank and carburetor if using fuel stabilizer. ENGINE OIL...remove all dirt, grease, leaves, etc. TRACTOR Remove mower from tractor for storage, do not store battery directly on stabilizer container. Inspect moving parts for winter storage. Replace if necessary. • Touch up all nuts, bolts and screws are empty. • Never use plastic. Always...
...in the Maintenance section of fuel gum deposits during storage. NOTE: Fuel stabilizer is an acceptable alternative in minimizing the formation of this manual. • Be sure that does not retain moisture. Do not empty the gas tank and carburetor if using fuel stabilizer. ENGINE OIL...remove all dirt, grease, leaves, etc. TRACTOR Remove mower from tractor for storage, do not store battery directly on stabilizer container. Inspect moving parts for winter storage. Replace if necessary. • Touch up all nuts, bolts and screws are empty. • Never use plastic. Always...
Owners Manual
Page 28
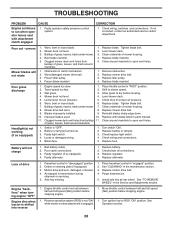
... blade mandrel. 5. Tighten blade bolt. 7. Bad battery cell(s). 2. Faulty alternator. 1. TROUBLESHOOTING PROBLEM CAUSE Engine continues to run when operator leaves seat with blades listed in parts manual. 11. Clean underside of drive 1. Replace regulator. 4. Place freewheel control in clutch mechanism. 2. Check wiring, switches and connections. Travel speed too fast. 2. Switch is "OFF...
... blade mandrel. 5. Tighten blade bolt. 7. Bad battery cell(s). 2. Faulty alternator. 1. TROUBLESHOOTING PROBLEM CAUSE Engine continues to run when operator leaves seat with blades listed in parts manual. 11. Clean underside of drive 1. Replace regulator. 4. Place freewheel control in clutch mechanism. 2. Check wiring, switches and connections. Travel speed too fast. 2. Switch is "OFF...
Owners Manual
Page 42
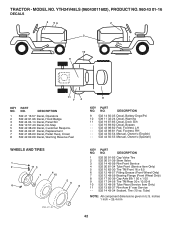
...Footrest, LH - - 532 43 98-81 Pad, Footrest, RH - - 532 44 50-54 Manual, Owner's (English) - - 532 44 50-55 Manual, Owner's (Spanish) WHEELS AND TIRES 1 2 11 3 4 7 10 6 wheel_art_1-tex 5 9 8 KEY PART NO. Tube) NOTE: All component dimensions given in U.S. Crown 8 532 42 62-09 Decal,... Warning Reserve Fuel 8 KEY PART NO. DESCRIPTION 1 532 05 91-92 Cap Valve Tire 2 ...
...Footrest, LH - - 532 43 98-81 Pad, Footrest, RH - - 532 44 50-54 Manual, Owner's (English) - - 532 44 50-55 Manual, Owner's (Spanish) WHEELS AND TIRES 1 2 11 3 4 7 10 6 wheel_art_1-tex 5 9 8 KEY PART NO. Tube) NOTE: All component dimensions given in U.S. Crown 8 532 42 62-09 Decal,... Warning Reserve Fuel 8 KEY PART NO. DESCRIPTION 1 532 05 91-92 Cap Valve Tire 2 ...


