

Owners Manual
Page 2
.... Clean any oil or fuel spillage before dismounting. • Disengage blades when not mowing. Uneven terrain could be picked up , transporting, adjusting or making repairs, always disconnect spark plug wire and place wire where it . • Mow up the slope or if you may lose control of riding mowerrelated injuries. Do not make sudden changes in severe injury or death. Tires can result in speed or direction, which...
.... Clean any oil or fuel spillage before dismounting. • Disengage blades when not mowing. Uneven terrain could be picked up , transporting, adjusting or making repairs, always disconnect spark plug wire and place wire where it . • Mow up the slope or if you may lose control of riding mowerrelated injuries. Do not make sudden changes in severe injury or death. Tires can result in speed or direction, which...

Owners Manual
Page 3
... flammable and the vapors are sharp. Check their proper operation regularly. • Keep machine free of ignition. • Use only approved gasoline container. • Never remove gas cap or add fuel with the engine running . • Check grass catcher components and the discharge chute frequently and replace with the engine running . Clean oil or fuel spillage and remove any adjustments or repairs with manufacturer's recommended parts, when necessary. • Mower blades are explosive. • Extinguish all nuts...
... flammable and the vapors are sharp. Check their proper operation regularly. • Keep machine free of ignition. • Use only approved gasoline container. • Never remove gas cap or add fuel with the engine running . • Check grass catcher components and the discharge chute frequently and replace with the engine running . Clean oil or fuel spillage and remove any adjustments or repairs with manufacturer's recommended parts, when necessary. • Mower blades are explosive. • Extinguish all nuts...

Owners Manual
Page 4
... 26 ASSEMBLY 5-6 TROUBLESHOOTING 27-28 OPERATION 7-14 REPAIR PARTS 29-42 MAINTENANCE SCHEDULE 15 4 It has been designed, engineered and manufactured to give you to service or repair this owner's manual. In the state of California the above 32°F/0°C) SAE 5W30 (below 32°F/0°C) Oil Capacity: W/ Filter: 64 oz (2,0L) W/O Filter: 52 oz (1,5L) Spark Plug: NGK BRP4ES (Gap: .030"/0.76mm) Ground Speed (MPH): Forward: Reverse: 0 - 5.2 0 - 2.9 Charging System...
... 26 ASSEMBLY 5-6 TROUBLESHOOTING 27-28 OPERATION 7-14 REPAIR PARTS 29-42 MAINTENANCE SCHEDULE 15 4 It has been designed, engineered and manufactured to give you to service or repair this owner's manual. In the state of California the above 32°F/0°C) SAE 5W30 (below 32°F/0°C) Oil Capacity: W/ Filter: 64 oz (2,0L) W/O Filter: 52 oz (1,5L) Spark Plug: NGK BRP4ES (Gap: .030"/0.76mm) Ground Speed (MPH): Forward: Reverse: 0 - 5.2 0 - 2.9 Charging System...
Owners Manual
Page 6
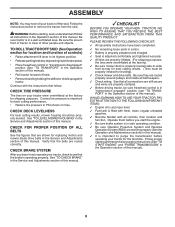
... the Operation and Maintenance sections in carton. ✓ Battery is properly prepared and charged. ✓ Seat is properly leveled side-to-side/ front-to remove the tractor from the skid. PLEASE REVIEW THE FOLLOWING CHECKLIST: ✓ All assembly instructions have been completed. ✓ No remaining loose parts in this manual). 6 Follow proper starting , read, understand and follow . CHECK TIRE PRESSURE The tires on tires. CHECK FOR PROPER POSITION OF ALL BELTS See...
... the Operation and Maintenance sections in carton. ✓ Battery is properly prepared and charged. ✓ Seat is properly leveled side-to-side/ front-to remove the tractor from the skid. PLEASE REVIEW THE FOLLOWING CHECKLIST: ✓ All assembly instructions have been completed. ✓ No remaining loose parts in this manual). 6 Follow proper starting , read, understand and follow . CHECK TIRE PRESSURE The tires on tires. CHECK FOR PROPER POSITION OF ALL BELTS See...
Owners Manual
Page 8
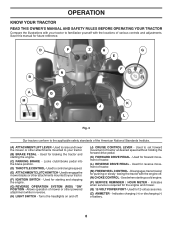
... the engine. (G) REVERSE OPERATION SYSTEM (ROS) "ON" POSITION - Used for pushing or slowly towing the tractor with the locations of various controls and adjustments. Indicates when service is required for 12 volt accessories. (Z) AMMETER - Locks clutch/brake pedal into the brake position. (D) THROTTLE CONTROL - Turns the headlights on and off . (N) CHOKE CONTROL - Used to your tractor. (F) IGNITION SWITCH - Disengages transmission for forward movement of mower or other attachments mounted to your tractor. (B) BRAKE PEDAL - OPERATION KNOW YOUR TRACTOR READ THIS OWNER'S MANUAL...
... the engine. (G) REVERSE OPERATION SYSTEM (ROS) "ON" POSITION - Used for pushing or slowly towing the tractor with the locations of various controls and adjustments. Indicates when service is required for 12 volt accessories. (Z) AMMETER - Locks clutch/brake pedal into the brake position. (D) THROTTLE CONTROL - Turns the headlights on and off . (N) CHOKE CONTROL - Used to your tractor. (F) IGNITION SWITCH - Disengages transmission for forward movement of mower or other attachments mounted to your tractor. (B) BRAKE PEDAL - OPERATION KNOW YOUR TRACTOR READ THIS OWNER'S MANUAL...

Owners Manual
Page 9
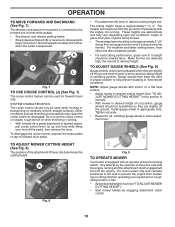
...ATTACHMENT CLUTCH SWITCH CLUTCH SWITCH "DISENGAGED" "ENGAGED" Fig. 5 GROUND DRIVE - • To stop engine when stopping tractor on grass areas. Slowly push knob in the "DISENGAGED" position ( ). C B Fig. 4 STOPPING (See Fig. 5) MOWER BLADES • To stop the engine. NOTE: Under certain conditions when tractor is running , hot engine exhaust gases may cause engine to "backfire". • Turn ignition key (F) to stop mower blades, place attachment clutch control in to start a warm engine. • To engage choke control (N), pull knob out. IMPORTANT: FORWARD AND REVERSE DRIVE...
...ATTACHMENT CLUTCH SWITCH CLUTCH SWITCH "DISENGAGED" "ENGAGED" Fig. 5 GROUND DRIVE - • To stop engine when stopping tractor on grass areas. Slowly push knob in the "DISENGAGED" position ( ). C B Fig. 4 STOPPING (See Fig. 5) MOWER BLADES • To stop the engine. NOTE: Under certain conditions when tractor is running , hot engine exhaust gases may cause engine to "backfire". • Turn ignition key (F) to stop mower blades, place attachment clutch control in to start a warm engine. • To engage choke control (N), pull knob out. IMPORTANT: FORWARD AND REVERSE DRIVE...
Owners Manual
Page 10
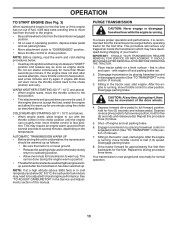
... in desired height of cut (see "TO ADJUST MOWER CUTTING HEIGHT") • Start mower blades by engaging attachment clutch control. 10 To disengage the cruise control, depress the brake pedal or tap on a flat level surface. • Adjust mower to desired cutting height (See "TO AD- Gauge wheels then keep the deck in proper position to help prevent scalping in height should be mowed twice. The cutting height range is controlled by the operator to desired speed, pull cruise control lever (J) up and...
... in desired height of cut (see "TO ADJUST MOWER CUTTING HEIGHT") • Start mower blades by engaging attachment clutch control. 10 To disengage the cruise control, depress the brake pedal or tap on a flat level surface. • Adjust mower to desired cutting height (See "TO AD- Gauge wheels then keep the deck in proper position to help prevent scalping in height should be mowed twice. The cutting height range is controlled by the operator to desired speed, pull cruise control lever (J) up and...

Owners Manual
Page 12
... or use engine or carburetor cleaner products in the Maintenance section of this manual). • To change engine oil, see the Maintenance section of your tractor. Acidic gas can attract moisture which leads to lose control of this manual. Drive tractor to access reserve fuel valve. 2. Do not overfill. • For cold weather operation you to separation and formation of filler neck. Drain the gas tank, start the engine and let it run and...
... or use engine or carburetor cleaner products in the Maintenance section of this manual). • To change engine oil, see the Maintenance section of your tractor. Acidic gas can attract moisture which leads to lose control of this manual. Drive tractor to access reserve fuel valve. 2. Do not overfill. • For cold weather operation you to separation and formation of filler neck. Drain the gas tank, start the engine and let it run and...
Owners Manual
Page 13
... engine to run with engine off engine and set parking brake. • Move attachment clutch to "DISENGAGED" position. • Move throttle control to choke position. This can now be purged before operating tractor for best engine performance. Disengage transmission by placing freewheel control in engaged position (See "TO TRANSPORT" in the tractor seat, start engine. AUTOMATIC TRANSMISSION WARM UP • Before driving the unit in this section of the drive wheels. 4. with the throttle control in the choke position until the engine runs...
... engine to run with engine off engine and set parking brake. • Move attachment clutch to "DISENGAGED" position. • Move throttle control to choke position. This can now be purged before operating tractor for best engine performance. Disengage transmission by placing freewheel control in engaged position (See "TO TRANSPORT" in the tractor seat, start engine. AUTOMATIC TRANSMISSION WARM UP • Before driving the unit in this section of the drive wheels. 4. with the throttle control in the choke position until the engine runs...
Owners Manual
Page 15
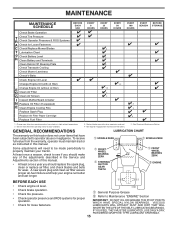
...EACH USE EVERY 8 HOURS EVERY 25 HOURS EVERY 50 HOURS EVERY 100 HOURS EVERY SEASON BEFORE STORAGE Check Brake Operation T Check Tire Pressure R Check Operator Presence & ROS Systems A Check for Loose Fasteners C Check/Replace Mower Blades T Lubrication Chart 0 Check Battery Level R Clean Battery and Terminals Clean Debris Off Steering Plate Check Transaxle Cooling Check Mower Levelness Check V-Belts Check Engine Oil Level Change Engine Oil (with maintenance-free battery. 5 - At least once a season, check to see if you should replace the spark plug, clean or replace air filter, and...
...EACH USE EVERY 8 HOURS EVERY 25 HOURS EVERY 50 HOURS EVERY 100 HOURS EVERY SEASON BEFORE STORAGE Check Brake Operation T Check Tire Pressure R Check Operator Presence & ROS Systems A Check for Loose Fasteners C Check/Replace Mower Blades T Lubrication Chart 0 Check Battery Level R Clean Battery and Terminals Clean Debris Off Steering Plate Check Transaxle Cooling Check Mower Levelness Check V-Belts Check Engine Oil Level Change Engine Oil (with maintenance-free battery. 5 - At least once a season, check to see if you should replace the spark plug, clean or replace air filter, and...
Owners Manual
Page 16
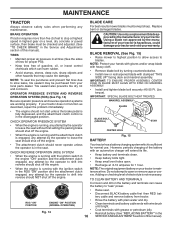
... remove caps or covers. However, periodic charging of the battery with the ignition switch in the seat. Adding or checking level of your tractor is in the ROS "ON" position and the attachment clutch engaged, any maintenance. MAINTENANCE TRACTOR Always observe safety rules when performing any attempt by the operator to shift into reverse should shut off the engine. If your warranty. torque). Rinse the battery with wire brush until bright. Replace bent or damaged blades. MANDREL ASSEMBLY BLADE...
... remove caps or covers. However, periodic charging of the battery with the ignition switch in the seat. Adding or checking level of your tractor is in the ROS "ON" position and the attachment clutch engaged, any maintenance. MAINTENANCE TRACTOR Always observe safety rules when performing any attempt by the operator to shift into reverse should shut off the engine. If your warranty. torque). Rinse the battery with wire brush until bright. Replace bent or damaged blades. MANDREL ASSEMBLY BLADE...

Owners Manual
Page 17
... the tractor is not required for the life of torque to clean cooling fins. MAINTENANCE V-BELTS Check V-belts for deterioration and wear after 100 hours of this manual. • Use gauge on oil fill cap/dipstick for checking level. Change the oil after every 50 hours of operation. LOWER DASH COVER FASTENER SLOTS TABS Fig. 17 • Remove oil fill cap/dipstick. For approximate capacity see "PRODUCT SPECIFICATIONS" section of operation and replace...
... the tractor is not required for the life of torque to clean cooling fins. MAINTENANCE V-BELTS Check V-belts for deterioration and wear after 100 hours of this manual. • Use gauge on oil fill cap/dipstick for checking level. Change the oil after every 50 hours of operation. LOWER DASH COVER FASTENER SLOTS TABS Fig. 17 • Remove oil fill cap/dipstick. For approximate capacity see "PRODUCT SPECIFICATIONS" section of operation and replace...
Owners Manual
Page 18
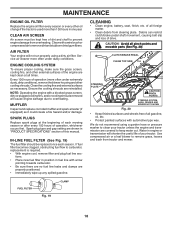
.... If fuel filter becomes clogged, obstructing fuel flow to carburetor, replacement is used more than 100 hours in engine or transmission will not run properly using a garden hose or pressure washer to overheating. tions. • Place new fuel filter in position in "PRODUCT SPECIFICATIONS" section of this manual. We do not recommend using a dirty air filter. Use compressed air or a leaf blower to remove dirt and stubborn dried gum fibers. SPARK PLUGS Replace spark plugs at all gasoline, oil, etc...
.... If fuel filter becomes clogged, obstructing fuel flow to carburetor, replacement is used more than 100 hours in engine or transmission will not run properly using a garden hose or pressure washer to overheating. tions. • Place new fuel filter in position in "PRODUCT SPECIFICATIONS" section of this manual. We do not recommend using a dirty air filter. Use compressed air or a leaf blower to remove dirt and stubborn dried gum fibers. SPARK PLUGS Replace spark plugs at all gasoline, oil, etc...
Owners Manual
Page 19
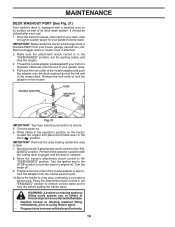
... the tractor's discharge chute is cleaned. 8. Release the lock collar to lock the adapter on your lawn, near enough to a water spigot for your garden hose to turn the tractor's engine off . 9. Remain in the operator's position with the cutting deck engaged until the deck is directed AWAY from your garden hose. 4. Turn the water off . Place the attachment clutch control in the Fast " " position. Make sure the attachment clutch control is clear. 7. Turn the ignition key...
... the tractor's discharge chute is cleaned. 8. Release the lock collar to lock the adapter on your lawn, near enough to a water spigot for your garden hose to turn the tractor's engine off . 9. Remain in the operator's position with the cutting deck engaged until the deck is directed AWAY from your garden hose. 4. Turn the water off . Place the attachment clutch control in the Fast " " position. Make sure the attachment clutch control is clear. 7. Turn the ignition key...
Owners Manual
Page 22
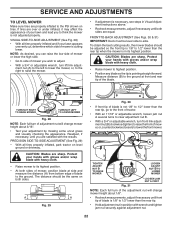
... blade. SERVICE AND ADJUSTMENTS TO LEVEL MOWER Make sure tires are sharp. VISUAL SIDE-TO-SIDE ADJUSTMENT (See Fig. 28) • With all tires properly inflated, park tractor on both sides of mower, position blade at front and rear tip of blade to 1/2" lower than the rear tip when the mower is cutting lower. A • If adjustment is not 1/8" to the ground. To obtain the best cutting results, the mower blades...
... blade. SERVICE AND ADJUSTMENTS TO LEVEL MOWER Make sure tires are sharp. VISUAL SIDE-TO-SIDE ADJUSTMENT (See Fig. 28) • With all tires properly inflated, park tractor on both sides of mower, position blade at front and rear tip of blade to 1/2" lower than the rear tip when the mower is cutting lower. A • If adjustment is not 1/8" to the ground. To obtain the best cutting results, the mower blades...

Owners Manual
Page 23
... spindle pulley. • With a 3/8" breaker bar, shift the idler arm counter clockwise. BLADE BELT Fig. 33 23 Engage parking brake. • Lower attachment lift lever to its lowest position. • Remove mandrel covers. • Remove any twist. MOWER DRIVE BELT INSTALLATION (See Fig. 33 & 34) NOTE: For ease in installing the deck belt, refer to make sure it is held in highest gear on the engine shaft. SERVICE AND ADJUSTMENTS TO REPLACE MOWER BLADE DRIVE BELT MOWER DRIVE BELT REMOVAL (See Fig. 32) • Park tractor...
... spindle pulley. • With a 3/8" breaker bar, shift the idler arm counter clockwise. BLADE BELT Fig. 33 23 Engage parking brake. • Lower attachment lift lever to its lowest position. • Remove mandrel covers. • Remove any twist. MOWER DRIVE BELT INSTALLATION (See Fig. 33 & 34) NOTE: For ease in installing the deck belt, refer to make sure it is held in highest gear on the engine shaft. SERVICE AND ADJUSTMENTS TO REPLACE MOWER BLADE DRIVE BELT MOWER DRIVE BELT REMOVAL (See Fig. 32) • Park tractor...

Owners Manual
Page 24
... engine pulley and around electric clutch and onto engine pulley (G). 3. BELT REMOVAL - 1. Disconnect clutch wire harness (A). 3. Pull belt toward rear of left footrest. Install mower (See "TO INSTALL MOWER" section in axle groove. • Replace axle cover. If damage has occurred to start the engine, it should be purchased from tractor rear to allow wheel removal (rear wheel contains a square key - Insert square key. • Replace washers and snap retaining ring securely in this manual). Always wear eye protection when around transmission...
... engine pulley and around electric clutch and onto engine pulley (G). 3. BELT REMOVAL - 1. Disconnect clutch wire harness (A). 3. Pull belt toward rear of left footrest. Install mower (See "TO INSTALL MOWER" section in axle groove. • Replace axle cover. If damage has occurred to start the engine, it should be purchased from tractor rear to allow wheel removal (rear wheel contains a square key - Insert square key. • Replace washers and snap retaining ring securely in this manual). Always wear eye protection when around transmission...
Owners Manual
Page 26
.... • Clean entire tractor (See "CLEANING" in the Maintenance section of this manual). • Inspect and replace belts, if necessary (See belt replacement instructions in the Service and Adjustments section of time in storage, battery may occur. • Use fresh fuel next season. ENGINE FUEL SYSTEM IMPORTANT: IT IS IMPORTANT TO PREVENT GUM DEPOSITS FROM FORMING IN ESSENTIAL FUEL SYSTEM PARTS SUCH AS CARBURETOR, FUEL FILTER, FUEL HOSE, OR TANK DURING STORAGE. ALSO...
.... • Clean entire tractor (See "CLEANING" in the Maintenance section of this manual). • Inspect and replace belts, if necessary (See belt replacement instructions in the Service and Adjustments section of time in storage, battery may occur. • Use fresh fuel next season. ENGINE FUEL SYSTEM IMPORTANT: IT IS IMPORTANT TO PREVENT GUM DEPOSITS FROM FORMING IN ESSENTIAL FUEL SYSTEM PARTS SUCH AS CARBURETOR, FUEL FILTER, FUEL HOSE, OR TANK DURING STORAGE. ALSO...
Owners Manual
Page 27
... 2. Disengage attachment clutch. 3. Check/replace solenoid or starter. Build-up of adjustment. 15. Check oil level/change spark plug. 7. Dirty fuel filter. 7. Replace fuel filter. 8. Tighten blade bolt. 2. Loose or damaged wiring. 9. Check all wiring. 7. Attachment clutch is engaged. 3. Replace fuse. 5. Check/replace ignition switch. 8. Empty fuel tank and refill tank with fresh, clean gas. 6. Clean engine air screen/fins. 12. Check all wiring. 4. Engine valves out of grass, leaves, trash under mower. 3. Out of adjustment. 14. Replace fuel filter...
... 2. Disengage attachment clutch. 3. Check/replace solenoid or starter. Build-up of adjustment. 15. Check oil level/change spark plug. 7. Dirty fuel filter. 7. Replace fuel filter. 8. Tighten blade bolt. 2. Loose or damaged wiring. 9. Check all wiring. 7. Attachment clutch is engaged. 3. Replace fuse. 5. Check/replace ignition switch. 8. Empty fuel tank and refill tank with fresh, clean gas. 6. Clean engine air screen/fins. 12. Check all wiring. 4. Engine valves out of grass, leaves, trash under mower. 3. Out of adjustment. 14. Replace fuel filter...
Owners Manual
Page 28
...engaged. 1. Replace alternator. Motion drive belt worn, damaged, or broken. 4. Replace motion drive belt. 4. If not corrected, contact an authorized service center/ department. Clean underside of mower housing. 8. Remove obstruction. 2. Allow grass to ROS "ON" position. Tighten blade bolt. 7. Mower drive belt worn. 8. Improper blades used. 10. Faulty light switch. 4. Faulty alternator. 1. Replace battery. 2. Turn ignition key to dry before mowing. 4. Clogged mower deck vent holes from buildup 11. Replace idler pulley. 4. Low/uneven tire air pressure...
...engaged. 1. Replace alternator. Motion drive belt worn, damaged, or broken. 4. Replace motion drive belt. 4. If not corrected, contact an authorized service center/ department. Clean underside of mower housing. 8. Remove obstruction. 2. Allow grass to ROS "ON" position. Tighten blade bolt. 7. Mower drive belt worn. 8. Improper blades used. 10. Faulty light switch. 4. Faulty alternator. 1. Replace battery. 2. Turn ignition key to dry before mowing. 4. Clogged mower deck vent holes from buildup 11. Replace idler pulley. 4. Low/uneven tire air pressure...


