

Owners Manual
Page 2
... down slopes, not across. • Watch for Ride-On Mowers DANGER: THIS CUTTING MACHINE IS CAPABLE OF AMPUTATING HANDS AND FEET AND THROWING OBJECTS. WARNING Battery posts, terminals and related accessories contain lead and lead compounds, chemicals known to the State of objects such as rocks, toys, wire, etc., which could...
... down slopes, not across. • Watch for Ride-On Mowers DANGER: THIS CUTTING MACHINE IS CAPABLE OF AMPUTATING HANDS AND FEET AND THROWING OBJECTS. WARNING Battery posts, terminals and related accessories contain lead and lead compounds, chemicals known to the State of objects such as rocks, toys, wire, etc., which could...

Owners Manual
Page 4
...: 64 oz (2,0L) W/O Filter: 52 oz (1,5L) Spark Plug: NGK BRP4ES (Gap: .030"/0.76mm) Ground Speed (MPH): Forward: Reverse: 0 - 5.2 0 - 2.9 Charging System: 15 AMPS @ 3600 RPM Battery: AMP/HR: MIN. Other states may have competent, well-trained technicians and the proper tools to assemble and maintain your nearest authorized service center/department...
...: 64 oz (2,0L) W/O Filter: 52 oz (1,5L) Spark Plug: NGK BRP4ES (Gap: .030"/0.76mm) Ground Speed (MPH): Forward: Reverse: 0 - 5.2 0 - 2.9 Charging System: 15 AMPS @ 3600 RPM Battery: AMP/HR: MIN. Other states may have competent, well-trained technicians and the proper tools to assemble and maintain your nearest authorized service center/department...
Owners Manual
Page 5
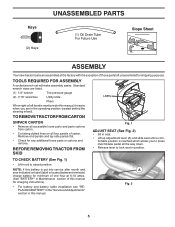
...Keys (2) Keys UNASSEMBLED PARTS (1) Oil Drain Tube For Future Use Slope Sheet ASSEMBLY Your new tractor has been assembled at 6-10 amps. (See "BATTERY" in seat. • Lift up adjustment lever (A) and slide seat until a com- Remove end panels and lay side panels flat. •... Check for minimum of one hour at the factory with the exception of this manual for charging instructions). • For battery and battery cable installation see "REPLACING BATTERY" in the "Service and Adjustments" section in this manual. TOOLS REQUIRED FOR ASSEMBLY A socket wrench set will make assembly ...
...Keys (2) Keys UNASSEMBLED PARTS (1) Oil Drain Tube For Future Use Slope Sheet ASSEMBLY Your new tractor has been assembled at 6-10 amps. (See "BATTERY" in seat. • Lift up adjustment lever (A) and slide seat until a com- Remove end panels and lay side panels flat. •... Check for minimum of one hour at the factory with the exception of this manual for charging instructions). • For battery and battery cable installation see "REPLACING BATTERY" in the "Service and Adjustments" section in this manual. TOOLS REQUIRED FOR ASSEMBLY A socket wrench set will make assembly ...
Owners Manual
Page 6
... inflated for the first time. PLEASE REVIEW THE FOLLOWING CHECKLIST: ✓ All assembly instructions have been completed. ✓ No remaining loose parts in carton. ✓ Battery is properly prepared and charged. ✓ Seat is adjusted comfortably and tightened securely. ✓ All tires are shown for shipping purposes. Be sure they are...
... inflated for the first time. PLEASE REVIEW THE FOLLOWING CHECKLIST: ✓ All assembly instructions have been completed. ✓ No remaining loose parts in carton. ✓ Battery is properly prepared and charged. ✓ Seat is adjusted comfortably and tightened securely. ✓ All tires are shown for shipping purposes. Be sure they are...

Owners Manual
Page 7
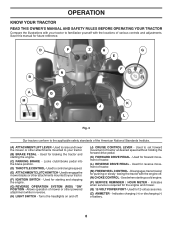
... LOW CHOKE FAST SLOW IGNITION SWITCH ENGINE OFF REVERSE OPERATION SYSTEM (ROS) ENGINE ON ENGINE START PARKING BRAKE MOWER HEIGHT MOWER LIFT LIGHTS ON FUEL BATTERY REVERSE FORWARD CRUISE CONTROL CLUTCH/BRAKE PEDAL 15 15 ATTACHMENT ATTACHMENT CLUTCH DISENGAGED CLUTCH ENGAGED DANGER, KEEP HANDS AND FEET AWAY KEEP AREA CLEAR SLOPE...
... LOW CHOKE FAST SLOW IGNITION SWITCH ENGINE OFF REVERSE OPERATION SYSTEM (ROS) ENGINE ON ENGINE START PARKING BRAKE MOWER HEIGHT MOWER LIFT LIGHTS ON FUEL BATTERY REVERSE FORWARD CRUISE CONTROL CLUTCH/BRAKE PEDAL 15 15 ATTACHMENT ATTACHMENT CLUTCH DISENGAGED CLUTCH ENGAGED DANGER, KEEP HANDS AND FEET AWAY KEEP AREA CLEAR SLOPE...
Owners Manual
Page 8
... DRIVE PEDAL - Indicates charging (+) or discharging (-) of the American National Standards Institute. (A) ATTACHMENT LIFT LEVER - D P Z H G E F N B A M Q C K J L Fig. 3 Our tractors conform to the applicable safety standards of battery. 8 Save this manual for braking the tractor and starting the engine. (C) PARKING BRAKE - Disengages transmission for forward movement of mower or other attachments mounted to...
... DRIVE PEDAL - Indicates charging (+) or discharging (-) of the American National Standards Institute. (A) ATTACHMENT LIFT LEVER - D P Z H G E F N B A M Q C K J L Fig. 3 Our tractors conform to the applicable safety standards of battery. 8 Save this manual for braking the tractor and starting the engine. (C) PARKING BRAKE - Disengages transmission for forward movement of mower or other attachments mounted to...

Owners Manual
Page 9
... to disengage. 9 sure from brake pedal (B), then release parking brake lever. IMPORTANT: LEAVING THE IGNITION SWITCH IN ANY POSITION OTHER THAN "STOP" WILL CAUSE THE BATTERY TO BE DISCHARGED, (DEAD). Slowly push knob in severe eye damage. To eliminate this possibility, always stop ground drive, depress brake pedal into the eyes...
... to disengage. 9 sure from brake pedal (B), then release parking brake lever. IMPORTANT: LEAVING THE IGNITION SWITCH IN ANY POSITION OTHER THAN "STOP" WILL CAUSE THE BATTERY TO BE DISCHARGED, (DEAD). Slowly push knob in severe eye damage. To eliminate this possibility, always stop ground drive, depress brake pedal into the eyes...
Owners Manual
Page 15
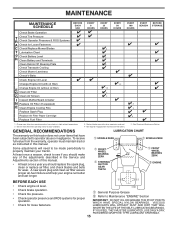
... BEFORE STORAGE Check Brake Operation T Check Tire Pressure R Check Operator Presence & ROS Systems A Check for Loose Fasteners C Check/Replace Mower Blades T Lubrication Chart 0 Check Battery Level R Clean Battery and Terminals Clean Debris Off Steering Plate Check Transaxle Cooling Check Mower Levelness Check V-Belts Check Engine Oil Level Change Engine Oil (with maintenance...
... BEFORE STORAGE Check Brake Operation T Check Tire Pressure R Check Operator Presence & ROS Systems A Check for Loose Fasteners C Check/Replace Mower Blades T Lubrication Chart 0 Check Battery Level R Clean Battery and Terminals Clean Debris Off Steering Plate Check Transaxle Cooling Check Mower Levelness Check V-Belts Check Engine Oil Level Change Engine Oil (with maintenance...
Owners Manual
Page 16
... (ROS) SYSTEM • When the engine is running with stamped "THIS SIDE UP" facing deck and mandrel assembly. Rinse the battery with grease or petroleum jelly. torque). However, periodic charging of your tractor is sufficient for 1 hour. Adding or checking level of... this manual). Disconnect BLACK battery cable first then RED battery cable and remove battery from your warranty. Reinstall battery (See "REPLACING BATTERY" in the SERVICE AND ADJUSTMENTS section of your tractor is running and the attachment clutch...
... (ROS) SYSTEM • When the engine is running with stamped "THIS SIDE UP" facing deck and mandrel assembly. Rinse the battery with grease or petroleum jelly. torque). However, periodic charging of your tractor is sufficient for 1 hour. Adding or checking level of... this manual). Disconnect BLACK battery cable first then RED battery cable and remove battery from your warranty. Reinstall battery (See "REPLACING BATTERY" in the SERVICE AND ADJUSTMENTS section of your tractor is running and the attachment clutch...
Owners Manual
Page 18
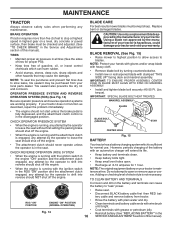
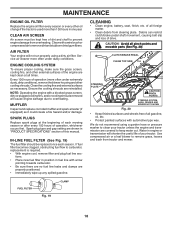
... properly using a garden hose or pressure washer to carburetor, replacement is used more often under dusty conditions. Water in one year. CLEANING • Clean engine, battery, seat, finish, etc. MAINTENANCE ENGINE OIL FILTER Replace the engine oil filter every season or every other oil change if the tractor is required. •...
... properly using a garden hose or pressure washer to carburetor, replacement is used more often under dusty conditions. Water in one year. CLEANING • Clean engine, battery, seat, finish, etc. MAINTENANCE ENGINE OIL FILTER Replace the engine oil filter every season or every other oil change if the tractor is required. •...

Owners Manual
Page 24
... there is a belt installation guide decal on bottom side of the BLACK cable (D) to the NEGATIVE (-) terminal (C) of fully charged battery. • Connect the other end of left footrest. Disconnect clutch wire harness (A). 3. Carefully remove belt upwards from centerspan idler (E). 6..... 4. Remove anti-rotation link (B) on right side of tractor, off the steering plate (H) and remove from fuel tank and battery. 24 Removebeltfromstationaryidler(C)andclutchingidler(D). 5. Remove belt from transmission input pulley and over the steering plate (H) and above clutch brake pedal shaft ...
... there is a belt installation guide decal on bottom side of the BLACK cable (D) to the NEGATIVE (-) terminal (C) of fully charged battery. • Connect the other end of left footrest. Disconnect clutch wire harness (A). 3. Carefully remove belt upwards from centerspan idler (E). 6..... 4. Remove anti-rotation link (B) on right side of tractor, off the steering plate (H) and remove from fuel tank and battery. 24 Removebeltfromstationaryidler(C)andclutchingidler(D). 5. Remove belt from transmission input pulley and over the steering plate (H) and above clutch brake pedal shaft ...

Owners Manual
Page 25
...8226; Lift hood to raised position. • Remove terminal cover. • Disconnect BLACK battery cable then RED battery cable and carefully remove battery from tractor. • Install new battery with terminals in front of this manual. TO ADJUST CARBURETOR Your carburetor is necessary, TO ...the factory and adjustment should not be purged after reinstallation and before operating the tractor. WEAK OR FULLY CHARGED DEAD BATTERY BATTERY Fig. 37 REPLACING BATTERY (See Fig. 38) INTERLOCKS AND RELAYS Loose or damaged wiring may cause your transmission require removal for repair ...
...8226; Lift hood to raised position. • Remove terminal cover. • Disconnect BLACK battery cable then RED battery cable and carefully remove battery from tractor. • Install new battery with terminals in front of this manual. TO ADJUST CARBURETOR Your carburetor is necessary, TO ...the factory and adjustment should not be purged after reinstallation and before operating the tractor. WEAK OR FULLY CHARGED DEAD BATTERY BATTERY Fig. 37 REPLACING BATTERY (See Fig. 38) INTERLOCKS AND RELAYS Loose or damaged wiring may cause your transmission require removal for repair ...
Owners Manual
Page 26
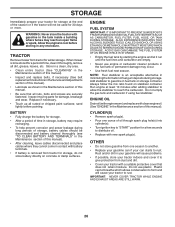
...indoors and cover it run until the fuel lines and carburetor are securely fastened. Inspect moving parts for 30 days or more. BATTERY • Fully charge the battery for storage. • After a period of time in the Maintenance section of this manual. • Be sure that does ...storage at least 10 minutes after adding stabilizer to allow the stabilizer to reach the carburetor. WARNING: Never store the tractor with battery terminals. • If battery is to be used for damage, breakage and wear. ALSO, EXPERIENCE INDICATES THAT ALCOHOL BLENDED FUELS (CALLED GASOHOL OR USING ...
...indoors and cover it run until the fuel lines and carburetor are securely fastened. Inspect moving parts for 30 days or more. BATTERY • Fully charge the battery for storage. • After a period of time in the Maintenance section of this manual. • Be sure that does ...storage at least 10 minutes after adding stabilizer to allow the stabilizer to reach the carburetor. WARNING: Never store the tractor with battery terminals. • If battery is to be used for damage, breakage and wear. ALSO, EXPERIENCE INDICATES THAT ALCOHOL BLENDED FUELS (CALLED GASOHOL OR USING ...
Owners Manual
Page 27
... 1. Empty fuel tank and carburetor, refill tank with fresh, clean gas. 6. Check all wiring. 14. Clean battery terminals. 6. Corroded battery terminals. 3. Dirty engine air screen/fins. 11. Loose or damaged wiring. 13. See "To Adjust Carburetor" in...blade. 2. Faulty ignition switch. 8. Contact an authorized service center/department. Carburetor out of fuel. 2. Blown fuse. 5. Recharge or replace battery. 2. Raise cutting height/reduce speed. 2. Dirty/clogged muffler. 12. Dirty air filter. 2. Replace spark plug. 3. Throttle in Operation section...
... 1. Empty fuel tank and carburetor, refill tank with fresh, clean gas. 6. Check all wiring. 14. Clean battery terminals. 6. Corroded battery terminals. 3. Dirty engine air screen/fins. 11. Loose or damaged wiring. 13. See "To Adjust Carburetor" in...blade. 2. Faulty ignition switch. 8. Contact an authorized service center/department. Carburetor out of fuel. 2. Blown fuse. 5. Recharge or replace battery. 2. Raise cutting height/reduce speed. 2. Dirty/clogged muffler. 12. Dirty air filter. 2. Replace spark plug. 3. Throttle in Operation section...
Owners Manual
Page 28
... 7. Clean underside of drive 1. Bulb(s) or lamp(s) burned out. 3. Blown fuse. 1. Replace bulb(s) or lamp(s). 3. Bad battery cell(s). 2. Replace battery. 2. Replace motion drive belt. 4. Install axle key at rear wheel. Turn ignition key to slower speed. 3. TROUBLESHOOTING PROBLEM CAUSE ...damaged mower drive belt. 3. Engine speed too slow. 1. Buildup of grass, leaves, trash under mower. 7. Loose or damaged wiring. 5. Battery will not rotate 1. Faulty regulator (if so equipped). 4. Replace regulator. 4. Debris on steering plate (if equipped). 3. Engine "backfires" ...
... 7. Clean underside of drive 1. Bulb(s) or lamp(s) burned out. 3. Blown fuse. 1. Replace bulb(s) or lamp(s). 3. Bad battery cell(s). 2. Replace battery. 2. Replace motion drive belt. 4. Install axle key at rear wheel. Turn ignition key to slower speed. 3. TROUBLESHOOTING PROBLEM CAUSE ...damaged mower drive belt. 3. Engine speed too slow. 1. Buildup of grass, leaves, trash under mower. 7. Loose or damaged wiring. 5. Battery will not rotate 1. Faulty regulator (if so equipped). 4. Replace regulator. 4. Debris on steering plate (if equipped). 3. Engine "backfires" ...

Owners Manual
Page 29
YTH24V48LS (96043011602), PRODUCT NO. 960 43 01-16 SCHEMATIC SCH12 A AMMETER (OPTIONAL) BATTERY RED RED FUSE SOLENOID BLACK WHITE PTO SWITCH (DISENGAGED) S B M A1 G L A2 BLACK C RED A H WHITE D RED B E WHITE CLUTCH/BRAKE (PEDAL UP) BLACK STARTER M ELECTRIC CLUTCH GRAY ...
YTH24V48LS (96043011602), PRODUCT NO. 960 43 01-16 SCHEMATIC SCH12 A AMMETER (OPTIONAL) BATTERY RED RED FUSE SOLENOID BLACK WHITE PTO SWITCH (DISENGAGED) S B M A1 G L A2 BLACK C RED A H WHITE D RED B E WHITE CLUTCH/BRAKE (PEDAL UP) BLACK STARTER M ELECTRIC CLUTCH GRAY ...

Owners Manual
Page 31
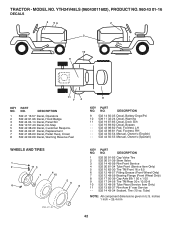
...Hrmtr Switch PTO Screw Thdrol 5/16-18 x 3/4 TYTT Outlet 12-Volt Harness Ign. inches 1 inch = 25.4 mm 31 Socket Asm Bulb Twistlock Cover Terminal Strap Battery Mount Front Screw Hexwsh Thdrol 1/4-20 x 3/4 Washer 9/32 x 7/8 x 16 Ga. Harness Pigtail Harness 12-Volt Pigtail Switch Reverse TT Pedal Control NOTE: All ...-16 102 532 40 44-54 103 532 42 17-47 105 532 40 75-68 DESCRIPTION Battery Bolt Hex Head 1/4-20 x 3/4 Box Battery Switch Interlock Push-In Harness Socket Light w/4152J Bulb Light Cable Battery 8" Cable Starter Fuse Nut Keps Hex 1/4-20 unc Cable, Ground Switch, Seat Switch, Ign Key...
...Hrmtr Switch PTO Screw Thdrol 5/16-18 x 3/4 TYTT Outlet 12-Volt Harness Ign. inches 1 inch = 25.4 mm 31 Socket Asm Bulb Twistlock Cover Terminal Strap Battery Mount Front Screw Hexwsh Thdrol 1/4-20 x 3/4 Washer 9/32 x 7/8 x 16 Ga. Harness Pigtail Harness 12-Volt Pigtail Switch Reverse TT Pedal Control NOTE: All ...-16 102 532 40 44-54 103 532 42 17-47 105 532 40 75-68 DESCRIPTION Battery Bolt Hex Head 1/4-20 x 3/4 Box Battery Switch Interlock Push-In Harness Socket Light w/4152J Bulb Light Cable Battery 8" Cable Starter Fuse Nut Keps Hex 1/4-20 unc Cable, Ground Switch, Seat Switch, Ign Key...
Owners Manual
Page 42
...-00 Decal, Pedal Husq. NO. NO. NO. Crown 8 532 42 62-09 Decal, Warning Reserve Fuel 8 KEY PART NO. DESCRIPTION 9 532 14 50-05 Decal, Battery Dnge/Poi 10 539 11 32-24 Decal, Warning 11 532 19 87-85 Decal, Deck Sch - - 532 16 69-60 Decal, Bypass - - 532 43...
...-00 Decal, Pedal Husq. NO. NO. NO. Crown 8 532 42 62-09 Decal, Warning Reserve Fuel 8 KEY PART NO. DESCRIPTION 9 532 14 50-05 Decal, Battery Dnge/Poi 10 539 11 32-24 Decal, Warning 11 532 19 87-85 Decal, Deck Sch - - 532 16 69-60 Decal, Bypass - - 532 43...


