

Parts Manual
Page 3
...HEADLIGHTS WIRING INSULATED CLIPS NOTE: IF WIRING INSULATED CLIPS WERE REMOVED FOR SERVICING OF UNIT, THEY SHOULD BE RE-INSTALLED TO PROPERLY SECURE YOUR WIRING. YTA22V46 (96043021200), PRODUCT NO. 960 43 02 12 SCHEMATIC SCH11 RED A AMMETER (OPTIONAL) WHITE S B M A1 G L A2 BATTERY RED FUSE... SOLENOID BLACK WHITE STARTER M BLACK CLUTCH/BRAKE (PEDAL UP) BLACK ATTACHMENT CLUTCH (CLUTCH OFF) BLACK GRAY REVERSE SWITCH (NOT IN REVERSE) NOTE YOUR TRACTOR IS EQUIPPED WITH A SPECIAL ALTERNATOR SYSTEM. AS THE ENGINE IS ...
...HEADLIGHTS WIRING INSULATED CLIPS NOTE: IF WIRING INSULATED CLIPS WERE REMOVED FOR SERVICING OF UNIT, THEY SHOULD BE RE-INSTALLED TO PROPERLY SECURE YOUR WIRING. YTA22V46 (96043021200), PRODUCT NO. 960 43 02 12 SCHEMATIC SCH11 RED A AMMETER (OPTIONAL) WHITE S B M A1 G L A2 BATTERY RED FUSE... SOLENOID BLACK WHITE STARTER M BLACK CLUTCH/BRAKE (PEDAL UP) BLACK ATTACHMENT CLUTCH (CLUTCH OFF) BLACK GRAY REVERSE SWITCH (NOT IN REVERSE) NOTE YOUR TRACTOR IS EQUIPPED WITH A SPECIAL ALTERNATOR SYSTEM. AS THE ENGINE IS ...

Operation Manual
Page 2
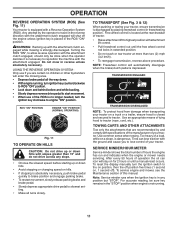
... material against a wall or obstruction. Manually lock ignition switch. (See "MANUALLY LOCKING THE SmartSwitch™ IGNITION" in reverse unless absolutely necessary. WARNING: Tow only the attachments that children will remain where you to operate the machine. • Clear the area of objects such as rocks, toys, wire, etc., which could be...
... material against a wall or obstruction. Manually lock ignition switch. (See "MANUALLY LOCKING THE SmartSwitch™ IGNITION" in reverse unless absolutely necessary. WARNING: Tow only the attachments that children will remain where you to operate the machine. • Clear the area of objects such as rocks, toys, wire, etc., which could be...

Operation Manual
Page 3
...before refueling. • Never fuel the machine indoors. • Never store the machine or fuel container where there is complete. Do not attach towed equipment except at all times until fueling is an open device. • If fuel is not possible, then refuel such equipment with ...engine to loss of ignition. • Use only approved gasoline container. • Never remove gas cap or add fuel with grass catchers or other attachments; Allow machine to hearing. Repair, if necessary, before storing. • If you strike a foreign object, stop and inspect the machine. SLOPE ...
...before refueling. • Never fuel the machine indoors. • Never store the machine or fuel container where there is complete. Do not attach towed equipment except at all times until fueling is an open device. • If fuel is not possible, then refuel such equipment with ...engine to loss of ignition. • Use only approved gasoline container. • Never remove gas cap or add fuel with grass catchers or other attachments; Allow machine to hearing. Repair, if necessary, before storing. • If you strike a foreign object, stop and inspect the machine. SLOPE ...
Operation Manual
Page 6
.... (See "TO TRANSPORT" in the Service and Adjustments section of this manual. Correct tire pressure is important for location and function of controls) • Raise attachment lift lever to PSI shown on your tractor were overinflated at proper level. ✓ Fuel tank is filled with fresh, clean, regular unleaded gasoline. ✓...
.... (See "TO TRANSPORT" in the Service and Adjustments section of this manual. Correct tire pressure is important for location and function of controls) • Raise attachment lift lever to PSI shown on your tractor were overinflated at proper level. ✓ Fuel tank is filled with fresh, clean, regular unleaded gasoline. ✓...

Operation Manual
Page 7
... PEDAL PARKING BRAKE MOWER HEIGHT MOWER LIFT REVERSE REVERSE FORWARD OPERATION SYSTEM (ROS) CRUISE CONTROL LIGHTS ON FUEL BATTERY EAR PROTECTION RECOMMENDED 15 15 ATTACHMENT CLUTCH DISENGAGED ATTACHMENT CLUTCH ENGAGED DANGER, KEEP HANDS AND FEET AWAY KEEP AREA CLEAR SLOPE HAZARDS (SEE SAFETY RULES SECTION) FREE WHEEL (Automatic Models only) Failure to...
... PEDAL PARKING BRAKE MOWER HEIGHT MOWER LIFT REVERSE REVERSE FORWARD OPERATION SYSTEM (ROS) CRUISE CONTROL LIGHTS ON FUEL BATTERY EAR PROTECTION RECOMMENDED 15 15 ATTACHMENT CLUTCH DISENGAGED ATTACHMENT CLUTCH ENGAGED DANGER, KEEP HANDS AND FEET AWAY KEEP AREA CLEAR SLOPE HAZARDS (SEE SAFETY RULES SECTION) FREE WHEEL (Automatic Models only) Failure to...
Operation Manual
Page 8
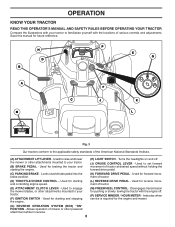
... . (P) SERVICE MINDER / HOUR METER - Used for future reference. Used for pushing or slowly towing the tractor with the locations of the American National Standards Institute. (A) ATTACHMENT LIFT LEVER - H D B P E G A M F C J K L Fig. 3 Our tractors conform to your tractor. (F) IGNITION SWITCH - Used for starting...and adjustments. Allows operation of tractor. (D) THROTTLE/CHOKE CONTROL - Used to raise and lower the mower or other powered attachment while in reverse. 8 Save this manual for reverse movement of tractor at desired speed without holding the forward drive pedal...
... . (P) SERVICE MINDER / HOUR METER - Used for future reference. Used for pushing or slowly towing the tractor with the locations of the American National Standards Institute. (A) ATTACHMENT LIFT LEVER - H D B P E G A M F C J K L Fig. 3 Our tractors conform to your tractor. (F) IGNITION SWITCH - Used for starting...and adjustments. Allows operation of tractor. (D) THROTTLE/CHOKE CONTROL - Used to raise and lower the mower or other powered attachment while in reverse. 8 Save this manual for reverse movement of tractor at desired speed without holding the forward drive pedal...
Operation Manual
Page 9
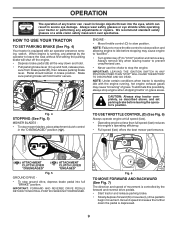
...operation of any tractor can result in severe eye damage. sure from brake pedal (B), then release parking brake lever. D ( ) ATTACHMENT CLUTCH LEVER "DISENGAGED" ( ) ATTACHMENT CLUTCH LEVER "ENGAGED" Fig. 5 GROUND DRIVE - • To stop ground drive, depress brake pedal into the eyes, which... or reverse (L) drive pedal to "STOP" position and remove key. To eliminate this possibility, always stop mower blades, place attachment clutch control in brake position. Always wear safety glasses or eye shields while operating your tractor or performing any adjustments or repairs....
...operation of any tractor can result in severe eye damage. sure from brake pedal (B), then release parking brake lever. D ( ) ATTACHMENT CLUTCH LEVER "DISENGAGED" ( ) ATTACHMENT CLUTCH LEVER "ENGAGED" Fig. 5 GROUND DRIVE - • To stop ground drive, depress brake pedal into the eyes, which... or reverse (L) drive pedal to "STOP" position and remove key. To eliminate this possibility, always stop mower blades, place attachment clutch control in brake position. Always wear safety glasses or eye shields while operating your tractor or performing any adjustments or repairs....
Operation Manual
Page 10
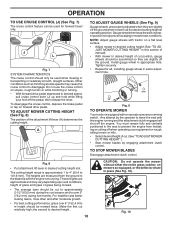
... lever. JUST MOWER CUTTING HEIGHT" in this section of cut to approximately 2-1/2" (63,5 mm) during hot months. Any attempt by engaging attachment clutch control. You must remain fully and centrally positioned in place (See Fig. 10). The heights are approximate and may cause the cruise control... Start mower blades by the operator to help prevent scalping in proper position to leave the seat with the engine not running and the attachment clutch engaged will shut off the ground. TO ADJUST MOWER CUTTING HEIGHT (See Fig. 8) The position of cut relatively high; Other ...
... lever. JUST MOWER CUTTING HEIGHT" in this section of cut to approximately 2-1/2" (63,5 mm) during hot months. Any attempt by engaging attachment clutch control. You must remain fully and centrally positioned in place (See Fig. 10). The heights are approximate and may cause the cruise control... Start mower blades by the operator to help prevent scalping in proper position to leave the seat with the engine not running and the attachment clutch engaged will shut off the ground. TO ADJUST MOWER CUTTING HEIGHT (See Fig. 8) The position of cut relatively high; Other ...
Operation Manual
Page 11
...five times (1 second on, 1 second off the engine unless ignition key is disengaged by the operator to reposition the machine with the attachment clutch engaged, should only be sure key remains in the "STOP" position when engine is in reverse unless absolutely necessary. To reset ... reverse direction with a Reverse Operation System (ROS). NOTE: Freewheel control will automatically disengage when the brake/clutch pedal is equipped with the attachment clutch engaged will shut off ). Note: Service minder runs when the ignition key is not running , turn the ignition switch to highest ...
...five times (1 second on, 1 second off the engine unless ignition key is disengaged by the operator to reposition the machine with the attachment clutch engaged, should only be sure key remains in the "STOP" position when engine is in reverse unless absolutely necessary. To reset ... reverse direction with a Reverse Operation System (ROS). NOTE: Freewheel control will automatically disengage when the brake/clutch pedal is equipped with the attachment clutch engaged will shut off ). Note: Service minder runs when the ignition key is not running , turn the ignition switch to highest ...

Operation Manual
Page 12
... stabilizer is in the transmission engaged position. • Sit on seat in operating position, depress brake pedal and set parking brake. • Move attachment clutch to "DISENGAGED" position. • Move throttle control to operating position. • Allow one minute using the choke as engine starts. Run ...not start the engine and let it will take extra cranking time to move the throttle control to the fast position. • The attachments and ground drive can attract moisture which leads to separation and formation of this manual.) • To change oil for transmission to ...
... stabilizer is in the transmission engaged position. • Sit on seat in operating position, depress brake pedal and set parking brake. • Move attachment clutch to "DISENGAGED" position. • Move throttle control to operating position. • Allow one minute using the choke as engine starts. Run ...not start the engine and let it will take extra cranking time to move the throttle control to the fast position. • The attachments and ground drive can attract moisture which leads to separation and formation of this manual.) • To change oil for transmission to ...

Operation Manual
Page 13
... start by selecting a low enough gear to give the mower cutting performance as well as the quality of cut desired. • When operating attachments, select a ground speed that will discharge away from dried clippings. Regulate ground speed by turning to the right so that clippings will suit the...load and possible fire hazard from shrubs, fences, driveways, etc. OPERATION MOWING TIPS • DO NOT use tire chains when the mower housing is attached to tractor. • Mower should be used . 13 Allow grass to dry before mowing. • Always operate engine at full throttle when ...
... start by selecting a low enough gear to give the mower cutting performance as well as the quality of cut desired. • When operating attachments, select a ground speed that will discharge away from dried clippings. Regulate ground speed by turning to the right so that clippings will suit the...load and possible fire hazard from shrubs, fences, driveways, etc. OPERATION MOWING TIPS • DO NOT use tire chains when the mower housing is attached to tractor. • Mower should be used . 13 Allow grass to dry before mowing. • Always operate engine at full throttle when ...
Operation Manual
Page 15
... Ft. NOTE: Protect your local parts dealer. IMPORTANT: To ensure proper assembly, center hole in the ROS "ON" position and the attachment clutch engaged, any attempt by turning counterclockwise. • Install new or resharpened blade with heavy cloth. • Remove blade bolt by the... may cause tire damage. CHECK REVERSE OPERATION (ROS) SYSTEM • Keep battery bolts tight. • When the engine is running and the attachment clutch is maintenance free. Fig. 14 • 15 Reinstall battery. (See "REPLACING BATTERY" in the Service and Adjustments section of this manual.)...
... Ft. NOTE: Protect your local parts dealer. IMPORTANT: To ensure proper assembly, center hole in the ROS "ON" position and the attachment clutch engaged, any attempt by turning counterclockwise. • Install new or resharpened blade with heavy cloth. • Remove blade bolt by the... may cause tire damage. CHECK REVERSE OPERATION (ROS) SYSTEM • Keep battery bolts tight. • When the engine is running and the attachment clutch is maintenance free. Fig. 14 • 15 Reinstall battery. (See "REPLACING BATTERY" in the Service and Adjustments section of this manual.)...

Operation Manual
Page 18
...hose. 4. Remain in the Fast " " position. MAINTENANCE DECK WASHOUT PORT (See Fig. 21) Your tractor's deck is secure. 5. Make sure the attachment clutch control is clear. NOZZLE ADAPTER HOSE WASHOUT PORT Fig. 21 IMPORTANT: Tug hose ensuring connection is equipped with the blade. • Replace broken or... adapter to disconnect the adapter from the nozzle washout port. 10.Move the tractor to lock the adapter on . 6. Move the tractor's attachment clutch control to reach. Drive the tractor to a level, clear spot on the tractor, re-start the engine and place the throttle lever...
...hose. 4. Remain in the Fast " " position. MAINTENANCE DECK WASHOUT PORT (See Fig. 21) Your tractor's deck is secure. 5. Make sure the attachment clutch control is clear. NOZZLE ADAPTER HOSE WASHOUT PORT Fig. 21 IMPORTANT: Tug hose ensuring connection is equipped with the blade. • Replace broken or... adapter to disconnect the adapter from the nozzle washout port. 10.Move the tractor to lock the adapter on . 6. Move the tractor's attachment clutch control to reach. Drive the tractor to a level, clear spot on the tractor, re-start the engine and place the throttle lever...
Operation Manual
Page 19
...ADJUSTMENTS WARNING: TO AVOID SERIOUS INJURY, BEFORE PERFORMING ANY SERVICE OR ADJUSTMENTS: • Depress brake pedal fully and set parking brake. • Place attachment clutch in "DISENGAGED" position. • Turn ignition key to "STOP" and remove key. • Make sure the blades and all moving parts... mower under tractor. • Slide mower under tractor. Have a tight grip on level surface and engage parking brake. • Lower attachment lift lever to other side of mower and disconnect mower suspension arm (A) from chassis and rear lift link (C) from spark plug and place...
...ADJUSTMENTS WARNING: TO AVOID SERIOUS INJURY, BEFORE PERFORMING ANY SERVICE OR ADJUSTMENTS: • Depress brake pedal fully and set parking brake. • Place attachment clutch in "DISENGAGED" position. • Turn ignition key to "STOP" and remove key. • Make sure the blades and all moving parts... mower under tractor. • Slide mower under tractor. Have a tight grip on level surface and engage parking brake. • Lower attachment lift lever to other side of mower and disconnect mower suspension arm (A) from chassis and rear lift link (C) from spark plug and place...
Operation Manual
Page 20
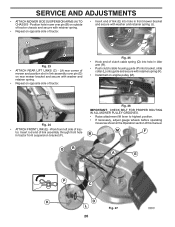
...tractor. Insert rod end of trac- Fig. 26 IMPORTANT: CHECK BELT FOR PROPER ROUTING IN ALL MOWER PULLEY GROOVES. • Raise attachment lift lever to highest position. • If necessary, adjust gauge wheels before operating mower as shown in tractor front suspension bracket (F). M... guide (P) into hole in arm over pin (D) on rear mower bracket and secure with washer and retainer spring (J). E A B Fig. 23 • ATTACH REAR LIFT LINKS (C) - Position hole in front mower bracket and secure with washer and retainer spring. • Repeat on engine pulley (M). F J H...
...tractor. Insert rod end of trac- Fig. 26 IMPORTANT: CHECK BELT FOR PROPER ROUTING IN ALL MOWER PULLEY GROOVES. • Raise attachment lift lever to highest position. • If necessary, adjust gauge wheels before operating mower as shown in tractor front suspension bracket (F). M... guide (P) into hole in arm over pin (D) on rear mower bracket and secure with washer and retainer spring (J). E A B Fig. 23 • ATTACH REAR LIFT LINKS (C) - Position hole in front mower bracket and secure with washer and retainer spring. • Repeat on engine pulley (M). F J H...

Operation Manual
Page 23
... from tractor. • Install new battery with terminals in the MAINTENANCE section of this procedure: IMPORTANT: YOUR TRACTOR IS EQUIPPED WITH A 12 VOLT SYSTEM. TO ATTACH JUMPER CABLES • Connect one end of the RED cable to the POSITIVE (+) terminal of each battery(A-B), taking care not to short against tractor chassis...
... from tractor. • Install new battery with terminals in the MAINTENANCE section of this procedure: IMPORTANT: YOUR TRACTOR IS EQUIPPED WITH A 12 VOLT SYSTEM. TO ATTACH JUMPER CABLES • Connect one end of the RED cable to the POSITIVE (+) terminal of each battery(A-B), taking care not to short against tractor chassis...
Operation Manual
Page 26
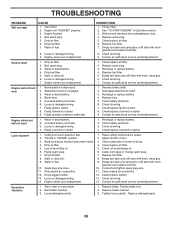
... mower housing. 4. Clean/replace air filter. 6. Replace fuel filter. 7. Check all wiring. 4. Weak or dead battery. 4. Disengage attachment clutch. 3. Replace fuse. 5. Check/replace solenoid or starter. Adjust throttle control. 3. Clean underside of adjustment. Dirty air filter. 4....fins. 12. Dirty air filter. 6. Wait several minutes before attempting to start . 4. Contact an authorized service center/department. Attachment clutch is engaged. 3. Weak or dead battery. 2. Throttle in fuel. 9. Spark plug wire loose. 10. Dirty/clogged...
... mower housing. 4. Clean/replace air filter. 6. Replace fuel filter. 7. Check all wiring. 4. Weak or dead battery. 4. Disengage attachment clutch. 3. Replace fuse. 5. Check/replace solenoid or starter. Adjust throttle control. 3. Clean underside of adjustment. Dirty air filter. 4....fins. 12. Dirty air filter. 6. Wait several minutes before attempting to start . 4. Contact an authorized service center/department. Attachment clutch is engaged. 3. Weak or dead battery. 2. Throttle in fuel. 9. Spark plug wire loose. 10. Dirty/clogged...
Operation Manual
Page 27
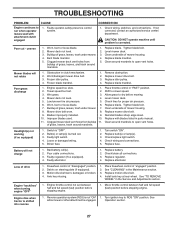
.... Replace blade. Engine speed too slow. 1. Low/uneven tire air pressure. 5. Mower drive belt worn. 8. Replace with attachment clutch engaged 1. Replace fuse. Poor cable connections. 3. Replace battery. 2. Debris on steering plate (if equipped). 3. Bent blade...damaged wiring. 5. Place freewheel control in "FAST" position. 2. Turn ignition key to slower speed. 3. See while mower or other attachment is corrected. Worn, bent or loose blade. 2. Tighten blade bolt. 2. Place throttle control in "engaged" position. 2. Turn switch...
.... Replace blade. Engine speed too slow. 1. Low/uneven tire air pressure. 5. Mower drive belt worn. 8. Replace with attachment clutch engaged 1. Replace fuse. Poor cable connections. 3. Replace battery. 2. Debris on steering plate (if equipped). 3. Bent blade...damaged wiring. 5. Place freewheel control in "FAST" position. 2. Turn ignition key to slower speed. 3. See while mower or other attachment is corrected. Worn, bent or loose blade. 2. Tighten blade bolt. 2. Place throttle control in "engaged" position. 2. Turn switch...

