Parts Manual
Page 15
...) only - Baffle Center Front Baffle Front RH Washer 13/32 x 1 x 1/2 11 Ga. pulley/ nut/washer and blade bolt/washers not included) Replacement Mower, Complete NOTE: All component dimensions given in U.S. inches 1 inch = 25.4 mm 15 YTA22V46 (96043021200), PRODUCT NO. 960 43 02 12 MOWER DECK KEY PART NO. LH Keeper Belt Eng... 05-12 Bolt Hex HD. 5/16-18 6 532 19 51-86 Arm Suspension 7 532 41 63-58 Screw # 10 x 0.750 11 532 40 53-80 Blade Mower Hi Lift 12 584 30 93-01 Screw Sems 7/16-20 x 1 Hx Hd 13 532 19 28-72 Shaft Assembly, Mandrel 14 532 18...
...) only - Baffle Center Front Baffle Front RH Washer 13/32 x 1 x 1/2 11 Ga. pulley/ nut/washer and blade bolt/washers not included) Replacement Mower, Complete NOTE: All component dimensions given in U.S. inches 1 inch = 25.4 mm 15 YTA22V46 (96043021200), PRODUCT NO. 960 43 02 12 MOWER DECK KEY PART NO. LH Keeper Belt Eng... 05-12 Bolt Hex HD. 5/16-18 6 532 19 51-86 Arm Suspension 7 532 41 63-58 Screw # 10 x 0.750 11 532 40 53-80 Blade Mower Hi Lift 12 584 30 93-01 Screw Sems 7/16-20 x 1 Hx Hd 13 532 19 28-72 Shaft Assembly, Mandrel 14 532 18...

Operation Manual
Page 2
...the mowing area for wheel weights or counterweights. • Keep machine free of grass, leaves or other reproductive harm. I. Stop the blades when crossing gravel surfaces. • Do not operate machine without the entire grass catcher, discharge chute, or other reproductive harm. Allow... material against a wall or obstruction. SAFETY RULES Safe Operation Practices for small children. • Never carry children, even with the blades shut off. Always look behind before and while backing. • Never direct discharged material toward the operator. CHILDREN CAN BE SERIOUSLY INJURED...
...the mowing area for wheel weights or counterweights. • Keep machine free of grass, leaves or other reproductive harm. I. Stop the blades when crossing gravel surfaces. • Do not operate machine without the entire grass catcher, discharge chute, or other reproductive harm. Allow... material against a wall or obstruction. SAFETY RULES Safe Operation Practices for small children. • Never carry children, even with the blades shut off. Always look behind before and while backing. • Never direct discharged material toward the operator. CHILDREN CAN BE SERIOUSLY INJURED...

Operation Manual
Page 3
... point. • Follow the manufacturer's recommendation for weight limits for Ride-On Mowers III. If the tires lose traction, disengage the blades and proceed slowly straight down slopes. • Do not shift to neutral and coast downhill. • Avoid starting, stopping, or ...ground. Always keep the machine in safe working condition. • Never tamper with manufacturer's recommended parts, when necessary. • Mower blades are explosive. • Extinguish all slopes requires extreme caution. When loading or unloading this is extremely flammable and the vapors are sharp....
... point. • Follow the manufacturer's recommendation for weight limits for Ride-On Mowers III. If the tires lose traction, disengage the blades and proceed slowly straight down slopes. • Do not shift to neutral and coast downhill. • Avoid starting, stopping, or ...ground. Always keep the machine in safe working condition. • Never tamper with manufacturer's recommended parts, when necessary. • Mower blades are explosive. • Extinguish all slopes requires extreme caution. When loading or unloading this is extremely flammable and the vapors are sharp....

Operation Manual
Page 4
... on your nearest authorized service center/department. PRODUCT SPECIFICATIONS Gasoline Capacity and type: Oil Type: (API: SG-SL) Oil Capacity: Spark Plug: Charging System: Battery: Blade Bolt Torque: 2.5 Gallons (9,46 L) Unleaded Regular SAE 30 (above is required by the operator. Should you experience any ). WARNING: This tractor is equipped with a spark...
... on your nearest authorized service center/department. PRODUCT SPECIFICATIONS Gasoline Capacity and type: Oil Type: (API: SG-SL) Oil Capacity: Spark Plug: Charging System: Battery: Blade Bolt Torque: 2.5 Gallons (9,46 L) Unleaded Regular SAE 30 (above is required by the operator. Should you experience any ). WARNING: This tractor is equipped with a spark...
Operation Manual
Page 6
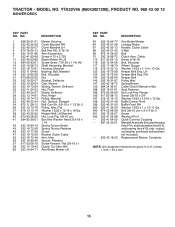
... THAT YOU RECEIVE THE BEST PERFORMANCE AND SATISFACTION FROM THIS QUALITY PRODUCT. TO ROLL TRACTOR OFF SKID (See Operation section for replacing motion and mower blade drive belts in a well-ventilated area. CHECK FOR PROPER POSITION OF ALL BELTS See the figures that are routed correctly. See "TO CHECK BRAKE" in...
... THAT YOU RECEIVE THE BEST PERFORMANCE AND SATISFACTION FROM THIS QUALITY PRODUCT. TO ROLL TRACTOR OFF SKID (See Operation section for replacing motion and mower blade drive belts in a well-ventilated area. CHECK FOR PROPER POSITION OF ALL BELTS See the figures that are routed correctly. See "TO CHECK BRAKE" in...
Operation Manual
Page 8
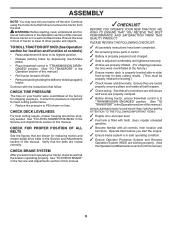
... the tractor with the engine off . (J) CRUISE CONTROL LEVER - Used to the applicable safety standards of tractor. (E) ATTACHMENT CLUTCH LEVER - Used to engage the mower blades, or other powered attachment while in reverse. 8 Disengages transmission for forward movement of mower or other attachments mounted to your tractor. (B) BRAKE PEDAL -
... the tractor with the engine off . (J) CRUISE CONTROL LEVER - Used to the applicable safety standards of tractor. (E) ATTACHMENT CLUTCH LEVER - Used to engage the mower blades, or other powered attachment while in reverse. 8 Disengages transmission for forward movement of mower or other attachments mounted to your tractor. (B) BRAKE PEDAL -
Operation Manual
Page 9
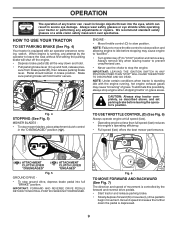
... LEAVING THE IGNITION SWITCH IN ANY POSITION OTHER THAN "STOP" WILL CAUSE THE BATTERY TO DISCHARGE AND GO DEAD. Fig. 4 STOPPING (See Fig. 5) MOWER BLADES - • To stop the engine. D ( ) ATTACHMENT CLUTCH LEVER "DISENGAGED" ( ) ATTACHMENT CLUTCH LEVER "ENGAGED" Fig. 5 GROUND DRIVE - •...and reverse drive pedals. • Start tractor and release parking brake. • Slowly depress forward (K) or reverse (L) drive pedal to stop mower blades, place attachment clutch control in the "DISENGAGED" position ( ). B C ENGINE - • Move throttle control (D) to leave the seat without...
... LEAVING THE IGNITION SWITCH IN ANY POSITION OTHER THAN "STOP" WILL CAUSE THE BATTERY TO DISCHARGE AND GO DEAD. Fig. 4 STOPPING (See Fig. 5) MOWER BLADES - • To stop the engine. D ( ) ATTACHMENT CLUTCH LEVER "DISENGAGED" ( ) ATTACHMENT CLUTCH LEVER "ENGAGED" Fig. 5 GROUND DRIVE - •...and reverse drive pedals. • Start tractor and release parking brake. • Slowly depress forward (K) or reverse (L) drive pedal to stop mower blades, place attachment clutch control in the "DISENGAGED" position ( ). B C ENGINE - • Move throttle control (D) to leave the seat without...
Operation Manual
Page 10
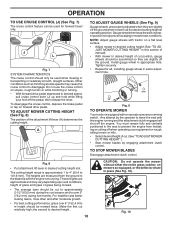
...this section of manual). • With mower in place (See Fig. 10). Any attempt by engaging attachment clutch control. TO STOP MOWER BLADES Disengage attachment clutch control. These heights are slightly off the engine. the second to desired height. 10 CAUTION: Do not operate the mower without...disengage. You must remain fully and centrally positioned in height should be cut . (See "TO ADJUST MOWER CUTTING HEIGHT".) • Start mower blades by the operator to leave the seat with the engine not running and the attachment clutch engaged will shut off the ground. Fig. 8 •...
...this section of manual). • With mower in place (See Fig. 10). Any attempt by engaging attachment clutch control. TO STOP MOWER BLADES Disengage attachment clutch control. These heights are slightly off the engine. the second to desired height. 10 CAUTION: Do not operate the mower without...disengage. You must remain fully and centrally positioned in height should be cut . (See "TO ADJUST MOWER CUTTING HEIGHT".) • Start mower blades by the operator to leave the seat with the engine not running and the attachment clutch engaged will shut off the ground. Fig. 8 •...

Operation Manual
Page 14
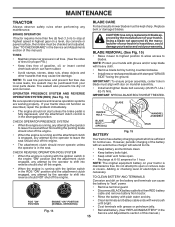
...been subjected to Maintenance "ENGINE" Section IMPORTANT: DO NOT OIL OR GREASE THE PIVOT POINTS WHICH HAVE SPECIAL NYLON BEARINGS. Replace blades more often when mowing in high ambient temperatures 2 - To receive full value from the warranty, operator must maintain tractor as ...; Check tire pressure. • Check operator presence and ROS systems for proper operation. • Check for Loose Fasteners A Check/Replace Mower Blades C Lubrication Chart T Check Battery Level O Clean Battery and Terminals R Clean Debris off Steering Plate Check Mower Levelness Check V-Belts Check Engine Oil...
...been subjected to Maintenance "ENGINE" Section IMPORTANT: DO NOT OIL OR GREASE THE PIVOT POINTS WHICH HAVE SPECIAL NYLON BEARINGS. Replace blades more often when mowing in high ambient temperatures 2 - To receive full value from the warranty, operator must maintain tractor as ...; Check tire pressure. • Check operator presence and ROS systems for proper operation. • Check for Loose Fasteners A Check/Replace Mower Blades C Lubrication Chart T Check Battery Level O Clean Battery and Terminals R Clean Debris off Steering Plate Check Mower Levelness Check V-Belts Check Engine Oil...
Operation Manual
Page 15
..., periodic charging of your local parts dealer. TO CLEAN BATTERY AND TERMINALS Corrosion and dirt on mandrel assembly. • Install and tighten blade bolt securely (45-55 Ft. Be sure operator presence and reverse operation systems are working properly. ROS "ON" POSITION ENGINE "ON" ...of electrolyte is hazardous, could damage your tractor and void your tractor does not function as described, repair the problem immediately. Using a blade not approved by the operator to "leak" power. • Remove terminal guard. • Disconnect BLACK battery cable first then RED...
..., periodic charging of your local parts dealer. TO CLEAN BATTERY AND TERMINALS Corrosion and dirt on mandrel assembly. • Install and tighten blade bolt securely (45-55 Ft. Be sure operator presence and reverse operation systems are working properly. ROS "ON" POSITION ENGINE "ON" ...of electrolyte is hazardous, could damage your tractor and void your tractor does not function as described, repair the problem immediately. Using a blade not approved by the operator to "leak" power. • Remove terminal guard. • Disconnect BLACK battery cable first then RED...

Operation Manual
Page 18
... port as part of the mower deck. WARNING: A broken or missing washout fitting could expose you or others to thrown objects from contact with the blade. • Replace broken or missing washout fitting immediately, prior to ensure the area is cleaned. 8. Move the tractor's attachment clutch control to reach. Turn the...
... port as part of the mower deck. WARNING: A broken or missing washout fitting could expose you or others to thrown objects from contact with the blade. • Replace broken or missing washout fitting immediately, prior to ensure the area is cleaned. 8. Move the tractor's attachment clutch control to reach. Turn the...
Operation Manual
Page 19
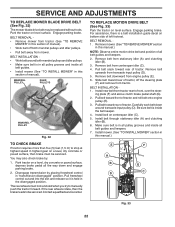
... DASH. Have a tight grip on level surface and engage parking brake. • Lower attachment lift lever to "STOP" and remove key. • Make sure the blades and all moving parts have completely stopped. • Disconnect spark plug wire from mower - remove retainer spring and washer. • Go to its lowest position.
... DASH. Have a tight grip on level surface and engage parking brake. • Lower attachment lift lever to "STOP" and remove key. • Make sure the blades and all moving parts have completely stopped. • Disconnect spark plug wire from mower - remove retainer spring and washer. • Go to its lowest position.

Operation Manual
Page 21
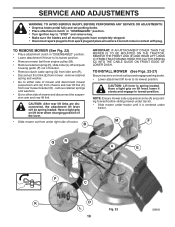
...to clear adjustment nut B. • With a 3/4" or adjustable wrench, turn front link adjustment nut (B) clockwise ( ) (tighten) to raise the front of blade to lower the front mower. A B B TURN NUT RIGHT TO RAISE MOWER TURN NUT LEFT TO LOWER MOWER Fig. 28 NOTE: Each full turn lift link...sharp. sure the distance (A) from bottom edge of mower, or, counterclockwise ( ) (loosen) to the ground. Fig. 30 • If front tip of blade is 1/8 to 1/2" (3,1 to raise the mower. • Recheck measurements, adjust if necessary until you are sharp. If tires are over or under inflated, ...
...to clear adjustment nut B. • With a 3/4" or adjustable wrench, turn front link adjustment nut (B) clockwise ( ) (tighten) to raise the front of blade to lower the front mower. A B B TURN NUT RIGHT TO RAISE MOWER TURN NUT LEFT TO LOWER MOWER Fig. 28 NOTE: Each full turn lift link...sharp. sure the distance (A) from bottom edge of mower, or, counterclockwise ( ) (loosen) to the ground. Fig. 30 • If front tip of blade is 1/8 to 1/2" (3,1 to raise the mower. • Recheck measurements, adjust if necessary until you are sharp. If tires are over or under inflated, ...
Operation Manual
Page 22
... and inside the belt keeper. 4. You may be serviced. The rear wheels must be serviced. SERVICE AND ADJUSTMENTS TO REPLACE MOWER BLADE DRIVE BELT (See Fig. 32) The mower blade drive belt may also check brake by placing freewheel control in highest gear on a level, dry concrete or paved surface, depress brake...
... and inside the belt keeper. 4. You may be serviced. The rear wheels must be serviced. SERVICE AND ADJUSTMENTS TO REPLACE MOWER BLADE DRIVE BELT (See Fig. 32) The mower blade drive belt may also check brake by placing freewheel control in highest gear on a level, dry concrete or paved surface, depress brake...
Operation Manual
Page 26
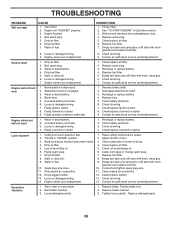
... carburetor, refill tank with fresh, clean gas. 6. Clean engine air screen/fins. 12. Engine valves out of fuel. 2. Bent blade mandrel. 3. TROUBLESHOOTING PROBLEM Will not start 1. Engine not "CHOKED" properly. 3. Wait several minutes before attempting to start . 4. Dirty... Dirty fuel filter. 7. Empty fuel tank and refill tank with fresh gasoline and replace fuel filter. 8. Excessive vibration 1. Tighten blade bolt. 2. Replace blade mandrel. 3. Dirty air filter. 6. CORRECTION 1. See "TO START ENGINE" in fuel. 9. Blown fuse. 5. Faulty solenoid or...
... carburetor, refill tank with fresh, clean gas. 6. Clean engine air screen/fins. 12. Engine valves out of fuel. 2. Bent blade mandrel. 3. TROUBLESHOOTING PROBLEM Will not start 1. Engine not "CHOKED" properly. 3. Wait several minutes before attempting to start . 4. Dirty... Dirty fuel filter. 7. Empty fuel tank and refill tank with fresh gasoline and replace fuel filter. 8. Excessive vibration 1. Tighten blade bolt. 2. Replace blade mandrel. 3. Dirty air filter. 6. CORRECTION 1. See "TO START ENGINE" in fuel. 9. Blown fuse. 5. Faulty solenoid or...
Operation Manual
Page 27
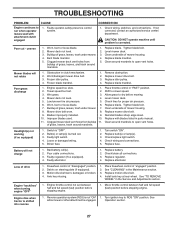
...Worn/damaged mower drive belt. 3. Mower deck not level. 4. Low/uneven tire air pressure. 5. Mower drive belt worn. 8. Improper blades used. 10. Replace with attachment clutch engaged 1. Bad battery cell(s). 2. Poor cable connections. 3. Faulty regulator (if so equipped). 4.... drive belt. 9. of grass, leaves, trash under mower. 4. Replace battery. 2. Remove obstruction. 2. Engine speed too slow. 1. Reinstall blades sharp edge down. 10. Replace regulator. 4. Shift to ROS "ON" position. Headlight(s) not working (if so equipped) 1. See while ...
...Worn/damaged mower drive belt. 3. Mower deck not level. 4. Low/uneven tire air pressure. 5. Mower drive belt worn. 8. Improper blades used. 10. Replace with attachment clutch engaged 1. Bad battery cell(s). 2. Poor cable connections. 3. Faulty regulator (if so equipped). 4.... drive belt. 9. of grass, leaves, trash under mower. 4. Replace battery. 2. Remove obstruction. 2. Engine speed too slow. 1. Reinstall blades sharp edge down. 10. Replace regulator. 4. Shift to ROS "ON" position. Headlight(s) not working (if so equipped) 1. See while ...


