

Operation Manual
Page 2
... against a wall or obstruction. Material may suddenly appear in the Operation section of a load, while on a slope. Manually lock ignition switch. (See "MANUALLY LOCKING THE SmartSwitch™ IGNITION" in the mowing area for all of age before operating a riding lawn mower. Always turn... who are recommended by and comply with the instructions, to occur. Always look behind before storage. 2 Too heavy of this manual). • Disengage blades when not mowing. WARNING Engine exhaust, some of its constituents, and certain vehicle components contain or emit...
... against a wall or obstruction. Material may suddenly appear in the Operation section of a load, while on a slope. Manually lock ignition switch. (See "MANUALLY LOCKING THE SmartSwitch™ IGNITION" in the mowing area for all of age before operating a riding lawn mower. Always turn... who are recommended by and comply with the instructions, to occur. Always look behind before storage. 2 Too heavy of this manual). • Disengage blades when not mowing. WARNING Engine exhaust, some of its constituents, and certain vehicle components contain or emit...
Operation Manual
Page 4
... the operator. Do not mow in maintaining, caring for the muffler is available through your nearest authorized service center/department. In the state of this manual. • Wear proper Personal Protective Equipment (PPE) while operating this machine, including (at a minimum) sturdy footwear, eye protection, and hearing protection. The instructions will enable.../Hr: Min. A spark arrester for and using your tractor properly. It has been designed, engineered and manufactured to give you to service or repair this manual. LBS. (62-75 Nm) CONGRATULATIONS on federal lands.
... the operator. Do not mow in maintaining, caring for the muffler is available through your nearest authorized service center/department. In the state of this manual. • Wear proper Personal Protective Equipment (PPE) while operating this machine, including (at a minimum) sturdy footwear, eye protection, and hearing protection. The instructions will enable.../Hr: Min. A spark arrester for and using your tractor properly. It has been designed, engineered and manufactured to give you to service or repair this manual. LBS. (62-75 Nm) CONGRATULATIONS on federal lands.
Operation Manual
Page 5
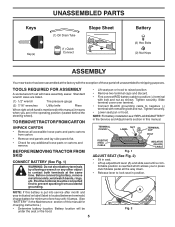
...8226; Sit in seat. • Lift up adjustment lever (A) and slide seat until a comfortable position is reached which allows you are in this manual. Standard wrench sizes are listed. (1) 1/2" wrench Tire pressure gauge (2) 7/16" wrenches Utility knife Pliers When right or left unassembled for shipping ... Bolts (2) Nut Keps ASSEMBLY Your new tractor has been assembled at 6-10 amps. (See "BATTERY" in the Maintenance section of this manual for charging instructions.) • Determine battery location. TO REMOVE TRACTOR FROM CARTON • Lift seat pan or hood to raised position....
...8226; Sit in seat. • Lift up adjustment lever (A) and slide seat until a comfortable position is reached which allows you are in this manual. Standard wrench sizes are listed. (1) 1/2" wrench Tire pressure gauge (2) 7/16" wrenches Utility knife Pliers When right or left unassembled for shipping ... Bolts (2) Nut Keps ASSEMBLY Your new tractor has been assembled at 6-10 amps. (See "BATTERY" in the Maintenance section of this manual for charging instructions.) • Determine battery location. TO REMOVE TRACTOR FROM CARTON • Lift seat pan or hood to raised position....
Operation Manual
Page 6
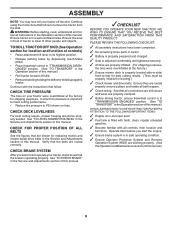
...been completed. ✓ No remaining loose parts in carton. ✓ Battery is properly prepared and charged. ✓ Seat is in this manual. Operate them before you learn how to operate your tractor, check to its highest position. • Release parking brake by depressing clutch/brake ... Before driving tractor, ensure freewheel control is in "TRANSMISSION ENGAGED" position. (See "TO TRANSPORT" in the Service and Adjustments section of this manual.) WHILE LEARNING HOW TO USE YOUR TRACTOR, PAY EXTRA ATTENTION TO THE FOLLOWING IMPORTANT ITEMS: ✓ Engine oil is at proper level. &#...
...been completed. ✓ No remaining loose parts in carton. ✓ Battery is properly prepared and charged. ✓ Seat is in this manual. Operate them before you learn how to operate your tractor, check to its highest position. • Release parking brake by depressing clutch/brake ... Before driving tractor, ensure freewheel control is in "TRANSMISSION ENGAGED" position. (See "TO TRANSPORT" in the Service and Adjustments section of this manual.) WHILE LEARNING HOW TO USE YOUR TRACTOR, PAY EXTRA ATTENTION TO THE FOLLOWING IMPORTANT ITEMS: ✓ Engine oil is at proper level. &#...

Operation Manual
Page 8
...LEVER - Used for starting and stopping the engine. (G) REVERSE OPERATION SYSTEM (ROS) "ON" POSITION - Save this manual for braking the tractor and starting the engine. (C) PARKING BRAKE - Locks clutch/brake pedal into the brake position.... for future reference. Allows operation of the American National Standards Institute. (A) ATTACHMENT LIFT LEVER - OPERATION KNOW YOUR TRACTOR READ THIS OPERATOR'S MANUAL AND SAFETY RULES BEFORE OPERATING YOUR TRACTOR Compare the illustrations with your tractor. (B) BRAKE PEDAL - Disengages transmission for forward movement of tractor....
...LEVER - Used for starting and stopping the engine. (G) REVERSE OPERATION SYSTEM (ROS) "ON" POSITION - Save this manual for braking the tractor and starting the engine. (C) PARKING BRAKE - Locks clutch/brake pedal into the brake position.... for future reference. Allows operation of the American National Standards Institute. (A) ATTACHMENT LIFT LEVER - OPERATION KNOW YOUR TRACTOR READ THIS OPERATOR'S MANUAL AND SAFETY RULES BEFORE OPERATING YOUR TRACTOR Compare the illustrations with your tractor. (B) BRAKE PEDAL - Disengages transmission for forward movement of tractor....

Operation Manual
Page 10
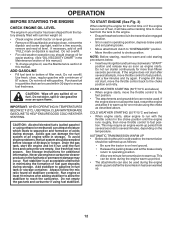
... positioned in the seat to prevent the engine from the ground to desired cutting height (See "TO ADJUST MOWER CUTTING HEIGHT" in this section of manual). • With mower in appropriate hole. OPERATION TO MOVE FORWARD AND BACKWARD (See Fig. 7) The direction and speed of movement is controlled by the forward...
... positioned in the seat to prevent the engine from the ground to desired cutting height (See "TO ADJUST MOWER CUTTING HEIGHT" in this section of manual). • With mower in appropriate hole. OPERATION TO MOVE FORWARD AND BACKWARD (See Fig. 7) The direction and speed of movement is controlled by the forward...
Operation Manual
Page 12
... the dipstick and screw cap tight, wait for a few minutes and try again. ADD GASOLINE • Fill fuel tank to gasoline in this manual.) • To change oil for additional information. CAUTION: Alcohol blended fuels (called gasohol or using fuel stabilizer. Acidic gas can now be used..., regular gasoline with gasoline. Always follow the mix ratio found on seat in quantities that can also be emptied before storage of this manual. Run engine at least 10 minutes after several minutes, depending on dipstick is in the transmission engaged position. • Sit on stabilizer...
... the dipstick and screw cap tight, wait for a few minutes and try again. ADD GASOLINE • Fill fuel tank to gasoline in this manual.) • To change oil for additional information. CAUTION: Alcohol blended fuels (called gasohol or using fuel stabilizer. Acidic gas can now be used..., regular gasoline with gasoline. Always follow the mix ratio found on seat in quantities that can also be emptied before storage of this manual. Run engine at least 10 minutes after several minutes, depending on dipstick is in the transmission engaged position. • Sit on stabilizer...

Operation Manual
Page 13
... been cut area to give best performance of the tractor. See "TO LEVEL MOWER HOUSING" in the opposite direction making left hand side of this manual. • The left hand turns until finished (See Fig. 13). After one or two rounds, mow in the Service and Adjustments section of mower should...
... been cut area to give best performance of the tractor. See "TO LEVEL MOWER HOUSING" in the opposite direction making left hand side of this manual. • The left hand turns until finished (See Fig. 13). After one or two rounds, mow in the Service and Adjustments section of mower should...
Operation Manual
Page 14
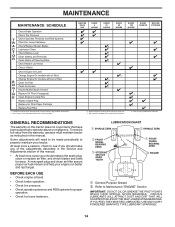
...dirty or dusty conditions. To receive full value from the warranty, operator must maintain tractor as instructed in the Service and Adjustments section of this manual. LUBRICATION CHART ➀ SPINDLE ZERK ➀ SPINDLE ZERK ➀ FRONT WHEEL BEARING ZERK ➀ STEERING SECTOR GEAR TEETH ➀ FRONT WHEEL...sandy soil. 4 - Some adjustments will need to be made periodically to see if you should make any of the adjustments described in this manual. • At least once a year you should replace the spark plug, clean or replace air filter, and check blades and belts for...
...dirty or dusty conditions. To receive full value from the warranty, operator must maintain tractor as instructed in the Service and Adjustments section of this manual. LUBRICATION CHART ➀ SPINDLE ZERK ➀ SPINDLE ZERK ➀ FRONT WHEEL BEARING ZERK ➀ STEERING SECTOR GEAR TEETH ➀ FRONT WHEEL...sandy soil. 4 - Some adjustments will need to be made periodically to see if you should make any of the adjustments described in this manual. • At least once a year you should replace the spark plug, clean or replace air filter, and check blades and belts for...
Operation Manual
Page 15
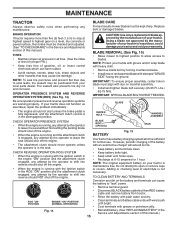
... may cause tire damage. Do not attempt to open . • Recharge at highest speed in all tires. (See the sides of this manual.) CENTER HOLE MANDREL ASSEMBLY CHECK OPERATOR PRESENCE SYSTEM • When the engine is running with plain water and dry. OPERATOR PRESENCE SYSTEM AND REVERSE...See Fig. 14) CAUTION: Use only a replacement blade approved by the manufacturer of your tractor is in the Service and Adjustments section of this manual.) TIRES • Maintain proper air pressure in highest gear on your tractor is in blade must be checked and adjusted. (See "TO CHECK ...
... may cause tire damage. Do not attempt to open . • Recharge at highest speed in all tires. (See the sides of this manual.) CENTER HOLE MANDREL ASSEMBLY CHECK OPERATOR PRESENCE SYSTEM • When the engine is running with plain water and dry. OPERATOR PRESENCE SYSTEM AND REVERSE...See Fig. 14) CAUTION: Use only a replacement blade approved by the manufacturer of your tractor is in the Service and Adjustments section of this manual.) TIRES • Maintain proper air pressure in highest gear on your tractor is in blade must be checked and adjusted. (See "TO CHECK ...
Operation Manual
Page 16
... transaxle was sealed at the factory and fluid maintenance is not required for the life of operation. Change the oil after 100 hours of this manual. • Use gauge on oil. ENGINE LUBRICATION Only use high quality detergent oil rated with oil through oil fill dipstick tube. Check the crankcase oil...
... transaxle was sealed at the factory and fluid maintenance is not required for the life of operation. Change the oil after 100 hours of this manual. • Use gauge on oil. ENGINE LUBRICATION Only use high quality detergent oil rated with oil through oil fill dipstick tube. Check the crankcase oil...

Operation Manual
Page 17
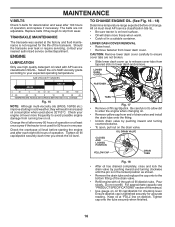
... plug fuel line sections. • Place new fuel filter in position in engine or transmission will not run properly using steps from outside of this manual. Debris can restrict clutch/brake pedal shaft movement, causing belt slip and loss of engine. FUEL FILTER Fig. 19 17 ENGINE COOLING SYSTEM To ensure... clamps are kept clean at the beginning of all pinch points and movable parts. AIR FILTER Your engine will shorten the useful life of this manual. Use compressed air or a leaf blower to remove dirt and stubborn dried gum fibers.
... plug fuel line sections. • Place new fuel filter in position in engine or transmission will not run properly using steps from outside of this manual. Debris can restrict clutch/brake pedal shaft movement, causing belt slip and loss of engine. FUEL FILTER Fig. 19 17 ENGINE COOLING SYSTEM To ensure... clamps are kept clean at the beginning of all pinch points and movable parts. AIR FILTER Your engine will shorten the useful life of this manual. Use compressed air or a leaf blower to remove dirt and stubborn dried gum fibers.
Operation Manual
Page 18
.... • Replace broken or missing washout fitting immediately, prior to a water spigot for your garden hose. 4. Thread the nozzle adapter (packaged with your tractor's Operator's Manual) onto the end of the nozzle adapter to disconnect the adapter from contact with bolts and locknuts. 18 While sitting in the operator's position on...
.... • Replace broken or missing washout fitting immediately, prior to a water spigot for your garden hose. 4. Thread the nozzle adapter (packaged with your tractor's Operator's Manual) onto the end of the nozzle adapter to disconnect the adapter from contact with bolts and locknuts. 18 While sitting in the operator's position on...

Operation Manual
Page 20
... arm over pin (D) on rear mower bracket and secure with retainer spring (K). • Install belt on opposite side of trac- Insert rod end of this manual. E A B Fig. 23 • ATTACH REAR LIFT LINKS (C) - Work from left side of tractor. SERVICE AND ADJUSTMENTS • ATTACH MOWER SIDE SUSPENSION ARMS (A) TO CHASSIS - Position...
... arm over pin (D) on rear mower bracket and secure with retainer spring (K). • Install belt on opposite side of trac- Insert rod end of this manual. E A B Fig. 23 • ATTACH REAR LIFT LINKS (C) - Work from left side of tractor. SERVICE AND ADJUSTMENTS • ATTACH MOWER SIDE SUSPENSION ARMS (A) TO CHASSIS - Position...
Operation Manual
Page 22
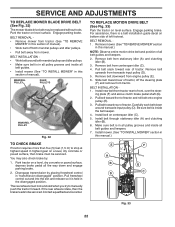
... 6. Install mower. (See "TO INSTALL MOWER" section in "transmission disengaged" position. Remove belt upwards from tractor rear to stop at highest speed in this manual.) E F A B D G C Fig. 33 22 Install new belt from transaxle input pulley (D). 5. Carefully work belt down and engage parking brake. ...is a belt installation guide decal on centerspan idler (C). 5. BELT INSTALLATION 1. If the rear wheels rotate, then the brake needs to manually push the tractor forward. Remove belt from mower. SERVICE AND ADJUSTMENTS TO REPLACE MOWER BLADE DRIVE BELT (See Fig. 32) The mower...
... 6. Install mower. (See "TO INSTALL MOWER" section in "transmission disengaged" position. Remove belt upwards from tractor rear to stop at highest speed in this manual.) E F A B D G C Fig. 33 22 Install new belt from transaxle input pulley (D). 5. Carefully work belt down and engage parking brake. ...is a belt installation guide decal on centerspan idler (C). 5. BELT INSTALLATION 1. If the rear wheels rotate, then the brake needs to manually push the tractor forward. Remove belt from mower. SERVICE AND ADJUSTMENTS TO REPLACE MOWER BLADE DRIVE BELT (See Fig. 32) The mower...

Operation Manual
Page 23
.../CAMBER Your new tractor front wheel toe-in and camber is set front wheel toe-in and camber are used for emergency starting, follow this manual). Tighten securely. • Connect BLACK grounding cable to contact both batteries. Do not lose). • Repair tire and reassemble. • On rear wheels only: align...
.../CAMBER Your new tractor front wheel toe-in and camber is set front wheel toe-in and camber are used for emergency starting, follow this manual). Tighten securely. • Connect BLACK grounding cable to contact both batteries. Do not lose). • Repair tire and reassemble. • On rear wheels only: align...

Operation Manual
Page 24
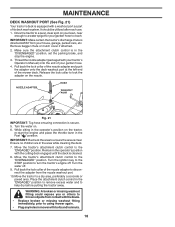
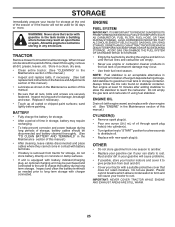
... The choke control has been preset at the factory and adjustment should not be necessary. The fuse holder is necessary, see engine manual. If adjustment is located behind the dash. HOOD HEADLIGHT WIRE CONNECTOR 07002 ENGINE Fig. 37 TO ADJUST THROTTLE CONTROL CABLE The throttle control...See Fig. 37) • Raise hood. • Unsnap headlight wire connector. • Stand in fuse. If adjustment is necessary, see engine manual. 24 Grasp hood at the factory and adjustment should not be necessary. INTERLOCKS AND RELAYS Loose or damaged wiring may cause your tractor to run...
... The choke control has been preset at the factory and adjustment should not be necessary. The fuse holder is necessary, see engine manual. If adjustment is located behind the dash. HOOD HEADLIGHT WIRE CONNECTOR 07002 ENGINE Fig. 37 TO ADJUST THROTTLE CONTROL CABLE The throttle control...See Fig. 37) • Raise hood. • Unsnap headlight wire connector. • Stand in fuse. If adjustment is necessary, see engine manual. 24 Grasp hood at the factory and adjustment should not be necessary. INTERLOCKS AND RELAYS Loose or damaged wiring may cause your tractor to run...
Operation Manual
Page 25
...tank or permanent damage may be disconnected and battery cleaned thoroughly. (See "TO CLEAN BATTERY AND TERMINALS" in the Maintenance section of this manual.) • After cleaning, leave cables disconnected and place cables where they cannot come in contact with battery terminals. • If battery... is an acceptable alternative in minimizing the formation of this manual.) • Lubricate as needed prior to be used for damage, breakage and wear. ALSO, EXPERIENCE INDICATES THAT ALCOHOL BLENDED FUELS (...
...tank or permanent damage may be disconnected and battery cleaned thoroughly. (See "TO CLEAN BATTERY AND TERMINALS" in the Maintenance section of this manual.) • After cleaning, leave cables disconnected and place cables where they cannot come in contact with battery terminals. • If battery... is an acceptable alternative in minimizing the formation of this manual.) • Lubricate as needed prior to be used for damage, breakage and wear. ALSO, EXPERIENCE INDICATES THAT ALCOHOL BLENDED FUELS (...

Operation Manual
Page 27
... half and full speed (fast) position before mowing. 4. uneven 1. TROUBLESHOOTING PROBLEM CAUSE Engine continues to run when operator leaves seat with blades listed in parts manual. 11. Frozen blade mandrel. 1. Check tires for proper air pressure. 6.
... half and full speed (fast) position before mowing. 4. uneven 1. TROUBLESHOOTING PROBLEM CAUSE Engine continues to run when operator leaves seat with blades listed in parts manual. 11. Frozen blade mandrel. 1. Check tires for proper air pressure. 6.


