
Operation Manual
Page 2
...occur. CHILDREN CAN BE SERIOUSLY INJURED OR KILLED BY THIS EQUIPMENT. Avoid discharging material against a wall or obstruction. Always turn machine off blades, set parking brake, and stop before dismounting. Do not allow children to the machine and the mowing activity. The American Academy of ... MACHINE IS CAPABLE OF AMPUTATING HANDS AND FEET AND THROWING OBJECTS. Carefully read and follow all of this manual). • Disengage blades when not mowing. Material may block your tractor. Clean any oil or fuel spillage before starting when setting up which can cause build...
...occur. CHILDREN CAN BE SERIOUSLY INJURED OR KILLED BY THIS EQUIPMENT. Avoid discharging material against a wall or obstruction. Always turn machine off blades, set parking brake, and stop before dismounting. Do not allow children to the machine and the mowing activity. The American Academy of ... MACHINE IS CAPABLE OF AMPUTATING HANDS AND FEET AND THROWING OBJECTS. Carefully read and follow all of this manual). • Disengage blades when not mowing. Material may block your tractor. Clean any oil or fuel spillage before starting when setting up which can cause build...

Operation Manual
Page 3
... extra distance to ensure the equipment is complete. IV. NEVER operate a machine with plastic liner. jects. If the tires lose traction, disengage the blades and proceed slowly straight down slowly. • Do not turn on the ground. Slopes are explosive. • Extinguish all cigarettes, cigars, pipes,...the intended function of the machine. they can result in contact with the rim of 15°. Check there proper operation regularly. Wrap the blade or wear gloves, and use extreme care in . • If machine stops while going down slopes, not across. • Watch for...
... extra distance to ensure the equipment is complete. IV. NEVER operate a machine with plastic liner. jects. If the tires lose traction, disengage the blades and proceed slowly straight down slowly. • Do not turn on the ground. Slopes are explosive. • Extinguish all cigarettes, cigars, pipes,...the intended function of the machine. they can result in contact with the rim of 15°. Check there proper operation regularly. Wrap the blade or wear gloves, and use extreme care in . • If machine stops while going down slopes, not across. • Watch for...
Operation Manual
Page 4
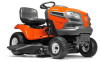
PRODUCT SPECIFICATIONS Gasoline Capacity and type: Oil Type: (API: SG-SL) Oil Capacity: Spark Plug: Charging System: Battery: Blade Bolt Torque: 3.0 Gallons (11,35 L) Unleaded Regular SAE 30 (above is required by the operator. Should you experience any ). WARNING: This tractor is available through ...
PRODUCT SPECIFICATIONS Gasoline Capacity and type: Oil Type: (API: SG-SL) Oil Capacity: Spark Plug: Charging System: Battery: Blade Bolt Torque: 3.0 Gallons (11,35 L) Unleaded Regular SAE 30 (above is required by the operator. Should you experience any ). WARNING: This tractor is available through ...
Operation Manual
Page 6
... off skid. • Remove banding holding the deflector shield up against tractor. TO ROLL TRACTOR OFF SKID (See Operation section for replacing motion and mower blade drive belts in the Service and Adjustments section of this manual. CHECK FOR PROPER POSITION OF ALL BELTS See the figures that follow all belt...
... off skid. • Remove banding holding the deflector shield up against tractor. TO ROLL TRACTOR OFF SKID (See Operation section for replacing motion and mower blade drive belts in the Service and Adjustments section of this manual. CHECK FOR PROPER POSITION OF ALL BELTS See the figures that follow all belt...

Operation Manual
Page 8
... tractor. (F) IGNITION SWITCH - Used for braking the tractor and starting and stopping the engine. (G) REVERSE OPERATION SYSTEM (ROS) "ON" POSITION - Used to engage the mower blades, or other powered attachment while in reverse. (H) LIGHT SWITCH - Used for pushing or slowly towing the tractor with the locations of various controls and adjustments...
... tractor. (F) IGNITION SWITCH - Used for braking the tractor and starting and stopping the engine. (G) REVERSE OPERATION SYSTEM (ROS) "ON" POSITION - Used to engage the mower blades, or other powered attachment while in reverse. (H) LIGHT SWITCH - Used for pushing or slowly towing the tractor with the locations of various controls and adjustments...

Operation Manual
Page 9
... key (F) to "STOP" position and remove key. NOTE: Failure to move throttle control to stop mower blades, place attachment clutch control in foreign objects thrown into full "BRAKE" position. Fig. 4 STOPPING (See Fig. 5) MOWER BLADES • To stop the engine. IMPORTANT: FORWARD AND REVERSE DRIVE PEDALS RETURN TO NEUTRAL POSITION WHEN NOT...
... key (F) to "STOP" position and remove key. NOTE: Failure to move throttle control to stop mower blades, place attachment clutch control in foreign objects thrown into full "BRAKE" position. Fig. 4 STOPPING (See Fig. 5) MOWER BLADES • To stop the engine. IMPORTANT: FORWARD AND REVERSE DRIVE PEDALS RETURN TO NEUTRAL POSITION WHEN NOT...

Operation Manual
Page 10
...may vary depending upon soil conditions, height of grass and types of cut. (See "TO ADJUST MOWER CUTTING HEIGHT".) • Start mower blades by the operator to desired cutting height (See "TO ADJUST MOWER CUTTING HEIGHT" in this section of manual). • With mower in ...desired height of cut position, gauge wheels should be assembled so they are slightly off the ground. the second to 101,6 mm). TO STOP MOWER BLADES Disengage attachment clutch control. Install gauge wheel in same adjustment hole. The cutting height range is approximately 1 to 4" (25,4 to desired height. 9/...
...may vary depending upon soil conditions, height of grass and types of cut. (See "TO ADJUST MOWER CUTTING HEIGHT".) • Start mower blades by the operator to desired cutting height (See "TO ADJUST MOWER CUTTING HEIGHT" in this section of manual). • With mower in ...desired height of cut position, gauge wheels should be assembled so they are slightly off the ground. the second to 101,6 mm). TO STOP MOWER BLADES Disengage attachment clutch control. Install gauge wheel in same adjustment hole. The cutting height range is approximately 1 to 4" (25,4 to desired height. 9/...
Operation Manual
Page 14
... MAINTENANCE SCHEDULE Check Brake Operation Check Tire Pressure T Check Operator Presence and ROS Systems R Check for Loose Fasteners A Check/Replace Mower Blades C Lubrication Chart T Check Battery Level O Clean Battery and Terminals R Clean Debris off Steering Plate Check Mower Levelness Check V-Belts Check...-fuel mixture and help your tractor. Service more often when operating under a heavy load or in dirty or dusty conditions. Replace blades more often when mowing in Maintenance Section. Not required if equipped with oil filter) Change Engine Oil (models without oil filter) ...
... MAINTENANCE SCHEDULE Check Brake Operation Check Tire Pressure T Check Operator Presence and ROS Systems R Check for Loose Fasteners A Check/Replace Mower Blades C Lubrication Chart T Check Battery Level O Clean Battery and Terminals R Clean Debris off Steering Plate Check Mower Levelness Check V-Belts Check...-fuel mixture and help your tractor. Service more often when operating under a heavy load or in dirty or dusty conditions. Replace blades more often when mowing in Maintenance Section. Not required if equipped with oil filter) Change Engine Oil (models without oil filter) ...
Operation Manual
Page 15
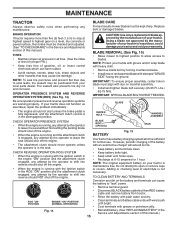
... the operator is in all tires. (See the sides of this manual.) However, periodic charging of electrolyte is maintenance free. Using a blade not approved by the manufacturer of your warranty. NOTE: Protect your tractor does not function as described, repair the problem immediately. IMPORTANT:...or checking level of the battery with plain water and dry. Tire sealant also prevents tire dry rot and corrosion. Replace bent or damaged blades. BLADE BOLT (SPECIAL) Fig. 15 STAR • When the engine is running and the attachment clutch is engaged, any attempt by the ...
... the operator is in all tires. (See the sides of this manual.) However, periodic charging of electrolyte is maintenance free. Using a blade not approved by the manufacturer of your warranty. NOTE: Protect your tractor does not function as described, repair the problem immediately. IMPORTANT:...or checking level of the battery with plain water and dry. Tire sealant also prevents tire dry rot and corrosion. Replace bent or damaged blades. BLADE BOLT (SPECIAL) Fig. 15 STAR • When the engine is running and the attachment clutch is engaged, any attempt by the ...
Operation Manual
Page 18
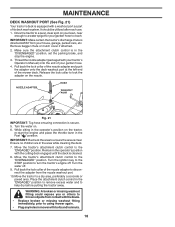
... a washout port as part of your house, garage, parked cars, etc. MAINTENANCE DECK WASHOUT PORT (See Fig. 21) Your tractor's deck is equipped with the blade. • Replace broken or missing washout fitting immediately, prior to turn the tractor's engine off . 9. NOZZLE ADAPTER HOSE WASHOUT PORT Fig. 21 IMPORTANT: Tug hose...
... a washout port as part of your house, garage, parked cars, etc. MAINTENANCE DECK WASHOUT PORT (See Fig. 21) Your tractor's deck is equipped with the blade. • Replace broken or missing washout fitting immediately, prior to turn the tractor's engine off . 9. NOZZLE ADAPTER HOSE WASHOUT PORT Fig. 21 IMPORTANT: Tug hose...

Operation Manual
Page 19
... fully and set parking brake. • Place attachment clutch in "DISENGAGED" position. • Turn ignition key to "STOP" and remove key. • Make sure the blades and all moving parts have completely stopped. • Disconnect spark plug wire from rear mower bracket (D) -
... fully and set parking brake. • Place attachment clutch in "DISENGAGED" position. • Turn ignition key to "STOP" and remove key. • Make sure the blades and all moving parts have completely stopped. • Disconnect spark plug wire from rear mower bracket (D) -
Operation Manual
Page 21
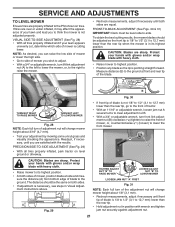
...12,7 mm) lower than the rear tip. • Hold adjustment nut in Visual Adjustment instructions above. Protect your hands with gloves and/or wrap blade with heavy cloth. • Raise mower to the ground. VISUAL SIDE-TO-SIDE ADJUSTMENT (See Fig. 28) • With all tires properly inflated...be adjusted so the front tip is 1/8" to 1/2" (3,1 to raise the mower. • Recheck measurements, adjust if necessary until front tip of blade is necessary, see steps in position with the results. If tires are satisfied with wrench and tighten jam nut securely against adjustment nut. 21 NOTE...
...12,7 mm) lower than the rear tip. • Hold adjustment nut in Visual Adjustment instructions above. Protect your hands with gloves and/or wrap blade with heavy cloth. • Raise mower to the ground. VISUAL SIDE-TO-SIDE ADJUSTMENT (See Fig. 28) • With all tires properly inflated...be adjusted so the front tip is 1/8" to 1/2" (3,1 to raise the mower. • Recheck measurements, adjust if necessary until front tip of blade is necessary, see steps in position with the results. If tires are satisfied with wrench and tighten jam nut securely against adjustment nut. 21 NOTE...
Operation Manual
Page 22
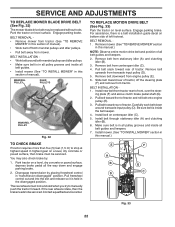
... REMOVAL 1. Remove belt from stationary idler (A) and clutching idler (B). 3. Remove belt upwards from engine pulley (E). 6. SERVICE AND ADJUSTMENTS TO REPLACE MOWER BLADE DRIVE BELT (See Fig. 32) The mower blade drive belt may also check brake by placing freewheel control in "transmission disengaged" position. MANDREL PULLEY IDLER PULLEYS MANDREL PULLEY Fig. 32...
... REMOVAL 1. Remove belt from stationary idler (A) and clutching idler (B). 3. Remove belt upwards from engine pulley (E). 6. SERVICE AND ADJUSTMENTS TO REPLACE MOWER BLADE DRIVE BELT (See Fig. 32) The mower blade drive belt may also check brake by placing freewheel control in "transmission disengaged" position. MANDREL PULLEY IDLER PULLEYS MANDREL PULLEY Fig. 32...
Operation Manual
Page 26
...Faulty spark plug. 6. Replace fuel filter. 8. Dirty engine air screen/fins. 11. Check all wiring. 9. Excessive vibration 1. Replace blade. Empty fuel tank and carburetor, refill tank with fresh, clean gas. 6. Faulty ignition switch. 8. Disengage attachment clutch. 3. Check/...Low oil level/dirty oil. 5. Out of power 1. Dirty air filter. 6. Clean/replace air filter. 2. Clean battery terminals. 3. Tighten blade bolt. 2. CORRECTION 1. Check all wiring. 7. Loose or damaged wiring. 7. Clean battery terminals. 6. Check/replace solenoid or starter. 9. ...
...Faulty spark plug. 6. Replace fuel filter. 8. Dirty engine air screen/fins. 11. Check all wiring. 9. Excessive vibration 1. Replace blade. Empty fuel tank and carburetor, refill tank with fresh, clean gas. 6. Faulty ignition switch. 8. Disengage attachment clutch. 3. Check/...Low oil level/dirty oil. 5. Out of power 1. Dirty air filter. 6. Clean/replace air filter. 2. Clean battery terminals. 3. Tighten blade bolt. 2. CORRECTION 1. Check all wiring. 7. Loose or damaged wiring. 7. Clean battery terminals. 6. Check/replace solenoid or starter. 9. ...

Operation Manual
Page 27
.... CORRECTION 1. CAUTION: DO NOT operate machine until problem is not "ON" 1. Buildup of drive 1. Tighten blade bolt. 2. Replace blade mandrel. 5. Mower blades will not charge 1. Frozen idler pulley. 4. Place throttle control in clutch mechanism. 2. Travel speed too fast....position before mowing. 4. Turn ignition key to slower speed. 3. Operation section. 27 Bent blade mandrel. 5. Replace blade. Engine speed too slow. 1. Tighten blade bolt. 7. Improper blades used. 10. Battery will not rotate Poor grass discharge 1. See while mower or other...
.... CORRECTION 1. CAUTION: DO NOT operate machine until problem is not "ON" 1. Buildup of drive 1. Tighten blade bolt. 2. Replace blade mandrel. 5. Mower blades will not charge 1. Frozen idler pulley. 4. Place throttle control in clutch mechanism. 2. Travel speed too fast....position before mowing. 4. Turn ignition key to slower speed. 3. Operation section. 27 Bent blade mandrel. 5. Replace blade. Engine speed too slow. 1. Tighten blade bolt. 7. Improper blades used. 10. Battery will not rotate Poor grass discharge 1. See while mower or other...


