
Parts Catalog
Page 18
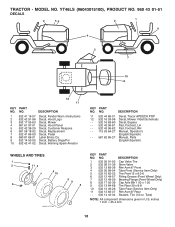
TRACTOR - YT46LS (96043015100), PRODUCT NO. 960 43 01-51 DECALS 2 56 2 1 9 4 3 7 10 8 12 11 KEY PART NO. DESCRIPTION 1 532 41 16-57 Decal, Fender Warn./Instructions 2 532 ... 69-60 Decal, Bypass - - 532 43 96-81 Pad, Footrest, LH - - 532 43 96-82 Pad, Footrest, RH - - 115 53 64-27 Manual, Operator's (English/Spanish) - - 581 62 85-27 Manual, Parts (English/Spanish) WHEELS AND TIRES 1 2 11 3 4 7 10 6 wheel_art_1-tex 5 9 8 KEY NO. 1 2 3 4 5 6 7 8 9 10 11 - - Tube) NOTE: All component dimensions given in...
TRACTOR - YT46LS (96043015100), PRODUCT NO. 960 43 01-51 DECALS 2 56 2 1 9 4 3 7 10 8 12 11 KEY PART NO. DESCRIPTION 1 532 41 16-57 Decal, Fender Warn./Instructions 2 532 ... 69-60 Decal, Bypass - - 532 43 96-81 Pad, Footrest, LH - - 532 43 96-82 Pad, Footrest, RH - - 115 53 64-27 Manual, Operator's (English/Spanish) - - 581 62 85-27 Manual, Parts (English/Spanish) WHEELS AND TIRES 1 2 11 3 4 7 10 6 wheel_art_1-tex 5 9 8 KEY NO. 1 2 3 4 5 6 7 8 9 10 11 - - Tube) NOTE: All component dimensions given in...

Operation Manual
Page 1
.../French L'utilisation d'essence contenant plus de 10 % d'éthanol annulera la garantie du produit. 115 86 37-24 Rev. 1 Operator's Manual Manuel de L'Opérateur YT46LS Please read the operator's manual carefully and make sure you understand the instructions before using the machine. Gasoline containing up to 10% ethanol (E10) is acceptable...
.../French L'utilisation d'essence contenant plus de 10 % d'éthanol annulera la garantie du produit. 115 86 37-24 Rev. 1 Operator's Manual Manuel de L'Opérateur YT46LS Please read the operator's manual carefully and make sure you understand the instructions before using the machine. Gasoline containing up to 10% ethanol (E10) is acceptable...
Operation Manual
Page 2
... American Academy of Pediatrics recommends that children will remain where you last saw them. • Keep children out of the mowing area and in the manual before operating or storing the machine. Shut off . Clean any oil or fuel spillage before starting when setting up to cause cancer and birth defects...
... American Academy of Pediatrics recommends that children will remain where you last saw them. • Keep children out of the mowing area and in the manual before operating or storing the machine. Shut off . Clean any oil or fuel spillage before starting when setting up to cause cancer and birth defects...
Operation Manual
Page 4
... Unleaded SAE 30 (above is required by the operator. If a spark arrester is used on your product: • Visit our website: www.husqvarna.com • Call Us Toll Free: 1-800-487-5951 TABLE OF CONTENTS SAFETY RULES 2-3 PRODUCT SPECIFICATIONS 4 CUSTOMER RESPONSIBILITIES 4 ASSEMBLY 5-6 OPERATION ...outside mowing. Do not mow in maintaining, caring for your purchase of the California Public Resources Code). In the state of this manual. • Wear proper Personal Protective Equipment (PPE) while operating this tractor. It has been designed, engineered and manufactured to ...
... Unleaded SAE 30 (above is required by the operator. If a spark arrester is used on your product: • Visit our website: www.husqvarna.com • Call Us Toll Free: 1-800-487-5951 TABLE OF CONTENTS SAFETY RULES 2-3 PRODUCT SPECIFICATIONS 4 CUSTOMER RESPONSIBILITIES 4 ASSEMBLY 5-6 OPERATION ...outside mowing. Do not mow in maintaining, caring for your purchase of the California Public Resources Code). In the state of this manual. • Wear proper Personal Protective Equipment (PPE) while operating this tractor. It has been designed, engineered and manufactured to ...
Operation Manual
Page 5
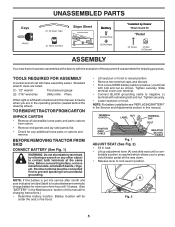
... 2) • Sit in seat. • Lift up adjustment lever (A) and slide seat until a comfortable position is mentioned in this manual, it means when you to press clutch/brake pedal all accessible loose parts and parts cartons from accidental grounding. Before connecting battery, remove... nut. Battery location will make assembly easier. NOTE: For battery installation see "REPLACING BATTERY" in the Service and Adjustments section in this manual. A Fig. 2 5 Tighten securely. Standard wrench sizes are in position. BEFORE REMOVING TRACTOR FROM SKID CONNECT BATTERY (See Fig. 1)...
... 2) • Sit in seat. • Lift up adjustment lever (A) and slide seat until a comfortable position is mentioned in this manual, it means when you to press clutch/brake pedal all accessible loose parts and parts cartons from accidental grounding. Before connecting battery, remove... nut. Battery location will make assembly easier. NOTE: For battery installation see "REPLACING BATTERY" in the Service and Adjustments section in this manual. A Fig. 2 5 Tighten securely. Standard wrench sizes are in position. BEFORE REMOVING TRACTOR FROM SKID CONNECT BATTERY (See Fig. 1)...
Operation Manual
Page 6
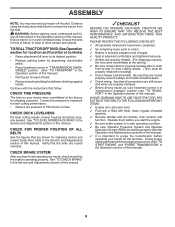
...Continue with all belt keepers. ✓ Check wiring. See "TO LEVEL MOWER HOUSING" in the Service and Adjustments section of this manual. ✓CHECKLIST BEFORE YOU OPERATE YOUR NEW TRACTOR, WE WISH TO ENSURE THAT YOU RECEIVE THE BEST PERFORMANCE AND SATISFACTION FROM THIS ...by depressing clutch/brake pedal. • Place freewheel control in "TRANSMISSION DISENGAGED" position. (See "TO TRANSPORT" in the Operation section of this manual). 6 WHILE LEARNING HOW TO USE YOUR TRACTOR, PAY EXTRA ATTENTION TO THE FOLLOWING IMPORTANT ITEMS: ✓ Engine oil is important to see ...
...Continue with all belt keepers. ✓ Check wiring. See "TO LEVEL MOWER HOUSING" in the Service and Adjustments section of this manual. ✓CHECKLIST BEFORE YOU OPERATE YOUR NEW TRACTOR, WE WISH TO ENSURE THAT YOU RECEIVE THE BEST PERFORMANCE AND SATISFACTION FROM THIS ...by depressing clutch/brake pedal. • Place freewheel control in "TRANSMISSION DISENGAGED" position. (See "TO TRANSPORT" in the Operation section of this manual). 6 WHILE LEARNING HOW TO USE YOUR TRACTOR, PAY EXTRA ATTENTION TO THE FOLLOWING IMPORTANT ITEMS: ✓ Engine oil is important to see ...
Operation Manual
Page 8
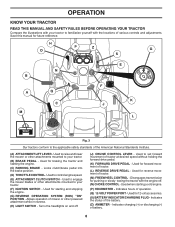
... your tractor. (B) BRAKE PEDAL - Indicates the status of tractor. (L) REVERSE DRIVE PEDAL - Allows operation of tractor. (M) FREEWHEEL CONTROL - Save this manual for 12 volt accessories. (S) BATTERY INDICATOR/CHARGING PLUG - Turns the headlights on and off . (N) CHOKE CONTROL - Used for forward movement of the ...mounted to control engine speed. (E) ATTACHMENT CLUTCH SWITCH - Indicates hours of battery. 8 OPERATION KNOW YOUR TRACTOR READ THIS MANUAL AND SAFETY RULES BEFORE OPERATING YOUR TRACTOR Compare the illustrations with your tractor. (F) IGNITION SWITCH - Used to raise and ...
... your tractor. (B) BRAKE PEDAL - Indicates the status of tractor. (L) REVERSE DRIVE PEDAL - Allows operation of tractor. (M) FREEWHEEL CONTROL - Save this manual for 12 volt accessories. (S) BATTERY INDICATOR/CHARGING PLUG - Turns the headlights on and off . (N) CHOKE CONTROL - Used for forward movement of the ...mounted to control engine speed. (E) ATTACHMENT CLUTCH SWITCH - Indicates hours of battery. 8 OPERATION KNOW YOUR TRACTOR READ THIS MANUAL AND SAFETY RULES BEFORE OPERATING YOUR TRACTOR Compare the illustrations with your tractor. (F) IGNITION SWITCH - Used to raise and ...
Operation Manual
Page 10
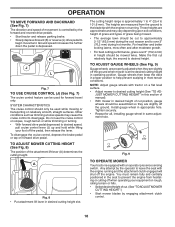
... ADJUST GAUGE WHEELS (See Fig. 9) Gauge wheels are properly adjusted when they are slightly off the ground. JUST MOWER CUTTING HEIGHT" in this section of manual). • With mower in appropriate hole. Install gauge wheel in desired height of cut . (See "TO ADJUST MOWER CUTTING HEIGHT".) • Start mower blades by...
... ADJUST GAUGE WHEELS (See Fig. 9) Gauge wheels are properly adjusted when they are slightly off the ground. JUST MOWER CUTTING HEIGHT" in this section of manual). • With mower in appropriate hole. Install gauge wheel in desired height of cut . (See "TO ADJUST MOWER CUTTING HEIGHT".) • Start mower blades by...
Operation Manual
Page 12
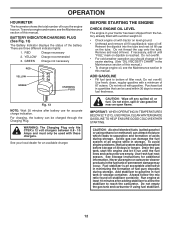
...in your local dealer for easier starting. (See "OIL VISCOSITY CHART" in the Maintenance section of this manual.) • To change engine oil, see the Maintenance section of this manual. Acidic gas can damage the fuel system of an engine while in quantities that can attract moisture which ...not necessary RED YELLOW GREEN CHARGING PLUG Fig. 13 NOTE: Wait 30 minutes after adding stabilizer to allow the stabilizer to gasoline in this manual. Remove and read oil level. Run engine at least 10 minutes after battery use for additional information. Do not empty the gas tank...
...in your local dealer for easier starting. (See "OIL VISCOSITY CHART" in the Maintenance section of this manual.) • To change engine oil, see the Maintenance section of this manual. Acidic gas can damage the fuel system of an engine while in quantities that can attract moisture which ...not necessary RED YELLOW GREEN CHARGING PLUG Fig. 13 NOTE: Wait 30 minutes after adding stabilizer to allow the stabilizer to gasoline in this manual. Remove and read oil level. Run engine at least 10 minutes after battery use for additional information. Do not empty the gas tank...
Operation Manual
Page 13
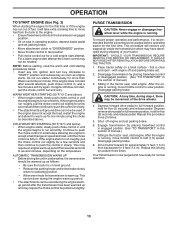
...throttle control to slow position. Disengage transmission by placing freewheel control in engaged position. (See "TO TRANSPORT" in this section of manual.) 3. After the engine is recommended that is running . Depress reverse drive pedal to full reverse position, hold for five (5)...Repeat this procedure three (3) times. 5. that the transmission be used during step 4, there may require the choke control be movement of manual.) 7. Sitting in the tractor seat, start attempt. Disengage parking brake. 8. This procedure will take extra cranking time to move throttle...
...throttle control to slow position. Disengage transmission by placing freewheel control in engaged position. (See "TO TRANSPORT" in this section of manual.) 3. After the engine is recommended that is running . Depress reverse drive pedal to full reverse position, hold for five (5)...Repeat this procedure three (3) times. 5. that the transmission be used during step 4, there may require the choke control be movement of manual.) 7. Sitting in the tractor seat, start attempt. Disengage parking brake. 8. This procedure will take extra cranking time to move throttle...
Operation Manual
Page 14
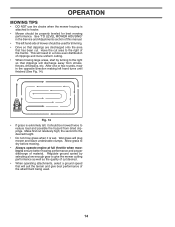
After one or two rounds, mow in the opposite direction making left hand side of this manual. • The left hand turns until finished (See Fig. 14). See "TO LEVEL MOWER HOUSING" in a more even distribution of clippings and more uniform cutting. &#...
After one or two rounds, mow in the opposite direction making left hand side of this manual. • The left hand turns until finished (See Fig. 14). See "TO LEVEL MOWER HOUSING" in a more even distribution of clippings and more uniform cutting. &#...
Operation Manual
Page 15
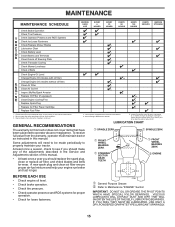
... warranty, operator must maintain tractor as instructed in high ambient temperatures 2 - Change more often when operating under a heavy load or in this manual. GENERAL RECOMMENDATIONS The warranty on this manual. • At least once a year you should replace the spark plug, clean or replace air filter, and check blades and belts for...
... warranty, operator must maintain tractor as instructed in high ambient temperatures 2 - Change more often when operating under a heavy load or in this manual. GENERAL RECOMMENDATIONS The warranty on this manual. • At least once a year you should replace the spark plug, clean or replace air filter, and check blades and belts for...

Operation Manual
Page 16
.... (See the sides of tires for proper PSI.) • Keep tires free of electrolyte is sufficient for 1 hour. However, periodic charging of this manual.) TIRES • Maintain proper air pressure in blade must be checked and adjusted. (See "TO CHECK BRAKE" in the Service and Adjustments section of... this manual.) Do not attempt to leave the seat should shut off the engine. • The attachment clutch should shut off the engine. • Keep...
.... (See the sides of tires for proper PSI.) • Keep tires free of electrolyte is sufficient for 1 hour. However, periodic charging of this manual.) TIRES • Maintain proper air pressure in blade must be checked and adjusted. (See "TO CHECK BRAKE" in the Service and Adjustments section of... this manual.) Do not attempt to leave the seat should shut off the engine. • The attachment clutch should shut off the engine. • Keep...
Operation Manual
Page 17
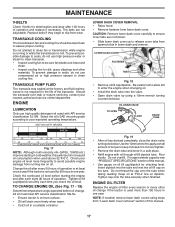
...and fluid maintenance is used for 50 hours in cold weather, they begin to release cover tabs from "Lower dash cover removal" section of this manual. 17 Replace belts if they will drain more freely when warm. • Catch oil in a safe place. • Refill engine with ... oil change if the tractor is not required for dirt, grass clippings and other materials. For approximate capacity see "PRODUCT SPECIFICATIONS" section of this manual. • Use gauge on oil. Do not overfill. Do not attempt to keep it closed. MAINTENANCE V-BELTS Check V-belts for checking level....
...and fluid maintenance is used for 50 hours in cold weather, they begin to release cover tabs from "Lower dash cover removal" section of this manual. 17 Replace belts if they will drain more freely when warm. • Catch oil in a safe place. • Refill engine with ... oil change if the tractor is not required for dirt, grass clippings and other materials. For approximate capacity see "PRODUCT SPECIFICATIONS" section of this manual. • Use gauge on oil. Do not overfill. Do not attempt to keep it closed. MAINTENANCE V-BELTS Check V-belts for checking level....
Operation Manual
Page 18
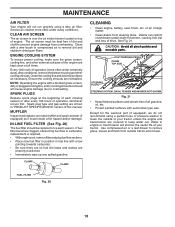
..., etc. • Protect painted surfaces with a wire brush or compressed air to prevent engine damage from steering plate. Water in "PRODUCT SPECIFICATIONS" section of this manual. MAINTENANCE AIR FILTER Your engine will shorten the useful life of your tractor unless the engine and transmission are kept clean at the beginning of...
..., etc. • Protect painted surfaces with a wire brush or compressed air to prevent engine damage from steering plate. Water in "PRODUCT SPECIFICATIONS" section of this manual. MAINTENANCE AIR FILTER Your engine will shorten the useful life of your tractor unless the engine and transmission are kept clean at the beginning of...
Operation Manual
Page 19
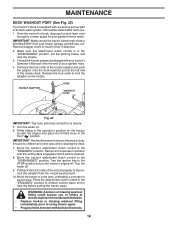
... any holes in the area while cleaning the deck. 7. MAINTENANCE DECK WASHOUT PORT (See Fig. 22) Your tractor's deck is equipped with your tractor's Operator's Manual) onto the end of your garden hose. 4. IMPORTANT: Recheck the area to the "ENGAGED" position.
... any holes in the area while cleaning the deck. 7. MAINTENANCE DECK WASHOUT PORT (See Fig. 22) Your tractor's deck is equipped with your tractor's Operator's Manual) onto the end of your garden hose. 4. IMPORTANT: Recheck the area to the "ENGAGED" position.
Operation Manual
Page 21
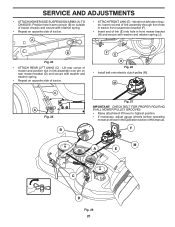
B Fig. 24 • ATTACH REAR LIFT LINKS (C) - Work from left side of this manual. J F E H Fig. 26 • Install belt onto electric clutch pulley (M). M C D Fig. 25 B Fig. 27 IMPORTANT: CHECK BELT FOR PROPER ROUTING IN ALL MOWER PULLEY GROOVES. • ...
B Fig. 24 • ATTACH REAR LIFT LINKS (C) - Work from left side of this manual. J F E H Fig. 26 • Install belt onto electric clutch pulley (M). M C D Fig. 25 B Fig. 27 IMPORTANT: CHECK BELT FOR PROPER ROUTING IN ALL MOWER PULLEY GROOVES. • ...
Operation Manual
Page 23
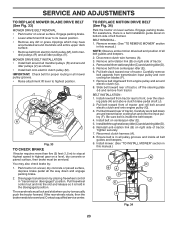
...33 TO CHECK BRAKE If tractor requires more than five (5) feet (1,5 m) to highest position. Remove mower. (See "TO REMOVE MOWER" section in this manual.) B A C D E G H J F Fig. 34 23 Pull belt toward rear of tractor, off the steering plate (H) and remove from tractor rear to...8226; Park tractor on right side of tractor. Pull freewheel control out and into the slot and release so it is in this manual.) NOTE: Observe entire motion drive belt and position of tractor and roll belt around all belt guides and keepers. 2. Removebeltfromstationaryidler(C)andclutchingidler...
...33 TO CHECK BRAKE If tractor requires more than five (5) feet (1,5 m) to highest position. Remove mower. (See "TO REMOVE MOWER" section in this manual.) B A C D E G H J F Fig. 34 23 Pull belt toward rear of tractor, off the steering plate (H) and remove from tractor rear to...8226; Park tractor on right side of tractor. Pull freewheel control out and into the slot and release so it is in this manual.) NOTE: Observe entire motion drive belt and position of tractor and roll belt around all belt guides and keepers. 2. Removebeltfromstationaryidler(C)andclutchingidler...
Operation Manual
Page 24
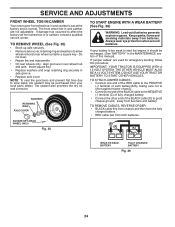
... cable (D) to affect the factory set at the factory and is set front wheel toe-in and camber are used for emergency starting, follow this manual). WASHERS RETAINING RING AXLE COVER SQUARE KEY (REAR WHEEL ONLY) Fig. 35 TO START ENGINE WITH A WEAK BATTERY (See Fig. 36) WARNING: Lead-acid batteries...
... cable (D) to affect the factory set at the factory and is set front wheel toe-in and camber are used for emergency starting, follow this manual). WASHERS RETAINING RING AXLE COVER SQUARE KEY (REAR WHEEL ONLY) Fig. 35 TO START ENGINE WITH A WEAK BATTERY (See Fig. 36) WARNING: Lead-acid batteries...
Operation Manual
Page 25
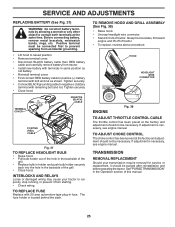
...ASSEMBLY (See Fig. 38) • Raise hood. • Unsnap headlight wire connector. • Stand in the Operation section of this manual. 25 HOOD HEADLIGHT WIRE CONNECTOR 07002 ENGINE Fig. 38 TO ADJUST THROTTLE CONTROL CABLE The throttle control has been preset at the factory and ...adjustment should be necessary. See "PURGE TRANSMISSION" in front of tractor. The fuse holder is necessary, see engine manual. SERVICE AND ADJUSTMENTS REPLACING BATTERY (See Fig. 37) WARNING: Do not short battery terminals by allowing a wrench or any other object ...
...ASSEMBLY (See Fig. 38) • Raise hood. • Unsnap headlight wire connector. • Stand in the Operation section of this manual. 25 HOOD HEADLIGHT WIRE CONNECTOR 07002 ENGINE Fig. 38 TO ADJUST THROTTLE CONTROL CABLE The throttle control has been preset at the factory and ...adjustment should be necessary. See "PURGE TRANSMISSION" in front of tractor. The fuse holder is necessary, see engine manual. SERVICE AND ADJUSTMENTS REPLACING BATTERY (See Fig. 37) WARNING: Do not short battery terminals by allowing a wrench or any other object ...


