

Owners Manual
Page 2
... without the entire grass catcher, discharge chute, or other safety devices in gear when going down before operating. Always turn off engine and wait for all times. • Only allow the mower deck to lose control of a load, while on a slope, is dangerous. Clean any oil or fuel spillage before storage. Operation on all movement on it, do not mow it cannot contact spark plug. If you...
... without the entire grass catcher, discharge chute, or other safety devices in gear when going down before operating. Always turn off engine and wait for all times. • Only allow the mower deck to lose control of a load, while on a slope, is dangerous. Clean any oil or fuel spillage before storage. Operation on all movement on it, do not mow it cannot contact spark plug. If you...

Owners Manual
Page 3
... equipment with the blades shut off . Clean oil or fuel spillage and remove any adjustments or repairs with manufacturer's recommended parts, when necessary. • Mower blades are often attracted to stop and inspect the machine. Adjust and service as required. • Maintain or replace safety and instruction labels, as on a water • heater or other than the operator. • Be alert and turn machine off and...
... equipment with the blades shut off . Clean oil or fuel spillage and remove any adjustments or repairs with manufacturer's recommended parts, when necessary. • Mower blades are often attracted to stop and inspect the machine. Adjust and service as required. • Maintain or replace safety and instruction labels, as on a water • heater or other than the operator. • Be alert and turn machine off and...
Owners Manual
Page 4
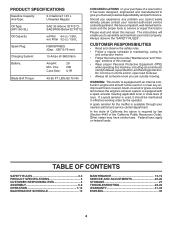
... using your nearest authorized service center/department. Please read and retain this manual. In the state of this manual. • Wear proper Personal Protective Equipment (PPE) while operating this tractor. If a spark arrester is required by the operator. TABLE OF CONTENTS SAFETY RULES 2-3 PRODUCT SPECIFICATIONS 4 CUSTOMER RESPONSIBILITIES 4 ASSEMBLY 5-6 OPERATION 7-14 MAINTENANCE SCHEDULE 15 MAINTENANCE 15-19 SERVICE AND ADJUSTMENTS 20-26 STORAGE 27 TROUBLESHOOTING 28-29 WARRANTY...
... using your nearest authorized service center/department. Please read and retain this manual. In the state of this manual. • Wear proper Personal Protective Equipment (PPE) while operating this tractor. If a spark arrester is required by the operator. TABLE OF CONTENTS SAFETY RULES 2-3 PRODUCT SPECIFICATIONS 4 CUSTOMER RESPONSIBILITIES 4 ASSEMBLY 5-6 OPERATION 7-14 MAINTENANCE SCHEDULE 15 MAINTENANCE 15-19 SERVICE AND ADJUSTMENTS 20-26 STORAGE 27 TROUBLESHOOTING 28-29 WARRANTY...
Owners Manual
Page 5
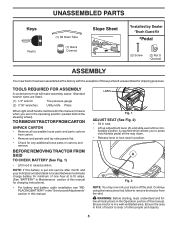
... exception of those parts left hand is clear of other people and objects. 5 UNASSEMBLED PARTS Keys Key(s) (1) Oil Drain Tube (1) Quick Connect Slope Sheet *Installed by Dealer *Brush Guard Kit *Pedal (2) Screw (2) Nut U -Channel ASSEMBLY Your new tractor has been assembled at 6-10 amps. (See "BATTERY" in Maintenance section of this manual. TOOLS REQUIRED FOR ASSEMBLY A socket wrench set will make assembly easier. Standard wrench sizes are in the operating position (seated behind the...
... exception of those parts left hand is clear of other people and objects. 5 UNASSEMBLED PARTS Keys Key(s) (1) Oil Drain Tube (1) Quick Connect Slope Sheet *Installed by Dealer *Brush Guard Kit *Pedal (2) Screw (2) Nut U -Channel ASSEMBLY Your new tractor has been assembled at 6-10 amps. (See "BATTERY" in Maintenance section of this manual. TOOLS REQUIRED FOR ASSEMBLY A socket wrench set will make assembly easier. Standard wrench sizes are in the operating position (seated behind the...

Owners Manual
Page 6
... of controls) • Raise attachment lift lever to its highest position. • Release parking brake by depressing clutch/brake pedal. • Place freewheel control in "TRANSMISSION DISENGAGED" position. (See "TO TRANSPORT" in the Operation section of this manual). Continue with all connections are still secure and wires are shown for replacing motion and mower blade drive belts in the Service and Adjustments section of this manual. ✓CHECKLIST BEFORE YOU OPERATE YOUR NEW TRACTOR...
... of controls) • Raise attachment lift lever to its highest position. • Release parking brake by depressing clutch/brake pedal. • Place freewheel control in "TRANSMISSION DISENGAGED" position. (See "TO TRANSPORT" in the Operation section of this manual). Continue with all connections are still secure and wires are shown for replacing motion and mower blade drive belts in the Service and Adjustments section of this manual. ✓CHECKLIST BEFORE YOU OPERATE YOUR NEW TRACTOR...

Owners Manual
Page 12
... 2. Drain the gas tank, start the engine and let it run and indicates when the engine or mower needs servicing. Always follow the mix ratio found on , 1 second off position five times (1 second on stabilizer container. Use fresh, clean, regular gasoline with gasoline. OPERATION SERVICE REMINDER/HOUR METER Service reminder shows the total number of operation the oil can icon will stay on level ground. • Unthread and remove oil fill cap/dipstick; BEFORE STARTING THE ENGINE CHECK ENGINE OIL LEVEL The engine...
... 2. Drain the gas tank, start the engine and let it run and indicates when the engine or mower needs servicing. Always follow the mix ratio found on , 1 second off position five times (1 second on stabilizer container. Use fresh, clean, regular gasoline with gasoline. OPERATION SERVICE REMINDER/HOUR METER Service reminder shows the total number of operation the oil can icon will stay on level ground. • Unthread and remove oil fill cap/dipstick; BEFORE STARTING THE ENGINE CHECK ENGINE OIL LEVEL The engine...
Owners Manual
Page 13
...: SHOULD YOUR TRANSMISSION REQUIRE REMOVAL FOR SERVICE OR REPLACEMENT, IT SHOULD BE PURGED AFTER REINSTALLATION BEFORE OPERATING THE TRACTOR. 1. off and parking brake set parking brake. • Move attachment clutch to "DISENGAGED" position. • Move throttle control to push the control in this section of manual.) 3. Drive tractor forward for approximately 5 feet (1,5 m) then backwards for five (5) seconds and release pedal. If the engine starts to run roughly, pull the choke control out slightly for...
...: SHOULD YOUR TRANSMISSION REQUIRE REMOVAL FOR SERVICE OR REPLACEMENT, IT SHOULD BE PURGED AFTER REINSTALLATION BEFORE OPERATING THE TRACTOR. 1. off and parking brake set parking brake. • Move attachment clutch to "DISENGAGED" position. • Move throttle control to push the control in this section of manual.) 3. Drive tractor forward for approximately 5 feet (1,5 m) then backwards for five (5) seconds and release pedal. If the engine starts to run roughly, pull the choke control out slightly for...

Owners Manual
Page 15
... Mower Levelness Check V-Belts Check Engine Oil Level Change Engine Oil (models with maintenance-free battery. 5 - IMPORTANT: DO NOT OIL OR GREASE THE PIVOT POINTS WHICH HAVE SPECIAL NYLON BEARINGS. GENERAL RECOMMENDATIONS The warranty on this manual. • At least once a year you should replace the spark plug, clean or replace air filter, and check blades and belts for wear. Service more often when mowing in Maintenance Section. A new spark plug and clean air filter ensure proper air-fuel mixture and help your tractor. MAINTENANCE MAINTENANCE SCHEDULE BEFORE EACH USE...
... Mower Levelness Check V-Belts Check Engine Oil Level Change Engine Oil (models with maintenance-free battery. 5 - IMPORTANT: DO NOT OIL OR GREASE THE PIVOT POINTS WHICH HAVE SPECIAL NYLON BEARINGS. GENERAL RECOMMENDATIONS The warranty on this manual. • At least once a year you should replace the spark plug, clean or replace air filter, and check blades and belts for wear. Service more often when mowing in Maintenance Section. A new spark plug and clean air filter ensure proper air-fuel mixture and help your tractor. MAINTENANCE MAINTENANCE SCHEDULE BEFORE EACH USE...

Owners Manual
Page 16
... MANDREL ASSEMBLY CHECK OPERATOR PRESENCE SYSTEM • When the engine is running and the attachment clutch is not necessary. However, periodic charging of electrolyte is engaged, any attempt by the operator to blades. Do not attempt to "leak" power. • Remove terminal guard. • Disconnect BLACK battery cable first then RED battery cable and remove battery from your tractor. ROS "ON" POSITION ENGINE "ON" POSITION (NORMAL OPERATING) • Clean terminals and battery cable ends with wire brush until...
... MANDREL ASSEMBLY CHECK OPERATOR PRESENCE SYSTEM • When the engine is running and the attachment clutch is not necessary. However, periodic charging of electrolyte is engaged, any attempt by the operator to blades. Do not attempt to "leak" power. • Remove terminal guard. • Disconnect BLACK battery cable first then RED battery cable and remove battery from your tractor. ROS "ON" POSITION ENGINE "ON" POSITION (NORMAL OPERATING) • Clean terminals and battery cable ends with wire brush until...

Owners Manual
Page 17
... clean to clean cooling fins. OIL DRAIN VALVE TO OPEN TO CLOSE 02794 DRAIN TUBE Fig. 19 • After oil has drained completely, close the drain valve turning clockwise. Do not thread the cap onto the tube when taking reading. MAINTENANCE V-BELTS Check V-belts for deterioration and wear after 100 hours of the transaxle. Use the 10mm wrench to enter the engine when changing oil. • Install the drain tube onto the valve...
... clean to clean cooling fins. OIL DRAIN VALVE TO OPEN TO CLOSE 02794 DRAIN TUBE Fig. 19 • After oil has drained completely, close the drain valve turning clockwise. Do not thread the cap onto the tube when taking reading. MAINTENANCE V-BELTS Check V-belts for deterioration and wear after 100 hours of the transaxle. Use the 10mm wrench to enter the engine when changing oil. • Install the drain tube onto the valve...

Owners Manual
Page 18
... transmission are covered to keep water out. NOTE: If needed, remove lower dash covers using a garden hose or pressure washer to clean the outside tractor and mower. 18 ENGINE COOLING SYSTEM To ensure proper cooling, make sure the grass screen, cooling fins, and other external surfaces of engine. SPARK PLUGS Replace spark plugs at all pinch points and movable parts. CAUTION: Avoid all times. Water in one year. Use compressed air or a leaf blower to remove grass...
... transmission are covered to keep water out. NOTE: If needed, remove lower dash covers using a garden hose or pressure washer to clean the outside tractor and mower. 18 ENGINE COOLING SYSTEM To ensure proper cooling, make sure the grass screen, cooling fins, and other external surfaces of engine. SPARK PLUGS Replace spark plugs at all pinch points and movable parts. CAUTION: Avoid all times. Water in one year. Use compressed air or a leaf blower to remove grass...

Owners Manual
Page 19
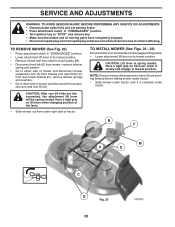
..."DISENGAGED" position, set the parking brake, and stop the engine. 3. Pull back the lock collar of the mower deck. Make sure the attachment clutch control is in the operator's position with the cutting deck engaged until the deck is cleaned. 8. Move the tractor's attachment clutch control to the "ENGAGED" position. Move the tractor's attachment clutch control to the "DISENGAGED" position. Place the attachment clutch control in the Fast " " position. Remove bagger chute or mulch cover if attached. 2. MAINTENANCE DECK WASHOUT PORT (See Fig. 22) Your tractor's deck is...
..."DISENGAGED" position, set the parking brake, and stop the engine. 3. Pull back the lock collar of the mower deck. Make sure the attachment clutch control is in the operator's position with the cutting deck engaged until the deck is cleaned. 8. Move the tractor's attachment clutch control to the "ENGAGED" position. Move the tractor's attachment clutch control to the "DISENGAGED" position. Place the attachment clutch control in the Fast " " position. Remove bagger chute or mulch cover if attached. 2. MAINTENANCE DECK WASHOUT PORT (See Fig. 22) Your tractor's deck is...
Owners Manual
Page 20
... on level surface and engage parking brake. • Lower attachment lift lever to either side of tractor. SERVICE AND ADJUSTMENTS WARNING: TO AVOID SERIOUS INJURY, BEFORE PERFORMING ANY SERVICE OR ADJUSTMENTS: • Depress brake pedal fully and set parking brake. • Place attachment clutch in "DISENGAGED" position. • Turn ignition key to "STOP" and remove key. • Make sure the blades and all moving parts have completely stopped. • Disconnect spark plug wire...
... on level surface and engage parking brake. • Lower attachment lift lever to either side of tractor. SERVICE AND ADJUSTMENTS WARNING: TO AVOID SERIOUS INJURY, BEFORE PERFORMING ANY SERVICE OR ADJUSTMENTS: • Depress brake pedal fully and set parking brake. • Place attachment clutch in "DISENGAGED" position. • Turn ignition key to "STOP" and remove key. • Make sure the blades and all moving parts have completely stopped. • Disconnect spark plug wire...

Owners Manual
Page 21
... rear corner of mower and position slot in arm over pin on opposite side of tractor. A • ATTACH FRONT LINK (E) - M C D Fig. 25 Fig. 27 IMPORTANT: CHECK BELT FOR PROPER ROUTING IN ALL MOWER PULLEY GROOVES. • Raise attachment lift lever to highest position. • If necessary, adjust gauge wheels before operating mower as shown in front mower bracket (H) and secure with washer and retainer spring. F J H Fig. 26 • Install belt onto electric clutch pulley (M).
... rear corner of mower and position slot in arm over pin on opposite side of tractor. A • ATTACH FRONT LINK (E) - M C D Fig. 25 Fig. 27 IMPORTANT: CHECK BELT FOR PROPER ROUTING IN ALL MOWER PULLEY GROOVES. • Raise attachment lift lever to highest position. • If necessary, adjust gauge wheels before operating mower as shown in front mower bracket (H) and secure with washer and retainer spring. F J H Fig. 26 • Install belt onto electric clutch pulley (M).

Owners Manual
Page 23
... (B) on level surface. Install new belt from engine pulley and around transmission cooling fan and onto the input pulley (F). Disconnect clutch wire harness (A). 3. Remove belt downward from tractor rear to front, over cooling fan blades (F). 7. SERVICE AND ADJUSTMENTS TO REPLACE MOWER BLADE DRIVE BELT (See Fig. 33) MOWER DRIVE BELT REMOVAL • Park tractor on a level, dry concrete or paved surface, then brake must lock and skid when you try to manually push the tractor forward. BELT REMOVAL - 1. Pull belt slack toward rear of tractor. Pull belt toward...
... (B) on level surface. Install new belt from engine pulley and around transmission cooling fan and onto the input pulley (F). Disconnect clutch wire harness (A). 3. Remove belt downward from tractor rear to front, over cooling fan blades (F). 7. SERVICE AND ADJUSTMENTS TO REPLACE MOWER BLADE DRIVE BELT (See Fig. 33) MOWER DRIVE BELT REMOVAL • Park tractor on a level, dry concrete or paved surface, then brake must lock and skid when you try to manually push the tractor forward. BELT REMOVAL - 1. Pull belt slack toward rear of tractor. Pull belt toward...

Owners Manual
Page 26
...) of oil through spark plug hole(s) into cylinder(s). • Turn ignition key to "START" position for a few seconds to distribute oil. • Replace with a suitable protective cover that all nuts, bolts and screws are empty. • Never use plastic. Rust and/or dirt in the Maintenance section of this manual.) • Lubricate as needed prior to long term storage with charger connected. Do not use engine or carburetor cleaner products...
...) of oil through spark plug hole(s) into cylinder(s). • Turn ignition key to "START" position for a few seconds to distribute oil. • Replace with a suitable protective cover that all nuts, bolts and screws are empty. • Never use plastic. Rust and/or dirt in the Maintenance section of this manual.) • Lubricate as needed prior to long term storage with charger connected. Do not use engine or carburetor cleaner products...
Owners Manual
Page 27
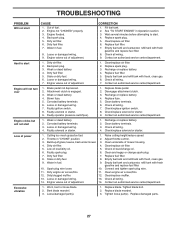
... starter. 9. Throttle in fuel. 8. Engine not "CHOKED" properly. 3. Check all wiring. 7. Stale or dirty fuel. 8. Engine valves out of adjustment. 14. Worn, bent or loose blade. 2. Wait several minutes before attempting to start 1. Replace spark plug. 3. Attachment clutch is engaged. 3. Loose or damaged wiring. 7. Depress brake pedal. 2. Check oil level/change spark plug. 7. Empty fuel tank and carburetor, refill tank with fresh gasoline and replace fuel filter. 8. Clean engine air screen/fins. 12. Replace blade mandrel. 3. Dirty air filter. 6. Water in "CHOKE" position...
... starter. 9. Throttle in fuel. 8. Engine not "CHOKED" properly. 3. Check all wiring. 7. Stale or dirty fuel. 8. Engine valves out of adjustment. 14. Worn, bent or loose blade. 2. Wait several minutes before attempting to start 1. Replace spark plug. 3. Attachment clutch is engaged. 3. Loose or damaged wiring. 7. Depress brake pedal. 2. Check oil level/change spark plug. 7. Empty fuel tank and carburetor, refill tank with fresh gasoline and replace fuel filter. 8. Clean engine air screen/fins. 12. Replace blade mandrel. 3. Dirty air filter. 6. Water in "CHOKE" position...

Owners Manual
Page 28
... turning engine "OFF" 1. Low/uneven tire air pressure. 5. Replace with attachment clutch engaged 1. Replace battery. 2. Loss of mower housing. 4. Worn, bent or loose blade. 6. Loose or damaged wiring. 5. Replace motion drive belt. 4. Poor cut - Replace regulator. 4. CORRECTION 1. Remove obstruction. 2. Wet grass. 3. Allow grass to dry before mowing. 4. Clean underside of drive 1. Check/replace light switch. 4. Poor cable connections. 3. Clogged mower deck vent holes from buildup 11. Tighten blade bolt. 7. Purge transmission. 5. See "TO REMOVE WHEEL...
... turning engine "OFF" 1. Low/uneven tire air pressure. 5. Replace with attachment clutch engaged 1. Replace battery. 2. Loss of mower housing. 4. Worn, bent or loose blade. 6. Loose or damaged wiring. 5. Replace motion drive belt. 4. Poor cut - Replace regulator. 4. CORRECTION 1. Remove obstruction. 2. Wet grass. 3. Allow grass to dry before mowing. 4. Clean underside of drive 1. Check/replace light switch. 4. Poor cable connections. 3. Clogged mower deck vent holes from buildup 11. Tighten blade bolt. 7. Purge transmission. 5. See "TO REMOVE WHEEL...

Owners Manual
Page 31
...authorized to handle warranty adjustments or repairs on engines manufactured by Briggs & Stratton, Honda, Kawasaki, or Kohler (Husqvarna does handle warranty issues on transmissions or transaxles. This Limited Warranty does not cover general maintenance parts and items ("Expendable Parts"), including without limitation spark plugs, bulbs, filters, lubricants, starter cords, belts, blades, and blade adapters. (d) Emissions Control Components. Damages resulting from the date of and replaces any obligations under this Limited Warranty. THIS LIMITED WARRANTY GIVES YOU SPECIFIC LEGAL...
...authorized to handle warranty adjustments or repairs on engines manufactured by Briggs & Stratton, Honda, Kawasaki, or Kohler (Husqvarna does handle warranty issues on transmissions or transaxles. This Limited Warranty does not cover general maintenance parts and items ("Expendable Parts"), including without limitation spark plugs, bulbs, filters, lubricants, starter cords, belts, blades, and blade adapters. (d) Emissions Control Components. Damages resulting from the date of and replaces any obligations under this Limited Warranty. THIS LIMITED WARRANTY GIVES YOU SPECIFIC LEGAL...

Owners Manual
Page 32
... purchase rests solely with you do not meet Engine manufacturer's specifications; (g) Use of gasohol (fuel containing ethanol), containing methanol (fuel containing wood alcohol). NOTE: Gasohol (fuel containing ethanol), which is listed in the Husqvarna oil label and covered in your operator's manual; (l) Operation of the unit with improperly installed/removed or modified cutting shields, guards, or safety devices; (m) Any removed/damaged air filter, excessive dirt, abrasives, salt water, moisture, corrosion...
... purchase rests solely with you do not meet Engine manufacturer's specifications; (g) Use of gasohol (fuel containing ethanol), containing methanol (fuel containing wood alcohol). NOTE: Gasohol (fuel containing ethanol), which is listed in the Husqvarna oil label and covered in your operator's manual; (l) Operation of the unit with improperly installed/removed or modified cutting shields, guards, or safety devices; (m) Any removed/damaged air filter, excessive dirt, abrasives, salt water, moisture, corrosion...


