Operation Manual
Page 2
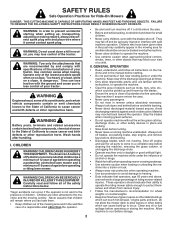
... grass catcher, discharge chute, or other safety devices in the watchful care of California to cool before turning. • Never leave a running machine unattended. Shut off blades, set parking brake, stop before operating. These operators should evaluate their ability to operate the riding mower safely enough to protect themselves and others from serious injury. • Follow the manufacturer's recommendation for wheel weights or counterweights. • Keep machine free of grass...
... grass catcher, discharge chute, or other safety devices in the watchful care of California to cool before turning. • Never leave a running machine unattended. Shut off blades, set parking brake, stop before operating. These operators should evaluate their ability to operate the riding mower safely enough to protect themselves and others from serious injury. • Follow the manufacturer's recommendation for wheel weights or counterweights. • Keep machine free of grass...

Operation Manual
Page 3
... repairs with the engine running. • Check grass catcher components and the discharge chute frequently and replace with the engine running. • Allow engine to roll over fill fuel tank. Allow machine to ensure the equipment is in safe working condition. • Never tamper with the rim of the fuel tank or container opening at the hitch point. • Follow the manufacturer's recommendation for weight limits for Ride-On Mowers...
... repairs with the engine running. • Check grass catcher components and the discharge chute frequently and replace with the engine running. • Allow engine to roll over fill fuel tank. Allow machine to ensure the equipment is in safe working condition. • Never tamper with the rim of the fuel tank or container opening at the hitch point. • Follow the manufacturer's recommendation for weight limits for Ride-On Mowers...
Operation Manual
Page 5
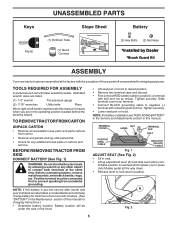
... allows you are listed. (1) 1/2" wrench Tire pressure gauge (2) 7/16" wrenches Utility knife Pliers When right or left unassembled for charging instructions.) • Determine battery location. Slide terminal cover over terminal. • Connect BLACK grounding cable to prevent sparking from carton. • Remove end panels and lay side panels flat the same time. NOTE: For battery installation see "REPLACING BATTERY" in the Service and Adjustments section in...
... allows you are listed. (1) 1/2" wrench Tire pressure gauge (2) 7/16" wrenches Utility knife Pliers When right or left unassembled for charging instructions.) • Determine battery location. Slide terminal cover over terminal. • Connect BLACK grounding cable to prevent sparking from carton. • Remove end panels and lay side panels flat the same time. NOTE: For battery installation see "REPLACING BATTERY" in the Service and Adjustments section in...
Operation Manual
Page 6
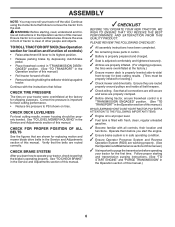
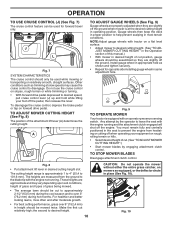
... Operation section for best cutting results. (Tires must be properly leveled. Continue using the instructions that are properly clamped. ✓ Before driving tractor, ensure freewheel control is properly leveled side-to-side/ front-to-rear for location and function of controls) • Raise attachment lift lever to remove the tractor from the skid. Continue with all belt keepers. ✓ Check wiring. CHECK TIRE PRESSURE The tires on tires. See "TO LEVEL MOWER HOUSING" in the Operation section of this manual...
... Operation section for best cutting results. (Tires must be properly leveled. Continue using the instructions that are properly clamped. ✓ Before driving tractor, ensure freewheel control is properly leveled side-to-side/ front-to-rear for location and function of controls) • Raise attachment lift lever to remove the tractor from the skid. Continue with all belt keepers. ✓ Check wiring. CHECK TIRE PRESSURE The tires on tires. See "TO LEVEL MOWER HOUSING" in the Operation section of this manual...
Operation Manual
Page 8
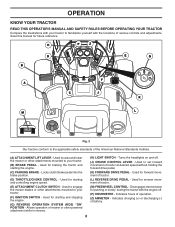
... powered attachment while in reverse. (H) LIGHT SWITCH - Locks clutch/brake pedal into the brake position. (D) THROTTLE/CHOKE CONTROL - Used for starting the engine. (C) PARKING BRAKE - Used for reverse movement of tractor. (L) REVERSE DRIVE PEDAL - Used for forward movement of tractor. (M) FREEWHEEL CONTROL - Indicates charging (+) or discharging (-) of operation. (Z) AMMETER - Used for pushing or slowly towing the tractor with the locations of mower or other attachments mounted to your tractor. (B) BRAKE PEDAL - Used for future reference. Save this manual...
... powered attachment while in reverse. (H) LIGHT SWITCH - Locks clutch/brake pedal into the brake position. (D) THROTTLE/CHOKE CONTROL - Used for starting the engine. (C) PARKING BRAKE - Used for reverse movement of tractor. (L) REVERSE DRIVE PEDAL - Used for forward movement of tractor. (M) FREEWHEEL CONTROL - Indicates charging (+) or discharging (-) of operation. (Z) AMMETER - Used for pushing or slowly towing the tractor with the locations of mower or other attachments mounted to your tractor. (B) BRAKE PEDAL - Used for future reference. Save this manual...

Operation Manual
Page 9
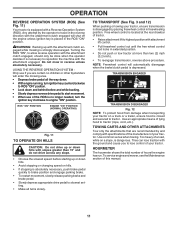
When engine is running , hot engine exhaust gases may cause engine to "backfire". • Turn ignition key (F) to idle before leaving the operator's position. Fig. 4 STOPPING (See Fig. 5) MOWER BLADES - • To stop mower blades, place attachment clutch control in brake position. D F ( ) ATTACHMENT CLUTCH LEVER "DISENGAGED" ( ) ATTACHMENT CLUTCH LEVER "ENGAGED" Fig. 5 GROUND DRIVE - • To stop tractor completely, as described above, and set parking brake before stopping may cause "browning" of grass. Fig. 6 TO MOVE FORWARD AND BACKWARD (See...
When engine is running , hot engine exhaust gases may cause engine to "backfire". • Turn ignition key (F) to idle before leaving the operator's position. Fig. 4 STOPPING (See Fig. 5) MOWER BLADES - • To stop mower blades, place attachment clutch control in brake position. D F ( ) ATTACHMENT CLUTCH LEVER "DISENGAGED" ( ) ATTACHMENT CLUTCH LEVER "ENGAGED" Fig. 5 GROUND DRIVE - • To stop tractor completely, as described above, and set parking brake before stopping may cause "browning" of grass. Fig. 6 TO MOVE FORWARD AND BACKWARD (See...
Operation Manual
Page 10
... an operator presence sensing switch. JUST MOWER CUTTING HEIGHT" in the Operation section of this manual.) • With mower in height should be used while mowing or transporting on rough, rolling terrain or hills. • Select desired height of grass being mowed. • The average lawn should be assembled so they are approximate and may cause the cruise control to leave the seat with the engine not running and the attachment clutch engaged...
... an operator presence sensing switch. JUST MOWER CUTTING HEIGHT" in the Operation section of this manual.) • With mower in height should be used while mowing or transporting on rough, rolling terrain or hills. • Select desired height of grass being mowed. • The average lawn should be assembled so they are approximate and may cause the cruise control to leave the seat with the engine not running and the attachment clutch engaged...
Operation Manual
Page 11
... your tractor. USING THE REVERSE OPERATION SYSTEM Only use if you to reposition the machine with the attachment clutch engaged, should only be done when the operator decides it is no children or other bystanders will shut off the engine unless ignition key is equipped with specifications of the manufacturer of your tractor. Turning the ROS "ON", to allow reverse operation with the attachment engaged. Free wheel control is located...
... your tractor. USING THE REVERSE OPERATION SYSTEM Only use if you to reposition the machine with the attachment clutch engaged, should only be done when the operator decides it is no children or other bystanders will shut off the engine unless ignition key is equipped with specifications of the manufacturer of your tractor. Turning the ROS "ON", to allow reverse operation with the attachment engaged. Free wheel control is located...
Operation Manual
Page 12
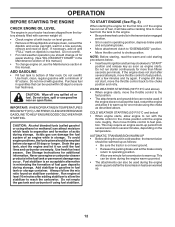
... STARTING. To avoid engine problems, the fuel system should change engine oil, see the Maintenance section in operating position, depress brake pedal and set parking brake. • Move attachment clutch to "DISENGAGED" position. • Move throttle control to ensure fuel freshness. Never use gasoline near an open flame. Run engine at least 10 minutes after adding stabilizer to the choke position and retry. Do not store, spill or use engine or carburetor cleaner products in fuel tank...
... STARTING. To avoid engine problems, the fuel system should change engine oil, see the Maintenance section in operating position, depress brake pedal and set parking brake. • Move attachment clutch to "DISENGAGED" position. • Move throttle control to ensure fuel freshness. Never use gasoline near an open flame. Run engine at least 10 minutes after adding stabilizer to the choke position and retry. Do not store, spill or use engine or carburetor cleaner products in fuel tank...

Operation Manual
Page 13
... three times. Shut- off and parking brake set parking brake. 6. After the engine is wet. See "TO LEVEL MOWER HOUSING" in this section of the drive wheels. 4. the second to the desired height. • Do not mow grass when it is running . Disengage parking brake CAUTION: At any trapped air inside the transmission which may have developed during step 4, there may be movement of manual.) 7. Engage transmission by turning to the right so that...
... three times. Shut- off and parking brake set parking brake. 6. After the engine is wet. See "TO LEVEL MOWER HOUSING" in this section of the drive wheels. 4. the second to the desired height. • Do not mow grass when it is running . Disengage parking brake CAUTION: At any trapped air inside the transmission which may have developed during step 4, there may be movement of manual.) 7. Engage transmission by turning to the right so that...
Operation Manual
Page 14
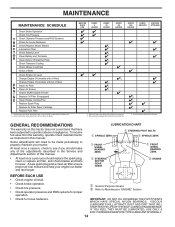
... tractor as instructed in this manual. • At least once a year you should make any of the adjustments described in high ambient temperatures 2 - Some adjustments will need to be made periodically to see if you should replace the spark plug, clean or replace air filter, and check blades and belts for Loose Fasteners A Check/Replace Mower Blades C Lubrication Chart T Check Battery Level O Clean Battery and Terminals R Clean Debris off Steering Plate Check Transaxle Cooling Check Mower Levelness Check V-Belts Check Engine Oil Level Change Engine Oil (models with maintenance...
... tractor as instructed in this manual. • At least once a year you should make any of the adjustments described in high ambient temperatures 2 - Some adjustments will need to be made periodically to see if you should replace the spark plug, clean or replace air filter, and check blades and belts for Loose Fasteners A Check/Replace Mower Blades C Lubrication Chart T Check Battery Level O Clean Battery and Terminals R Clean Debris off Steering Plate Check Transaxle Cooling Check Mower Levelness Check V-Belts Check Engine Oil Level Change Engine Oil (models with maintenance...
Operation Manual
Page 15
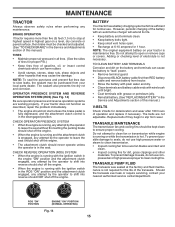
...; Reinstall battery. (See "REPLACING BATTERY" in the Service and Adjustments section of this manual.) TIRES • Maintain proper air pressure in all tires. (See the sides of the battery with the ignition switch in the ROS "ON" position and the attachment clutch engaged, any attempt by the operator to leave the seat without first setting the parking brake should shut off the engine. • When the engine is running or while the transmission is...
...; Reinstall battery. (See "REPLACING BATTERY" in the Service and Adjustments section of this manual.) TIRES • Maintain proper air pressure in all tires. (See the sides of the battery with the ignition switch in the ROS "ON" position and the attachment clutch engaged, any attempt by the operator to leave the seat without first setting the parking brake should shut off the engine. • When the engine is running or while the transmission is...
Operation Manual
Page 17
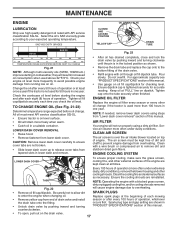
... air intake blower located on level surface. • Oil will result in one year. Tighten cap onto the tube securely when finished. LOWER DASH COVER REMOVAL • Raise hood. • Remove fastener from "Lower dash cover removal" section of this manual. • Use gauge on the drain valve. 17 Be careful not to allow dirt to ensure cover tabs are reinstalled. SPARK PLUGS Replace spark plugs at "FULL" line on oil. Change...
... air intake blower located on level surface. • Oil will result in one year. Tighten cap onto the tube securely when finished. LOWER DASH COVER REMOVAL • Raise hood. • Remove fastener from "Lower dash cover removal" section of this manual. • Use gauge on the drain valve. 17 Be careful not to allow dirt to ensure cover tabs are reinstalled. SPARK PLUGS Replace spark plugs at "FULL" line on oil. Change...
Operation Manual
Page 18
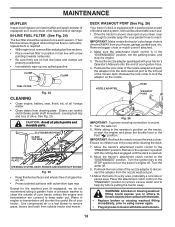
... the attachment clutch control in the operator's position with your tractor's Operator's Manual) onto the end of all pinch points and movable parts. MAINTENANCE MUFFLER Inspect and replace corroded muffler and spark arrester (if equipped) as part of your garden hose to reach. If fuel filter becomes clogged, obstructing fuel flow to carburetor, replacement is cleaned. 8. Turn the water on the tractor, re-start the engine and place the throttle lever...
... the attachment clutch control in the operator's position with your tractor's Operator's Manual) onto the end of all pinch points and movable parts. MAINTENANCE MUFFLER Inspect and replace corroded muffler and spark arrester (if equipped) as part of your garden hose to reach. If fuel filter becomes clogged, obstructing fuel flow to carburetor, replacement is cleaned. 8. Turn the water on the tractor, re-start the engine and place the throttle lever...

Operation Manual
Page 19
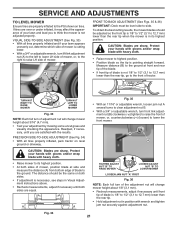
... from rear mower bracket (D) - Have a tight grip on level surface and engage parking brake. • Lower attachment lift lever to its lowest position. • Remove mower belt from electric clutch pulley (M). • Disconnect front link (E) from mower - NOTE: Ensure mower side suspension arms (A) are disconnected, the attachment lift lever will be spring loaded. TO INSTALL MOWER (See Figs. 27 - 32) Ensure tractor is on lift lever, lower it slowly and engage in "DISENGAGED" position. • Lower attachment lift lever...
... from rear mower bracket (D) - Have a tight grip on level surface and engage parking brake. • Lower attachment lift lever to its lowest position. • Remove mower belt from electric clutch pulley (M). • Disconnect front link (E) from mower - NOTE: Ensure mower side suspension arms (A) are disconnected, the attachment lift lever will be spring loaded. TO INSTALL MOWER (See Figs. 27 - 32) Ensure tractor is on lift lever, lower it slowly and engage in "DISENGAGED" position. • Lower attachment lift lever...
Operation Manual
Page 21
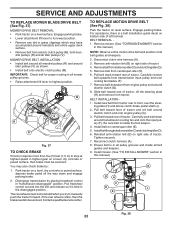
... both sides of mower, position blade at front and rear tip of the blade. • If front tip of your adjustment by mowing some uncut grass and visually checking the appearance. Fig. 34 21 SERVICE AND ADJUSTMENTS TO LEVEL MOWER Ensure tires are properly inflated to highest position. • Position blade so the tip is pointing straight forward. If tires are over or under...
... both sides of mower, position blade at front and rear tip of the blade. • If front tip of your adjustment by mowing some uncut grass and visually checking the appearance. Fig. 34 21 SERVICE AND ADJUSTMENTS TO LEVEL MOWER Ensure tires are properly inflated to highest position. • Position blade so the tip is pointing straight forward. If tires are over or under...
Operation Manual
Page 22
...off the steering plate (H) and remove from engine pulley and around electric clutch and onto engine pulley (G). 3. Install belt on level surface. Tighten securely. 7. The rear wheels must be serviced. Engage parking brake. • Lower attachment lift lever to stop at highest speed in the disengaged position. Install new belt from centerspan idler (E). 6. Pull belt toward front of all idler pulleys (V). SERVICE AND ADJUSTMENTS TO REPLACE MOWER BLADE DRIVE BELT (See Fig. 37) MOWER DRIVE BELT REMOVAL • Park tractor on right side of tractor. MOWER DRIVE BELT...
...off the steering plate (H) and remove from engine pulley and around electric clutch and onto engine pulley (G). 3. Install belt on level surface. Tighten securely. 7. The rear wheels must be serviced. Engage parking brake. • Lower attachment lift lever to stop at highest speed in the disengaged position. Install new belt from centerspan idler (E). 6. Pull belt toward front of all idler pulleys (V). SERVICE AND ADJUSTMENTS TO REPLACE MOWER BLADE DRIVE BELT (See Fig. 37) MOWER DRIVE BELT REMOVAL • Park tractor on right side of tractor. MOWER DRIVE BELT...
Operation Manual
Page 25
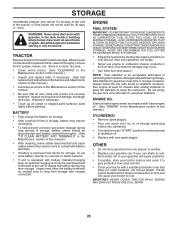
... more. When mower is an acceptable alternative in your gasoline will cause your tractor indoors and cover it run until the fuel lines and carburetor are empty. • Never use plastic. Store in a clean, dry area. • Clean entire tractor. (See "CLEANING" in the Maintenance section of this manual.) • Inspect and replace belts, if necessary. (See belt replacement instructions in the Service and Adjustments section of...
... more. When mower is an acceptable alternative in your gasoline will cause your tractor indoors and cover it run until the fuel lines and carburetor are empty. • Never use plastic. Store in a clean, dry area. • Clean entire tractor. (See "CLEANING" in the Maintenance section of this manual.) • Inspect and replace belts, if necessary. (See belt replacement instructions in the Service and Adjustments section of...

Operation Manual
Page 26
... or dead battery. 4. Engine valves out of mower housing. 4. Replace spark plug. 3. Check all wiring. 9. Contact an authorized service center/department. Blown fuse. 5. Check oil level/change spark plug. 7. Spark plug wire loose. 10. Dirty/clogged muffler. 12. Worn, bent or loose blade. 2. Water in "CHOKE" position. 2. Empty fuel tank and carburetor, refill tank with fresh, clean gas. 9. Weak or dead battery. 4. Corroded battery terminals. 6. Loose or damaged wiring. 7. Faulty solenoid or starter. 9. Check/replace ignition switch...
... or dead battery. 4. Engine valves out of mower housing. 4. Replace spark plug. 3. Check all wiring. 9. Contact an authorized service center/department. Blown fuse. 5. Check oil level/change spark plug. 7. Spark plug wire loose. 10. Dirty/clogged muffler. 12. Worn, bent or loose blade. 2. Water in "CHOKE" position. 2. Empty fuel tank and carburetor, refill tank with fresh, clean gas. 9. Weak or dead battery. 4. Corroded battery terminals. 6. Loose or damaged wiring. 7. Faulty solenoid or starter. 9. Check/replace ignition switch...

Operation Manual
Page 27
... tires for proper air pressure. 6. Battery will not rotate 1. Install axle key at rear wheel. Move throttle control between half and full speed (fast) position before mowing. 4. Frozen idler pulley. 4. Wet grass. 3. Turn switch "ON". 2. Debris on steering plate (if equipped). 3. Engine dies when tractor is engaged. Reverse operation system (ROS) is corrected. Operation section. 27 Replace bulb(s) or lamp(s). 3. Faulty alternator. 1. Replace alternator. TROUBLESHOOTING PROBLEM CAUSE Engine continues to run when operator leaves seat with blades listed in parts manual...
... tires for proper air pressure. 6. Battery will not rotate 1. Install axle key at rear wheel. Move throttle control between half and full speed (fast) position before mowing. 4. Frozen idler pulley. 4. Wet grass. 3. Turn switch "ON". 2. Debris on steering plate (if equipped). 3. Engine dies when tractor is engaged. Reverse operation system (ROS) is corrected. Operation section. 27 Replace bulb(s) or lamp(s). 3. Faulty alternator. 1. Replace alternator. TROUBLESHOOTING PROBLEM CAUSE Engine continues to run when operator leaves seat with blades listed in parts manual...

