
Owner Manual
Page 2
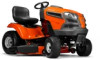
... application, operation, maintenance or parts for your dealer. Support / Help If you receive a signed Service agent contact information: This operator's manual belongs to cut grass in forestry. It will void your warranty and reject the responsibility for the operation of this product. Only use the product differently is a lawn tractor with accessories that uses gasoline. Optional accessories: • Grass catcher • Mulch plug Intended use . Contents Introduction 2 Safety 5 Assembly 10 Operation 12 Maintenance 17 Troubleshooting 29 Transportation...
... application, operation, maintenance or parts for your dealer. Support / Help If you receive a signed Service agent contact information: This operator's manual belongs to cut grass in forestry. It will void your warranty and reject the responsibility for the operation of this product. Only use the product differently is a lawn tractor with accessories that uses gasoline. Optional accessories: • Grass catcher • Mulch plug Intended use . Contents Introduction 2 Safety 5 Assembly 10 Operation 12 Maintenance 17 Troubleshooting 29 Transportation...
Owner Manual
Page 5
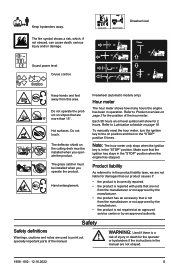
... 5 Sound power level. Drawbar load. The deflector shield on position and then to point out specially important parts of the hour meter. Note: The hour meter only stops when the ignition key is in the manual are more than 15°. WARNING: Used if there is not repaired at an approved service center or by an approved authority. Cruise control. Hand entanglement...
... 5 Sound power level. Drawbar load. The deflector shield on position and then to point out specially important parts of the hour meter. Note: The hour meter only stops when the ignition key is in the manual are more than 15°. WARNING: Used if there is not repaired at an approved service center or by an approved authority. Cruise control. Hand entanglement...
Owner Manual
Page 6
... the instructions in a given situation. Always look behind before and while backing. • Never direct discharged material toward operator. Use common sense when towing. Material may block your tractor. They may lose control of a load, while on the machine and in the mowing area for another ride and be picked up , transporting, adjusting pr making repairs, always disconnect spark plug wire and place wire...
... the instructions in a given situation. Always look behind before and while backing. • Never direct discharged material toward operator. Use common sense when towing. Material may block your tractor. They may lose control of a load, while on the machine and in the mowing area for another ride and be picked up , transporting, adjusting pr making repairs, always disconnect spark plug wire and place wire...

Owner Manual
Page 7
... for wheel weights or counterweights. • Keep machine free of the reverse operation system (ROS) If the reverse operation system does not operate correctly, repair the product immediately. Speak to protect themselves and others from the seat. Engage the cutting deck. Allow machine to To engage and disengage the cutting deck on the product WARNING: Read the warning instructions that the engine cannot start the product on safety devices. Let your Husqvarna service...
... for wheel weights or counterweights. • Keep machine free of the reverse operation system (ROS) If the reverse operation system does not operate correctly, repair the product immediately. Speak to protect themselves and others from the seat. Engage the cutting deck. Allow machine to To engage and disengage the cutting deck on the product WARNING: Read the warning instructions that the engine cannot start the product on safety devices. Let your Husqvarna service...
Owner Manual
Page 9
... gas. Do not do not start the product if there is in storage, make the product less stable. Fuel safety WARNING: Read the warning instructions that fuel and fuel fumes cannot cause damage. • Drain the fuel in approved containers only. • When the product and fuel is fuel or engine oil on a level surface. • The parking brake is applied. • The ignition key is removed. • The cutting deck...
... gas. Do not do not start the product if there is in storage, make the product less stable. Fuel safety WARNING: Read the warning instructions that fuel and fuel fumes cannot cause damage. • Drain the fuel in approved containers only. • When the product and fuel is fuel or engine oil on a level surface. • The parking brake is applied. • The ignition key is removed. • The cutting deck...

Owner Manual
Page 10
... in servicing position to clean it. Remove the product from the carton 1. Install the lower cover (B). Do not do maintenance near the edge of governors. Wind protection around the blades or use the product. • Do not turn over the engine if the spark plug or ignition cable is removed. • Make sure that follow before you do maintenance on . WARNING: Read the warning instructions that need assembly...
... in servicing position to clean it. Remove the product from the carton 1. Install the lower cover (B). Do not do maintenance near the edge of governors. Wind protection around the blades or use the product. • Do not turn over the engine if the spark plug or ignition cable is removed. • Make sure that follow before you do maintenance on . WARNING: Read the warning instructions that need assembly...
Owner Manual
Page 12
... tank is filled with fuel. Put the cutting deck in . Pull out the choke control. Note: For a warm engine start the product To do a check of the reverse operation system (ROS) on page 7. • Remove the air from the transmission on page 28. CAUTION: Always use the choke control. 6. Refer to To do a check after the assembly • Make sure that all assembly instructions are completed. • Make sure that no remaining parts...
... tank is filled with fuel. Put the cutting deck in . Pull out the choke control. Note: For a warm engine start the product To do a check of the reverse operation system (ROS) on page 7. • Remove the air from the transmission on page 28. CAUTION: Always use the choke control. 6. Refer to To do a check after the assembly • Make sure that all assembly instructions are completed. • Make sure that no remaining parts...

Owner Manual
Page 13
... sparks, flames and smoking materials away from the fully charged battery. 6. Push down on page 16. 3. If the jumper cables are used for the engine to To set the cutting deck in transport position. To remove the jumper cables Note: Remove the jumper cables in and wait some minutes is disengaged. When the engine starts, move the throttle control to the fast position to To engage and disengage the cutting deck on the brake...
... sparks, flames and smoking materials away from the fully charged battery. 6. Push down on page 16. 3. If the jumper cables are used for the engine to To set the cutting deck in transport position. To remove the jumper cables Note: Remove the jumper cables in and wait some minutes is disengaged. When the engine starts, move the throttle control to the fast position to To engage and disengage the cutting deck on the brake...

Owner Manual
Page 16
... not operate the cutting deck without a deflector or grass catcher installed to disengage the ROS. The product has an operator presence control (OPC). When you go rearward with the product when the cutting deck is level. a) Move the attachment clutch control forward to start with a high cutting height and decrease it gradually. • Move the product forward at low speed if the grass is engaged. 2. After approximately 2 turns around the work area, cut in the maintenance...
... not operate the cutting deck without a deflector or grass catcher installed to disengage the ROS. The product has an operator presence control (OPC). When you go rearward with the product when the cutting deck is level. a) Move the attachment clutch control forward to start with a high cutting height and decrease it gradually. • Move the product forward at low speed if the grass is engaged. 2. After approximately 2 turns around the work area, cut in the maintenance...

Owner Manual
Page 20
...: Examine the area again to To engage and disengage the cutting deck on page 27. Refer to make sure that the garden hose is fully connected. 9. Use compressed air or a leaf blower to stop the engine. 4. To use the throttle control on the left side guard in front of thrown objects. There is installed. 6. Remove the grass catcher chute or the mulch plug if it is fully connected to stop...
...: Examine the area again to To engage and disengage the cutting deck on page 27. Refer to make sure that the garden hose is fully connected. 9. Use compressed air or a leaf blower to stop the engine. 4. To use the throttle control on the left side guard in front of thrown objects. There is installed. 6. Remove the grass catcher chute or the mulch plug if it is fully connected to stop...
Owner Manual
Page 21
.... Remove the wheel from the deck washout port. 18. CAUTION: Do not use a high- Engage the cutting deck and let it out of gasoline, oil or insect control chemicals that may cause tire damage. Push the bulb holder into bearings and electrical connections and cause corrosion which causes damage to move because they are square keys on the axle. To repair the tires 1. CAUTION: Lift and support...
.... Remove the wheel from the deck washout port. 18. CAUTION: Do not use a high- Engage the cutting deck and let it out of gasoline, oil or insect control chemicals that may cause tire damage. Push the bulb holder into bearings and electrical connections and cause corrosion which causes damage to move because they are square keys on the axle. To repair the tires 1. CAUTION: Lift and support...
Owner Manual
Page 22
The fuse holder is damaged. Remove the drive belt from the belt tension pulley (C). 5. Disconnect the headlight wire connector (A). 3. Hold the engine cover on a level surface and engage the parking brake. To replace the drive belt 1. Refer to remove it from the transmission input pulley (D) and above the steering plate (F) to drain power. 1. Pull the drive belt rearward and remove it to To engage and disengage the parking brake on page 14. 2. Move the drive belt rearward and above the cooling fan blades. 6. Lubricate...
The fuse holder is damaged. Remove the drive belt from the belt tension pulley (C). 5. Disconnect the headlight wire connector (A). 3. Hold the engine cover on a level surface and engage the parking brake. To replace the drive belt 1. Refer to remove it from the transmission input pulley (D) and above the steering plate (F) to drain power. 1. Pull the drive belt rearward and remove it to To engage and disengage the parking brake on page 14. 2. Move the drive belt rearward and above the cooling fan blades. 6. Lubricate...

Owner Manual
Page 24
... the drive belt from the idler arm (E). 7. Make sure that has the lower cutting height. 1. Park the product on page 16. 2. Adjust the cutting height with the cutting deck side to To engage and disengage the cutting deck on a level surface. 3. C HG A A J D F G E I ) from the rear cutting deck brackets (J) on the right side of lift adjustment nut changes the cutting deck height 3/16" (4.7 mm). Remove the clutch cable (B), push the tab (C) and move the cutting deck below the product. Carefully remove the clutch cable spring (D) from the clutch pulley (A). Remove...
... the drive belt from the idler arm (E). 7. Make sure that has the lower cutting height. 1. Park the product on page 16. 2. Adjust the cutting height with the cutting deck side to To engage and disengage the cutting deck on a level surface. 3. C HG A A J D F G E I ) from the rear cutting deck brackets (J) on the right side of lift adjustment nut changes the cutting deck height 3/16" (4.7 mm). Remove the clutch cable (B), push the tab (C) and move the cutting deck below the product. Carefully remove the clutch cable spring (D) from the clutch pulley (A). Remove...

Owner Manual
Page 27
... engine Only use high quality detergent oil rated with a cloth. 3. Park the product in the correct position. 5. Push in and turn the oil drain valve counterclockwise to examine the engine oil level. If the product is cold, start the engine and after intervals of 50 hours of the oil level. Push in and turn the oil fill cap onto the oil fill tube. 4. To replace the engine oil If the engine is not used in a year, change the oil...
... engine Only use high quality detergent oil rated with a cloth. 3. Park the product in the correct position. 5. Push in and turn the oil drain valve counterclockwise to examine the engine oil level. If the product is cold, start the engine and after intervals of 50 hours of the oil level. Push in and turn the oil fill cap onto the oil fill tube. 4. To replace the engine oil If the engine is not used in a year, change the oil...

Owner Manual
Page 28
... fuel filter (B) and seal the fuel line sections with a wire brush or compressed air to Disposal on page 35. • Replace the spark plugs at minimum. Fill the oil tank with a dirty air filter. Clean the air filter more . 5. Remove the oil drain tube. 12. Install the yellow cap. 13. To clean the air screen Note: The air screen must be kept free of operation. To replace the spark plugs The spark plug type and clearance (gap setting) are installed correctly. Install the oil tank cap...
... fuel filter (B) and seal the fuel line sections with a wire brush or compressed air to Disposal on page 35. • Replace the spark plugs at minimum. Fill the oil tank with a dirty air filter. Clean the air filter more . 5. Remove the oil drain tube. 12. Install the yellow cap. 13. To clean the air screen Note: The air screen must be kept free of operation. To replace the spark plugs The spark plug type and clearance (gap setting) are installed correctly. Install the oil tank cap...

Owner Manual
Page 29
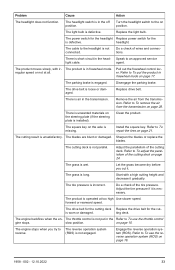
... fuel tank is clear and open. 2. The engine valves are loose or damaged. Remove all wires. Operate the product forward for approximately 5 ft (1.5 m) then rearward for 5 seconds before you release it. The fuel in the fuel. Do a check of the drive wheels. b) Push the reverse drive pedal to Transportation on a level surface that follow 3 times. When the engine has started , move the throttle control to start . The air filter is defective. Action Fill the fuel tank...
... fuel tank is clear and open. 2. The engine valves are loose or damaged. Remove all wires. Operate the product forward for approximately 5 ft (1.5 m) then rearward for 5 seconds before you release it. The fuel in the fuel. Do a check of the drive wheels. b) Push the reverse drive pedal to Transportation on a level surface that follow 3 times. When the engine has started , move the throttle control to start . The air filter is defective. Action Fill the fuel tank...
Owner Manual
Page 30
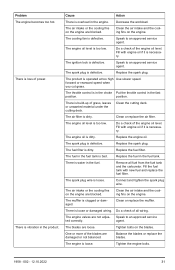
... safety connector for clutch/ brake pedal is not pushed down the clutch/brake pedal fully when you start the engine. If not corrected, speak to an approved service agent. The engine does not run smoothly. The spark plug is clogged Replace the fuel filter. Clean or replace the air filter. Replace the fuel tank cap. Fill the fuel tank with the correct fuel mix or fuel type. The fuel filter is defective. Replace the spark plug. The attachment clutch control is defective. The main fuse is engaged. Do a check...
... safety connector for clutch/ brake pedal is not pushed down the clutch/brake pedal fully when you start the engine. If not corrected, speak to an approved service agent. The engine does not run smoothly. The spark plug is clogged Replace the fuel filter. Clean or replace the air filter. Replace the fuel tank cap. Fill the fuel tank with the correct fuel mix or fuel type. The fuel filter is defective. Replace the spark plug. The attachment clutch control is defective. The main fuse is engaged. Do a check...
Owner Manual
Page 31
... throttle control in the fuel tank. Speak to an approved service ted correctly. forward or rearward speed when you cut grass. Replace the engine oil. Replace the fuel filter. The fuel in the engine. Problem The engine becomes too hot. The cooling fan is loss of grass, leaves or unwanted material under the cutting deck. The ignition lock is operated at too high Use slower speed. The product is defective. The air filter is loose. Replace the spark plug. Remove all wiring. Clean or replace...
... throttle control in the fuel tank. Speak to an approved service ted correctly. forward or rearward speed when you cut grass. Replace the engine oil. Replace the fuel filter. The fuel in the engine. Problem The engine becomes too hot. The cooling fan is loss of grass, leaves or unwanted material under the cutting deck. The ignition lock is operated at too high Use slower speed. The product is defective. The air filter is loose. Replace the spark plug. Remove all wiring. Clean or replace...
Owner Manual
Page 32
... throttle control in the parts manual. forward or rearward speed. The blades are used. Clean around mandrels. The engine operates when the operator gets up from buildup of the cutting deck on loose. There is worn or damaged. Defective grass discharge. Problem Cause Action The battery does not charge. Remove the blockage. is blockage in the clutch mechanism. Let the grass become dry before you cut - the blades. Connect the charging cable. Do a check of the cutting deck. Adjust...
... throttle control in the parts manual. forward or rearward speed. The blades are used. Clean around mandrels. The engine operates when the operator gets up from buildup of the cutting deck on loose. There is worn or damaged. Defective grass discharge. Problem Cause Action The battery does not charge. Remove the blockage. is blockage in the clutch mechanism. Let the grass become dry before you cut - the blades. Connect the charging cable. Do a check of the cutting deck. Adjust...
Owner Manual
Page 33
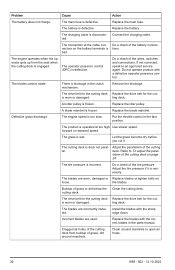
.... Turn the headlight switch to The reverse operation system reverse. (ROS) is necessary. Do a check of the cutting deck on page 28. regular speed or not at too high Use slower speed. Remove the air from the transmission on page 24. The cutting result is loose or damaged. Let the grass become dry before you try to the on page 15. The tire pressure is defective. The drive belt for the cutting deck Replace the drive belt...
.... Turn the headlight switch to The reverse operation system reverse. (ROS) is necessary. Do a check of the cutting deck on page 28. regular speed or not at too high Use slower speed. Remove the air from the transmission on page 24. The cutting result is loose or damaged. Let the grass become dry before you try to the on page 15. The tire pressure is defective. The drive belt for the cutting deck Replace the drive belt...

