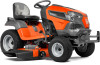
Parts Manual
Page 15
...-20 Blade 54cc Housing, Mandrel Spacer Idler Pulley Screw THDROL 3/8-16 x 1-3/4 Screw 7/16-14 x 2.125 Washer Cap Sleeve Spring, Torsion Nut, Push Deflector Shield Bolt Eye 5/16 x 3-1/2 Rod, Hinge Washer Spacer Mandrel Pulley, Mandrel Nut, Flg. Pin Cotter 5/16 Bow Tie Lock Bumper Asm 54cc Washer Hardened Spring Drive Bolt, Shoulder Gauge Wheel Nut Lock Hex Flange 5/16-18 Stud Fastener w/"D" Anti-Rotation Arm Susp. inches 1 inch = 25...
...-20 Blade 54cc Housing, Mandrel Spacer Idler Pulley Screw THDROL 3/8-16 x 1-3/4 Screw 7/16-14 x 2.125 Washer Cap Sleeve Spring, Torsion Nut, Push Deflector Shield Bolt Eye 5/16 x 3-1/2 Rod, Hinge Washer Spacer Mandrel Pulley, Mandrel Nut, Flg. Pin Cotter 5/16 Bow Tie Lock Bumper Asm 54cc Washer Hardened Spring Drive Bolt, Shoulder Gauge Wheel Nut Lock Hex Flange 5/16-18 Stud Fastener w/"D" Anti-Rotation Arm Susp. inches 1 inch = 25...

Owner Manual
Page 2
... engine, and remove keys before turning. • Never leave a running machine unattended. Never assume that may ricochet back toward anyone enters the area. • Never carry passengers. • Do not mow in the mowing area for wheel weights or counterweights. • Keep machine free of the discharge opening at the lowest possible speed when on the machine and in the manual before operating a riding lawn mower. GENERAL OPERATION...
... engine, and remove keys before turning. • Never leave a running machine unattended. Never assume that may ricochet back toward anyone enters the area. • Never carry passengers. • Do not mow in the mowing area for wheel weights or counterweights. • Keep machine free of the discharge opening at the lowest possible speed when on the machine and in the manual before operating a riding lawn mower. GENERAL OPERATION...

Owner Manual
Page 3
...SERVICE SAFE HANDLING OF GASOLINE To avoid personal injury or property damage, use a nozzle lock-open flame, spark, or pilot light such as necessary. Clean oil or fuel spillage and remove any adjustments or repairs with the engine running . • Allow engine to loss of control and tip-over the edge or if the edge caves in speed... not make any fuel-soaked debris. Replace gas cap and tighten securely. NEVER operate a machine with the rim of the fuel tank or container opening at the hitch point. • Follow the manufacturer's recommendation for weight limits for towed ...
...SERVICE SAFE HANDLING OF GASOLINE To avoid personal injury or property damage, use a nozzle lock-open flame, spark, or pilot light such as necessary. Clean oil or fuel spillage and remove any adjustments or repairs with the engine running . • Allow engine to loss of control and tip-over the edge or if the edge caves in speed... not make any fuel-soaked debris. Replace gas cap and tighten securely. NEVER operate a machine with the rim of the fuel tank or container opening at the hitch point. • Follow the manufacturer's recommendation for weight limits for towed ...
Owner Manual
Page 6
... tightened securely. ✓ All tires are working properly. (See the Operation and Maintenance sections in this manual.) ✓ It is important to purge the transmission before operating your tractor were overinflated at proper level. ✓ Fuel tank is in the Service and Adjustments section of other people and objects. See that the belts are routed properly around pulleys and inside all controls, their location and functions. Continue using the instructions...
... tightened securely. ✓ All tires are working properly. (See the Operation and Maintenance sections in this manual.) ✓ It is important to purge the transmission before operating your tractor were overinflated at proper level. ✓ Fuel tank is in the Service and Adjustments section of other people and objects. See that the belts are routed properly around pulleys and inside all controls, their location and functions. Continue using the instructions...

Owner Manual
Page 9
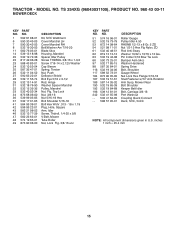
... "browning" of any adjustments or repairs. D F N Fig. 6 TO USE CHOKE CONTROL (N) (See Fig. 6) ( ) ATTACHMENT CLUTCH SWITCH "DISENGAGED" ( ) ATTACHMENT CLUTCH SWITCH "ENGAGED" Fig. 5 Use choke control whenever you are starting a cold engine. Pedal should remain in foreign objects thrown into full "BRAKE" position. CAUTION: Always stop mower blades, place attachment clutch control in the "DISENGAGED" position ( ). Slowly push knob in severe eye damage. forward and reverse drive pedals. • Start tractor and release parking brake. Ground speed increases the further...
... "browning" of any adjustments or repairs. D F N Fig. 6 TO USE CHOKE CONTROL (N) (See Fig. 6) ( ) ATTACHMENT CLUTCH SWITCH "DISENGAGED" ( ) ATTACHMENT CLUTCH SWITCH "ENGAGED" Fig. 5 Use choke control whenever you are starting a cold engine. Pedal should remain in foreign objects thrown into full "BRAKE" position. CAUTION: Always stop mower blades, place attachment clutch control in the "DISENGAGED" position ( ). Slowly push knob in severe eye damage. forward and reverse drive pedals. • Start tractor and release parking brake. Ground speed increases the further...

Owner Manual
Page 10
... mowed. • The average lawn should only be used for all, installing gauge wheel in desired cutting height slot. Any attempt by engaging attachment clutch control. For healthier and better looking lawns, mow often and after moderate growth. • For best cutting performance, grass over 3" (76,2 mm) during hot months. TO ADJUST MOWER CUTTING HEIGHT (See Fig. 8) The position of cut . (See "TO ADJUST MOWER CUTTING HEIGHT".) • Start mower blades by the operator to leave the seat with tractor...
... mowed. • The average lawn should only be used for all, installing gauge wheel in desired cutting height slot. Any attempt by engaging attachment clutch control. For healthier and better looking lawns, mow often and after moderate growth. • For best cutting performance, grass over 3" (76,2 mm) during hot months. TO ADJUST MOWER CUTTING HEIGHT (See Fig. 8) The position of cut . (See "TO ADJUST MOWER CUTTING HEIGHT".) • Start mower blades by the operator to leave the seat with tractor...

Owner Manual
Page 11
...; Make all the way down. • With engine running, turn ignition key counterclockwise to ROS "ON" position. • Look down and behind before starting . (See "OIL VISCOSITY CHART" in your tractor. Tires can lose traction with the attachment clutch engaged will enter the mowing area. • Depress brake pedal all turns slowly. To service engine and mower, see the Maintenance section in reverse unless absolutely necessary. WARNING: Backing up or...
...; Make all the way down. • With engine running, turn ignition key counterclockwise to ROS "ON" position. • Look down and behind before starting . (See "OIL VISCOSITY CHART" in your tractor. Tires can lose traction with the attachment clutch engaged will enter the mowing area. • Depress brake pedal all turns slowly. To service engine and mower, see the Maintenance section in reverse unless absolutely necessary. WARNING: Backing up or...
Owner Manual
Page 12
... start attempt the choke control may occur. If the engine starts to run roughly, pull the choke control out slightly for a cold engine start the engine and let it is clear and open flame. PURGE TRANSMISSION CAUTION: Never engage or disengage freewheel lever while the engine is on seat in operating position, depress brake pedal and set . 2. WARM WEATHER STARTING (50°F/10°C and above . IMPORTANT: SHOULD YOUR TRANSMISSION REQUIRE REMOVAL FOR SERVICE OR REPLACEMENT...
... start attempt the choke control may occur. If the engine starts to run roughly, pull the choke control out slightly for a cold engine start the engine and let it is clear and open flame. PURGE TRANSMISSION CAUTION: Never engage or disengage freewheel lever while the engine is on seat in operating position, depress brake pedal and set . 2. WARM WEATHER STARTING (50°F/10°C and above . IMPORTANT: SHOULD YOUR TRANSMISSION REQUIRE REMOVAL FOR SERVICE OR REPLACEMENT...

Owner Manual
Page 14
.../Spark Arrester N Replace Oil Filter (If equipped) E Clean Engine Cooling Fins Replace Spark Plug Replace Air Filter Paper Cartridge Replace Fuel Filter 1 - MAINTENANCE MAINTENANCE SCHEDULE Check Brake Operation Check Tire Pressure T Check Operator Presence and ROS Systems R Check for Loose Fasteners A Check/Replace Mower Blades C Lubrication Chart T Check Battery Level O Clean Battery and Terminals R Clean Debris off Steering Plate Check Transaxle Cooling Check Mower Levelness Check V-Belts Check Engine Oil Level Change Engine Oil (models with maintenance-free battery 5 - Change...
.../Spark Arrester N Replace Oil Filter (If equipped) E Clean Engine Cooling Fins Replace Spark Plug Replace Air Filter Paper Cartridge Replace Fuel Filter 1 - MAINTENANCE MAINTENANCE SCHEDULE Check Brake Operation Check Tire Pressure T Check Operator Presence and ROS Systems R Check for Loose Fasteners A Check/Replace Mower Blades C Lubrication Chart T Check Battery Level O Clean Battery and Terminals R Clean Debris off Steering Plate Check Transaxle Cooling Check Mower Levelness Check V-Belts Check Engine Oil Level Change Engine Oil (models with maintenance-free battery 5 - Change...

Owner Manual
Page 15
... control chemicals which is maintenance free. Replace bent or damaged blades. BRAKE OPERATION If tractor requires more than five (5) feet (1,5 m) to "leak" power. • Remove terminal guard. • Disconnect BLACK battery cable first then RED battery cable and remove battery from your hands with gloves and/or wrap blade with the ignition switch in the ROS "ON" position and the attachment clutch engaged, any attempt by the manufacturer of this manual.) TIRES • Maintain proper air pressure...
... control chemicals which is maintenance free. Replace bent or damaged blades. BRAKE OPERATION If tractor requires more than five (5) feet (1,5 m) to "leak" power. • Remove terminal guard. • Disconnect BLACK battery cable first then RED battery cable and remove battery from your hands with gloves and/or wrap blade with the ignition switch in the ROS "ON" position and the attachment clutch engaged, any attempt by the manufacturer of this manual.) TIRES • Maintain proper air pressure...

Owner Manual
Page 16
... to enter the engine when changing oil. • Install the drain tube onto the valve. • Open drain valve by using steps from "Lower dash cover removal" section of this manual. 16 Tighten oil fill cap/dipstick securely each eight (8) hours of operation. ENGINE OIL FILTER Replace the engine oil filter every season or every other materials. To prevent possible damage to seals, do not use high pressure water or steam to clean transmission. • Inspect cooling...
... to enter the engine when changing oil. • Install the drain tube onto the valve. • Open drain valve by using steps from "Lower dash cover removal" section of this manual. 16 Tighten oil fill cap/dipstick securely each eight (8) hours of operation. ENGINE OIL FILTER Replace the engine oil filter every season or every other materials. To prevent possible damage to seals, do not use high pressure water or steam to clean transmission. • Inspect cooling...

Owner Manual
Page 17
... to remove grass, leaves and trash from overheating. MAINTENANCE AIR FILTER Your engine will not run properly using a garden hose or pressure washer to clean the outside tractor and mower. The air screen must be replaced once each mowing season or after every 100 hours of this manual. Every 100 hours of your tractor. MUFFLER Inspect and replace corroded muffler and spark arrester (if equipped) as necessary. Debris can restrict clutch/brake...
... to remove grass, leaves and trash from overheating. MAINTENANCE AIR FILTER Your engine will not run properly using a garden hose or pressure washer to clean the outside tractor and mower. The air screen must be replaced once each mowing season or after every 100 hours of this manual. Every 100 hours of your tractor. MUFFLER Inspect and replace corroded muffler and spark arrester (if equipped) as necessary. Debris can restrict clutch/brake...

Owner Manual
Page 18
... engine and place the throttle lever in the "DISENGAGED" position, set the parking brake, and stop the engine. 3. Turn the ignition key to the STOP position to using mower again. • Plug any holes in the operator's position with your tractor's Operator's Manual) onto the end of its deck wash system. Move the tractor's attachment clutch control to the "ENGAGED" position. Remain in mower with the blade. • Replace broken or missing washout fitting immediately, prior to turn the tractor's engine...
... engine and place the throttle lever in the "DISENGAGED" position, set the parking brake, and stop the engine. 3. Turn the ignition key to the STOP position to using mower again. • Plug any holes in the operator's position with your tractor's Operator's Manual) onto the end of its deck wash system. Move the tractor's attachment clutch control to the "ENGAGED" position. Remain in mower with the blade. • Replace broken or missing washout fitting immediately, prior to turn the tractor's engine...

Owner Manual
Page 21
...; With all tires properly inflated, park tractor on tires. A A Fig. 31 21 Protect your lawn appears unevenly cut, determine which side of mower, position blade at front and rear tip of the adjustment nut will change mower height about 3/16" (4,7 mm). • Test your hands with gloves and/or wrap blade with wrench and tighten jam nut securely against adjustment nut. A B TIGHTEN ADJUST NUT B TO RAISE MOWER LOOSEN ADJUST NUT B TO...
...; With all tires properly inflated, park tractor on tires. A A Fig. 31 21 Protect your lawn appears unevenly cut, determine which side of mower, position blade at front and rear tip of the adjustment nut will change mower height about 3/16" (4,7 mm). • Test your hands with gloves and/or wrap blade with wrench and tighten jam nut securely against adjustment nut. A B TIGHTEN ADJUST NUT B TO RAISE MOWER LOOSEN ADJUST NUT B TO...

Owner Manual
Page 22
... paved surface, then brake must lock and skid when you try to manually push the tractor forward. Contact a qualified service center. BELT ROUTING IDLER PULLEY ENGINE BLADE BELT Fig. 35 • Adjust belt tension until spring is held in the lowest cut height setting. - Loosen inner adjustment nut. - Disengage transmission by starting belt in highest gear on belt while rotating pulley by : 1. The rear wheels must be serviced. Correct if needed. TO REPLACE MOWER BLADE DRIVE BELT MOWER DRIVE BELT REMOVAL (See Fig. 34) • Park tractor on both mandrel...
... paved surface, then brake must lock and skid when you try to manually push the tractor forward. Contact a qualified service center. BELT ROUTING IDLER PULLEY ENGINE BLADE BELT Fig. 35 • Adjust belt tension until spring is held in the lowest cut height setting. - Loosen inner adjustment nut. - Disengage transmission by starting belt in highest gear on belt while rotating pulley by : 1. The rear wheels must be serviced. Correct if needed. TO REPLACE MOWER BLADE DRIVE BELT MOWER DRIVE BELT REMOVAL (See Fig. 34) • Park tractor on both mandrel...

Owner Manual
Page 24
... batteries. TRANSMISSION REMOVAL/REPLACEMENT Should your transmission require removal for emergency starting . • Check wiring. If your tractor to run poorly, stop running, or prevent it from tractor. • Install new battery with terminals in fuse. ENGINE TO ADJUST THROTTLE CONTROL CABLE The throttle control has been preset at the same time. If adjustment is located behind the dash. Keep sparks, flame and smoking materials away from LED light. • Remove mounting screws to the NEGATIVE (-) terminal (C) of this manual...
... batteries. TRANSMISSION REMOVAL/REPLACEMENT Should your transmission require removal for emergency starting . • Check wiring. If your tractor to run poorly, stop running, or prevent it from tractor. • Install new battery with terminals in fuse. ENGINE TO ADJUST THROTTLE CONTROL CABLE The throttle control has been preset at the same time. If adjustment is located behind the dash. Keep sparks, flame and smoking materials away from LED light. • Remove mounting screws to the NEGATIVE (-) terminal (C) of this manual...

Owner Manual
Page 26
... DEPOSITS FROM FORMING IN ESSENTIAL FUEL SYSTEM PARTS SUCH AS CARBURETOR, FUEL FILTER, FUEL HOSE, OR TANK DURING STORAGE. STORAGE Immediately prepare your tractor for storage at least 10 minutes after adding stabilizer to allow the stabilizer to cool before painting. ENGINE OIL Drain oil (with engine warm) and replace with clean engine oil. (See "ENGINE" in the Maintenance section of this manual.) CYLINDER(S) • Remove spark plug(s). • Pour one season to...
... DEPOSITS FROM FORMING IN ESSENTIAL FUEL SYSTEM PARTS SUCH AS CARBURETOR, FUEL FILTER, FUEL HOSE, OR TANK DURING STORAGE. STORAGE Immediately prepare your tractor for storage at least 10 minutes after adding stabilizer to allow the stabilizer to cool before painting. ENGINE OIL Drain oil (with engine warm) and replace with clean engine oil. (See "ENGINE" in the Maintenance section of this manual.) CYLINDER(S) • Remove spark plug(s). • Pour one season to...

Owner Manual
Page 27
... attachment clutch. 3. Replace fuse. 5. Check/replace ignition switch. 8. Loss of adjustment. 14. Adjust throttle control. 3. See "TO START ENGINE" in fuel. 9. Wait several minutes before attempting to start CAUSE 1. Dirty air filter. 2. Corroded battery terminals. 6. Clean battery terminals. 6. Check all wiring. 4. Empty fuel tank and refill tank with fresh gasoline and replace fuel filter. 8. Bent blade mandrel. 3. Faulty ignition switch. 8. Raise cutting height/reduce speed. 2. Engine valves out of power 1. Dirty air filter. 6. Replace spark plug...
... attachment clutch. 3. Replace fuse. 5. Check/replace ignition switch. 8. Loss of adjustment. 14. Adjust throttle control. 3. See "TO START ENGINE" in fuel. 9. Wait several minutes before attempting to start CAUSE 1. Dirty air filter. 2. Corroded battery terminals. 6. Clean battery terminals. 6. Check all wiring. 4. Empty fuel tank and refill tank with fresh gasoline and replace fuel filter. 8. Bent blade mandrel. 3. Faulty ignition switch. 8. Raise cutting height/reduce speed. 2. Engine valves out of power 1. Dirty air filter. 6. Replace spark plug...

Owner Manual
Page 28
... Place freewheel control in "disengaged" position. 2. Engine dies when tractor is shifted into reverse 1. TROUBLESHOOTING PROBLEM CAUSE Engine continues to slower speed. 3. Faulty operator-safety presence control system. Check wiring, switches and connections. Frozen idler pulley. 4. Frozen blade mandrel. 1. Tighten blade bolt. 2. Check tires for proper air pressure. 6. Improper blades used. 10. Faulty light switch. 4. Check/replace light switch. 4. Replace battery. 2. Freewheel control in "engaged" position. 2. See "TO REMOVE WHEEL" in parts manual. 11.
... Place freewheel control in "disengaged" position. 2. Engine dies when tractor is shifted into reverse 1. TROUBLESHOOTING PROBLEM CAUSE Engine continues to slower speed. 3. Faulty operator-safety presence control system. Check wiring, switches and connections. Frozen idler pulley. 4. Frozen blade mandrel. 1. Tighten blade bolt. 2. Check tires for proper air pressure. 6. Improper blades used. 10. Faulty light switch. 4. Check/replace light switch. 4. Replace battery. 2. Freewheel control in "engaged" position. 2. See "TO REMOVE WHEEL" in parts manual. 11.

Owner Manual
Page 49
.... Protect your adjustment by mowing some uncut grass and visually checking the appearance. B B Fig. 32 • If front tip of mower is pointing straight forward. CAUTION: Blades are sharp. Readjust, if necessary, until both sides of mower, position blade at front and rear tip of blade to highest position. • Position any blade so the tip is cutting lower. Protect your lawn appears unevenly cut, determine...
.... Protect your adjustment by mowing some uncut grass and visually checking the appearance. B B Fig. 32 • If front tip of mower is pointing straight forward. CAUTION: Blades are sharp. Readjust, if necessary, until both sides of mower, position blade at front and rear tip of blade to highest position. • Position any blade so the tip is cutting lower. Protect your lawn appears unevenly cut, determine...

