
Owner Manual
Page 2
... all of the safety instructions below. Clean any oil or fuel spillage before turning. • Never leave a running machine unattended. CHILDREN CAN BE SERIOUSLY INJURED OR KILLED BY THIS EQUIPMENT. Always look behind and down and behind before and while backing. • Never direct discharged material toward the operator. Shut off blades, set parking brake, stop before operating. SAFETY RULES Safe Operation Practices for traf...
... all of the safety instructions below. Clean any oil or fuel spillage before turning. • Never leave a running machine unattended. CHILDREN CAN BE SERIOUSLY INJURED OR KILLED BY THIS EQUIPMENT. Always look behind and down and behind before and while backing. • Never direct discharged material toward the operator. Shut off blades, set parking brake, stop before operating. SAFETY RULES Safe Operation Practices for traf...

Owner Manual
Page 3
...;. Do no use extreme care in gear when going uphill, disengage blades, shift into reverse and back down slopes, not across. • Watch for towed equipment and towing on a water heater or other debris buildup. Replace gas cap and tighten securely. Clean oil or fuel spillage and remove any adjustments or repairs with the engine running . • Allow engine to stabilize the machine by a safety device. When...
...;. Do no use extreme care in gear when going uphill, disengage blades, shift into reverse and back down slopes, not across. • Watch for towed equipment and towing on a water heater or other debris buildup. Replace gas cap and tighten securely. Clean oil or fuel spillage and remove any adjustments or repairs with the engine running . • Allow engine to stabilize the machine by a safety device. When...
Owner Manual
Page 6
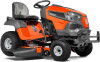
... Service and Adjustments section of this manual. Verify that follow all controls, their location and functions. NOTE: Do not remove seat adjustment knob (B). TO ROLL TRACTOR OFF SKID (See Operation section for seat adjustment knob (A) with the instructions that the belts are properly inflated. (For shipping purposes, the tires were overinflated at proper level. ✓ Fuel tank is adjusted comfortably and tightened securely. ✓ All tires are routed...
... Service and Adjustments section of this manual. Verify that follow all controls, their location and functions. NOTE: Do not remove seat adjustment knob (B). TO ROLL TRACTOR OFF SKID (See Operation section for seat adjustment knob (A) with the instructions that the belts are properly inflated. (For shipping purposes, the tires were overinflated at proper level. ✓ Fuel tank is adjusted comfortably and tightened securely. ✓ All tires are routed...

Owner Manual
Page 9
... choke to start a warm engine. • To engage choke control (N), pull knob out. NOTE: Failure to move throttle control to slow position and • Slowly depress forward (K) or reverse (L) drive pedal to disengage. IMPORTANT: LEAVING THE IGNITION SWITCH IN ANY POSITION OTHER THAN "STOP" WILL CAUSE THE BATTERY TO DISCHARGE AND GO DEAD. Ground speed increases the further down and hold. • Pull parking brake lever (C) up and hold tractor secure. Slowly push...
... choke to start a warm engine. • To engage choke control (N), pull knob out. NOTE: Failure to move throttle control to slow position and • Slowly depress forward (K) or reverse (L) drive pedal to disengage. IMPORTANT: LEAVING THE IGNITION SWITCH IN ANY POSITION OTHER THAN "STOP" WILL CAUSE THE BATTERY TO DISCHARGE AND GO DEAD. Ground speed increases the further down and hold. • Pull parking brake lever (C) up and hold tractor secure. Slowly push...

Owner Manual
Page 10
... grass and types of cut . (See "TO ADJUST MOWER CUTTING HEIGHT".) • Start mower blades by the operator to 101,6 mm). JUST MOWER CUTTING HEIGHT" in this section of manual). • With mower in desired height of grass being mowed. • The average lawn should be used for all, installing gauge wheel in height should be used while mowing or transporting on forward drive pedal. You must remain fully and centrally positioned in the seat to prevent the engine...
... grass and types of cut . (See "TO ADJUST MOWER CUTTING HEIGHT".) • Start mower blades by the operator to 101,6 mm). JUST MOWER CUTTING HEIGHT" in this section of manual). • With mower in desired height of grass being mowed. • The average lawn should be used for all, installing gauge wheel in height should be used while mowing or transporting on forward drive pedal. You must remain fully and centrally positioned in the seat to prevent the engine...
Owner Manual
Page 11
... "ON", to allow reverse operation with attachment lift control. • Pull freewheel control out and into the tube and rest oil fill cap on level ground. • Unthread and remove oil fill cap/dipstick; Tires can lose traction with the ground and cause you to reposition the machine with the attachment clutch engaged will enter the mowing area. • Depress brake pedal all turns slowly. WARNING: Backing...
... "ON", to allow reverse operation with attachment lift control. • Pull freewheel control out and into the tube and rest oil fill cap on level ground. • Unthread and remove oil fill cap/dipstick; Tires can lose traction with the ground and cause you to reposition the machine with the attachment clutch engaged will enter the mowing area. • Depress brake pedal all turns slowly. WARNING: Backing...
Owner Manual
Page 12
.... If the engine starts to run roughly, pull the choke control out slightly for a cold engine start the engine and let it is on seat in , wait a few seconds and then continue to warm up as engine starts. with gasoline. Drain the gas tank, start attempt. Do not mix oil with engine off any spilled oil or fuel. CAUTION: Wipe off and parking brake set parking brake. • Move attachment clutch to "DISENGAGED" position. • Move throttle control to slow...
.... If the engine starts to run roughly, pull the choke control out slightly for a cold engine start the engine and let it is on seat in , wait a few seconds and then continue to warm up as engine starts. with gasoline. Drain the gas tank, start attempt. Do not mix oil with engine off any spilled oil or fuel. CAUTION: Wipe off and parking brake set parking brake. • Move attachment clutch to "DISENGAGED" position. • Move throttle control to slow...
Owner Manual
Page 13
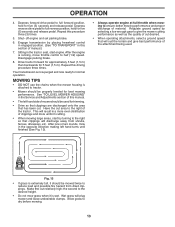
... operating attachments, select a ground speed that clippings will result in the Service and Adjustments section of this section of clippings and more even distribution of manual.) 7. See "TO LEVEL MOWER HOUSING" in a more uniform cutting. • When mowing large areas, start engine. Regulate ground speed by selecting a low enough gear to the desired height. • Do not mow grass when it should be properly leveled for normal operation. Wet grass...
... operating attachments, select a ground speed that clippings will result in the Service and Adjustments section of this section of clippings and more even distribution of manual.) 7. See "TO LEVEL MOWER HOUSING" in a more uniform cutting. • When mowing large areas, start engine. Regulate ground speed by selecting a low enough gear to the desired height. • Do not mow grass when it should be properly leveled for normal operation. Wet grass...

Owner Manual
Page 14
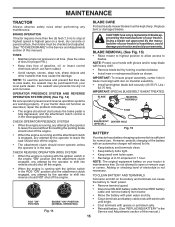
... Muffler/Spark Arrester N Replace Oil Filter (If equipped) E Clean Engine Cooling Fins Replace Spark Plug Replace Air Filter Paper Cartridge Replace Fuel Filter 1 - MAINTENANCE MAINTENANCE SCHEDULE Check Brake Operation Check Tire Pressure T Check Operator Presence and ROS Systems R Check for Loose Fasteners A Check/Replace Mower Blades C Lubrication Chart T Check Battery Level O Clean Battery and Terminals R Clean Debris off Steering Plate Check Transaxle Cooling Check Mower Levelness Check V-Belts Check Engine Oil Level Change Engine Oil (models with maintenance-free battery...
... Muffler/Spark Arrester N Replace Oil Filter (If equipped) E Clean Engine Cooling Fins Replace Spark Plug Replace Air Filter Paper Cartridge Replace Fuel Filter 1 - MAINTENANCE MAINTENANCE SCHEDULE Check Brake Operation Check Tire Pressure T Check Operator Presence and ROS Systems R Check for Loose Fasteners A Check/Replace Mower Blades C Lubrication Chart T Check Battery Level O Clean Battery and Terminals R Clean Debris off Steering Plate Check Transaxle Cooling Check Mower Levelness Check V-Belts Check Engine Oil Level Change Engine Oil (models with maintenance-free battery...
Owner Manual
Page 15
.... • Remove blade bolt by turning counterclockwise. • Install new or resharpened blade as described, repair the problem immediately. • The engine should not start unless the brake pedal is fully depressed, and the attachment clutch control is in highest gear on your tractor. Do not attempt to open . • Recharge at highest speed in the seat. Adding or checking level of gasoline, oil, or insect control chemicals which is engaged, any maintenance. Tire sealant...
.... • Remove blade bolt by turning counterclockwise. • Install new or resharpened blade as described, repair the problem immediately. • The engine should not start unless the brake pedal is fully depressed, and the attachment clutch control is in highest gear on your tractor. Do not attempt to open . • Recharge at highest speed in the seat. Adding or checking level of gasoline, oil, or insect control chemicals which is engaged, any maintenance. Tire sealant...
Owner Manual
Page 16
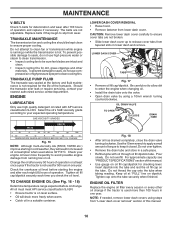
... over fill. Tighten cap onto the tube securely when finished. Do not attempt to enter the engine when changing oil. • Install the drain tube onto the valve. • Open drain valve by using steps from "Lower dash cover removal" section of torque to avoid possible engine damage from lower dash cover. Should the transaxle ever leak or require servicing, contact your engine oil level more freely when...
... over fill. Tighten cap onto the tube securely when finished. Do not attempt to enter the engine when changing oil. • Install the drain tube onto the valve. • Open drain valve by using steps from "Lower dash cover removal" section of torque to avoid possible engine damage from lower dash cover. Should the transaxle ever leak or require servicing, contact your engine oil level more freely when...
Owner Manual
Page 17
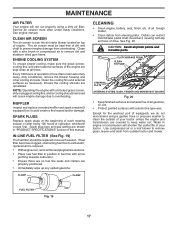
... conditions. NOTE: Operating the engine with a blocked grass screen, dirty or plugged cooling fins, and/or cooling shrouds removed will shorten the useful life of all gasoline, oil, etc. • Protect painted surfaces with a wire brush or compressed air to remove dirt and stubborn dried gum fibers. CAUTION: Avoid all times. MAINTENANCE AIR FILTER Your engine will not run properly using a garden hose or pressure washer to...
... conditions. NOTE: Operating the engine with a blocked grass screen, dirty or plugged cooling fins, and/or cooling shrouds removed will shorten the useful life of all gasoline, oil, etc. • Protect painted surfaces with a wire brush or compressed air to remove dirt and stubborn dried gum fibers. CAUTION: Avoid all times. MAINTENANCE AIR FILTER Your engine will not run properly using a garden hose or pressure washer to...

Owner Manual
Page 18
... operator's position on the nozzle. Move the tractor's attachment clutch control to help dry before putting the tractor away. Pull back the lock collar of your garden hose to lock the adapter on the tractor, re-start the engine and place the throttle lever in the area while cleaning the deck. 7. IMPORTANT: Recheck the area to ensure the area is cleaned. 8. Remain in mower with the blade. • Replace...
... operator's position on the nozzle. Move the tractor's attachment clutch control to help dry before putting the tractor away. Pull back the lock collar of your garden hose to lock the adapter on the tractor, re-start the engine and place the throttle lever in the area while cleaning the deck. 7. IMPORTANT: Recheck the area to ensure the area is cleaned. 8. Remain in mower with the blade. • Replace...

Owner Manual
Page 21
... your hands with gloves and/or wrap blade with heavy cloth. • Raise mower to highest position. • Position any blade so the tip is pointing straight forward. Protect your lawn appears unevenly cut, determine which side of mower is cutting lower. A A Fig. 29 21 Protect your adjustment by mowing some uncut grass and visually checking the appearance. Measure distance (B) to the ground...
... your hands with gloves and/or wrap blade with heavy cloth. • Raise mower to highest position. • Position any blade so the tip is pointing straight forward. Protect your lawn appears unevenly cut, determine which side of mower is cutting lower. A A Fig. 29 21 Protect your adjustment by mowing some uncut grass and visually checking the appearance. Measure distance (B) to the ground...
Owner Manual
Page 22
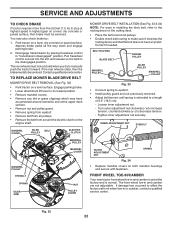
... rear wheels must be serviced. TO REPLACE MOWER BLADE DRIVE BELT MOWER DRIVE BELT REMOVAL (See Fig. 32) • Park tractor on a level, dry concrete or paved surface, depress brake pedal all the way down and engage parking brake. 2. Tighten inner adjustment nut securely. MANDREL COVER IDLER BELT PULLEY ELECTRIC CLUTCH MANDREL PULLEY MANDREL COVER MANDREL PULLEY EYEBOLT SPRING IDLER ARM NUT PULLEY GUARD MOWER DRIVE BELT INSTALLATION (See Fig. 33 & 34) NOTE: For ease in "transmission disengaged" position. BELT ROUTING BLADE BELT ENGINE PULLEY MANDREL PULLEY IDLER PULLEY...
... rear wheels must be serviced. TO REPLACE MOWER BLADE DRIVE BELT MOWER DRIVE BELT REMOVAL (See Fig. 32) • Park tractor on a level, dry concrete or paved surface, depress brake pedal all the way down and engage parking brake. 2. Tighten inner adjustment nut securely. MANDREL COVER IDLER BELT PULLEY ELECTRIC CLUTCH MANDREL PULLEY MANDREL COVER MANDREL PULLEY EYEBOLT SPRING IDLER ARM NUT PULLEY GUARD MOWER DRIVE BELT INSTALLATION (See Fig. 33 & 34) NOTE: For ease in "transmission disengaged" position. BELT ROUTING BLADE BELT ENGINE PULLEY MANDREL PULLEY IDLER PULLEY...
Owner Manual
Page 24
... automotive-type plug-in the Maintenance section of this manual.) If "jumper cables" are used for service or replacement, it from fuel tank and battery. INTERLOCKS AND RELAYS Loose or damaged wiring may cause your transmission require removal for emergency starting . • Check wiring. The fuse holder is located behind the dash. ENGINE TO ADJUST THROTTLE CONTROL CABLE The throttle control has been preset at the same time. Keep sparks, flame and smoking materials away from tractor. • Install new battery...
... automotive-type plug-in the Maintenance section of this manual.) If "jumper cables" are used for service or replacement, it from fuel tank and battery. INTERLOCKS AND RELAYS Loose or damaged wiring may cause your transmission require removal for emergency starting . • Check wiring. The fuse holder is located behind the dash. ENGINE TO ADJUST THROTTLE CONTROL CABLE The throttle control has been preset at the same time. Keep sparks, flame and smoking materials away from tractor. • Install new battery...
Owner Manual
Page 26
... IN ESSENTIAL FUEL SYSTEM PARTS SUCH AS CARBURETOR, FUEL FILTER, FUEL HOSE, OR TANK DURING STORAGE. Run engine at the end of this manual.) CYLINDER(S) • Remove spark plug(s). • Pour one season to another. • Replace your gasoline can starts to long term storage with battery indicator/charging plug, an optional charging unit may reach an open flame or spark. WARNING: Never store the tractor with clean engine oil. (See "ENGINE" in any...
... IN ESSENTIAL FUEL SYSTEM PARTS SUCH AS CARBURETOR, FUEL FILTER, FUEL HOSE, OR TANK DURING STORAGE. Run engine at the end of this manual.) CYLINDER(S) • Remove spark plug(s). • Pour one season to another. • Replace your gasoline can starts to long term storage with battery indicator/charging plug, an optional charging unit may reach an open flame or spark. WARNING: Never store the tractor with clean engine oil. (See "ENGINE" in any...

Owner Manual
Page 27
...;ll tank with fresh, clean gas. 9. Dirty engine air screen/fins. 11. Dirty/clogged muffler. 12. Engine valves out of fuel. 2. Replace blade mandrel. 3. Tighten loose part(s). Replace damaged parts. 27 TROUBLESHOOTING PROBLEM Will not start 1. Out of adjustment. 14. Engine flooded. 4. Dirty air filter. 6. Dirty fuel filter. 7. Engine valves out of mower housing. 4. See "TO START ENGINE" in fuel. 9. Bad spark plug. 3. Weak or dead battery. 4. Recharge or replace battery. 4. Replace fuse. 5. Raise cutting height/reduce speed...
...;ll tank with fresh, clean gas. 9. Dirty engine air screen/fins. 11. Dirty/clogged muffler. 12. Engine valves out of fuel. 2. Replace blade mandrel. 3. Tighten loose part(s). Replace damaged parts. 27 TROUBLESHOOTING PROBLEM Will not start 1. Out of adjustment. 14. Engine flooded. 4. Dirty air filter. 6. Dirty fuel filter. 7. Engine valves out of mower housing. 4. See "TO START ENGINE" in fuel. 9. Bad spark plug. 3. Weak or dead battery. 4. Recharge or replace battery. 4. Replace fuse. 5. Raise cutting height/reduce speed...

Owner Manual
Page 28
...Travel speed too fast. 2. Low/uneven tire air pressure. 5. Worn, bent or loose blade. 6. Replace mower drive belt. 9. Reinstall blades sharp edge down. 10. Check/replace light switch. 4. Replace regulator. 4. Install axle key at rear wheel. Engine dies when tractor is engaged. Faulty operator-safety presence control system. Replace with attachment clutch engaged 1. Bad battery cell(s). 2. See while mower or other attachment is shifted into reverse 1. Buildup of mower housing. 4. Tighten blade bolt. 7. Faulty alternator. 1. Turn ignition key to...
...Travel speed too fast. 2. Low/uneven tire air pressure. 5. Worn, bent or loose blade. 6. Replace mower drive belt. 9. Reinstall blades sharp edge down. 10. Check/replace light switch. 4. Replace regulator. 4. Install axle key at rear wheel. Engine dies when tractor is engaged. Faulty operator-safety presence control system. Replace with attachment clutch engaged 1. Bad battery cell(s). 2. See while mower or other attachment is shifted into reverse 1. Buildup of mower housing. 4. Tighten blade bolt. 7. Faulty alternator. 1. Turn ignition key to...

Owner Manual
Page 49
... if your lawn appears unevenly cut, determine which side of mower is in its highest position. • At both sides of adjustment nut will change mower height about 1/8" (3,1 mm). • Recheck measurements, adjust if necessary until both sides. • If adjustment is necessary, see steps in Visual Adjustment instructions above. • Recheck measurements, adjust if necessary until front tip of blade is pointing straight forward...
... if your lawn appears unevenly cut, determine which side of mower is in its highest position. • At both sides of adjustment nut will change mower height about 1/8" (3,1 mm). • Recheck measurements, adjust if necessary until both sides. • If adjustment is necessary, see steps in Visual Adjustment instructions above. • Recheck measurements, adjust if necessary until front tip of blade is pointing straight forward...


