
Parts Manual
Page 3
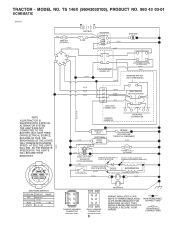
... REVERSE SWITCH (NOT IN REVERSE) NOTE YOUR TRACTOR IS EQUIPPED WITH A SPECIAL ALTERNATOR SYSTEM. BECAUSE OF THIS, THE BRIGHTNESS OF THE LIGHTS WILL CHANGE WITH ENGINE SPEED. THE LIGHTS ARE NOT CONNECTED TO THE BATTERY, BUT HAVE THEIR OWN ELECTRICAL SOURCE. BLACK BLACK BLACK BLACK 2 BLACK 3 BLACK BLACK 1 6 GRAY JUNCTION CONNECTOR CHASSIS HARNESS SEAT SWITCH (NOT OCCUPIED) SHORTING CONNECTOR BLACK /WHITE IGNITION UNIT (OPTIONAL) SPARK PLUGS GAP (2 PLUGS...
... REVERSE SWITCH (NOT IN REVERSE) NOTE YOUR TRACTOR IS EQUIPPED WITH A SPECIAL ALTERNATOR SYSTEM. BECAUSE OF THIS, THE BRIGHTNESS OF THE LIGHTS WILL CHANGE WITH ENGINE SPEED. THE LIGHTS ARE NOT CONNECTED TO THE BATTERY, BUT HAVE THEIR OWN ELECTRICAL SOURCE. BLACK BLACK BLACK BLACK 2 BLACK 3 BLACK BLACK 1 6 GRAY JUNCTION CONNECTOR CHASSIS HARNESS SEAT SWITCH (NOT OCCUPIED) SHORTING CONNECTOR BLACK /WHITE IGNITION UNIT (OPTIONAL) SPARK PLUGS GAP (2 PLUGS...
Parts Manual
Page 18
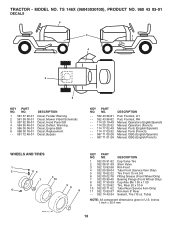
... 43-34 DESCRIPTION Cap Valve Tire Stem Valve Rim Front Tube Front (Service Item Only) Tire Front 15 x 6.0-6 Fitting Grease (Front Wheel Only) Bearing Flange (Front Wheel Only) Cap Axle Blk 1 50 x 1 00 Tire, Rear 20 x 10-8 Tube Rear (Service Item Only) Rim Asm 8" Rear Sealant, Tire (10 oz. Warning Decal, Engine B&S Decal, Replacement Decal, Bypass KEY PART NO. Tube) NOTE: All component dimensions given in U.S. inches 1 inch = 25.4 mm 18 TS 146X (96043030100), PRODUCT...
... 43-34 DESCRIPTION Cap Valve Tire Stem Valve Rim Front Tube Front (Service Item Only) Tire Front 15 x 6.0-6 Fitting Grease (Front Wheel Only) Bearing Flange (Front Wheel Only) Cap Axle Blk 1 50 x 1 00 Tire, Rear 20 x 10-8 Tube Rear (Service Item Only) Rim Asm 8" Rear Sealant, Tire (10 oz. Warning Decal, Engine B&S Decal, Replacement Decal, Bypass KEY PART NO. Tube) NOTE: All component dimensions given in U.S. inches 1 inch = 25.4 mm 18 TS 146X (96043030100), PRODUCT...

Owner Manual
Page 2
... the operator. They may lose control of a child. Wash hands after handling. Material may block your tractor. Do not allow children to hearing. • Data indicates that children will remain where you may fall off blades, set parking brake, and stop before cleaning the machine, removing the grass catcher, or unclogging the discharge chute. • Operate machine only in daylight or good artificial light. •...
... the operator. They may lose control of a child. Wash hands after handling. Material may block your tractor. Do not allow children to hearing. • Data indicates that children will remain where you may fall off blades, set parking brake, and stop before cleaning the machine, removing the grass catcher, or unclogging the discharge chute. • Operate machine only in daylight or good artificial light. •...

Owner Manual
Page 3
... other attachments; jects. Always keep the machine in or on a slope. IV. Replace gas cap and tighten securely. Clean oil or fuel spillage and remove any adjustments or repairs with a machine that has a hitch designed for Ride-On Mowers III. Slopes are a major factor related to loss of control. • Travel slowly and allow children or others in gear when going uphill, disengage blades, shift into reverse...
... other attachments; jects. Always keep the machine in or on a slope. IV. Replace gas cap and tighten securely. Clean oil or fuel spillage and remove any adjustments or repairs with a machine that has a hitch designed for Ride-On Mowers III. Slopes are a major factor related to loss of control. • Travel slowly and allow children or others in gear when going uphill, disengage blades, shift into reverse...

Owner Manual
Page 6
... charged. ✓ Seat is adjusted comfortably and tightened securely. ✓ All tires are working properly. (See the Operation and Maintenance sections in the Operation section of other people and objects. TO ROLL TRACTOR OFF SKID (See Operation section for location and function of controls) • Raise attachment lift lever to -rear for best cutting results. (Tires must be properly leveled. Correct tire pressure is in the Service and Adjustments section of this manual...
... charged. ✓ Seat is adjusted comfortably and tightened securely. ✓ All tires are working properly. (See the Operation and Maintenance sections in the Operation section of other people and objects. TO ROLL TRACTOR OFF SKID (See Operation section for location and function of controls) • Raise attachment lift lever to -rear for best cutting results. (Tires must be properly leveled. Correct tire pressure is in the Service and Adjustments section of this manual...

Owner Manual
Page 9
... drive, depress brake pedal into the eyes, which can result in severe eye damage. tor's position. D ( ) ATTACHMENT CLUTCH LEVER "DISENGAGED" ( ) ATTACHMENT CLUTCH LEVER "ENGAGED" Fig. 5 GROUND DRIVE - • To stop tractor com- When engine is running , hot engine exhaust gases may cause engine to "backfire". • Turn ignition key (F) to stop mower blades, place attachment clutch control in the "DISENGAGED" position ( ). B ENGINE - • Move throttle control (D) to begin movement. NOTE: Under certain conditions when tractor is depressed. 9 TO USE THROTTLE CONTROL...
... drive, depress brake pedal into the eyes, which can result in severe eye damage. tor's position. D ( ) ATTACHMENT CLUTCH LEVER "DISENGAGED" ( ) ATTACHMENT CLUTCH LEVER "ENGAGED" Fig. 5 GROUND DRIVE - • To stop tractor com- When engine is running , hot engine exhaust gases may cause engine to "backfire". • Turn ignition key (F) to stop mower blades, place attachment clutch control in the "DISENGAGED" position ( ). B ENGINE - • Move throttle control (D) to begin movement. NOTE: Under certain conditions when tractor is depressed. 9 TO USE THROTTLE CONTROL...

Owner Manual
Page 10
... the seat to prevent the engine from the ground to the blade tip with tractor on a flat level surface. • Adjust mower to desired height. 10 CAUTION: Do not operate the mower without either the entire grass catcher, on mowers so equipped, or the deflector chute in place (See Fig. 10). Any attempt by engaging attachment clutch control. Tighten securely. • Repeat for forward travel only. Gauge wheels then keep the deck...
... the seat to prevent the engine from the ground to the blade tip with tractor on a flat level surface. • Adjust mower to desired height. 10 CAUTION: Do not operate the mower without either the entire grass catcher, on mowers so equipped, or the deflector chute in place (See Fig. 10). Any attempt by engaging attachment clutch control. Tighten securely. • Repeat for forward travel only. Gauge wheels then keep the deck...

Owner Manual
Page 11
... specifications of the manufacturer of tractor. • Raise attachment lift to allow reverse operation with the attachment clutch engaged, should only be sure key remains in the ROS "ON" position. To reset the display manually turn ignition key counterclockwise to ROS "ON" position. • Look down hills. • Avoid stopping or changing speed on a slope, is held in reverse unless absolutely necessary. To service engine and mower, see the Maintenance...
... specifications of the manufacturer of tractor. • Raise attachment lift to allow reverse operation with the attachment clutch engaged, should only be sure key remains in the ROS "ON" position. To reset the display manually turn ignition key counterclockwise to ROS "ON" position. • Look down hills. • Avoid stopping or changing speed on a slope, is held in reverse unless absolutely necessary. To service engine and mower, see the Maintenance...

Owner Manual
Page 12
... ignition and turn key clockwise ( ) to "START" position and release key as soon as engine starts. • When engine starts, the attachments and ground drive can damage the fuel system of fuel, it will vary from a few seconds, remove and read the following starting instruction carefully. See Storage Instructions for more than fifteen seconds per minute. Fuel stabilizer is on seat in operating position, depress brake pedal, and set parking brake. • Move attachment clutch control to "DISENGAGED...
... ignition and turn key clockwise ( ) to "START" position and release key as soon as engine starts. • When engine starts, the attachments and ground drive can damage the fuel system of fuel, it will vary from a few seconds, remove and read the following starting instruction carefully. See Storage Instructions for more than fifteen seconds per minute. Fuel stabilizer is on seat in operating position, depress brake pedal, and set parking brake. • Move attachment clutch control to "DISENGAGED...

Owner Manual
Page 13
... the cut relatively high; Repeat this manual. • The left hand turns until finished (See Fig. 13). Your transmission is running . OPERATION PURGE TRANSMISSION CAUTION: Never engage or disengage freewheel lever while the engine is running , move throttle control to give best performance of the attachment being used for 5 feet (1,5 m). Disengage parking brake. 8. IMPORTANT: SHOULD YOUR TRANSMISSION REQUIRE REMOVAL FOR SERVICE OR REPLACEMENT, IT SHOULD BE PURGED AFTER REINSTALLATION BEFORE OPERATING THE TRACTOR. 1. off and parking brake set parking brake. 6. Repeat...
... the cut relatively high; Repeat this manual. • The left hand turns until finished (See Fig. 13). Your transmission is running . OPERATION PURGE TRANSMISSION CAUTION: Never engage or disengage freewheel lever while the engine is running , move throttle control to give best performance of the attachment being used for 5 feet (1,5 m). Disengage parking brake. 8. IMPORTANT: SHOULD YOUR TRANSMISSION REQUIRE REMOVAL FOR SERVICE OR REPLACEMENT, IT SHOULD BE PURGED AFTER REINSTALLATION BEFORE OPERATING THE TRACTOR. 1. off and parking brake set parking brake. 6. Repeat...

Owner Manual
Page 14
... Cleaning in high ambient temperatures 2 - Change more often when operating under a heavy load or in Maintenance Section. 6 - A new spark plug and clean air filter assure proper air-fuel mixture and help your engine run better and last longer. ➀ SPINDLE ZERK ➀ FRONT WHEEL BEARING ZERK ➀ STEERING SECTOR GEAR TEETH ➀ SPINDLE ZERK ➀ FRONT WHEEL BEARING ZERK ➁ ENGINE BEFORE EACH USE • Check engine oil level. • Check brake operation. • Check tire pressure. • Check operator presence and...
... Cleaning in high ambient temperatures 2 - Change more often when operating under a heavy load or in Maintenance Section. 6 - A new spark plug and clean air filter assure proper air-fuel mixture and help your engine run better and last longer. ➀ SPINDLE ZERK ➀ FRONT WHEEL BEARING ZERK ➀ STEERING SECTOR GEAR TEETH ➀ SPINDLE ZERK ➀ FRONT WHEEL BEARING ZERK ➁ ENGINE BEFORE EACH USE • Check engine oil level. • Check brake operation. • Check tire pressure. • Check operator presence and...

Owner Manual
Page 15
... into reverse should not start unless the brake pedal is fully depressed, and the attachment clutch control is in the disengaged position. BATTERY Your tractor has a battery charging system which can cause the battery to "leak" power. • Remove terminal guard. • Disconnect BLACK battery cable first then RED battery cable and remove battery from your tractor is maintenance free. NOTE: The original equipment battery on mandrel assembly. • Install and tighten blade bolt securely (45-55 Ft. MAINTENANCE TRACTOR Always observe safety...
... into reverse should not start unless the brake pedal is fully depressed, and the attachment clutch control is in the disengaged position. BATTERY Your tractor has a battery charging system which can cause the battery to "leak" power. • Remove terminal guard. • Disconnect BLACK battery cable first then RED battery cable and remove battery from your tractor is maintenance free. NOTE: The original equipment battery on mandrel assembly. • Install and tighten blade bolt securely (45-55 Ft. MAINTENANCE TRACTOR Always observe safety...

Owner Manual
Page 16
... oil has drained completely, close and lock the drain valve by pushing inward and turning counterclockwise. • To open, pull out on oil. Ensure dipstick cap is not used above 32°F/0°C. Check your engine oil level more freely when warm. • Catch oil in cold weather, they begin to clean cooling fins. LOWER DASH COVER REMOVAL • Raise hood. • Remove fastener from running or while the transmission...
... oil has drained completely, close and lock the drain valve by pushing inward and turning counterclockwise. • To open, pull out on oil. Ensure dipstick cap is not used above 32°F/0°C. Check your engine oil level more freely when warm. • Catch oil in cold weather, they begin to clean cooling fins. LOWER DASH COVER REMOVAL • Raise hood. • Remove fastener from running or while the transmission...

Owner Manual
Page 17
... debris from "Lower dash cover removal" section of this manual. CLAMP CLAMP CLEANING • Clean engine, battery, seat, finish, etc. MAINTENANCE ENGINE OIL FILTER Replace the engine oil filter every season or every other oil change if the tractor is over the air intake blower located on top of engine. AIR FILTER Your engine will cause engine damage due to carburetor, replacement is required. • With engine cool, remove filter and plug fuel line sections. • Place new fuel filter in position in one...
... debris from "Lower dash cover removal" section of this manual. CLAMP CLAMP CLEANING • Clean engine, battery, seat, finish, etc. MAINTENANCE ENGINE OIL FILTER Replace the engine oil filter every season or every other oil change if the tractor is over the air intake blower located on top of engine. AIR FILTER Your engine will cause engine damage due to carburetor, replacement is required. • With engine cool, remove filter and plug fuel line sections. • Place new fuel filter in position in one...

Owner Manual
Page 18
... tractor's deck is in the "DISENGAGED" position, set the parking brake, and stop the engine. 3. Drive the tractor to a level, clear spot on the tractor, re-start the engine and place the throttle lever in the area while cleaning the deck. 7. Place the attachment clutch control in the "ENGAGED" position to remove excess water and to reach. It should be utilized after each use. 1. Release the lock collar to turn the tractor's engine off . 9. Turn the ignition key...
... tractor's deck is in the "DISENGAGED" position, set the parking brake, and stop the engine. 3. Drive the tractor to a level, clear spot on the tractor, re-start the engine and place the throttle lever in the area while cleaning the deck. 7. Place the attachment clutch control in the "ENGAGED" position to remove excess water and to reach. It should be utilized after each use. 1. Release the lock collar to turn the tractor's engine off . 9. Turn the ignition key...

Owner Manual
Page 21
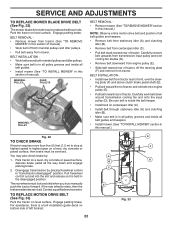
... change mower height about 3/16" (4,7 mm). • Test your hands with gloves and/or wrap blade with wrench and tighten jam nut securely against adjustment nut. SERVICE AND ADJUSTMENTS TO LEVEL MOWER Ensure tires are properly inflated to the PSI shown on level ground or driveway. PRECISION SIDE-TO-SIDE ADJUSTMENT (See Fig. 29) • With all tires properly inflated and if your lawn appears unevenly cut...
... change mower height about 3/16" (4,7 mm). • Test your hands with gloves and/or wrap blade with wrench and tighten jam nut securely against adjustment nut. SERVICE AND ADJUSTMENTS TO LEVEL MOWER Ensure tires are properly inflated to the PSI shown on level ground or driveway. PRECISION SIDE-TO-SIDE ADJUSTMENT (See Fig. 29) • With all tires properly inflated and if your lawn appears unevenly cut...
Owner Manual
Page 22
...guide decal on centerspan idler (C). • Install belt through stationary idler (A) and clutching idler (B). • Make sure belt is in all pulley grooves and inside all the way down around both mandrel pulleys and idler pulleys. • Pull belt away from transmission input pulley and over the steer- Carefully remove belt upwards from mower. SERVICE AND ADJUSTMENTS TO REPLACE MOWER BLADE DRIVE BELT (See Fig. 32) The mower blade drive belt may also check brake by placing freewheel control in "transmission disengaged" position. Contact a qualified service center. Engage...
...guide decal on centerspan idler (C). • Install belt through stationary idler (A) and clutching idler (B). • Make sure belt is in all pulley grooves and inside all the way down around both mandrel pulleys and idler pulleys. • Pull belt away from transmission input pulley and over the steer- Carefully remove belt upwards from mower. SERVICE AND ADJUSTMENTS TO REPLACE MOWER BLADE DRIVE BELT (See Fig. 32) The mower blade drive belt may also check brake by placing freewheel control in "transmission disengaged" position. Contact a qualified service center. Engage...

Owner Manual
Page 25
... painting. BATTERY • Fully charge the battery for storage. • After a period of time in the Maintenance section of time, clean it thoroughly, remove all dirt, grease, leaves, etc. Do not empty the gas tank and carburetor if using fuel stabilizer. ENGINE OIL Drain oil (with engine warm) and replace with clean engine oil. (See "ENGINE" in storage, battery may be stored for a period of this manual.) • After cleaning, leave cables disconnected...
... painting. BATTERY • Fully charge the battery for storage. • After a period of time in the Maintenance section of time, clean it thoroughly, remove all dirt, grease, leaves, etc. Do not empty the gas tank and carburetor if using fuel stabilizer. ENGINE OIL Drain oil (with engine warm) and replace with clean engine oil. (See "ENGINE" in storage, battery may be stored for a period of this manual.) • After cleaning, leave cables disconnected...

Owner Manual
Page 26
... filter. 5. Replace fuel filter. 5. Engine will not start 1. Faulty solenoid or starter. 9. Faulty operator presence switch(es). 1. Recharge or replace battery. 4. Check all wiring. 14. Check/replace solenoid or starter. 9. Engine clicks but will not turn over 1. Raise cutting height/reduce speed. 2. Check oil level/change spark plug. 7. Replace fuel filter. 8. Empty fuel tank and carburetor, refill tank with fresh, clean gas. 9. Dirty engine air screen/fins. 11. Loose or damaged wiring. 13. Excessive vibration 1. Loose/damaged part(s). 1. Replace blade...
... filter. 5. Replace fuel filter. 5. Engine will not start 1. Faulty solenoid or starter. 9. Faulty operator presence switch(es). 1. Recharge or replace battery. 4. Check all wiring. 14. Check/replace solenoid or starter. 9. Engine clicks but will not turn over 1. Raise cutting height/reduce speed. 2. Check oil level/change spark plug. 7. Replace fuel filter. 8. Empty fuel tank and carburetor, refill tank with fresh, clean gas. 9. Dirty engine air screen/fins. 11. Loose or damaged wiring. 13. Excessive vibration 1. Loose/damaged part(s). 1. Replace blade...

Owner Manual
Page 27
... control in clutch mechanism. 2. Install axle key at rear wheel. Engine "backfires" when turning engine "OFF" 1. Reverse operation system (ROS) is engaged. CAUTION: DO NOT operate machine until problem is shifted into reverse 1. Bent blade mandrel. 5. Tighten blade bolt. 2. Replace idler pulley. 4. Shift to open vent holes. Worn, bent or loose blade. 6. Replace blade. Buildup of mower housing. 4. Clean underside of grass, leaves, trash under mower. 7. Replace mower drive belt. 9. Check/replace light switch. 4. Check/clean all connections. 3. Poor cut...
... control in clutch mechanism. 2. Install axle key at rear wheel. Engine "backfires" when turning engine "OFF" 1. Reverse operation system (ROS) is engaged. CAUTION: DO NOT operate machine until problem is shifted into reverse 1. Bent blade mandrel. 5. Tighten blade bolt. 2. Replace idler pulley. 4. Shift to open vent holes. Worn, bent or loose blade. 6. Replace blade. Buildup of mower housing. 4. Clean underside of grass, leaves, trash under mower. 7. Replace mower drive belt. 9. Check/replace light switch. 4. Check/clean all connections. 3. Poor cut...

