
Owner Manual
Page 3
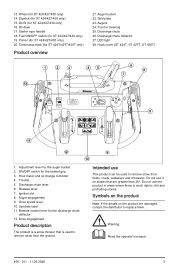
...;. Starter rope handle 18. Primer (for ST 424/427/430 only) 16. Throttle 5. Do not use the product in areas where there is used to remove snow from fields, roads, walkways and driveways. Auger engagement 9. Symbols on the product Note: If the decals on slopes that is much debris, dirt and protruding stones. Augers 24. Discharge chute deflector 27. Drive speed lever 10. Remote control lever for cleaning 25. Tool...
...;. Starter rope handle 18. Primer (for ST 424/427/430 only) 16. Throttle 5. Do not use the product in areas where there is used to remove snow from fields, roads, walkways and driveways. Auger engagement 9. Symbols on the product Note: If the decals on slopes that is much debris, dirt and protruding stones. Augers 24. Discharge chute deflector 27. Drive speed lever 10. Remote control lever for cleaning 25. Tool...
Owner Manual
Page 4
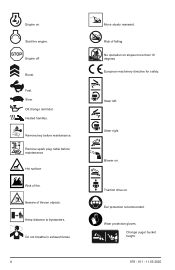
... rearward. Steer left. Traction drive on . Engine off. Oil change reminder. Risk of fire. European machinery directive for safety. Blower on . Change auger bucket height. 876 - 011 - 11.05.2020 Remove key before maintenance. Ear protection recommended. Boost. Fast. Remove spark plug cable before maintenance. No operation on . Keep distance to bystanders. Engine on slopes more than 10 degrees. Start the engine. Slow. Heated handles. Risk of falling. Beware...
... rearward. Steer left. Traction drive on . Engine off. Oil change reminder. Risk of fire. European machinery directive for safety. Blower on . Change auger bucket height. 876 - 011 - 11.05.2020 Remove key before maintenance. Ear protection recommended. Boost. Fast. Remove spark plug cable before maintenance. No operation on . Keep distance to bystanders. Engine on slopes more than 10 degrees. Start the engine. Slow. Heated handles. Risk of falling. Beware...
Owner Manual
Page 5
... to keep your dealer, service agent or approved service center for correct installation of the situation. Injury or death is a possible result of incorrect maintenance. • Do not breathe in this manual. Use the instructions for information. • Disconnect the spark plug cable before you use the product for the tasks found in good condition. Only use approved attachments and accessories. • Do...
... to keep your dealer, service agent or approved service center for correct installation of the situation. Injury or death is a possible result of incorrect maintenance. • Do not breathe in this manual. Use the instructions for information. • Disconnect the spark plug cable before you use the product for the tasks found in good condition. Only use approved attachments and accessories. • Do...

Owner Manual
Page 6
... you leave the operating position, before unclogging the auger housing or chute deflector, and when making any damage, and repair the damage before filling. • When practical, remove gas-powered equipment from the spark plug, disconnect the cord on . • The operator of the discharge opening at all moving parts. If this is highly flammable. • Use an approved fuel container. • Never add fuel to fall. •...
... you leave the operating position, before unclogging the auger housing or chute deflector, and when making any damage, and repair the damage before filling. • When practical, remove gas-powered equipment from the spark plug, disconnect the cord on . • The operator of the discharge opening at all moving parts. If this is highly flammable. • Use an approved fuel container. • Never add fuel to fall. •...
Owner Manual
Page 7
... use and when the engine operates at idle speed. Safety devices on your clothing, change clothing immediately. • Do not get fuel on the product. Make sure that follow before you refuel, open the fuel tank cap slowly and release the pressure carefully. • Do not add fuel to an approved Husqvarna service agent. Battery safety WARNING: A damaged battery can cause injury. WARNING: Read the warning instructions...
... use and when the engine operates at idle speed. Safety devices on your clothing, change clothing immediately. • Do not get fuel on the product. Make sure that follow before you refuel, open the fuel tank cap slowly and release the pressure carefully. • Do not add fuel to an approved Husqvarna service agent. Battery safety WARNING: A damaged battery can cause injury. WARNING: Read the warning instructions...

Owner Manual
Page 8
... 1. All other metal objects near the battery. See Disposal on the product, stop the engine and remove the ignition cable from the engine contain carbon monoxide, an odorless, poisonous and very dangerous gas. Always use the product. • The exhaust fumes from the spark plug. • Use protective gloves when you do maintenance on the blades. Cut the four corners of the carton and...
... 1. All other metal objects near the battery. See Disposal on the product, stop the engine and remove the ignition cable from the engine contain carbon monoxide, an odorless, poisonous and very dangerous gas. Always use the product. • The exhaust fumes from the spark plug. • Use protective gloves when you do maintenance on the blades. Cut the four corners of the carton and...

Owner Manual
Page 10
... discharge chute lever. Push the knob (D) down on the threaded stud and tighten. 6. See To adjust the release cable of the product. 2. Put the cables through the hole (C). 4. Install the cable barrel fitting (F) to the lower handle. Put the bolt (B) through the hook cable slot. • For ST 424, ST 427, ST 430 use hook cable slot (C). • For ST 424T, ST 427T, ST 430T use hook cable slot (K). J I ) with the roll pin (C). 6. Adjust...
... discharge chute lever. Push the knob (D) down on the threaded stud and tighten. 6. See To adjust the release cable of the product. 2. Put the cables through the hole (C). 4. Install the cable barrel fitting (F) to the lower handle. Put the bolt (B) through the hook cable slot. • For ST 424, ST 427, ST 430 use hook cable slot (C). • For ST 424T, ST 427T, ST 430T use hook cable slot (K). J I ) with the roll pin (C). 6. Adjust...
Owner Manual
Page 12
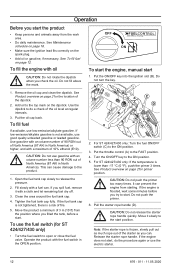
... INSTRUCTIONS ON To start the engine, manual start . Turn the ON/OFF key to release the pressure. 2. See Product overview on page 2 for the location of fire. 5. Pull the starter rope handle (D). Remove the oil cap and clean the dipstick. See Product overview on page 2 for ST 424/427/430 only) • Turn the fuel switch to start position. Tighten the fuel tank cap fully. CAUTION: Do not push the primer too many times. Note: If the starter rope...
... INSTRUCTIONS ON To start the engine, manual start . Turn the ON/OFF key to release the pressure. 2. See Product overview on page 2 for the location of fire. 5. Pull the starter rope handle (D). Remove the oil cap and clean the dipstick. See Product overview on page 2 for ST 424/427/430 only) • Turn the fuel switch to start position. Tighten the fuel tank cap fully. CAUTION: Do not push the primer too many times. Note: If the starter rope...
Owner Manual
Page 13
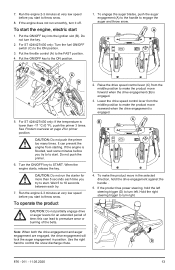
... in position. Put the throttle control (A) to start to START. A A B C D 5. When the engine starts, release the key. CAUTION: Do not run smoothly, turn the key. 2. Hold the right steering trigger to control the snow discharge chute. 876 - 011 - 11.05.2020 13 If the engine does not run the starter for primer position. Put the ON/OFF key into the ignition slot (B). CAUTION: Do not push the primer too many times. Use...
... in position. Put the throttle control (A) to start to START. A A B C D 5. When the engine starts, release the key. CAUTION: Do not run smoothly, turn the key. 2. Hold the right steering trigger to control the snow discharge chute. 876 - 011 - 11.05.2020 13 If the engine does not run the starter for primer position. Put the ON/OFF key into the ignition slot (B). CAUTION: Do not push the primer too many times. Use...
Owner Manual
Page 15
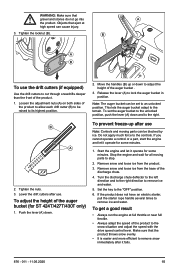
... to the snow situation and adjust the speed with the drive speed control lever. Loosen the adjustment nuts (A) on both sides of the discharge chute. 4. Remove snow and loose ice from the base of the product to allow each drift cutter (B) to be set the auger bucket to the unlocked position, push the lever (A) down . 2. If the product does not have an electric starter, pull the starter rope handle several times to cut through...
... to the snow situation and adjust the speed with the drive speed control lever. Loosen the adjustment nuts (A) on both sides of the discharge chute. 4. Remove snow and loose ice from the base of the product to allow each drift cutter (B) to be set the auger bucket to the unlocked position, push the lever (A) down . 2. If the product does not have an electric starter, pull the starter rope handle several times to cut through...
Owner Manual
Page 17
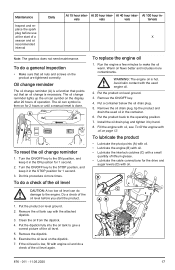
... not need maintenance. Examine the oil level on for the drive and auger levers (D) with a small quantity of the oil level. 5. Remove the oil drain plug, tip the product and drain the used engine oil. 2. WARNING: The engine oil is then on the dipstick. 7. The oil can do a check of a season and at the start the product. 1. Run the engine a few minutes to the operating position. 7. Put the product on level ground. 3. Put a container below the oil drain plug. 5. Warm oil...
... not need maintenance. Examine the oil level on for the drive and auger levers (D) with a small quantity of the oil level. 5. Remove the oil drain plug, tip the product and drain the used engine oil. 2. WARNING: The engine oil is then on the dipstick. 7. The oil can do a check of a season and at the start the product. 1. Run the engine a few minutes to the operating position. 7. Put the product on level ground. 3. Put a container below the oil drain plug. 5. Warm oil...
Owner Manual
Page 18
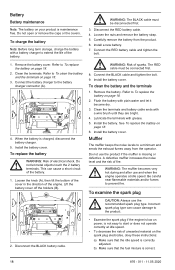
... adjusted. To charge the battery Note: Before long term storage, charge the battery with grease. 5. Remove the battery. Muffler The muffler keeps the noise levels to To replace the battery on page 18. 6. When the battery is correct. 18 876 - 011 - 11.05.2020 Install the battery cover. Lubricate the terminals with a battery charger to To replace the battery on the spark plug electrodes, obey these instructions: a) Make sure that the fuel mixture...
... adjusted. To charge the battery Note: Before long term storage, charge the battery with grease. 5. Remove the battery. Muffler The muffler keeps the noise levels to To replace the battery on page 18. 6. When the battery is correct. 18 876 - 011 - 11.05.2020 Install the battery cover. Lubricate the terminals with a battery charger to To replace the battery on the spark plug electrodes, obey these instructions: a) Make sure that the fuel mixture...
Owner Manual
Page 19
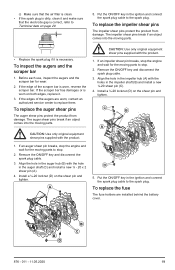
... impeller shaft (B) and install a new ¼-20 shear pin (C). 4. Before each use, inspect the augers and the scraper bar for the moving parts to stop the engine and wait for wear. 2. If the edges of the scraper bar is necessary. CAUTION: Use only original equipment shear pins supplied with the hole in the auger hub (B) with the product. 1. Remove the ON/OFF key and disconnect the spark plug cable. 3. Install...
... impeller shaft (B) and install a new ¼-20 shear pin (C). 4. Before each use, inspect the augers and the scraper bar for the moving parts to stop the engine and wait for wear. 2. If the edges of the scraper bar is necessary. CAUTION: Use only original equipment shear pins supplied with the hole in the auger hub (B) with the product. 1. Remove the ON/OFF key and disconnect the spark plug cable. 3. Install...
Owner Manual
Page 20
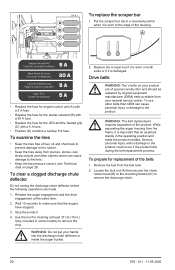
... the discharge chute deflector or inside the auger bucket. 2. Use the tool for cleaning (at the same time. 2. Serious personal injury and/or damage to remove the clog. Put the scraper bar (A) in some models) to the product could occur if the product falls during the belt replacement process. Wait 10 seconds to make sure that secures the chute rotator head (B) to the...
... the discharge chute deflector or inside the auger bucket. 2. Use the tool for cleaning (at the same time. 2. Serious personal injury and/or damage to remove the clog. Put the scraper bar (A) in some models) to the product could occur if the product falls during the belt replacement process. Wait 10 seconds to make sure that secures the chute rotator head (B) to the...
Owner Manual
Page 21
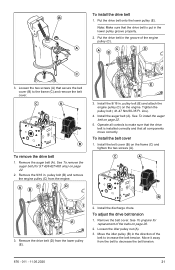
... chute. See To prepare for ST 424/427/430 only) on page 20. 2. See To remove the auger belt (for replacement of the belts on page 22. 2. Lbs). 4. Install the auger belt (A). To install the belt cover 1. To adjust the drive belt tension 1. Loosen the idler pulley nut (A). 3. Put the drive belt onto the lower pulley (E). Put the drive belt in . Remove the 9/16 in the groove of the belt to the frame (C) and remove the belt cover. pulley bolt...
... chute. See To prepare for ST 424/427/430 only) on page 20. 2. See To remove the auger belt (for replacement of the belts on page 22. 2. Lbs). 4. Install the auger belt (A). To install the belt cover 1. To adjust the drive belt tension 1. Loosen the idler pulley nut (A). 3. Put the drive belt onto the lower pulley (E). Put the drive belt in . Remove the 9/16 in the groove of the belt to the frame (C) and remove the belt cover. pulley bolt...

Owner Manual
Page 23
... back and pivots to attach to decrease the belt tension. 4. For ST 424/427/430 only: Install the ¼'' bolts (D) and tighten (5-8 Nm). 7. Operate all components are moving . Measure the time for replacement of the auger belt to monitor the movement of the auger. 6. Remove the cable cover on page 21. Remove the wooden block from the auger control cable, unscrew the bottom jam nut (B) and tighten the top...
... back and pivots to attach to decrease the belt tension. 4. For ST 424/427/430 only: Install the ¼'' bolts (D) and tighten (5-8 Nm). 7. Operate all components are moving . Measure the time for replacement of the auger belt to monitor the movement of the auger. 6. Remove the cable cover on page 21. Remove the wooden block from the auger control cable, unscrew the bottom jam nut (B) and tighten the top...

Owner Manual
Page 24
... resolve the problem, replace the auger belt. To adjust the release cable of the discharge chute does not move freely. 3. Put the discharge chute lever in the center position. 2. Loosen the locking screw (A) 1 turn to make the cables less tight. To adjust the release cable, turn the cable adjuster until the discharge chute points straight forward, and the cables are necessary for ST 424T/ 427T/430T only) Note: Tools that are tight. Remove the wheel from...
... resolve the problem, replace the auger belt. To adjust the release cable of the discharge chute does not move freely. 3. Put the discharge chute lever in the center position. 2. Loosen the locking screw (A) 1 turn to make the cables less tight. To adjust the release cable, turn the cable adjuster until the discharge chute points straight forward, and the cables are necessary for ST 424T/ 427T/430T only) Note: Tools that are tight. Remove the wheel from...
Owner Manual
Page 27
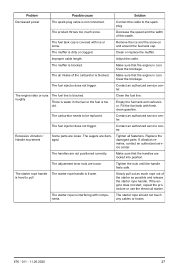
... fuel line. The carburetor needs to the spark plug. The fuel injector does not trigger. Contact an authorized service center. Replace the damaged parts. The handles are loose. The starter rope handle The starter rope handle is covered with ice or snow. Clear the blockage. If vibration remains, contact an authorized service center. If the engine does not start, repeat the procedure or use the electrical starter. Clean or replace the muffler. The fuel injector does not trigger. The adjustment lever nuts are not positioned...
... fuel line. The carburetor needs to the spark plug. The fuel injector does not trigger. Contact an authorized service center. Replace the damaged parts. The handles are loose. The starter rope handle The starter rope handle is covered with ice or snow. Clear the blockage. If vibration remains, contact an authorized service center. If the engine does not start, repeat the procedure or use the electrical starter. Clean or replace the muffler. The fuel injector does not trigger. The adjustment lever nuts are not positioned...
Owner Manual
Page 28
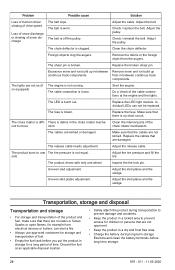
... the tire lock pin. Discard the fuel at the engine and the lights. Adjust the belt. Replace the broken shear pin. side Adjust the tire pressure and fill the tire. Problem Possible cause Solution Loss of traction drive/ slowing of drive speed Loss of snow discharge or slowing of the cable connections at an applicable disposal location • Safely attach the product during long-term storage. The shear pin is worn...
... the tire lock pin. Discard the fuel at the engine and the lights. Adjust the belt. Replace the broken shear pin. side Adjust the tire pressure and fill the tire. Problem Possible cause Solution Loss of traction drive/ slowing of drive speed Loss of snow discharge or slowing of the cable connections at an applicable disposal location • Safely attach the product during long-term storage. The shear pin is worn...

Parts Manual
Page 23
...FUEL CAP 17 597 35 82-01 THROTTLE BODY ASSEMBLY 18 532 44 39-44 CDI IGNITION COIL 20 532 42 92-55 SPARK PLUG 23 597 35 83-01 FUEL HOSE KIT (QTY 3 W/CLAMPS) 28 582 62 15-01 RECOIL STARTER 29 582 62 16-01 STARTER CUP 30 597 35 86-01 BLOWER HOUSING 31 597 35 87-01 CYL COVER (COMPLETE ASSEMBLY... KIT (SET OF 2) 69 586 32 67-01 THROTTLE BODY MTG STUD KIT (2) 72 597 36 04-01 LABEL KIT (HOP) (EFI) 75 532 42 92-32 SHIELD - MCR 8 532 44 39-00 FLYWHEEL - SHROUD MOUNTING (STARTER SIDE) 33 597 35 91-01 BRACKET - SHROUD SUPPORT (THROTTLE BODY SIDE) 34 532 43 69-66 SPARK PLUG BOOT - ENGINE, LCT KEY PART...
...FUEL CAP 17 597 35 82-01 THROTTLE BODY ASSEMBLY 18 532 44 39-44 CDI IGNITION COIL 20 532 42 92-55 SPARK PLUG 23 597 35 83-01 FUEL HOSE KIT (QTY 3 W/CLAMPS) 28 582 62 15-01 RECOIL STARTER 29 582 62 16-01 STARTER CUP 30 597 35 86-01 BLOWER HOUSING 31 597 35 87-01 CYL COVER (COMPLETE ASSEMBLY... KIT (SET OF 2) 69 586 32 67-01 THROTTLE BODY MTG STUD KIT (2) 72 597 36 04-01 LABEL KIT (HOP) (EFI) 75 532 42 92-32 SHIELD - MCR 8 532 44 39-00 FLYWHEEL - SHROUD MOUNTING (STARTER SIDE) 33 597 35 91-01 BRACKET - SHROUD SUPPORT (THROTTLE BODY SIDE) 34 532 43 69-66 SPARK PLUG BOOT - ENGINE, LCT KEY PART...


