Owners Manual
Page 3
... Steering Control Levers 18 Parking Brake 19 Throttle Control 19 Blade Switch 19 Ignition Switch 20 Choke Control 20 Fuses 20 Fuel Tank 21 Fuel Shut Off Valve 22 Cutting Height Adjuster 22 Bypass Linkages 22 Seat Adjustment Lever 23 Hour Meter 23 Tracking Knob 23 OPERATION 24 Training 24 Steering 24 Before Starting 25 Starting the Engine 26 Jumper Cables Use 29 Running 30 Operating On Hills 31 Mowing Tips 32 Stopping the Engine 33 Moving Machine By Hand 34 MAINTENANCE 35 Maintenance Schedule 35 Battery 37 Safety...
... Steering Control Levers 18 Parking Brake 19 Throttle Control 19 Blade Switch 19 Ignition Switch 20 Choke Control 20 Fuses 20 Fuel Tank 21 Fuel Shut Off Valve 22 Cutting Height Adjuster 22 Bypass Linkages 22 Seat Adjustment Lever 23 Hour Meter 23 Tracking Knob 23 OPERATION 24 Training 24 Steering 24 Before Starting 25 Starting the Engine 26 Jumper Cables Use 29 Running 30 Operating On Hills 31 Mowing Tips 32 Stopping the Engine 33 Moving Machine By Hand 34 MAINTENANCE 35 Maintenance Schedule 35 Battery 37 Safety...
Owners Manual
Page 5
... equipped with these instructions and common sense. The manufacturer's directions concerning operation, maintenance, and repairs must be potentially dangerous if used in accordance with special accessories provided by all power equipment, can also be operated, maintained, and repaired by steering controls both contribute to change without obstacles such as stones, tree stumps, etc. Lawn mowers and all who are used improperly. Use only approved repair parts to stop.
... equipped with these instructions and common sense. The manufacturer's directions concerning operation, maintenance, and repairs must be potentially dangerous if used in accordance with special accessories provided by all power equipment, can also be operated, maintained, and repaired by steering controls both contribute to change without obstacles such as stones, tree stumps, etc. Lawn mowers and all who are used improperly. Use only approved repair parts to stop.
Owners Manual
Page 9
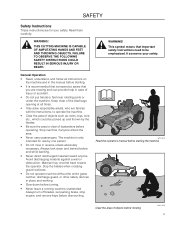
... entire grass catcher, discharge guard, or other safety devices in reverse unless absolutely necessary. Avoid discharging material against a wall or obstruction. The machine is only intended for your safety. Always turn off blades, set parking brake, stop engine, and remove keys before dismounting. 8011-512 Read the operator's manual before starting . • It is clear of injury or accident. • Do not put hands or feet near rotating parts or...
... entire grass catcher, discharge guard, or other safety devices in reverse unless absolutely necessary. Avoid discharging material against a wall or obstruction. The machine is only intended for your safety. Always turn off blades, set parking brake, stop engine, and remove keys before dismounting. 8011-512 Read the operator's manual before starting . • It is clear of injury or accident. • Do not put hands or feet near rotating parts or...

Owners Manual
Page 13
... containers. • Never remove gas cap or add fuel with the engine running. Replace gas cap and tighten securely. • Do not start the engine near spilled fuel. • Never use extreme care in fuel system, engine must not be started when the driver's floor plate or any protective plate for burns if touched. Allow engine to cool before refueling. There is risk for the mower deck's drive belt is removed. 13 If this...
... containers. • Never remove gas cap or add fuel with the engine running. Replace gas cap and tighten securely. • Do not start the engine near spilled fuel. • Never use extreme care in fuel system, engine must not be started when the driver's floor plate or any protective plate for burns if touched. Allow engine to cool before refueling. There is risk for the mower deck's drive belt is removed. 13 If this...
Owners Manual
Page 14
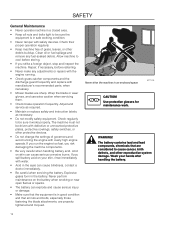
Clean oil or fuel spillage and remove any adjustments or repairs with the engine running. • Check grass catcher components and the discharge guard frequently and replace with manufacturer's recommended parts, when necessary. • Mower blades are considered to be driven with defective or unmounted protective plates, protective cowlings, safety switches, or other protective devices. • Do not change the settings of grass, leaves, or other reproductive system damage. Wrap the blade or...
Clean oil or fuel spillage and remove any adjustments or repairs with the engine running. • Check grass catcher components and the discharge guard frequently and replace with manufacturer's recommended parts, when necessary. • Mower blades are considered to be driven with defective or unmounted protective plates, protective cowlings, safety switches, or other protective devices. • Do not change the settings of grass, leaves, or other reproductive system damage. Wrap the blade or...
Owners Manual
Page 15
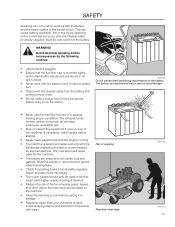
... on the battery. Adjust and service as necessary. • The mulch blades should only be used in familiar areas when higher quality mowing is spilled fuel. • Disconnect the chassis cable from the battery. Sparking in spaces lacking proper ventilation. Only use approved repair parts for the machine. • The blades are stored in storage. • Regularly clean deck and underside of deck, avoid spraying engine and electrical components...
... on the battery. Adjust and service as necessary. • The mulch blades should only be used in familiar areas when higher quality mowing is spilled fuel. • Disconnect the chassis cable from the battery. Sparking in spaces lacking proper ventilation. Only use approved repair parts for the machine. • The blades are stored in storage. • Regularly clean deck and underside of deck, avoid spraying engine and electrical components...
Owners Manual
Page 22
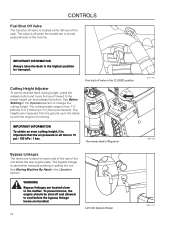
... desired deck cutting height, press the release button and move the lever forward to 4" (102mm) in all tires is 15 psi / 103 kPa / 1 bar. Fuel shut off valve in the Operation section. To prevent burns, the engine should be shut off when the handle tab is important that the air pressure in ½" (13mm) increments. CONTROLS Fuel Shut Off Valve The fuel shut off valve is used when manually pushing or pulling...
... desired deck cutting height, press the release button and move the lever forward to 4" (102mm) in all tires is 15 psi / 103 kPa / 1 bar. Fuel shut off valve in the Operation section. To prevent burns, the engine should be shut off when the handle tab is important that the air pressure in ½" (13mm) increments. CONTROLS Fuel Shut Off Valve The fuel shut off valve is used when manually pushing or pulling...
Owners Manual
Page 24
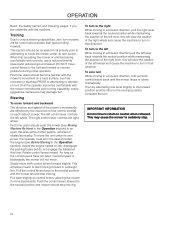
Adjust the engine speed to idle, disengage the parking brake but do not engage the blades at this will not move. This will slow the rotation of the left wheel. Push the control levers forward to suddenly stop moving forward in that direction. To zero turn . This may damage turf. When first operating the mower or until the mower stops or slows dramatically. First time users should be reviewed in...
Adjust the engine speed to idle, disengage the parking brake but do not engage the blades at this will not move. This will slow the rotation of the left wheel. Push the control levers forward to suddenly stop moving forward in that direction. To zero turn . This may damage turf. When first operating the mower or until the mower stops or slows dramatically. First time users should be reviewed in...
Owners Manual
Page 35
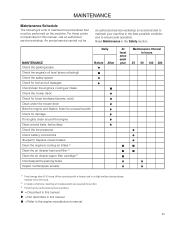
... Daily MAINTENANCE Check the parking brake Check the engine's oil level (every refueling) Check the safety system Check for fuel and oil leakages Check/clean the engine's cooling air intake Check the mower deck Check for loose hardware (screws, nuts) Clean under the mower deck Start the engine and blades, listen for unusual sounds Check for damage Thoroughly clean around the engine Clean around belts, belt pulleys Check the tire pressures Check battery connections Sharpen3)/ Replace mower blades Clean the engine's cooling air intake 2) Clean the air cleaner foam pre-filter 2) Clean the air...
... Daily MAINTENANCE Check the parking brake Check the engine's oil level (every refueling) Check the safety system Check for fuel and oil leakages Check/clean the engine's cooling air intake Check the mower deck Check for loose hardware (screws, nuts) Clean under the mower deck Start the engine and blades, listen for unusual sounds Check for damage Thoroughly clean around the engine Clean around belts, belt pulleys Check the tire pressures Check battery connections Sharpen3)/ Replace mower blades Clean the engine's cooling air intake 2) Clean the air cleaner foam pre-filter 2) Clean the air...
Owners Manual
Page 36
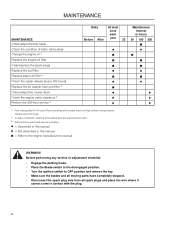
...: • Engage the parking brake. • Place the Blade-switch in the disengaged position. • Turn the ignition switch to the engine manufacturer's manual Maintenance interval in contact with the plug. 36 MAINTENANCE MAINTENANCE Check/adjust throttle cable Check the condition of belts, belt pulleys Change the engine oil 1) Replace the engine oil filter Clean/replace the spark plugs Replace the fuel filter Replace paper air filter 2) Check the caster wheels (every 200 hours) Replace the air cleaner foam pre-filter 2) Check/adjust the mower deck Check the engine valve clearance...
...: • Engage the parking brake. • Place the Blade-switch in the disengaged position. • Turn the ignition switch to the engine manufacturer's manual Maintenance interval in contact with the plug. 36 MAINTENANCE MAINTENANCE Check/adjust throttle cable Check the condition of belts, belt pulleys Change the engine oil 1) Replace the engine oil filter Clean/replace the spark plugs Replace the fuel filter Replace paper air filter 2) Check the caster wheels (every 200 hours) Replace the air cleaner foam pre-filter 2) Check/adjust the mower deck Check the engine valve clearance...
Owners Manual
Page 37
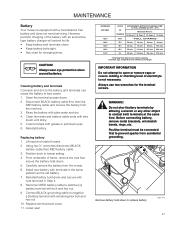
... remove caps or covers. Replace terminal boot cover. 11. Adding or checking level of charger IMPORTANT INFORMATION Do not attempt to replace battery 8050-109 37 Always use two wrenches for charging times. Replacing battery 1. Front underside of the battery with terminals in Step 4. 8. Before connecting battery, remove metal bracelets, wristwatch bands, rings, etc. MAINTENANCE Battery Your mower is not necessary. Rinse the battery with a maintenance free battery and does not need servicing. Reconnect RED battery cable...
... remove caps or covers. Replace terminal boot cover. 11. Adding or checking level of charger IMPORTANT INFORMATION Do not attempt to replace battery 8050-109 37 Always use two wrenches for charging times. Replacing battery 1. Front underside of the battery with terminals in Step 4. 8. Before connecting battery, remove metal bracelets, wristwatch bands, rings, etc. MAINTENANCE Battery Your mower is not necessary. Rinse the battery with a maintenance free battery and does not need servicing. Reconnect RED battery cable...

Owners Manual
Page 40
... needed. 7. The belts are not adjustable. Lower the deck into the lowest cutting position. 3. Wrap the deck belt around spring loaded idler pulley. 4. Tighten the belt guide and replace belt shields on a level surface. Note the position of the cutter housing pulleys and remove belt from belt shields and remove shields. 4. Belt guide 3. Check for reinstallation. 6. Remove bolts from the deck. 1 3 1. Belt shields 2. Place belt around the electric clutch pulley that may have any dirt or grass that is located on the top of operation. Route the belt...
... needed. 7. The belts are not adjustable. Lower the deck into the lowest cutting position. 3. Wrap the deck belt around spring loaded idler pulley. 4. Tighten the belt guide and replace belt shields on a level surface. Note the position of the cutter housing pulleys and remove belt from belt shields and remove shields. 4. Belt guide 3. Check for reinstallation. 6. Remove bolts from the deck. 1 3 1. Belt shields 2. Place belt around the electric clutch pulley that may have any dirt or grass that is located on the top of operation. Route the belt...

Owners Manual
Page 41
... ground/grass (down) or THIS SIDE UP facing deck and spindle housing. 1 3. Tighten blade bolt securely. 5. Blade 2. Check the blades Blade replacement 1. Do not use lower grade hardware than specified. 1. Check the blade mounts. The sharpening of blades should decide whether the blade can be repaired/ground or must be carried out by turning counterclockwise. 2. Blade bolt (special) 3. MAINTENANCE Cutting Blades To attain the best mowing effect, it is heat treated. Replace with a Husqvarna bolt if required. Blades are...
... ground/grass (down) or THIS SIDE UP facing deck and spindle housing. 1 3. Tighten blade bolt securely. 5. Blade 2. Check the blades Blade replacement 1. Do not use lower grade hardware than specified. 1. Check the blade mounts. The sharpening of blades should decide whether the blade can be repaired/ground or must be carried out by turning counterclockwise. 2. Blade bolt (special) 3. MAINTENANCE Cutting Blades To attain the best mowing effect, it is heat treated. Replace with a Husqvarna bolt if required. Blades are...

Owners Manual
Page 43
... pressure. MAINTENANCE Caster Wheels Check every 200 hours. Install in reverse order. Avoid spraying engine and electrical components with a cleanout port, attach the quick connect (from the mower blades. Hardware Check daily. Pull the wheel out of the yoke and take the unit to any type of the deck with cold water. Make it a habit to clean the machine directly after use the spinning action to the tires. Removal...
... pressure. MAINTENANCE Caster Wheels Check every 200 hours. Install in reverse order. Avoid spraying engine and electrical components with a cleanout port, attach the quick connect (from the mower blades. Hardware Check daily. Pull the wheel out of the yoke and take the unit to any type of the deck with cold water. Make it a habit to clean the machine directly after use the spinning action to the tires. Removal...

Owners Manual
Page 46
... Safety System in the Maintenance Section • Faulty carburetor • Choke control is pulled out with a warm engine • Clogged fuel filter or jet • Clogged ventilation valve on the fuel cap • Fuel tank nearly empty • Fouled spark plugs • Rich fuel mixture or fuel-air mixture. • Wrong fuel type • Water in fuel • Clogged air filter • Clogged air filter • Fouled spark plugs • Carburetor incorrectly adjusted • Air trapped in hydraulic system • Blades are loose...
... Safety System in the Maintenance Section • Faulty carburetor • Choke control is pulled out with a warm engine • Clogged fuel filter or jet • Clogged ventilation valve on the fuel cap • Fuel tank nearly empty • Fouled spark plugs • Rich fuel mixture or fuel-air mixture. • Wrong fuel type • Water in fuel • Clogged air filter • Clogged air filter • Fouled spark plugs • Carburetor incorrectly adjusted • Air trapped in hydraulic system • Blades are loose...

Owners Manual
Page 47
... engine • Contamination in the carburetor or fuel line. • Fouled spark plugs Battery not charging • Poor contact of the battery terminal cable connections • Charging lead is disconnected The machine moves slowly, unevenly, or not at all • Parking brake on • Bypass valve on pump open • Drive belt for the transmission slack or has come off • Air trapped in hydraulic system Mower deck not engaging • Drive belt...
... engine • Contamination in the carburetor or fuel line. • Fouled spark plugs Battery not charging • Poor contact of the battery terminal cable connections • Charging lead is disconnected The machine moves slowly, unevenly, or not at all • Parking brake on • Bypass valve on pump open • Drive belt for the transmission slack or has come off • Air trapped in hydraulic system Mower deck not engaging • Drive belt...
Owners Manual
Page 48
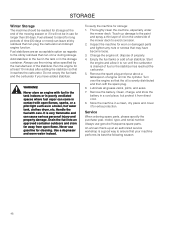
... plug the carburetor and disrupt engine function. Remove the battery. An annual check-up damage to the paint and spray a thin layer of oil on the underside of the mower deck to the fuel in the tank or in a clean, dry place and cover it for extra protection. Run the engine for storage: 1. Do not empty the fuel tank and the carburetor if you have become loose. 3. WARNING! Change...
... plug the carburetor and disrupt engine function. Remove the battery. An annual check-up damage to the paint and spray a thin layer of oil on the underside of the mower deck to the fuel in the tank or in a clean, dry place and cover it for extra protection. Run the engine for storage: 1. Do not empty the fuel tank and the carburetor if you have become loose. 3. WARNING! Change...
Owners Manual
Page 51
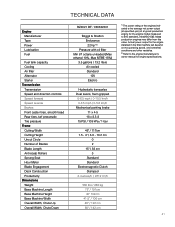
Actual power output for engine specifications. 51 Mass production engines may differ from this value. TECHNICAL DATA Engine Manufacturer Type Power Lubrication Fuel Fuel tank capacity Cooling Air filter Alternator Starter Transmission Transmission Speed and direction controls Speed forward Speed reverse Brakes Front caster tires, smooth tread Rear tires, turf pneumatic Tire pressure Frame Cutting Width Cutting Height Uncut Circle Number of Blades Blade Length Anti-scalp Rollers Sprung Seat Hour Meter Blade Engagement Deck Construction Productivity Dimensions Weight Base Machine Length ...
Actual power output for engine specifications. 51 Mass production engines may differ from this value. TECHNICAL DATA Engine Manufacturer Type Power Lubrication Fuel Fuel tank capacity Cooling Air filter Alternator Starter Transmission Transmission Speed and direction controls Speed forward Speed reverse Brakes Front caster tires, smooth tread Rear tires, turf pneumatic Tire pressure Frame Cutting Width Cutting Height Uncut Circle Number of Blades Blade Length Anti-scalp Rollers Sprung Seat Hour Meter Blade Engagement Deck Construction Productivity Dimensions Weight Base Machine Length ...

Owners Manual
Page 55
... 50-Hour Service Perform the 25-hour service Clean/replace the air cleaner paper filter cartridge (shorter intervals for dusty operating conditions) Change engine oil Lubricate according to lubrication chart Check/adjust the parking brake Date, mtr reading, stamp, sign q q q q q Action 100-Hour Service Perform the 25-hour service Perform the 50-hour service Change the engine oil filter Clean/replace the spark plugs Replace the fuel filter Check V-belts Check tighten caster wheel axle bolts (every 200 hours) Change the air filter's paper cartridge...
... 50-Hour Service Perform the 25-hour service Clean/replace the air cleaner paper filter cartridge (shorter intervals for dusty operating conditions) Change engine oil Lubricate according to lubrication chart Check/adjust the parking brake Date, mtr reading, stamp, sign q q q q q Action 100-Hour Service Perform the 25-hour service Perform the 50-hour service Change the engine oil filter Clean/replace the spark plugs Replace the fuel filter Check V-belts Check tighten caster wheel axle bolts (every 200 hours) Change the air filter's paper cartridge...

Owners Manual
Page 56
... valve seats Check the engine valve clearance Replace the air cleaner foam pre-filter Date, mtr reading, stamp, sign q q q q q q q Action At Least Once Each Year Clean the engine's cooling air intake (25 hours) Replace the air cleaner foam pre-filter (300 hours) Replace the air filter's paper cartridge Change the engine oil (50 hours) Replace the engine oil filter (100 hours) Check/adjust the cutting height Check/adjust the parking brake (50 hours) Clean/Change the spark plugs (100 hours) Change the fuel filter (100 hours) Check the engine valve...
... valve seats Check the engine valve clearance Replace the air cleaner foam pre-filter Date, mtr reading, stamp, sign q q q q q q q Action At Least Once Each Year Clean the engine's cooling air intake (25 hours) Replace the air cleaner foam pre-filter (300 hours) Replace the air filter's paper cartridge Change the engine oil (50 hours) Replace the engine oil filter (100 hours) Check/adjust the cutting height Check/adjust the parking brake (50 hours) Clean/Change the spark plugs (100 hours) Change the fuel filter (100 hours) Check the engine valve...


