

Owners Manual
Page 3
... Locations 17 Steering Control Levers 18 Parking Brake 19 Throttle Control 19 Blade Switch 19 Ignition Switch 20 Choke Control 20 Fuses 20 Fuel Tank 21 Fuel Shut Off Valve 22 Cutting Height Adjuster 22 Seat Adjustment Lever 23 Hour Meter 23 Tracking Knob 23 Operation 24 Training 24 Steering 24 Before Starting 25 Starting the Engine 25 Jumper Cables 28 Running 29 Operating On Hills 30 Mowing Tips 31 Stopping the Engine 32 Manual Transport 33 Maintenance 34 Maintenance Schedule 34 Battery 36 Safety System 37 Tire Pressures 38 Parking Brake 38 V-belts 39 Deck Belt...
... Locations 17 Steering Control Levers 18 Parking Brake 19 Throttle Control 19 Blade Switch 19 Ignition Switch 20 Choke Control 20 Fuses 20 Fuel Tank 21 Fuel Shut Off Valve 22 Cutting Height Adjuster 22 Seat Adjustment Lever 23 Hour Meter 23 Tracking Knob 23 Operation 24 Training 24 Steering 24 Before Starting 25 Starting the Engine 25 Jumper Cables 28 Running 29 Operating On Hills 30 Mowing Tips 31 Stopping the Engine 32 Manual Transport 33 Maintenance 34 Maintenance Schedule 34 Battery 36 Safety System 37 Tire Pressures 38 Parking Brake 38 V-belts 39 Deck Belt...
Owners Manual
Page 5
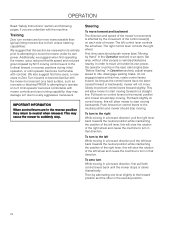
... the operator's manual to maintain this operator's manual, left and right, backward and forward are also knowledgeable about the safety instructions. The manufacturer's directions concerning operation, maintenance, and repairs must always use extreme caution when towing. Use only approved repair parts to the new owner. If the machine is important for service. Never allow extra distance to rapidly mow primarily large areas. Safety requires good judgement, careful use , service, maintenance) by steering controls...
... the operator's manual to maintain this operator's manual, left and right, backward and forward are also knowledgeable about the safety instructions. The manufacturer's directions concerning operation, maintenance, and repairs must always use extreme caution when towing. Use only approved repair parts to the new owner. If the machine is important for service. Never allow extra distance to rapidly mow primarily large areas. Safety requires good judgement, careful use , service, maintenance) by steering controls...

Owners Manual
Page 9
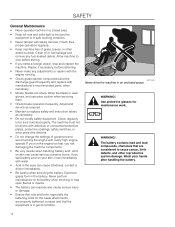
... clear of objects before operating. Always look down before starting the machine Clear the area of bystanders before mowing 8011-513 9 Shut off blades, set parking brake, stop before cleaning the machine, removing the grass catcher, or unclogging the discharge guard. • Operate machine only in the manual before turning. • Never leave a running machine unattended. SAFETY Safety Instructions These instructions are familiar with the instructions, to operate the machine. • Clear...
... clear of objects before operating. Always look down before starting the machine Clear the area of bystanders before mowing 8011-513 9 Shut off blades, set parking brake, stop before cleaning the machine, removing the grass catcher, or unclogging the discharge guard. • Operate machine only in the manual before turning. • Never leave a running machine unattended. SAFETY Safety Instructions These instructions are familiar with the instructions, to operate the machine. • Clear...
Owners Manual
Page 13
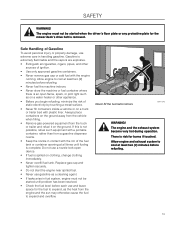
... fueling is removed. Safe Handling of Gasoline To avoid personal injury or property damage, use extreme care in fuel system, engine must not be started when the driver's floor plate or any protective plate for the mower deck's drive belt is complete. Replace gas cap and tighten securely. • Do not start the engine near spilled fuel. • Never use a nozzle lock-open device. • If fuel is an open flame, spark...
... fueling is removed. Safe Handling of Gasoline To avoid personal injury or property damage, use extreme care in fuel system, engine must not be started when the driver's floor plate or any protective plate for the mower deck's drive belt is complete. Replace gas cap and tighten securely. • Do not start the engine near spilled fuel. • Never use a nozzle lock-open device. • If fuel is an open flame, spark...
Owners Manual
Page 14
... oil or fuel spillage and remove any adjustments or repairs with the engine running the engine with safety devices. If you spill battery acid on your hands after handling the battery. 14 Use protective glasses for the blade attachments, are properly tightened, torqued and that the equipment is in safe working condition. • Never tamper with overly high engine speeds. Acid on the battery when smoking or near open flames or sparks...
... oil or fuel spillage and remove any adjustments or repairs with the engine running the engine with safety devices. If you spill battery acid on your hands after handling the battery. 14 Use protective glasses for the blade attachments, are properly tightened, torqued and that the equipment is in safe working condition. • Never tamper with overly high engine speeds. Acid on the battery when smoking or near open flames or sparks...
Owners Manual
Page 15
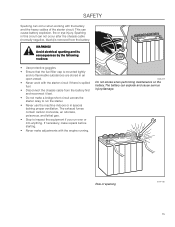
... lethal gas. • Stop to run over or into anything. WARNING! This can explode and cause serious injury/damage. The battery can cause battery explosion, fire or eye injury. Avoid electrical sparking and its consequences by the following routines: • Use protective goggles. • Ensure that the fuel filler cap is removed from the battery. Risk of the starter circuit. Sparking in spaces...
... lethal gas. • Stop to run over or into anything. WARNING! This can explode and cause serious injury/damage. The battery can cause battery explosion, fire or eye injury. Avoid electrical sparking and its consequences by the following routines: • Use protective goggles. • Ensure that the fuel filler cap is removed from the battery. Risk of the starter circuit. Sparking in spaces...
Owners Manual
Page 16
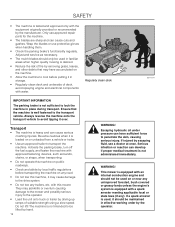
... blades or use approved repair parts for the machine. • The blades are sharp and can cause serious crushing injuries. Activate the parking brake, turn off the fuel supply, and fasten the machine with an internal combustion engine and should be used in place during transport. This mower is not sufficient to transport the machine. Only use protective gloves when handling them. • Check the parking brake...
... blades or use approved repair parts for the machine. • The blades are sharp and can cause serious crushing injuries. Activate the parking brake, turn off the fuel supply, and fasten the machine with an internal combustion engine and should be used in place during transport. This mower is not sufficient to transport the machine. Only use protective gloves when handling them. • Check the parking brake...

Owners Manual
Page 17
Parking brake 3. Steering control levers 2. Deck lift 11. The rider is regulated and thereby the direction and speed. Blade switch 5. Ignition switch 6. Tracking adjustment 17 Throttle control 4. Fuel shut off valve 10. Fuses 8. Choke control 7. Using the left and right steering controls, the flow is fitted with either a Kohler or Briggs & Stratton four-stroke overhead valve engine. Seat adjustment lever 12. Hour meter 13. Transmission from the engine is made via a beltdriven hydraulic pumps. Fuel tank cap 9. Control Locations 7 13 2 1 9 8 11 4 5 3 6 ...
Parking brake 3. Steering control levers 2. Deck lift 11. The rider is regulated and thereby the direction and speed. Blade switch 5. Ignition switch 6. Tracking adjustment 17 Throttle control 4. Fuel shut off valve 10. Fuses 8. Choke control 7. Using the left and right steering controls, the flow is fitted with either a Kohler or Briggs & Stratton four-stroke overhead valve engine. Seat adjustment lever 12. Hour meter 13. Transmission from the engine is made via a beltdriven hydraulic pumps. Fuel tank cap 9. Control Locations 7 13 2 1 9 8 11 4 5 3 6 ...
Owners Manual
Page 24
... and mower should push mower (see "Before Starting" in that direction. Then by Hand" in the Operation section) to start moving in the reverse position. 24 Training Zero turn in Operation section), adjust engine speed to idle, disengage parking brake, do not engage blades at this will allow mower to an open, flat area, without other in a forward direction, first pull both control levers forward slightly. The right control lever controls the right wheel. First time users...
... and mower should push mower (see "Before Starting" in that direction. Then by Hand" in the Operation section) to start moving in the reverse position. 24 Training Zero turn in Operation section), adjust engine speed to idle, disengage parking brake, do not engage blades at this will allow mower to an open, flat area, without other in a forward direction, first pull both control levers forward slightly. The right control lever controls the right wheel. First time users...
Owners Manual
Page 25
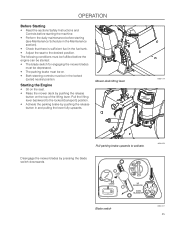
operation Before Starting • Read the sections Safety Instructions and Controls before starting (see Maintenance Schedule in the Maintenance section). • Check that there is sufficient fuel in the fuel tank. • Adjust the seat to the desired position. Mower deck lifting lever 8058-019 Pull parking brake upwards to the locked (transport) position. • Activate the parking brake by pushing the release button on the seat. • Raise the mower deck by pushing the release button in...
operation Before Starting • Read the sections Safety Instructions and Controls before starting (see Maintenance Schedule in the Maintenance section). • Check that there is sufficient fuel in the fuel tank. • Adjust the seat to the desired position. Mower deck lifting lever 8058-019 Pull parking brake upwards to the locked (transport) position. • Activate the parking brake by pushing the release button on the seat. • Raise the mower deck by pushing the release button in...
Owners Manual
Page 30
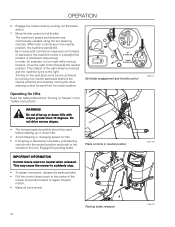
... "Safety Instructions". Set blade engagement and throttle control Operating On Hills Read the Safety Instructions "Driving on hills. • If stopping is reduced and the machine turns to neutral when released. Move throttle control to the center of the unit. In order, for example, to turn ) can be used before starting up or down hills. • Avoid stopping or changing speed on Slopes" in neutral position IMPORTANT INFORMATION Control levers return...
... "Safety Instructions". Set blade engagement and throttle control Operating On Hills Read the Safety Instructions "Driving on hills. • If stopping is reduced and the machine turns to neutral when released. Move throttle control to the center of the unit. In order, for example, to turn ) can be used before starting up or down hills. • Avoid stopping or changing speed on Slopes" in neutral position IMPORTANT INFORMATION Control levers return...
Owners Manual
Page 34
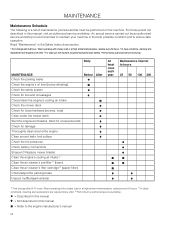
... MAINTENANCE Check the parking brake Check the engine's oil level (every refueling) Check the safety system Check for fuel and oil leakages Check/clean the engine's cooling air intake Check the mower deck Check for loose hardware (screws, nuts) Clean under the mower deck Start the engine and blades, listen for unusual sounds Check for damage Thoroughly clean around the engine Clean around belts, belt pulleys Check the tire pressures Before After Check battery connections Sharpen3)/ Replace mower blades Clean the engine's cooling air intake 2) Clean the air cleaner's pre-filter...
... MAINTENANCE Check the parking brake Check the engine's oil level (every refueling) Check the safety system Check for fuel and oil leakages Check/clean the engine's cooling air intake Check the mower deck Check for loose hardware (screws, nuts) Clean under the mower deck Start the engine and blades, listen for unusual sounds Check for damage Thoroughly clean around the engine Clean around belts, belt pulleys Check the tire pressures Before After Check battery connections Sharpen3)/ Replace mower blades Clean the engine's cooling air intake 2) Clean the air cleaner's pre-filter...

Owners Manual
Page 35
... any service or adjustment checklist • Engage the parking brake. • Place the Blade-switch in the disengaged position. • Turn the ignition switch to the engine manufacturer's manual WARNING! MAINTENANCE MAINTENANCE Check/adjust throttle cable Check the condition of belts, belt pulleys Change the engine oil 1) Replace the engine oil filter Clean/replace the spark plugs Replace the fuel filter Replace air filter 2) (paper filter) Check the caster wheels (every 200 hours) Replace the air cleaner's pre-filter 2) (foam) Check/adjust the mower deck Check the engine valve...
... any service or adjustment checklist • Engage the parking brake. • Place the Blade-switch in the disengaged position. • Turn the ignition switch to the engine manufacturer's manual WARNING! MAINTENANCE MAINTENANCE Check/adjust throttle cable Check the condition of belts, belt pulleys Change the engine oil 1) Replace the engine oil filter Clean/replace the spark plugs Replace the fuel filter Replace air filter 2) (paper filter) Check the caster wheels (every 200 hours) Replace the air cleaner's pre-filter 2) (foam) Check/adjust the mower deck Check the engine valve...
Owners Manual
Page 36
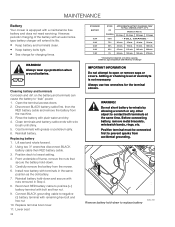
... (-) battery terminal with grease or petroleum jelly. 6. Connect BLACK grounding cable to open or remove caps or covers. Adding or checking level of the battery with an automotive type battery charger will extend its life. • Keep battery and terminals clean. • Keep battery bolts tight. • See charge for the terminal screws. Reinstall battery. Carefully remove the battery from the machine. 3. Install new battery with bolt and hex nut. 9. Reconnect RED battery cable...
... (-) battery terminal with grease or petroleum jelly. 6. Connect BLACK grounding cable to open or remove caps or covers. Adding or checking level of the battery with an automotive type battery charger will extend its life. • Keep battery and terminals clean. • Keep battery bolts tight. • See charge for the terminal screws. Reinstall battery. Carefully remove the battery from the machine. 3. Install new battery with bolt and hex nut. 9. Reconnect RED battery cable...
Owners Manual
Page 39
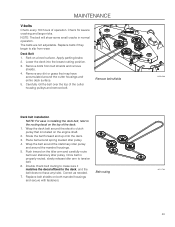
... the engine shaft. 2. Carefully roll the belt over stationary idler pulley. Place belt around the electric clutch pulley that may have accumulated around the mandrel housings. 5. Replace belt shields on a level surface. The belts are not adjustable. Apply parking brake. 2. Remove bolts from wear. MAINTENANCE V-belts Check every 100 hours of the cutter housing pulleys and remove belt. Belt routing 8058-088 8011-764 39 Wrap the belt around the stationary idler pulley and around the cutter housings and entire deck surface. 5. Deck Belt 1. Replace belts...
... the engine shaft. 2. Carefully roll the belt over stationary idler pulley. Place belt around the electric clutch pulley that may have accumulated around the mandrel housings. 5. Replace belt shields on a level surface. The belts are not adjustable. Apply parking brake. 2. Remove bolts from wear. MAINTENANCE V-belts Check every 100 hours of the cutter housing pulleys and remove belt. Belt routing 8058-088 8011-764 39 Wrap the belt around the stationary idler pulley and around the cutter housings and entire deck surface. 5. Deck Belt 1. Replace belts...

Owners Manual
Page 40
... with gloves and/or wrap blades with a Husqvarna bolt if required. Remove blade bolt by an authorized service workshop. Install and tighten blade bolt securely. 4. Blade 2. Blade bolt (special) 3. Torque blade bolt to attain the best mowing effect, it is heat treated. Blades are well sharpened and not damaged. Install new or resharpened blade with large nicks should be replaced. Cutter housing Blade attachment 3 8058-027 40 Balance the blades after sharpening. MAINTENANCE Cutting Blades In order to 90 ft...
... with gloves and/or wrap blades with a Husqvarna bolt if required. Remove blade bolt by an authorized service workshop. Install and tighten blade bolt securely. 4. Blade 2. Blade bolt (special) 3. Torque blade bolt to attain the best mowing effect, it is heat treated. Blades are well sharpened and not damaged. Install new or resharpened blade with large nicks should be replaced. Cutter housing Blade attachment 3 8058-027 40 Balance the blades after sharpening. MAINTENANCE Cutting Blades In order to 90 ft...

Owners Manual
Page 46
... Checking the Safety System in the "Maintenance Section" • Faulty carburetor • Choke control is pulled out with a warm engine • Clogged fuel filter or jet • Clogged ventilation valve on the fuel cap • Fuel tank nearly empty • Fouled spark plugs • Rich fuel mixture or fuel-air mixture. • Wrong fuel type • Water in fuel • Clogged air filter • Clogged air filter • Fouled spark plugs • Carburetor incorrectly adjusted • Air trapped in hydraulic system • Blades...
... Checking the Safety System in the "Maintenance Section" • Faulty carburetor • Choke control is pulled out with a warm engine • Clogged fuel filter or jet • Clogged ventilation valve on the fuel cap • Fuel tank nearly empty • Fouled spark plugs • Rich fuel mixture or fuel-air mixture. • Wrong fuel type • Water in fuel • Clogged air filter • Clogged air filter • Fouled spark plugs • Carburetor incorrectly adjusted • Air trapped in hydraulic system • Blades...

Owners Manual
Page 47
... the carburetor or fuel line. • Fouled spark plugs • Poor contact of the battery terminal cable connections • Charging lead is disconnected • Parking brake on • Bypass valve on pump open • Drive belt for the transmission slack or has come off • Air trapped in hydraulic system • Drive belt for the mower deck has come loose • Contact for the electromagnetic coupling has loosened • Blade switch...
... the carburetor or fuel line. • Fouled spark plugs • Poor contact of the battery terminal cable connections • Charging lead is disconnected • Parking brake on • Bypass valve on pump open • Drive belt for the transmission slack or has come off • Air trapped in hydraulic system • Drive belt for the mower deck has come loose • Contact for the electromagnetic coupling has loosened • Blade switch...
Owners Manual
Page 48
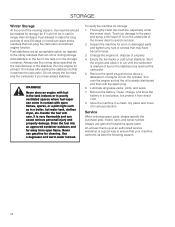
... away from direct cold. 8. Handle the fuel with open flame. To ready the machine for at an authorized service workshop is drained of the mower deck to avoid corrosion. 2. Change the engine oil; Remove the spark plug and pour about a tablespoon of the mowing season, the machine should be readied for storage (or if it reaches the carburetor. Turn over the engine so that your machine...
... away from direct cold. 8. Handle the fuel with open flame. To ready the machine for at an authorized service workshop is drained of the mower deck to avoid corrosion. 2. Change the engine oil; Remove the spark plug and pour about a tablespoon of the mowing season, the machine should be readied for storage (or if it reaches the carburetor. Turn over the engine so that your machine...
Owners Manual
Page 60
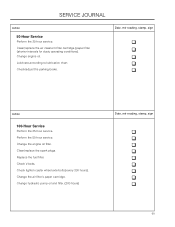
... q q q q q q q q q 60 Replace the fuel filter. Check/adjust the parking brake. Perform the 50-hour service. Check tighten caster wheel axle bolts (every 200 hours). Change the air filter's paper cartridge. Change engine oil. Clean/replace the spark plugs. SERVICE JOURNAL Action 50-Hour Service Perform the 25-hour service. Change the engine oil filter. Lubricate according to lubrication chart. Date, mtr reading, stamp, sign q q q q q Action 100-Hour Service Perform the 25-hour service. Clean/replace the air cleaner's filter cartridge (paper filter (shorter intervals...
... q q q q q q q q q 60 Replace the fuel filter. Check/adjust the parking brake. Perform the 50-hour service. Check tighten caster wheel axle bolts (every 200 hours). Change the air filter's paper cartridge. Change engine oil. Clean/replace the spark plugs. SERVICE JOURNAL Action 50-Hour Service Perform the 25-hour service. Change the engine oil filter. Lubricate according to lubrication chart. Date, mtr reading, stamp, sign q q q q q Action 100-Hour Service Perform the 25-hour service. Clean/replace the air cleaner's filter cartridge (paper filter (shorter intervals...


