
Owners Manual
Page 3
... Parking Brake 21 Blade Switch 21 Ignition Switch 21 Fuses 23 Choke Control 23 Cutting Height Pedals 23 Seat Adjustment Lever 24 Fuel Shut Off Valve 24 Refueling 25 OPERATION 26 Training 26 Steering 26 Roll Bar and Safety Belt 27 Before Starting 27 Starting the Engine 28 Jumper Cables 32 Running 33 Operating on Hills 34 Stopping the Engine 35 Mowing Tips 36 Moving Machine By Hand 37 MAINTENANCE 38 Battery 40 Safety System 41 Tire Pressures 41 Caster Wheels 41 Hardware 41 Parking Brake 42 Parking Brake Adjustments...
... Parking Brake 21 Blade Switch 21 Ignition Switch 21 Fuses 23 Choke Control 23 Cutting Height Pedals 23 Seat Adjustment Lever 24 Fuel Shut Off Valve 24 Refueling 25 OPERATION 26 Training 26 Steering 26 Roll Bar and Safety Belt 27 Before Starting 27 Starting the Engine 28 Jumper Cables 32 Running 33 Operating on Hills 34 Stopping the Engine 35 Mowing Tips 36 Moving Machine By Hand 37 MAINTENANCE 38 Battery 40 Safety System 41 Tire Pressures 41 Caster Wheels 41 Hardware 41 Parking Brake 42 Parking Brake Adjustments...
Owners Manual
Page 5
... for weight limits for the maintenance and affects the machine's resale value. Do not tow near ditches, canals, and other types of the operator and others in accordance with special accessories provided by all power equipment can also be operated, maintained, and repaired by steering controls both contribute to rapidly mow primarily large areas. All other hazards. The machine must always use...
... for weight limits for the maintenance and affects the machine's resale value. Do not tow near ditches, canals, and other types of the operator and others in accordance with special accessories provided by all power equipment can also be operated, maintained, and repaired by steering controls both contribute to rapidly mow primarily large areas. All other hazards. The machine must always use...

Owners Manual
Page 13
... mower deck's drive belt is not possible, refuel such equipment with a portable container, rather than from a gasoline dispenser nozzle. • Keep the nozzle in contact with plastic liner. The engine must not be started until fueling is risk for the fuel to expand and overflow. The engine and the exhaust system become very hot during operation. If this is removed. Replace gas cap and tighten...
... mower deck's drive belt is not possible, refuel such equipment with a portable container, rather than from a gasoline dispenser nozzle. • Keep the nozzle in contact with plastic liner. The engine must not be started until fueling is risk for the fuel to expand and overflow. The engine and the exhaust system become very hot during operation. If this is removed. Replace gas cap and tighten...
Owners Manual
Page 14
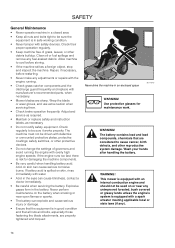
Clean oil or fuel spillage and remove any adjustments or repairs with the engine running the engine with safety devices. Adjust and service as required. • Maintain or replace safety and instruction labels, as necessary. • Do not modify safety equipment. Explosive gases form in the battery. This mower is in safe working condition. • Never tamper with overly high engine speeds. Allow machine to be driven with a spark arrester meeting applicable...
Clean oil or fuel spillage and remove any adjustments or repairs with the engine running the engine with safety devices. Adjust and service as required. • Maintain or replace safety and instruction labels, as necessary. • Do not modify safety equipment. Explosive gases form in the battery. This mower is in safe working condition. • Never tamper with overly high engine speeds. Allow machine to be driven with a spark arrester meeting applicable...
Owners Manual
Page 15
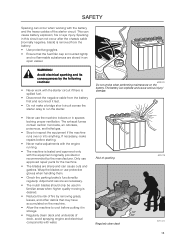
... storage. • Regularly clean deck and underside of the starter circuit. Wrap the blades or use approved repair parts for the machine. • The blades are stored in spaces lacking proper ventilation. Avoid electrical sparking and its consequences by removing grass, leaves, and other debris that the fuel filler cap is spilled fuel. • Disconnect the negative cable from the battery. • Use protective goggles. • Ensure...
... storage. • Regularly clean deck and underside of the starter circuit. Wrap the blades or use approved repair parts for the machine. • The blades are stored in spaces lacking proper ventilation. Avoid electrical sparking and its consequences by removing grass, leaves, and other debris that the fuel filler cap is spilled fuel. • Disconnect the negative cable from the battery. • Use protective goggles. • Ensure...
Owners Manual
Page 18
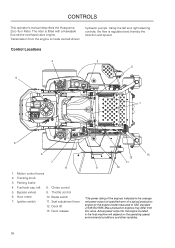
... 3. Seat adjustment lever 12. Bypass valves 9. Hour meter 10. Transmission from this value. Motion control levers 2. Fuel tank cap, left and right steering controls, the flow is made via belt-driven hydraulic pumps. Throttle control 6. Deck release 13 12 11 9 10 *The power rating of a typical production engine for the engine installed in the final machine will depend on the operating speed, environmental conditions and other variables. 18 Parking brake 4. CONTROLS This operator's manual describes the Husqvarna Zero Turn Rider...
... 3. Seat adjustment lever 12. Bypass valves 9. Hour meter 10. Transmission from this value. Motion control levers 2. Fuel tank cap, left and right steering controls, the flow is made via belt-driven hydraulic pumps. Throttle control 6. Deck release 13 12 11 9 10 *The power rating of a typical production engine for the engine installed in the final machine will depend on the operating speed, environmental conditions and other variables. 18 Parking brake 4. CONTROLS This operator's manual describes the Husqvarna Zero Turn Rider...
Owners Manual
Page 26
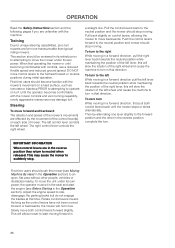
... typical riding mowers. DO NOT move both control levers back until becoming comfortable with the mower controls and zero turning capability, overly aggressive maneuvers may cause the mower to turn While moving . The right control lever controls the right wheel. IMPORTANT INFORMATION When control levers are effected by alternating one lever slightly to operate on turf. Adjust the engine speed to neutral when released. Until the operator becomes comfortable with controls, use a reduced throttle speed and...
... typical riding mowers. DO NOT move both control levers back until becoming comfortable with the mower controls and zero turning capability, overly aggressive maneuvers may cause the mower to turn While moving . The right control lever controls the right wheel. IMPORTANT INFORMATION When control levers are effected by alternating one lever slightly to operate on turf. Adjust the engine speed to neutral when released. Until the operator becomes comfortable with controls, use a reduced throttle speed and...

Owners Manual
Page 34
... using the two steering controls. Do not drive across slopes. Engage the mower deck by the rotating blades. Operating on Hills Read the Safety Instructions Driving on hills. • If stopping is near mower when engaging blade switch. 6. Place controls in the neutral position, the machine stands still. WARNING! When both controls an equal amount forward or backward, the machine moves in the Safety Instructions. IMPORTANT INFORMATION Control levers return to full throttle...
... using the two steering controls. Do not drive across slopes. Engage the mower deck by the rotating blades. Operating on Hills Read the Safety Instructions Driving on hills. • If stopping is near mower when engaging blade switch. 6. Place controls in the neutral position, the machine stands still. WARNING! When both controls an equal amount forward or backward, the machine moves in the Safety Instructions. IMPORTANT INFORMATION Control levers return to full throttle...
Owners Manual
Page 38
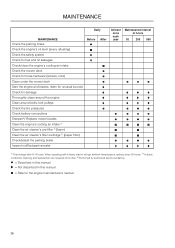
...'s manual 38 maintenance MAINTENANCE Check the parking brake Check the engine's oil level (every refueling) Check the safety system Check for fuel and oil leakages Check/clean the engine's cooling air intake Check the mower deck Check for loose hardware (screws, nuts) Clean under the mower deck Start the engine and blades, listen for unusual sounds Check for damage Thoroughly clean around the engine Clean around belts, belt pulleys Check the tire pressures Check battery connections Sharpen3)/ Replace mower blades Clean the engine's cooling air intake 2) Clean the air cleaner's pre-filter...
...'s manual 38 maintenance MAINTENANCE Check the parking brake Check the engine's oil level (every refueling) Check the safety system Check for fuel and oil leakages Check/clean the engine's cooling air intake Check the mower deck Check for loose hardware (screws, nuts) Clean under the mower deck Start the engine and blades, listen for unusual sounds Check for damage Thoroughly clean around the engine Clean around belts, belt pulleys Check the tire pressures Check battery connections Sharpen3)/ Replace mower blades Clean the engine's cooling air intake 2) Clean the air cleaner's pre-filter...
Owners Manual
Page 39
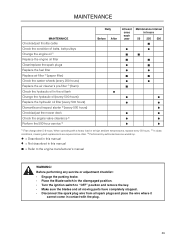
... MAINTENANCE Check/adjust throttle cable Check the condition of belts, belt pulleys Change the engine oil 1) Replace the engine oil filter Clean/replace the spark plugs Replace the fuel filter Replace air filter 2) (paper filter) Check the caster wheels (every 200 hours) Replace the air cleaner's pre-filter 2) (foam) Check the hydraulic oil in the oil tank Change the hydraulic oil (every 500 hours) Replace the hydraulic oil filter (every 500 hours) Dismantle and inspect starter 3) (every 500 hours) Check/adjust the mower deck Check the engine valve clearance 3) Perform the 500-hour service...
... MAINTENANCE Check/adjust throttle cable Check the condition of belts, belt pulleys Change the engine oil 1) Replace the engine oil filter Clean/replace the spark plugs Replace the fuel filter Replace air filter 2) (paper filter) Check the caster wheels (every 200 hours) Replace the air cleaner's pre-filter 2) (foam) Check the hydraulic oil in the oil tank Change the hydraulic oil (every 500 hours) Replace the hydraulic oil filter (every 500 hours) Dismantle and inspect starter 3) (every 500 hours) Check/adjust the mower deck Check the engine valve clearance 3) Perform the 500-hour service...
Owners Manual
Page 40
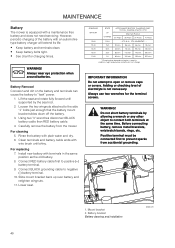
.... 370 min. *Charging time depends on the battery and terminals can cause the battery to prevent sparks from the mower. For replacing 7. Install new battery with wire brush until supported by allowing a wrench or any other object to open or remove caps or covers. Do not short battery terminals by the seat rod. 2. Battery bracket Battery cleaning and installation 8065-020 40 STANDARD BATTERY STATE OF CHARGE APPROXIMATE BATTERY CHARGING TIME* TO FULL CHARGE AT 80OF...
.... 370 min. *Charging time depends on the battery and terminals can cause the battery to prevent sparks from the mower. For replacing 7. Install new battery with wire brush until supported by allowing a wrench or any other object to open or remove caps or covers. Do not short battery terminals by the seat rod. 2. Battery bracket Battery cleaning and installation 8065-020 40 STANDARD BATTERY STATE OF CHARGE APPROXIMATE BATTERY CHARGING TIME* TO FULL CHARGE AT 80OF...
Owners Manual
Page 41
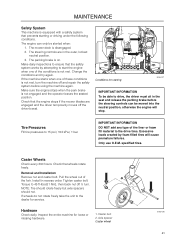
... driver's seat. Change the conditions and try again. Check that the safety system works by foam filled tires will stop. Install in reverse order. If wheels do not rotate freely take the unit to start the engine when one of the conditions is not engaged and the operator leaves the seated position. The steering controls are engaged and the driver temporarily moves off ½ turn the machine off and repair...
... driver's seat. Change the conditions and try again. Check that the safety system works by foam filled tires will stop. Install in reverse order. If wheels do not rotate freely take the unit to start the engine when one of the conditions is not engaged and the operator leaves the seated position. The steering controls are engaged and the driver temporarily moves off ½ turn the machine off and repair...
Owners Manual
Page 44
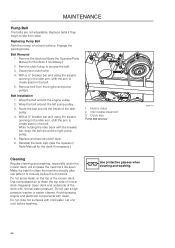
... water on a level surface. Avoid spraying engine and electrical components with the breaker bar, wrap the belt around the inside of the mower deck. While holding the idler back with water. Remove belt from wear. Remove the deck belt (see the Operator/ Parts Manual for the deck if necessary.) 2. Route the belt around the right pump pulley. 5. Idler release placement 3. Replacing Pump Belt Park the mower on the top of the idler pulley. 4. Engage the parking brake. Use protective glasses when...
... water on a level surface. Avoid spraying engine and electrical components with the breaker bar, wrap the belt around the inside of the mower deck. While holding the idler back with water. Remove belt from wear. Remove the deck belt (see the Operator/ Parts Manual for the deck if necessary.) 2. Route the belt around the right pump pulley. 5. Idler release placement 3. Replacing Pump Belt Park the mower on the top of the idler pulley. 4. Engage the parking brake. Use protective glasses when...

Owners Manual
Page 47
... starting, make sure the oil tank is at normal speeds, the hydraulic drive is cold and adjusted accordingly. With the bypass valve closed and the engine running at fast idle, slowly move the directional control in hydrostatic systems may be : • Noisy operation. • Lack of power or drive after stopping the engine. 4. When the hydraulic drive operates at normal noise levels and moves smoothly forward and reverse...
... starting, make sure the oil tank is at normal speeds, the hydraulic drive is cold and adjusted accordingly. With the bypass valve closed and the engine running at fast idle, slowly move the directional control in hydrostatic systems may be : • Noisy operation. • Lack of power or drive after stopping the engine. 4. When the hydraulic drive operates at normal noise levels and moves smoothly forward and reverse...
Owners Manual
Page 48
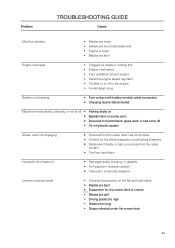
... on the battery terminal cable connections • Fuse blown • Ignition system faulty • Fault in the starter safety circuit, see Safety System in the Maintenance Section • Faulty carburetor • Choke control is pulled out with warm engine • Clogged fuel filter or jet • Clogged ventilation valve on the fuel cap • Fuel tank nearly empty • Fouled spark plug • Spark plug is loose • Rich fuel mixture or fuel-air mixture • Wrong fuel type •...
... on the battery terminal cable connections • Fuse blown • Ignition system faulty • Fault in the starter safety circuit, see Safety System in the Maintenance Section • Faulty carburetor • Choke control is pulled out with warm engine • Clogged fuel filter or jet • Clogged ventilation valve on the fuel cap • Fuel tank nearly empty • Fouled spark plug • Spark plug is loose • Rich fuel mixture or fuel-air mixture • Wrong fuel type •...
Owners Manual
Page 49
... or no oil in the engine • Fouled spark plug Battery not charging • Poor contact with battery terminal cable connectors • Charging lead is disconnected Machine moves slowly, unevenly, or not at all • Parking brake on • Bypass valve on pump open • Drive belt for transmission gears slack or has come off • Air in hydraulic system Mower deck not engaging • Drive belt for the mower deck has come loose •...
... or no oil in the engine • Fouled spark plug Battery not charging • Poor contact with battery terminal cable connectors • Charging lead is disconnected Machine moves slowly, unevenly, or not at all • Parking brake on • Bypass valve on pump open • Drive belt for transmission gears slack or has come off • Air in hydraulic system Mower deck not engaging • Drive belt for the mower deck has come loose •...
Owners Manual
Page 50
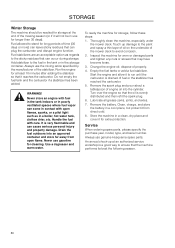
... poorly ventilated spaces where fuel vapor can occur during storage. Never use genuine Husqvarna spare parts. Empty the fuel tanks or add a fuel stabilizer. Remove the spark plug and pour about a tablespoon of engine oil into an approved container and store far away from direct cold. 8. Remove the battery. Service When ordering spare parts, please specify the purchase year, model, type, and serial number. An annual check-up damage to...
... poorly ventilated spaces where fuel vapor can occur during storage. Never use genuine Husqvarna spare parts. Empty the fuel tanks or add a fuel stabilizer. Remove the spark plug and pour about a tablespoon of engine oil into an approved container and store far away from direct cold. 8. Remove the battery. Service When ordering spare parts, please specify the purchase year, model, type, and serial number. An annual check-up damage to...

Owners Manual
Page 60
... Change air filter ¨ Inspect spark plug ¨ Inspect fuel filter ¨ Check engine RPM ¨ Clean underside of deck ¨ Check blade pitch ¨ Grease blade spindles ¨ Inspect spindle bearings ¨ Inspect deck belt and blades ¨ Inspect idler arm bearings ¨ Inspect deck idler pulleys ¨ Check hydraulic oil level ¨ Inspect hydraulic filter ¨ Inspect hydraulic drive belt ¨ Inspect hydraulic hoses ¨ Check neutral position ¨ Inspect battery connections ¨ Check safety system ¨ Check seat belt...
... Change air filter ¨ Inspect spark plug ¨ Inspect fuel filter ¨ Check engine RPM ¨ Clean underside of deck ¨ Check blade pitch ¨ Grease blade spindles ¨ Inspect spindle bearings ¨ Inspect deck belt and blades ¨ Inspect idler arm bearings ¨ Inspect deck idler pulleys ¨ Check hydraulic oil level ¨ Inspect hydraulic filter ¨ Inspect hydraulic drive belt ¨ Inspect hydraulic hoses ¨ Check neutral position ¨ Inspect battery connections ¨ Check safety system ¨ Check seat belt...

Owners Manual
Page 61
... Change air filter Inspect spark plug Inspect fuel filter Check engine RPM Clean underside of deck Check blade pitch Grease blade spindles Inspect spindle bearings Inspect deck belt and blades Inspect idler arm bearings Inspect deck idler pulleys Change hydraulic oil level Change hydraulic filter Replace hydraulic drive belt Inspect hydraulic hoses Check neutral position Inspect battery connections Load test battery Clean electrical connections Inspect the clutch Check safety system Check seat belt Check ROPS Check fuel system for leaks Inspect safety guards and shields Check brake adjustment...
... Change air filter Inspect spark plug Inspect fuel filter Check engine RPM Clean underside of deck Check blade pitch Grease blade spindles Inspect spindle bearings Inspect deck belt and blades Inspect idler arm bearings Inspect deck idler pulleys Change hydraulic oil level Change hydraulic filter Replace hydraulic drive belt Inspect hydraulic hoses Check neutral position Inspect battery connections Load test battery Clean electrical connections Inspect the clutch Check safety system Check seat belt Check ROPS Check fuel system for leaks Inspect safety guards and shields Check brake adjustment...
Owners Manual
Page 62
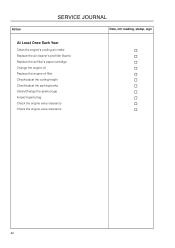
Action SERVICE JOURNAL Date, mtr reading, stamp, sign At Least Once Each Year Clean the engine's cooling air intake ¨ Replace the air cleaner's pre-filter (foam) ¨ Replace the air filter's paper cartridge ¨ Change the engine oil ¨ Replace the engine oil filter ¨ Check/adjust the cutting height ¨ Check/adjust the parking brake ¨ Clean/Change the spark plugs ¨ Inspect spark plug ¨ Check the engine valve clearance ¨ Check the engine valve clearance ¨ 62
Action SERVICE JOURNAL Date, mtr reading, stamp, sign At Least Once Each Year Clean the engine's cooling air intake ¨ Replace the air cleaner's pre-filter (foam) ¨ Replace the air filter's paper cartridge ¨ Change the engine oil ¨ Replace the engine oil filter ¨ Check/adjust the cutting height ¨ Check/adjust the parking brake ¨ Clean/Change the spark plugs ¨ Inspect spark plug ¨ Check the engine valve clearance ¨ Check the engine valve clearance ¨ 62


