

Owners Manual
Page 3
... Control Levers 18 Parking Brake 19 Throttle Control 19 Blade Switch 19 Ignition Switch 20 Choke Control 20 Fuses 20 Fuel Tank 21 Fuel Shut Off Valve 22 Cutting Height Adjuster 22 Bypass Linkages 22 Seat Adjustment Lever 23 Hour Meter 23 Tracking Knob 23 OPERATION 24 Training 24 Steering 24 Before Starting 25 Starting the Engine 26 Jumper Cables Use 29 Running 30 Operating on Hills 31 Stopping the Engine 32 Mowing Tips 33 Moving Machine By Hand 34 MAINTENANCE 35 Maintenance Schedule 35 Battery 37 Safety...
... Control Levers 18 Parking Brake 19 Throttle Control 19 Blade Switch 19 Ignition Switch 20 Choke Control 20 Fuses 20 Fuel Tank 21 Fuel Shut Off Valve 22 Cutting Height Adjuster 22 Bypass Linkages 22 Seat Adjustment Lever 23 Hour Meter 23 Tracking Knob 23 OPERATION 24 Training 24 Steering 24 Before Starting 25 Starting the Engine 26 Jumper Cables Use 29 Running 30 Operating on Hills 31 Stopping the Engine 32 Mowing Tips 33 Moving Machine By Hand 34 MAINTENANCE 35 Maintenance Schedule 35 Battery 37 Safety...
Owners Manual
Page 5
... accordance with special accessories provided by steering controls both contribute to the new owner. Use only approved repair parts to your dealer for service. The following of the machine may cause loss of traction and loss of this machine is equipped with a tow hitch, use approved fastening equipment and ensure that service and repair work are subject to the operator and a hydrostatic transmission regulated by...
... accordance with special accessories provided by steering controls both contribute to the new owner. Use only approved repair parts to your dealer for service. The following of the machine may cause loss of traction and loss of this machine is equipped with a tow hitch, use approved fastening equipment and ensure that service and repair work are subject to the operator and a hydrostatic transmission regulated by...
Owners Manual
Page 9
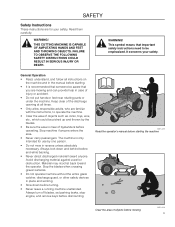
...; Do not mow in case of objects before operating. Always turn off blades, set parking brake, stop engine, and remove keys before dismounting. 8011-512 Read the operator's manual before and while backing. • Never direct discharged material toward the operator. SAFETY Safety Instructions These instructions are for use by the blades. • Be sure the area is only intended for your safety. Stop machine if anyone . THIS CUTTING MACHINE IS CAPABLE...
...; Do not mow in case of objects before operating. Always turn off blades, set parking brake, stop engine, and remove keys before dismounting. 8011-512 Read the operator's manual before and while backing. • Never direct discharged material toward the operator. SAFETY Safety Instructions These instructions are for use by the blades. • Be sure the area is only intended for your safety. Stop machine if anyone . THIS CUTTING MACHINE IS CAPABLE...

Owners Manual
Page 13
... in fuel system, engine must not be started when the driver's floor plate or any protective plate for burns if touched. Allow engine to expand and overflow. SAFETY Safe Handling of ignition. • Use only approved gasoline container. • Never remove gas cap or add fuel with plastic liner. The engine and the exhaust system become very hot during operation. There is risk for the mower deck's drive belt...
... in fuel system, engine must not be started when the driver's floor plate or any protective plate for burns if touched. Allow engine to expand and overflow. SAFETY Safe Handling of ignition. • Use only approved gasoline container. • Never remove gas cap or add fuel with plastic liner. The engine and the exhaust system become very hot during operation. There is risk for the mower deck's drive belt...
Owners Manual
Page 14
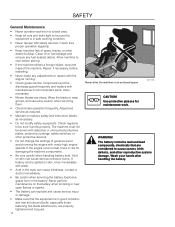
... buildup. Clean oil or fuel spillage and remove any adjustments or repairs with the engine running the engine with manufacturer's recommended parts, when necessary. • Mower blades are sharp. Check regularly to cool before restarting. • Never make any fuel-soaked debris. Wash your hands after handling the battery. Wrap the blade or wear gloves, and use extra caution when servicing them. • Check brake operation frequently. If the engine runs too fast...
... buildup. Clean oil or fuel spillage and remove any adjustments or repairs with the engine running the engine with manufacturer's recommended parts, when necessary. • Mower blades are sharp. Check regularly to cool before restarting. • Never make any fuel-soaked debris. Wash your hands after handling the battery. Wrap the blade or wear gloves, and use extra caution when servicing them. • Check brake operation frequently. If the engine runs too fast...

Owners Manual
Page 15
... spraying engine and electrical components with the equipment originally provided or recommended by removing grass, leaves, and other debris that the fuel filler cap is mounted tightly and no flammable substances are sharp and can explode and cause serious injury/damage. • Never use protective gloves when handling them. • Check the parking brake functions regularly. Sparking in this circuit can cause battery...
... spraying engine and electrical components with the equipment originally provided or recommended by removing grass, leaves, and other debris that the fuel filler cap is mounted tightly and no flammable substances are sharp and can explode and cause serious injury/damage. • Never use protective gloves when handling them. • Check the parking brake functions regularly. Sparking in this circuit can cause battery...
Owners Manual
Page 17
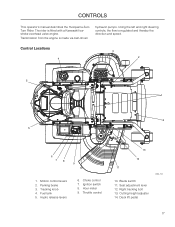
.... Transmission from the engine is fitted with a Kawasaki fourstroke overhead valve engine. Fuel tank 5. Ignition switch 8. CONTROLS This operator's manual describes the Husqvarna Zero Turn Rider. Using the left and right steering controls, the flow is regulated and thereby the direction and speed. Hydro release levers 6. Cutting height adjuster 14. Blade switch 11. Seat adjustment lever 12. Throttle control 13 12 11 10. Control Locations 4 3 2 5 1 14 5 6 78 9 10 1. Parking brake 3. Right tracking bolt 13. Deck lift pedal 8058-152 17 Choke control 7. Hour...
.... Transmission from the engine is fitted with a Kawasaki fourstroke overhead valve engine. Fuel tank 5. Ignition switch 8. CONTROLS This operator's manual describes the Husqvarna Zero Turn Rider. Using the left and right steering controls, the flow is regulated and thereby the direction and speed. Hydro release levers 6. Cutting height adjuster 14. Blade switch 11. Seat adjustment lever 12. Throttle control 13 12 11 10. Control Locations 4 3 2 5 1 14 5 6 78 9 10 1. Parking brake 3. Right tracking bolt 13. Deck lift pedal 8058-152 17 Choke control 7. Hour...

Owners Manual
Page 24
... the Operation section). OPERATION Read the Safety section and the following pages if you are far more maneuverable than typical riding mowers. Training Due to idle, disengage the parking brake but do not engage the blades at this will allow mower to turn mowers are unfamiliar with controls, use a reduced throttle speed and reduced ground speed. Adjust the engine speed to unique steering capabilities, zero turn in a forward direction, first pull both control levers forward slightly. Pull the control levers...
... the Operation section). OPERATION Read the Safety section and the following pages if you are far more maneuverable than typical riding mowers. Training Due to idle, disengage the parking brake but do not engage the blades at this will allow mower to turn mowers are unfamiliar with controls, use a reduced throttle speed and reduced ground speed. Adjust the engine speed to unique steering capabilities, zero turn in a forward direction, first pull both control levers forward slightly. Pull the control levers...
Owners Manual
Page 35
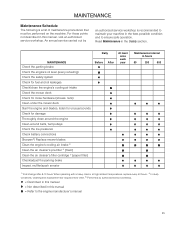
... authorized service workshop. MAINTENANCE Check the parking brake Check the engine's oil level (every refueling) Check the safety system Check for fuel and oil leakages Check/clean the engine's cooling air intake Check the mower deck Check for loose hardware (screws, nuts) Clean under the mower deck Start the engine and blades, listen for unusual sounds Check for damage Thoroughly clean around the engine Clean around belts, belt pulleys Check the tire pressures Check battery connections Sharpen3)/ Replace mower blades Clean the engine's cooling air intake 2) Clean the air cleaner's pre-filter...
... authorized service workshop. MAINTENANCE Check the parking brake Check the engine's oil level (every refueling) Check the safety system Check for fuel and oil leakages Check/clean the engine's cooling air intake Check the mower deck Check for loose hardware (screws, nuts) Clean under the mower deck Start the engine and blades, listen for unusual sounds Check for damage Thoroughly clean around the engine Clean around belts, belt pulleys Check the tire pressures Check battery connections Sharpen3)/ Replace mower blades Clean the engine's cooling air intake 2) Clean the air cleaner's pre-filter...
Owners Manual
Page 36
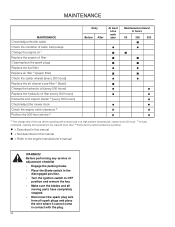
MAINTENANCE MAINTENANCE Check/adjust throttle cable Check the condition of belts, belt pulleys Change the engine oil 1) Replace the engine oil filter Clean/replace the spark plugs Replace the fuel filter Replace air filter 2) (paper filter) Check the caster wheels (every 200 hours) Replace the air cleaner's pre-filter 2) (foam) Change the hydraulic oil (every 500 hours) Replace the hydraulic oil filter (every 500 hours) Dismantle and inspect starter 3) (every 500 hours) Check/adjust the mower deck Check the engine valve clearance 3) Perform the 500-hour service 3) Daily Before After At ...
MAINTENANCE MAINTENANCE Check/adjust throttle cable Check the condition of belts, belt pulleys Change the engine oil 1) Replace the engine oil filter Clean/replace the spark plugs Replace the fuel filter Replace air filter 2) (paper filter) Check the caster wheels (every 200 hours) Replace the air cleaner's pre-filter 2) (foam) Change the hydraulic oil (every 500 hours) Replace the hydraulic oil filter (every 500 hours) Dismantle and inspect starter 3) (every 500 hours) Check/adjust the mower deck Check the engine valve clearance 3) Perform the 500-hour service 3) Daily Before After At ...

Owners Manual
Page 37
... and battery cable ends with grease or petroleum jelly. 6. Before connecting battery, remove metal bracelets, wristwatch bands, rings, etc. Disconnect BLACK battery cable first, then the RED battery cable and remove the battery from the mower. 6. Reinstall battery. Connect BLACK grounding cable to open or remove caps or covers. Adding or checking level of charger IMPORTANT INFORMATION Do not attempt to negative (-) battery terminal with a maintenance free battery and does not need servicing. Always use two...
... and battery cable ends with grease or petroleum jelly. 6. Before connecting battery, remove metal bracelets, wristwatch bands, rings, etc. Disconnect BLACK battery cable first, then the RED battery cable and remove the battery from the mower. 6. Reinstall battery. Connect BLACK grounding cable to open or remove caps or covers. Adding or checking level of charger IMPORTANT INFORMATION Do not attempt to negative (-) battery terminal with a maintenance free battery and does not need servicing. Always use two...

Owners Manual
Page 39
... park brake. Using a ratchet or breaker bar with fasteners. 1 3 2 5 Belt routing, deck belt 4 8058-061 39 Remove any dirt or grass that the routing matches the routing decal. 7. Replace belt shields on both mandrel housings and secure with a 9/16" socket on the spring idler bolt, relieve the tension on the idler arm and carefully route belt over the top of the cutter housing pulleys. 5. Place belt around the electric clutch on the deck. 1. Once the belt is located on a level surface. Check...
... park brake. Using a ratchet or breaker bar with fasteners. 1 3 2 5 Belt routing, deck belt 4 8058-061 39 Remove any dirt or grass that the routing matches the routing decal. 7. Replace belt shields on both mandrel housings and secure with a 9/16" socket on the spring idler bolt, relieve the tension on the idler arm and carefully route belt over the top of the cutter housing pulleys. 5. Place belt around the electric clutch on the deck. 1. Once the belt is located on a level surface. Check...

Owners Manual
Page 40
... side of operation. Place the belt over the fans and route it between the two fan covers. Electric clutch 2. Tilt seat forward to hold the tension off the belt while removing the implement used as a brace in the belt. 5. Replace belts if they begin to create slack in the plate. 6. Idler arm release placement 3. MAINTENANCE Pump Belt The belts are not adjustable. Replacing Pump Belt Park the mower on the engine pulley. 5. Clutch stop Pump belt removal 8058...
... side of operation. Place the belt over the fans and route it between the two fan covers. Electric clutch 2. Tilt seat forward to hold the tension off the belt while removing the implement used as a brace in the belt. 5. Replace belts if they begin to create slack in the plate. 6. Idler arm release placement 3. MAINTENANCE Pump Belt The belts are not adjustable. Replacing Pump Belt Park the mower on the engine pulley. 5. Clutch stop Pump belt removal 8058...

Owners Manual
Page 42
... rear of leveling procedure, mower deck drive belt must be installed prior to -side manner (2). 2. In the rear, blade tips should be properly adjusted. NOTE: This will cause an uneven mowing result. Chain 3. Slotted deck hanger plates Leveling the mower deck 1 8058-151 1 2 4 8011-601-3 42 MAINTENANCE Adjusting the Mower Deck Check the tire pressure before adjustment of the mower deck. In the front, blade tips should be required to achieve the desired cut for the type of the mower deck...
... rear of leveling procedure, mower deck drive belt must be installed prior to -side manner (2). 2. In the rear, blade tips should be properly adjusted. NOTE: This will cause an uneven mowing result. Chain 3. Slotted deck hanger plates Leveling the mower deck 1 8058-151 1 2 4 8011-601-3 42 MAINTENANCE Adjusting the Mower Deck Check the tire pressure before adjustment of the mower deck. In the front, blade tips should be required to achieve the desired cut for the type of the mower deck...
Owners Manual
Page 47
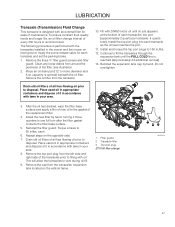
... port plugs to vent during oil fill. 9. Reinstall the expansion tank cap by hand, turning it in accordance with the transaxles installed in the mower and the mower on level ground. Drain old oil filters of maintenance. Reinstall the filter guard. Place used oil in /lbs. Remove the cap from the left side and right side of the transaxles prior to fill the transaxles through the expansion tank until oil just...
... port plugs to vent during oil fill. 9. Reinstall the expansion tank cap by hand, turning it in accordance with the transaxles installed in the mower and the mower on level ground. Drain old oil filters of maintenance. Reinstall the filter guard. Place used oil in /lbs. Remove the cap from the left side and right side of the transaxles prior to fill the transaxles through the expansion tank until oil just...

Owners Manual
Page 48
... the battery terminal cable connections • Fuse blown • Ignition system faulty • Fault in the starter safety circuit See Safety System in the Maintenance section Engine runs rough • Faulty carburetor • Clogged fuel filter or jet • Clogged ventilation valve on the fuel cap • Fuel tank nearly empty • Fouled spark plug • Spark plug is loose • Rich fuel mixture or fuel-air mixture • Wrong fuel type • Water in the fuel • Clogged air filter Engine...
... the battery terminal cable connections • Fuse blown • Ignition system faulty • Fault in the starter safety circuit See Safety System in the Maintenance section Engine runs rough • Faulty carburetor • Clogged fuel filter or jet • Clogged ventilation valve on the fuel cap • Fuel tank nearly empty • Fouled spark plug • Spark plug is loose • Rich fuel mixture or fuel-air mixture • Wrong fuel type • Water in the fuel • Clogged air filter Engine...

Owners Manual
Page 49
... engine • Fouled spark plug Battery not charging • Poor contact with battery terminal cable connectors • Charging lead is disconnected • Fault in engine charging system Machine moves slowly, unevenly, or not at all • Parking brake on • Bypass valve on pump open • Drive belt for the transmission gears slack or has come off • Air in hydraulic system Mower deck not engaging • Drive belt for the mower deck has come loose...
... engine • Fouled spark plug Battery not charging • Poor contact with battery terminal cable connectors • Charging lead is disconnected • Fault in engine charging system Machine moves slowly, unevenly, or not at all • Parking brake on • Bypass valve on pump open • Drive belt for the transmission gears slack or has come off • Air in hydraulic system Mower deck not engaging • Drive belt for the mower deck has come loose...

Owners Manual
Page 50
... have become loose. 3. Remove the spark plug and pour about a tablespoon of the stabilizer. Fuel allowed to the paint and spray a thin layer of oil on the underside of properly. 4. Always use genuine Husqvarna spare parts. To ready the machine for cleaning. Change the engine oil; Turn over the engine so that can cause serious personal injury and property damage. Remove the battery. Always use the mixing...
... have become loose. 3. Remove the spark plug and pour about a tablespoon of the stabilizer. Fuel allowed to the paint and spray a thin layer of oil on the underside of properly. 4. Always use genuine Husqvarna spare parts. To ready the machine for cleaning. Change the engine oil; Turn over the engine so that can cause serious personal injury and property damage. Remove the battery. Always use the mixing...

Owners Manual
Page 60
... Inspect throttle cable Inspect hardware Check the tire pressures Change the engine oil and filter Change air filter Inspect spark plug Inspect fuel filter Check engine RPM Clean underside of deck Check blade pitch Grease blade spindles Inspect spindle bearings Inspect deck belt and blades Inspect idler arm bearings Inspect deck idler pulleys Inspect hydraulic filter Inspect hydraulic drive belt Inspect hydraulic hoses Check neutral position Inspect battery connections Check safety system Check seat belt Check fuel system for leaks Inspect safety guards and shields Check brake adjustment Date...
... Inspect throttle cable Inspect hardware Check the tire pressures Change the engine oil and filter Change air filter Inspect spark plug Inspect fuel filter Check engine RPM Clean underside of deck Check blade pitch Grease blade spindles Inspect spindle bearings Inspect deck belt and blades Inspect idler arm bearings Inspect deck idler pulleys Inspect hydraulic filter Inspect hydraulic drive belt Inspect hydraulic hoses Check neutral position Inspect battery connections Check safety system Check seat belt Check fuel system for leaks Inspect safety guards and shields Check brake adjustment Date...

Owners Manual
Page 61
... oil and filter Change air filter Inspect spark plug Inspect fuel filter Check engine RPM Clean underside of deck Check blade pitch Grease blade spindles Inspect spindle bearings Inspect deck belt and blades Inspect idler arm bearings Inspect deck idler pulleys Change hydraulic oil Change hydraulic filter Replace hydraulic drive belt Inspect hydraulic hoses Check neutral position Inspect battery connections Load test battery Clean electrical connections Inspect the clutch Check safety system Check seat belt Check fuel system for leaks Inspect safety guards and shields Check brake adjustment...
... oil and filter Change air filter Inspect spark plug Inspect fuel filter Check engine RPM Clean underside of deck Check blade pitch Grease blade spindles Inspect spindle bearings Inspect deck belt and blades Inspect idler arm bearings Inspect deck idler pulleys Change hydraulic oil Change hydraulic filter Replace hydraulic drive belt Inspect hydraulic hoses Check neutral position Inspect battery connections Load test battery Clean electrical connections Inspect the clutch Check safety system Check seat belt Check fuel system for leaks Inspect safety guards and shields Check brake adjustment...


