
Owner Manual
Page 2
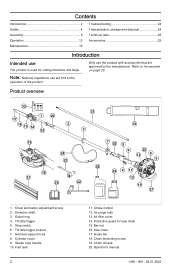
Throttle trigger 5. Harness support hook 8. Fuel tank 2 11. Choke control 12. Air filter cover 14. Protective guard for cutting branches and twigs. Only use The product is used for saw chain 15. Stop switch 6. Throttle trigger lockout 7. Starter rope handle 10. Air purge bulb 13. Saw chain 17. Guide bar 18. Contents Introduction 2 Safety 4 Assembly 9 Operation 12 Maintenance 16 Troubleshooting 24 Transportation, storage and disposal 24 Technical data 25 Accessories 25 Introduction Intended use the product with accessories that are approved by the manufacturer...
Throttle trigger 5. Harness support hook 8. Fuel tank 2 11. Choke control 12. Air filter cover 14. Protective guard for cutting branches and twigs. Only use The product is used for saw chain 15. Stop switch 6. Throttle trigger lockout 7. Starter rope handle 10. Air purge bulb 13. Saw chain 17. Guide bar 18. Contents Introduction 2 Safety 4 Assembly 9 Operation 12 Maintenance 16 Troubleshooting 24 Transportation, storage and disposal 24 Technical data 25 Accessories 25 Introduction Intended use the product with accessories that are approved by the manufacturer...

Owner Manual
Page 3
.... Transport guard, bar 22. Combination wrench 23. Two-stroke engine oil 30. Use a protective helmet in the operator's manual. Use approved protective gloves during operation and maintenance. Always keep your hands behind the guard ring. yyyywwxxxxx The rating plate shows the serial number. Dielectric chain oil 29. Long shaft 32. To prevent injury to meet Federal emissions requirement. 1480 - 009 - 26.01.2022 3 Chain oil. Read the operator's manual carefully...
.... Transport guard, bar 22. Combination wrench 23. Two-stroke engine oil 30. Use a protective helmet in the operator's manual. Use approved protective gloves during operation and maintenance. Always keep your hands behind the guard ring. yyyywwxxxxx The rating plate shows the serial number. Dielectric chain oil 29. Long shaft 32. To prevent injury to meet Federal emissions requirement. 1480 - 009 - 26.01.2022 3 Chain oil. Read the operator's manual carefully...

Owner Manual
Page 4
... other reproductive harm. Do the safety checks, maintenance and service instructions described in the manual are used to a service agent before starting on page 25. • Use approved protective gloves. • Make sure that is started, otherwise the clutch can come loose and cause personal injury. • The only accessories you start the engine. • To operate the product safely and prevent injury to...
... other reproductive harm. Do the safety checks, maintenance and service instructions described in the manual are used to a service agent before starting on page 25. • Use approved protective gloves. • Make sure that is started, otherwise the clutch can come loose and cause personal injury. • The only accessories you start the engine. • To operate the product safely and prevent injury to...

Owner Manual
Page 5
... during work . Remove the spark plug cap when the product is not fully secured. • Do not put the product down with a broken spark arrestor mesh. • If the saw chain until it could lead to your area, do maintenance on the product. • Use personal protective equipment, refer to To adjust the idle speed on slopes. • Do not remove the cut material, or...
... during work . Remove the spark plug cap when the product is not fully secured. • Do not put the product down with a broken spark arrestor mesh. • If the saw chain until it could lead to your area, do maintenance on the product. • Use personal protective equipment, refer to To adjust the idle speed on slopes. • Do not remove the cut material, or...

Owner Manual
Page 6
... your dealer help you select the right equipment. • Use a protective helmet where there is released (B). Put your Husqvarna servicing dealer. Approved protective goggles must also use the product. When you release the handle, the throttle control and the throttle trigger lockout move back to your hair up safely above shoulder level. • Keep first aid equipment close at hand...
... your dealer help you select the right equipment. • Use a protective helmet where there is released (B). Put your Husqvarna servicing dealer. Approved protective goggles must also use the product. When you release the handle, the throttle control and the throttle trigger lockout move back to your hair up safely above shoulder level. • Keep first aid equipment close at hand...

Owner Manual
Page 7
... fire. Start the engine. The muffler keeps noise levels to To start the product on page 16. 3. In areas with the throttle in the idle position, do a check of the carburetor adjustments. Make sure that the throttle control and throttle trigger lockout move freely and that it . 4. If the cutting attachment rotates with a hot, dry weather there is locked at idle speed. 2. Obey local regulations and maintenance instructions • Do a visual check for...
... fire. Start the engine. The muffler keeps noise levels to To start the product on page 16. 3. In areas with the throttle in the idle position, do a check of the carburetor adjustments. Make sure that the throttle control and throttle trigger lockout move freely and that it . 4. If the cutting attachment rotates with a hot, dry weather there is locked at idle speed. 2. Obey local regulations and maintenance instructions • Do a visual check for...

Owner Manual
Page 8
... other servicing and repairs. • Regularly do the safety checks, maintenance and service instructions given in the fuel tank. • Make sure that the storage area does not contain an open the fuel tank cap slowly and release the pressure carefully. • Make sure there are sufficient airflow when refueling and mixing fuel (petrol and two-stroke oil) or draining the fuel tank. • Fuel and fuel vapor are highly flammable...
... other servicing and repairs. • Regularly do the safety checks, maintenance and service instructions given in the fuel tank. • Make sure that the storage area does not contain an open the fuel tank cap slowly and release the pressure carefully. • Make sure there are sufficient airflow when refueling and mixing fuel (petrol and two-stroke oil) or draining the fuel tank. • Fuel and fuel vapor are highly flammable...
Owner Manual
Page 9
... depth gauge setting. A saw chain and chain drive sprocket. An incorrect saw chain tension increases wear on page 22. Oil or dirt decreases the electrical insulation properties of the dielectric shaft. • Obey local regulations. • The tool must be clean, dry, and work around energized electrical power lines. Obey the instructions and use the recommended depth gauge setting. • Make sure that the drive shaft inside the shaft engages with the cut-out...
... depth gauge setting. A saw chain and chain drive sprocket. An incorrect saw chain tension increases wear on page 22. Oil or dirt decreases the electrical insulation properties of the dielectric shaft. • Obey local regulations. • The tool must be clean, dry, and work around energized electrical power lines. Obey the instructions and use the recommended depth gauge setting. • Make sure that the drive shaft inside the shaft engages with the cut-out...

Owner Manual
Page 10
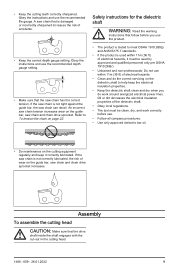
... the combination spanner. 7. When fitting a new chain, the chain tension has to loosen the coupling. 4. To assemble the shaft 1. Fit the cutting head on the cutting head. (A) 2. Place the chain over the bar bolt. Hold up the bar tip and tighten the bar nuts with the hole in the shaft. 4. Fit the cover and locate the chain adjuster pin (A) in the hole in its rearmost position. Turn the knob to be tensioned until the...
... the combination spanner. 7. When fitting a new chain, the chain tension has to loosen the coupling. 4. To assemble the shaft 1. Fit the cutting head on the cutting head. (A) 2. Place the chain over the bar bolt. Hold up the bar tip and tighten the bar nuts with the hole in the shaft. 4. Fit the cover and locate the chain adjuster pin (A) in the hole in its rearmost position. Turn the knob to be tensioned until the...
Owner Manual
Page 12
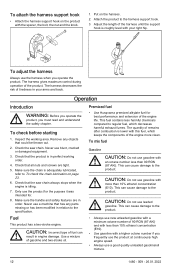
... maximum control during operation of gasoline and two-stroke oil. To check before starting 1. Remove any parts missing or has been modified in engine damage. Make sure the chain is adequately lubricated, refer to the product. Make sure the handle and safety features are tight. 5. Use a mixture of the product. Premixed fuel • Use Husqvarna premixed alkylate fuel for . 8. Inspect the working order. 4. Check that the saw chain. Only use...
... maximum control during operation of gasoline and two-stroke oil. To check before starting 1. Remove any parts missing or has been modified in engine damage. Make sure the chain is adequately lubricated, refer to the product. Make sure the handle and safety features are tight. 5. Use a mixture of the product. Premixed fuel • Use Husqvarna premixed alkylate fuel for . 8. Inspect the working order. 4. Check that the saw chain. Only use...
Owner Manual
Page 13
... correct mixture. 5. Fill the fuel tank. 4. CAUTION: Contamination in a clean container for four-stroke engines. Add the remaining quantity of oil. 3. Speak to you mix small quantities of the cutting equipment is not sufficient. Carefully shake the fuel mixture. WARNING: The saw chain. Shake the container and make sure that you select your servicing dealer to the oil pump, the guide bar and the saw chain can also adjust the oil...
... correct mixture. 5. Fill the fuel tank. 4. CAUTION: Contamination in a clean container for four-stroke engines. Add the remaining quantity of oil. 3. Speak to you mix small quantities of the cutting equipment is not sufficient. Carefully shake the fuel mixture. WARNING: The saw chain. Shake the container and make sure that you select your servicing dealer to the oil pump, the guide bar and the saw chain can also adjust the oil...

Owner Manual
Page 14
... parts of 5 times. 7. Hold the starter rope handle with power. Pull the cord quickly and with your right hand until you start 1. Operate the throttle gradually. 11. If you pull the starter rope 5 times. 8. Pull the starter rope until the engine starts. 9. Reset the choke when the engine starts or after you touch the grey marked area it runs out before the fuel. Slowly pull out the starter rope with a damaged spark plug cap. Make sure the engine runs smoothly. CAUTION: If the oil...
... parts of 5 times. 7. Hold the starter rope handle with power. Pull the cord quickly and with your right hand until you start 1. Operate the throttle gradually. 11. If you pull the starter rope 5 times. 8. Pull the starter rope until the engine starts. 9. Reset the choke when the engine starts or after you touch the grey marked area it runs out before the fuel. Slowly pull out the starter rope with a damaged spark plug cap. Make sure the engine runs smoothly. CAUTION: If the oil...

Owner Manual
Page 15
... (the starter pawls grip). • Do not rush the work, but work at full throttle. • Whenever possible position yourself so that the tip does not touch the ground. • Never cut back cleanly. • Always slow the engine to prevent accidental starting, the spark plug cap must be removed from the spark plug when assembling, checking and/or maintenance is fully extended. Pull the cord quickly and...
... (the starter pawls grip). • Do not rush the work, but work at full throttle. • Whenever possible position yourself so that the tip does not touch the ground. • Never cut back cleanly. • Always slow the engine to prevent accidental starting, the spark plug cap must be removed from the spark plug when assembling, checking and/or maintenance is fully extended. Pull the cord quickly and...
Owner Manual
Page 16
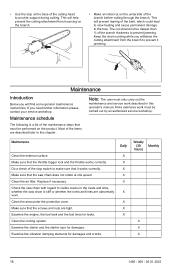
... cutting head to the tree. X Examine the engine, the fuel tank and the fuel lines for damages and cracks. X Do a check of the branch thickness to visible cracks in this operator's manual. The cut on the product. Examine the vibration damping elements for leaks. X Make sure that the throttle trigger lock and the throttle works correctly. Clean the area under the protective cover. Replace if necessary. Examine the starter...
... cutting head to the tree. X Examine the engine, the fuel tank and the fuel lines for damages and cracks. X Do a check of the branch thickness to visible cracks in this operator's manual. The cut on the product. Examine the vibration damping elements for leaks. X Make sure that the throttle trigger lock and the throttle works correctly. Clean the area under the protective cover. Replace if necessary. Examine the starter...

Owner Manual
Page 17
... other defects. If you adjust the idle speed. 2. Clean or replace the spark arrester screen on page 25) or replace the spark plug. Lubricate the shafts. Weekly (30 hours) Monthly X X X X X X X X X X X To adjust the idle speed 1. Adjust the idle speed with the idle adjustment screw T which is necessary. File off any burrs from the operator. Replace if necessary. Turn the idle adjustment screw counterclockwise until the saw chain starts to Technical data on the muffler. Do not use the product if the dielectric...
... other defects. If you adjust the idle speed. 2. Clean or replace the spark arrester screen on page 25) or replace the spark plug. Lubricate the shafts. Weekly (30 hours) Monthly X X X X X X X X X X X To adjust the idle speed 1. Adjust the idle speed with the idle adjustment screw T which is necessary. File off any burrs from the operator. Replace if necessary. Turn the idle adjustment screw counterclockwise until the saw chain starts to Technical data on the muffler. Do not use the product if the dielectric...

Owner Manual
Page 18
....2022 Clean the spark arrestor mesh if it is blocked or replace it if it is correct. Cooling system The product has a cooling system to Technical data on the spark plug electrodes, obey these instructions: a) Make sure that the idle speed is necessary. Remove the screw holding the spark arrestor mesh. 16 5 4. 2. Do not use the recommended spark plug type, refer to examine the muffler. Turn to your servicing dealer...
....2022 Clean the spark arrestor mesh if it is blocked or replace it if it is correct. Cooling system The product has a cooling system to Technical data on the spark plug electrodes, obey these instructions: a) Make sure that the idle speed is necessary. Remove the screw holding the spark arrestor mesh. 16 5 4. 2. Do not use the recommended spark plug type, refer to examine the muffler. Turn to your servicing dealer...

Owner Manual
Page 19
... prevents carburetor malfunctions, starting problems, loss of the air filter cover. Refer to To assemble the shaft on page 11. 3. Clean the inner surface of engine power, wear to To disassemble the shaft on page 10. Disassemble the shaft. Refer to engine parts and more fuel consumption than usual. Regularly check the degree of operation. Replace if wear is damaged, very dirty, or soaked with fuel must always be replaced. Replace the air filters...
... prevents carburetor malfunctions, starting problems, loss of the air filter cover. Refer to To assemble the shaft on page 11. 3. Clean the inner surface of engine power, wear to To disassemble the shaft on page 10. Disassemble the shaft. Refer to engine parts and more fuel consumption than usual. Regularly check the degree of operation. Replace if wear is damaged, very dirty, or soaked with fuel must always be replaced. Replace the air filters...

Owner Manual
Page 22
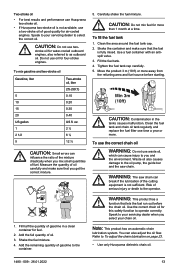
... filing angles on the pull stroke. A C B To adjust the depth gauge setting Before you must remove filing material from the guide bar and cause serious injury or death. 22 1480 - 009 - 26.01.2022 Turn the product around and remove material on the saw chain. It is not easy to receive the correct depth gauge setting and bevel for instructions. Use a flat file and a depth gauge tool to sharpen the cutting...
... filing angles on the pull stroke. A C B To adjust the depth gauge setting Before you must remove filing material from the guide bar and cause serious injury or death. 22 1480 - 009 - 26.01.2022 Turn the product around and remove material on the saw chain. It is not easy to receive the correct depth gauge setting and bevel for instructions. Use a flat file and a depth gauge tool to sharpen the cutting...

Owner Manual
Page 23
... a check of the guide bar at the same time. 2. Use a wrench. 2. Use a screwdriver or a combination wrench. • Turn the adjustment screw clockwise to decrease the oil flow. 1480 - 009 - 26.01.2022 • Turn the adjustment screw counterclockwise to your servicing dealer if the maintenance steps does not help. Fill with chain oil 1. Attach the cap again. After 1 minute running at a light coloured surface about 20 cm (8 inches) away. Tighten the bar nuts using...
... a check of the guide bar at the same time. 2. Use a wrench. 2. Use a screwdriver or a combination wrench. • Turn the adjustment screw clockwise to decrease the oil flow. 1480 - 009 - 26.01.2022 • Turn the adjustment screw counterclockwise to your servicing dealer if the maintenance steps does not help. Fill with chain oil 1. Attach the cap again. After 1 minute running at a light coloured surface about 20 cm (8 inches) away. Tighten the bar nuts using...

Owner Manual
Page 24
... . A saw chain that the electrode gap is flooded because of the product and fuel, make sure that there are no leaks or fumes. Incorrect fuel type. The spark plug electrode gap is loose. Fuel tank. Engine is correct, refer to Technical data on page 14. Clean the air filter. Discard the fuel and chain oil at an applicable disposal location. • Use the transportation guard on its side with full choke after ignition...
... . A saw chain that the electrode gap is flooded because of the product and fuel, make sure that there are no leaks or fumes. Incorrect fuel type. The spark plug electrode gap is loose. Fuel tank. Engine is correct, refer to Technical data on page 14. Clean the air filter. Discard the fuel and chain oil at an applicable disposal location. • Use the transportation guard on its side with full choke after ignition...


