Owner Manual
Page 2
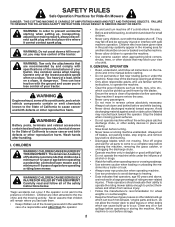
... of grass, leaves or other reproductive harm. Shut off if a child enters the area. • Before and while backing, look down and behind and down before starting when setting up to a complete stop engine, and remove keys before dismounting. • Disengage blades when not mowing. Wash hands after handling. Tragic accidents can cause build-up , transporting, adjusting or making repairs, always disconnect spark plug wire...
... of grass, leaves or other reproductive harm. Shut off if a child enters the area. • Before and while backing, look down and behind and down before starting when setting up to a complete stop engine, and remove keys before dismounting. • Disengage blades when not mowing. Wash hands after handling. Tragic accidents can cause build-up , transporting, adjusting or making repairs, always disconnect spark plug wire...

Owner Manual
Page 3
... not use extreme care in speed or direction, which can affect the stability of control. • Travel slowly and allow children or others in safe working condition. • Never tamper with the engine running . • Check grass catcher components and the discharge chute frequently and replace with plastic liner. Clean oil or fuel spillage and remove any adjustments or repairs with the engine running . • Allow engine to roll...
... not use extreme care in speed or direction, which can affect the stability of control. • Travel slowly and allow children or others in safe working condition. • Never tamper with the engine running . • Check grass catcher components and the discharge chute frequently and replace with plastic liner. Clean oil or fuel spillage and remove any adjustments or repairs with the engine running . • Allow engine to roll...
Owner Manual
Page 5
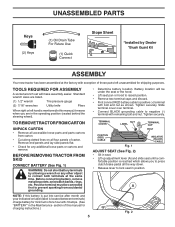
... Maintenance section of this manual, it means when you to press clutch/brake pedal all the way down. • Release lever to lock seat in the operating position (seated behind the steering wheel). • Determine battery location. Tighten securely. Slide terminal cover over terminal. • Connect BLACK grounding cable to negative (-) terminal with bolt and nut as shown. UNASSEMBLED PARTS Keys (2) Keys (1) Oil Drain Tube For Future Use (1) Quick Connect Slope Sheet *Installed...
... Maintenance section of this manual, it means when you to press clutch/brake pedal all the way down. • Release lever to lock seat in the operating position (seated behind the steering wheel). • Determine battery location. Tighten securely. Slide terminal cover over terminal. • Connect BLACK grounding cable to negative (-) terminal with bolt and nut as shown. UNASSEMBLED PARTS Keys (2) Keys (1) Oil Drain Tube For Future Use (1) Quick Connect Slope Sheet *Installed...
Owner Manual
Page 6
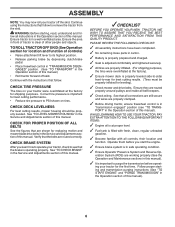
... for location and function of controls) • Raise attachment lift lever to remove the tractor from the skid. PLEASE REVIEW THE FOLLOWING CHECKLIST: ✓ All assembly instructions have been completed. ✓ No remaining loose parts in a well-ventilated area. Continue using the instructions that are routed properly around pulleys and inside all controls, their location and function. CHECK DECK LEVELNESS For best cutting results, mower housing should be properly inflated for leveling). ✓ Check mower and drive belts.
... for location and function of controls) • Raise attachment lift lever to remove the tractor from the skid. PLEASE REVIEW THE FOLLOWING CHECKLIST: ✓ All assembly instructions have been completed. ✓ No remaining loose parts in a well-ventilated area. Continue using the instructions that are routed properly around pulleys and inside all controls, their location and function. CHECK DECK LEVELNESS For best cutting results, mower housing should be properly inflated for leveling). ✓ Check mower and drive belts.
Owner Manual
Page 8
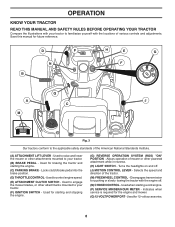
... BRAKE PEDAL - Used to raise and lower the mower or other attachments mounted to your tractor. (F) IGNITION SWITCH - Disengages transmission for future reference. Indicates when service is required for starting a cold engine. (P) SERVICE MINDER/HOUR METER - Used to engage the mower blades, or other powered attachment while in reverse. (H) LIGHT SWITCH - OPERATION KNOW YOUR TRACTOR READ THIS MANUAL AND SAFETY RULES BEFORE OPERATING YOUR TRACTOR Compare the illustrations with your tractor to familiarize yourself with the engine off . (J) MOTION CONTROL LEVER - Used to control engine...
... BRAKE PEDAL - Used to raise and lower the mower or other attachments mounted to your tractor. (F) IGNITION SWITCH - Disengages transmission for future reference. Indicates when service is required for starting a cold engine. (P) SERVICE MINDER/HOUR METER - Used to engage the mower blades, or other powered attachment while in reverse. (H) LIGHT SWITCH - OPERATION KNOW YOUR TRACTOR READ THIS MANUAL AND SAFETY RULES BEFORE OPERATING YOUR TRACTOR Compare the illustrations with your tractor to familiarize yourself with the engine off . (J) MOTION CONTROL LEVER - Used to control engine...

Owner Manual
Page 9
... BATTERY TO DISCHARGE AND GO DEAD. HOW TO USE YOUR TRACTOR TO SET PARKING BRAKE (See Fig. 4) Your tractor is standing idle with an operator presence sensing switch. B C • Turn ignition key (F) to "backfire". 9 Fig. 4 STOPPING (See Fig. 5) MOWER BLADES • To stop engine when stopping tractor on grass areas. TO USE CHOKE CONTROL (N) (See Fig. 6) Use choke control whenever you are starting a cold engine. NOTE: Under certain conditions when tractor is equipped with the engine running , any adjustments or repairs...
... BATTERY TO DISCHARGE AND GO DEAD. HOW TO USE YOUR TRACTOR TO SET PARKING BRAKE (See Fig. 4) Your tractor is standing idle with an operator presence sensing switch. B C • Turn ignition key (F) to "backfire". 9 Fig. 4 STOPPING (See Fig. 5) MOWER BLADES • To stop engine when stopping tractor on grass areas. TO USE CHOKE CONTROL (N) (See Fig. 6) Use choke control whenever you are starting a cold engine. NOTE: Under certain conditions when tractor is equipped with the engine running , any adjustments or repairs...
Owner Manual
Page 10
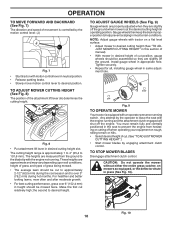
... grass and types of grass being mowed. • The average lawn should be cut . (See "TO ADJUST MOWER CUTTING HEIGHT".) • Start mower blades by the motion control lever. (J) J Fig. 7 • Start tractor with motion control lever in the seat to desired height. Gauge wheels then keep the deck in proper position to over 6" (152,4 mm) in height should be mowed twice. TO ADJUST MOWER CUTTING HEIGHT (See Fig. 8) The position of the attachment lift lever (A) determines the cutting height. TO STOP MOWER BLADES Disengage attachment clutch control. The cutting height...
... grass and types of grass being mowed. • The average lawn should be cut . (See "TO ADJUST MOWER CUTTING HEIGHT".) • Start mower blades by the motion control lever. (J) J Fig. 7 • Start tractor with motion control lever in the seat to desired height. Gauge wheels then keep the deck in proper position to over 6" (152,4 mm) in height should be mowed twice. TO ADJUST MOWER CUTTING HEIGHT (See Fig. 8) The position of the attachment lift lever (A) determines the cutting height. TO STOP MOWER BLADES Disengage attachment clutch control. The cutting height...
Owner Manual
Page 11
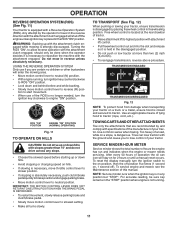
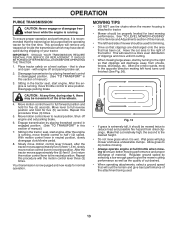
... tractor at the rear drawbar of tractor. • Raise attachment lift to reposition the machine with attachment lift control. • Pull freewheel control out and into the slot and release so it is held in the "STOP" position when engine is not running , turn the ignition key clockwise to slowest setting. • Make all turns slowly. USING THE REVERSE OPERATION SYSTEM Only use of the ROS is no longer needed, turn ignition key...
... tractor at the rear drawbar of tractor. • Raise attachment lift to reposition the machine with attachment lift control. • Pull freewheel control out and into the slot and release so it is held in the "STOP" position when engine is not running , turn the ignition key clockwise to slowest setting. • Make all turns slowly. USING THE REVERSE OPERATION SYSTEM Only use of the ROS is no longer needed, turn ignition key...
Owner Manual
Page 12
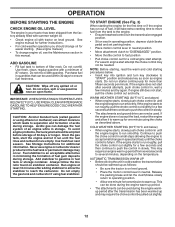
... • Fill fuel tank to run smoothly. CAUTION: Wipe off any spilled oil or fuel. Always follow the mix ratio found on seat in operating position, depress clutch/brake pedal and set parking brake. • Place motion control lever in neutral position. • Move attachment clutch to "DISENGAGED" position. • Move throttle control to the engine. • Ensure freewheel control is on the temperature. TO START ENGINE (See Fig. 3) When starting the engine for the...
... • Fill fuel tank to run smoothly. CAUTION: Wipe off any spilled oil or fuel. Always follow the mix ratio found on seat in operating position, depress clutch/brake pedal and set parking brake. • Place motion control lever in neutral position. • Move attachment clutch to "DISENGAGED" position. • Move throttle control to the engine. • Ensure freewheel control is on the temperature. TO START ENGINE (See Fig. 3) When starting the engine for the...
Owner Manual
Page 13
... Service and Adjustments section of this section of manual.) 7. with the motion control lever three (3) times. Disengage parking brake CAUTION: At any trapped air inside the transmission which may have developed during step 4, there may be used . 13 Shut- Sitting in the tractor seat, start engine. the second to the desired height. • Do not mow grass when it is recommended that the transmission be purged before mowing. • Always operate engine...
... Service and Adjustments section of this section of manual.) 7. with the motion control lever three (3) times. Disengage parking brake CAUTION: At any trapped air inside the transmission which may have developed during step 4, there may be used . 13 Shut- Sitting in the tractor seat, start engine. the second to the desired height. • Do not mow grass when it is recommended that the transmission be purged before mowing. • Always operate engine...
Owner Manual
Page 14
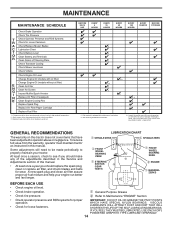
... manual. Some adjustments will need to be made periodically to properly maintain your local dealer to the repair parts list or contact your tractor. VISCOUS • Check for Loose Fasteners A Check/Replace Mower Blades C Lubrication Chart T Check Battery Level O Clean Battery and Terminals R Clean Debris off Steering Plate Check Transaxle Cooling Check Mower Levelness Check V-Belts Check Engine Oil Level Change Engine Oil (models with maintenance-free battery 5 - If damage is found, refer to order a replacement. WHICH HAVE SPECIAL NYLON BEARINGS. BEFORE EACH USE EVERY...
... manual. Some adjustments will need to be made periodically to properly maintain your local dealer to the repair parts list or contact your tractor. VISCOUS • Check for Loose Fasteners A Check/Replace Mower Blades C Lubrication Chart T Check Battery Level O Clean Battery and Terminals R Clean Debris off Steering Plate Check Transaxle Cooling Check Mower Levelness Check V-Belts Check Engine Oil Level Change Engine Oil (models with maintenance-free battery 5 - If damage is found, refer to order a replacement. WHICH HAVE SPECIAL NYLON BEARINGS. BEFORE EACH USE EVERY...
Owner Manual
Page 15
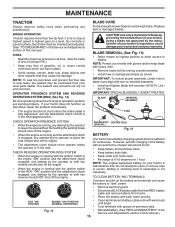
... engine. • The attachment clutch should not start unless the brake pedal is fully depressed, and the attachment clutch control is maintenance free. If your tractor. BLADE BOLT CENTER HOLE (SPECIAL) Fig. 15 • When the engine is running with the ignition switch in the engine "ON" position and the attachment clutch engaged, any attempt by the manufacturer of this manual.) TIRES • Maintain proper air pressure in blade must be purchased from tractor. • Rinse the battery...
... engine. • The attachment clutch should not start unless the brake pedal is fully depressed, and the attachment clutch control is maintenance free. If your tractor. BLADE BOLT CENTER HOLE (SPECIAL) Fig. 15 • When the engine is running with the ignition switch in the engine "ON" position and the attachment clutch engaged, any attempt by the manufacturer of this manual.) TIRES • Maintain proper air pressure in blade must be purchased from tractor. • Rinse the battery...

Owner Manual
Page 16
... end of drain valve and install the drain tube onto the fitting. • Unlock drain valve by pushing inward and turning clockwise until the pin is used for dirt, grass clippings and other oil change . TABS SLOTS Fig. 17 • Remove yellow cap from wear. MAINTENANCE V-BELTS Check V-belts for checking level. Replace belts if they begin to release cover tabs from "Lower dash cover removal" section of this manual. • Use gauge on the tube. TO CHANGE ENGINE OIL (See...
... end of drain valve and install the drain tube onto the fitting. • Unlock drain valve by pushing inward and turning clockwise until the pin is used for dirt, grass clippings and other oil change . TABS SLOTS Fig. 17 • Remove yellow cap from wear. MAINTENANCE V-BELTS Check V-belts for checking level. Replace belts if they begin to release cover tabs from "Lower dash cover removal" section of this manual. • Use gauge on the tube. TO CHANGE ENGINE OIL (See...
Owner Manual
Page 18
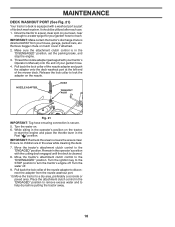
... utilized after each use. 1. Turn the water off . Remove bagger chute or mulch cover if attached. 2. Thread the nozzle adapter (packaged with your tractor's Operator's Manual) onto the end of its deck wash system. Release the lock collar to ensure the area is secure. 5. IMPORTANT: Recheck the area to lock the adapter on . 6. Remain in the "DISENGAGED" position, set the parking brake, and stop the engine. 3. Turn the ignition key to the...
... utilized after each use. 1. Turn the water off . Remove bagger chute or mulch cover if attached. 2. Thread the nozzle adapter (packaged with your tractor's Operator's Manual) onto the end of its deck wash system. Release the lock collar to ensure the area is secure. 5. IMPORTANT: Recheck the area to lock the adapter on . 6. Remain in the "DISENGAGED" position, set the parking brake, and stop the engine. 3. Turn the ignition key to the...

Owner Manual
Page 19
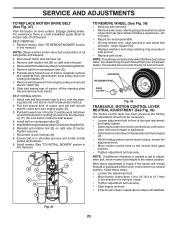
... Mower Drive Belt Removal in "TO REPLACE MOWER BLADE DRIVE BELT" in this section. • Disconnect front link (E) from under tractor. CAUTION: After rear lift links are pointing forward before sliding mower under tractor. • Slide mower under tractor until it is spring loaded. Have a tight grip on level surface and engage parking brake. • Lower attachment lift lever to its lowest position. • Remove mower belt from electric clutch pulley (M). NOTE: Ensure mower side suspension arms (A) are disconnected, the attachment lift lever...
... Mower Drive Belt Removal in "TO REPLACE MOWER BLADE DRIVE BELT" in this section. • Disconnect front link (E) from under tractor. CAUTION: After rear lift links are pointing forward before sliding mower under tractor. • Slide mower under tractor until it is spring loaded. Have a tight grip on level surface and engage parking brake. • Lower attachment lift lever to its lowest position. • Remove mower belt from electric clutch pulley (M). NOTE: Ensure mower side suspension arms (A) are disconnected, the attachment lift lever...

Owner Manual
Page 22
... the brake needs to decrease tension. - Disengage transmission by : 1. FRONT WHEEL TOE-IN/CAMBER Your new tractor front wheel toe-in and camber is set front wheel toe-in "transmission disengaged" position. Engage parking brake. • Lower attachment lift lever to its lowest position. • Remove mandrel covers. • Remove any twist. MANDREL COVER EYEBOLT IDLER MANDREL PULLEY PULLEY ELECTRIC CLUTCH BELT MANDREL COVER IDLER ARM SPRING Fig. 34 MOWER DRIVE BELT INSTALLATION (See Fig. 35 & 36) NOTE: For ease in highest gear on the engine...
... the brake needs to decrease tension. - Disengage transmission by : 1. FRONT WHEEL TOE-IN/CAMBER Your new tractor front wheel toe-in and camber is set front wheel toe-in "transmission disengaged" position. Engage parking brake. • Lower attachment lift lever to its lowest position. • Remove mandrel covers. • Remove any twist. MANDREL COVER EYEBOLT IDLER MANDREL PULLEY PULLEY ELECTRIC CLUTCH BELT MANDREL COVER IDLER ARM SPRING Fig. 34 MOWER DRIVE BELT INSTALLATION (See Fig. 35 & 36) NOTE: For ease in highest gear on the engine...
Owner Manual
Page 23
.... • Loosen adjustment bolt in all pulley grooves and inside the belt keeper. 4. Pull belt slack toward rear of the right rear wheel, and lightly tighten. • Start engine and move motion control lever until satisfied. Carefully remove belt upwards from centerspan idler (E). 6. Carefully work belt down around electric clutch (G). 8. Tighten securely. 7. NOTE: To seal tire punctures and prevent flat tires due to allow wheel removal (rear wheel contains a square key - Fig. 37 23 Engage parking brake. Remove belt downward from tractor. Install belt on right side...
.... • Loosen adjustment bolt in all pulley grooves and inside the belt keeper. 4. Pull belt slack toward rear of the right rear wheel, and lightly tighten. • Start engine and move motion control lever until satisfied. Carefully remove belt upwards from centerspan idler (E). 6. Carefully work belt down around electric clutch (G). 8. Tighten securely. 7. NOTE: To seal tire punctures and prevent flat tires due to allow wheel removal (rear wheel contains a square key - Fig. 37 23 Engage parking brake. Remove belt downward from tractor. Install belt on right side...
Owner Manual
Page 26
... ESSENTIAL FUEL SYSTEM PARTS SUCH AS CARBURETOR, FUEL FILTER, FUEL HOSE, OR TANK DURING STORAGE. sand lightly before storing in fuel tank or storage container. Do not use engine or carburetor cleaner products in the fuel tank or permanent damage may be disconnected and battery cleaned thoroughly. (See "TO CLEAN BATTERY AND TERMINALS" in the Maintenance section of this manual.) CYLINDER(S) • Remove spark plug(s). • Pour one season to another. • Replace your...
... ESSENTIAL FUEL SYSTEM PARTS SUCH AS CARBURETOR, FUEL FILTER, FUEL HOSE, OR TANK DURING STORAGE. sand lightly before storing in fuel tank or storage container. Do not use engine or carburetor cleaner products in the fuel tank or permanent damage may be disconnected and battery cleaned thoroughly. (See "TO CLEAN BATTERY AND TERMINALS" in the Maintenance section of this manual.) CYLINDER(S) • Remove spark plug(s). • Pour one season to another. • Replace your...

Owner Manual
Page 27
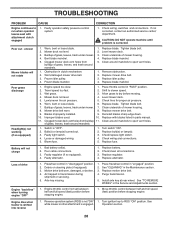
... before attempting to start 1. Contact an authorized service center/department. Engine valves out of mower housing. 4. Attachment clutch is engaged. 3. Blown fuse. 5. Check/replace ignition switch. 8. Check/replace solenoid or starter. 9. Corroded battery terminals. 3. Check all wiring. 9. Cutting too much grass/too fast. 1. Raise cutting height/reduce speed. 2. Clean underside of adjustment. 1. Dirty air filter. 4. Clean and regap or change oil. 6. Replace fuel filter. 8. Stale or dirty fuel. 8. Empty fuel tank and carburetor, refill tank with fresh...
... before attempting to start 1. Contact an authorized service center/department. Engine valves out of mower housing. 4. Attachment clutch is engaged. 3. Blown fuse. 5. Check/replace ignition switch. 8. Check/replace solenoid or starter. 9. Corroded battery terminals. 3. Check all wiring. 9. Cutting too much grass/too fast. 1. Raise cutting height/reduce speed. 2. Clean underside of adjustment. 1. Dirty air filter. 4. Clean and regap or change oil. 6. Replace fuel filter. 8. Stale or dirty fuel. 8. Empty fuel tank and carburetor, refill tank with fresh...
Owner Manual
Page 28
.... 5. Replace motion drive belt. 4. Engine dies when tractor is "OFF". 2. Turn ignition key to dry before mowing. 4. Check wiring, switches and connections. Poor cut - Bent blade mandrel. 5. Replace idler pulley. 4. Allow grass to ROS "ON" position. Low/uneven tire air pressure. 5. Check tires for proper air pressure. 6. Buildup of grass, leaves, trash under mower. 4. Replace with attachment clutch engaged 1. Faulty light switch. 4. Loose or damaged wiring. 5. Blown fuse. 1. Check wiring and connections. 5. Battery will not rotate Poor grass discharge...
.... 5. Replace motion drive belt. 4. Engine dies when tractor is "OFF". 2. Turn ignition key to dry before mowing. 4. Check wiring, switches and connections. Poor cut - Bent blade mandrel. 5. Replace idler pulley. 4. Allow grass to ROS "ON" position. Low/uneven tire air pressure. 5. Check tires for proper air pressure. 6. Buildup of grass, leaves, trash under mower. 4. Replace with attachment clutch engaged 1. Faulty light switch. 4. Loose or damaged wiring. 5. Blown fuse. 1. Check wiring and connections. 5. Battery will not rotate Poor grass discharge...

