
Parts Manual
Page 3
...-01 WHEEL ASSY 29 593 73 65-01 WHEEL ASSY 30 591 43 97-01 DUST COVER LE121 P, 967682502, 2018-01 Remark Front cover upper Front axle Suspension Front cover low Suspension M6 Height adjustment handle Machined M6*12 M6 hex flange locking Right side Side discharge Side discharge Rear discharge Rear discharge hatch Rear tail Left side rear axle bracket assy Deck assy Suspension Front Rear, push "20"" mower" QTY KIT...
...-01 WHEEL ASSY 29 593 73 65-01 WHEEL ASSY 30 591 43 97-01 DUST COVER LE121 P, 967682502, 2018-01 Remark Front cover upper Front axle Suspension Front cover low Suspension M6 Height adjustment handle Machined M6*12 M6 hex flange locking Right side Side discharge Side discharge Rear discharge Rear discharge hatch Rear tail Left side rear axle bracket assy Deck assy Suspension Front Rear, push "20"" mower" QTY KIT...
Owner Manual
Page 2
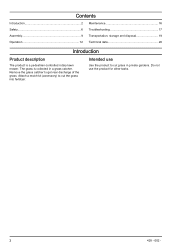
Do not use Use the product to cut the grass into fertilizer. The grass is a pedestrian-controlled rotary lawn mower. Intended use the product for other tasks. 2 428 - 002 - Attach a mulch kit (accessory) to get rear discharge of the grass. Contents Introduction 2 Safety 6 Assembly 9 Maintenance 16 Troubleshooting 17 Transportation, storage and disposal 19 Operation 12 Technical data 20 Introduction Product description The product is collected in private gardens. Remove the grass catcher to cut grass in a grass catcher.
Do not use Use the product to cut the grass into fertilizer. The grass is a pedestrian-controlled rotary lawn mower. Intended use the product for other tasks. 2 428 - 002 - Attach a mulch kit (accessory) to get rear discharge of the grass. Contents Introduction 2 Safety 6 Assembly 9 Maintenance 16 Troubleshooting 17 Transportation, storage and disposal 19 Operation 12 Technical data 20 Introduction Product description The product is collected in private gardens. Remove the grass catcher to cut grass in a grass catcher.
Owner Manual
Page 3
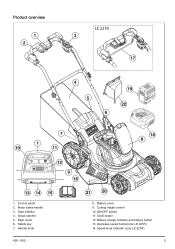
Control panel 2. Rear cover 6. Battery cover 9. Start inhibitor 4. Safety key 7. Battery charge indicator and battery button 13. Speed level indicator (only LE 221R) 428 - 002 - 3 Motor brake handle 3. Cutting height control 10. Decrease speed button(only LE 221R) 14. SavE button 12. Product overview 1 2 LE 221R 3 17 4 5 19 22 6 7 1 10 11 18 8 12 9 16 13 14 15 1. Grass catcher 5. Handle knob 21 20 8. ON/OFF button 11.
Control panel 2. Rear cover 6. Battery cover 9. Start inhibitor 4. Safety key 7. Battery charge indicator and battery button 13. Speed level indicator (only LE 221R) 428 - 002 - 3 Motor brake handle 3. Cutting height control 10. Decrease speed button(only LE 221R) 14. SavE button 12. Product overview 1 2 LE 221R 3 17 4 5 19 22 6 7 1 10 11 18 8 12 9 16 13 14 15 1. Grass catcher 5. Handle knob 21 20 8. ON/OFF button 11.
Owner Manual
Page 4
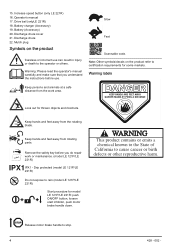
... motor brake handle to the operator or others. 15. Discharge chute 22. Remove the safety key before you understand the instructions before use can result in injury or death to stop. 4 428 - 002 - Operator's manual 17. Keep hands and feet away from rotating parts. Drive bail (onlyLE 221R) 18. Slow Fast Scannable code. Warning labels Keep persons and animals at a safe distance from the work or maintenance. (model...
... motor brake handle to the operator or others. 15. Discharge chute 22. Remove the safety key before you understand the instructions before use can result in injury or death to stop. 4 428 - 002 - Operator's manual 17. Keep hands and feet away from rotating parts. Drive bail (onlyLE 221R) 18. Slow Fast Scannable code. Warning labels Keep persons and animals at a safe distance from the work or maintenance. (model...
Owner Manual
Page 6
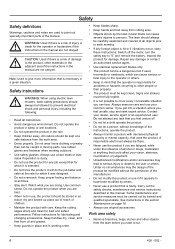
... death to point out specially important parts of the instructions, operate the product. • Always monitor a person, with care. Some maintenance and service measures must be a dangerous tool if used to the user or others . • Keep in moving parts. All visitors should be kept at a safe distance from oil and grease. • Keep guards in place and in the manual are not...
... death to point out specially important parts of the instructions, operate the product. • Always monitor a person, with care. Some maintenance and service measures must be a dangerous tool if used to the user or others . • Keep in moving parts. All visitors should be kept at a safe distance from oil and grease. • Keep guards in place and in the manual are not...
Owner Manual
Page 7
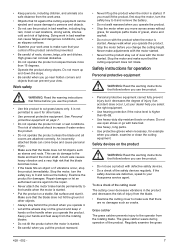
... safety key to cut grass lawns only. Make sure that the blade does not hit the ground or other tasks. • Use personal protective equipment. Stop the motor and make adjustments with the motor started. Let your Husqvarna service agent. Safety devices on the product WARNING: Read the warning instructions that are defective, speak to 0 and remove the battery. Work safety WARNING: Read the warning instructions that can come loose...
... safety key to cut grass lawns only. Make sure that the blade does not hit the ground or other tasks. • Use personal protective equipment. Stop the motor and make adjustments with the motor started. Let your Husqvarna service agent. Safety devices on the product WARNING: Read the warning instructions that are defective, speak to 0 and remove the battery. Work safety WARNING: Read the warning instructions that can come loose...
Owner Manual
Page 8
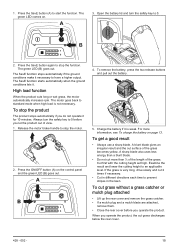
... the air slots of the motor brake, start when the safety key is released, the motor stops. The safety key connects the battery that follow before you use non-rechargeable batteries. • Risk of the handlebar. Battery and battery charger safety Read the operator's manual for related Husqvarna products only. The start inhibitor out. Push the motor brake handle in position 1. 3. The battery or conductor can only start the motor and then release the motor brake handle. catcher and replace it...
... the air slots of the motor brake, start when the safety key is released, the motor stops. The safety key connects the battery that follow before you use non-rechargeable batteries. • Risk of the handlebar. Battery and battery charger safety Read the operator's manual for related Husqvarna products only. The start inhibitor out. Push the motor brake handle in position 1. 3. The battery or conductor can only start the motor and then release the motor brake handle. catcher and replace it...

Owner Manual
Page 9
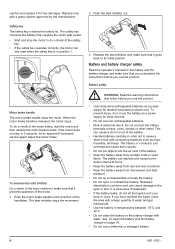
... the cutting edges sharp and clean for the best and safest performance. • Let your nearest service agent for how to corrosive or flammable materials. Only use the battery charger close to change accessories. SAVE THESE INSTRUCTIONS Assembly Introduction To assemble the handle WARNING: Before you start during maintenance, turn the safety key to consult their physician and the medical implant manufacturer before operating this operator's manual. Never...
... the cutting edges sharp and clean for the best and safest performance. • Let your nearest service agent for how to corrosive or flammable materials. Only use the battery charger close to change accessories. SAVE THESE INSTRUCTIONS Assembly Introduction To assemble the handle WARNING: Before you start during maintenance, turn the safety key to consult their physician and the medical implant manufacturer before operating this operator's manual. Never...
Owner Manual
Page 10
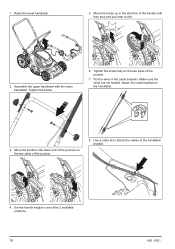
.... 10 428 - 002 - Use a cable tie to attach the cables to the handlebar. 3. Move the knobs up in the direction of the product. 7. CLICK! 2. Tighten the knobs. 6. Make sure the wires are not twisted. Raise the lower handlebar. 5. Attach the cable brackets to the handlebar bracket. 4. Put the wires in one of the product. 8. Set the handle height in the cable brackets. Move the knobs to...
.... 10 428 - 002 - Use a cable tie to attach the cables to the handlebar. 3. Move the knobs up in the direction of the product. 7. CLICK! 2. Tighten the knobs. 6. Make sure the wires are not twisted. Raise the lower handlebar. 5. Attach the cable brackets to the handlebar bracket. 4. Put the wires in one of the product. 8. Set the handle height in the cable brackets. Move the knobs to...
Owner Manual
Page 11
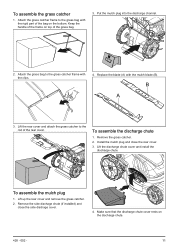
... mulch plug into the discharge channel. 2. Attach the grass bag to the grass bag with the rigid part of the grass bag. 3. B A 3. To assemble the mulch plug 1. Lift the discharge chute cover and install the discharge chute. Make sure that the discharge chute cover rests on top of the bag on the bottom. Attach the grass catcher frame to the grass catcher frame with the mulch blade (B). Keep the handle of the rear cover. Replace the blade (A) with the clips. 4. Install the mulch plug and close the side dischage cover. 4. Remove...
... mulch plug into the discharge channel. 2. Attach the grass bag to the grass bag with the rigid part of the grass bag. 3. B A 3. To assemble the mulch plug 1. Lift the discharge chute cover and install the discharge chute. Make sure that the discharge chute cover rests on top of the bag on the bottom. Attach the grass catcher frame to the grass catcher frame with the mulch blade (B). Keep the handle of the rear cover. Replace the blade (A) with the clips. 4. Install the mulch plug and close the side dischage cover. 4. Remove...
Owner Manual
Page 12
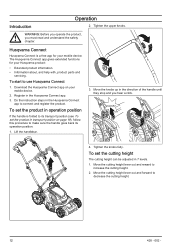
... with, product parts and servicing. Move the knobs up in the Husqvarna Connect app to increase the cutting height. 2. Move the cutting height lever out and reward to connect and register the product. Husqvarna Connect Husqvarna Connect is folded to make sure the handle goes back its transport position (see To set the cutting height The cutting height can be adjusted in 7 levels. 1. Do the instruction steps in the...
... with, product parts and servicing. Move the knobs up in the Husqvarna Connect app to increase the cutting height. 2. Move the cutting height lever out and reward to connect and register the product. Husqvarna Connect Husqvarna Connect is folded to make sure the handle goes back its transport position (see To set the cutting height The cutting height can be adjusted in 7 levels. 1. Do the instruction steps in the...
Owner Manual
Page 13
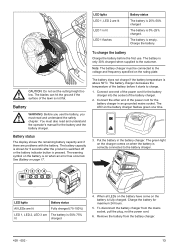
... you use . Connect the other end of the lawn is not flat. Charge the battery for 5 seconds after the product is switched off or the battery indicator button is pressed. LED lights LED 1, LED 2 are The battery is 50%-75% lit charged 4. CAUTION: Do not set the cutting height too low. The blades can hit the ground if the surface of the power cord...
... you use . Connect the other end of the lawn is not flat. Charge the battery for 5 seconds after the product is switched off or the battery indicator button is pressed. LED lights LED 1, LED 2 are The battery is 50%-75% lit charged 4. CAUTION: Do not set the cutting height too low. The blades can hit the ground if the surface of the power cord...
Owner Manual
Page 14
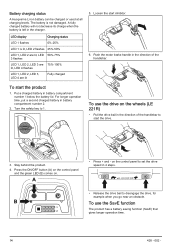
... use the drive on the wheels (LE 221R) • Pull the drive bail in the direction of the handlebar to start the product 1. To start the drive. 3. Turn the safety key to disengage the drive, for example when you go near an obstacle. Press the ON/OFF button (A) on the control panel and the green LED (B) comes on the control panel to set the drive speed in battery compartment number...
... use the drive on the wheels (LE 221R) • Pull the drive bail in the direction of the handlebar to start the product 1. To start the drive. 3. Turn the safety key to disengage the drive, for example when you go near an obstacle. Press the ON/OFF button (A) on the control panel and the green LED (B) comes on the control panel to set the drive speed in battery compartment number...
Owner Manual
Page 15
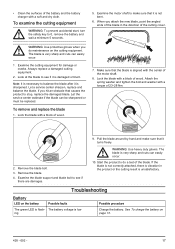
... the grass. Charge the battery if it necessary to standard mode when high load is weak. A blunt blade gives an irregular result and the cut grass discharges below the rear cover. 428 - 002 - 15 If the grass is very long, drive slowly and cut grass without a grass catcher or mulch plug attached • Lift up the rear cover and remove the grass catcher. • If a mulch plug and a mulch blade are attached, remove them. • Close the rear cover before you operate the...
... the grass. Charge the battery if it necessary to standard mode when high load is weak. A blunt blade gives an irregular result and the cut grass discharges below the rear cover. 428 - 002 - 15 If the grass is very long, drive slowly and cut grass without a grass catcher or mulch plug attached • Lift up the rear cover and remove the grass catcher. • If a mulch plug and a mulch blade are attached, remove them. • Close the rear cover before you operate the...
Owner Manual
Page 16
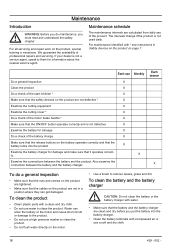
... is not used daily. For maintenance identified with * see instructions in a position where they can enter the battery or the motor and cause short circuit or damage to clean the product. • Do not flush water directly on the product are calculated from daily use a high pressure washer to the product. • Do not use of professional repairs and servicing. Each...
... is not used daily. For maintenance identified with * see instructions in a position where they can enter the battery or the motor and cause short circuit or damage to clean the product. • Do not flush water directly on the product are calculated from daily use a high pressure washer to the product. • Do not use of professional repairs and servicing. Each...
Owner Manual
Page 17
... accidental start, turn the safety key to see if it is very sharp and cuts can easily occur. 10. Examine the motor shaft to make sure that it turns freely. WARNING: Use protective gloves when you do a test of the blade. Lock the blade with a torque of 23-28 Nm. 2. Attach the spring washer and tighten the bolt and washer with a block of wood. 7. Pull the blade...
... accidental start, turn the safety key to see if it is very sharp and cuts can easily occur. 10. Examine the motor shaft to make sure that it turns freely. WARNING: Use protective gloves when you do a test of the blade. Lock the blade with a torque of 23-28 Nm. 2. Attach the spring washer and tighten the bolt and washer with a block of wood. 7. Pull the blade...
Owner Manual
Page 18
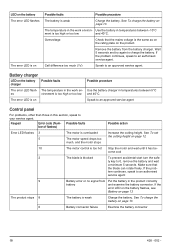
... to an approved service agent Control panel For problems, other than those in this section, speak to charge the battery. See To charge the battery on page 13. See To set the cutting height on page 12. 10 The motor control is weak Charge the battery. Make sure that the mains voltage is too high or too low and 40°C. Remove the battery from Put the...
... to an approved service agent Control panel For problems, other than those in this section, speak to charge the battery. See To charge the battery on page 13. See To set the cutting height on page 12. 10 The motor control is weak Charge the battery. Make sure that the mains voltage is too high or too low and 40°C. Remove the battery from Put the...
Owner Manual
Page 19
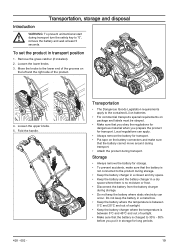
...the battery from the battery charger during transport turn the safety key to "0", remove the battery and wait at least 5 seconds. Loosen the lower knobs. 3. Storage • Always remove the battery for long periods. 19 Fold the handle. 428 - 002 - To set ...the product in a dry space where there is between 5°C and 45°C and out of the product. 4. Transportation, storage and disposal Introduction WARNING: To prevent unintentional start during storage. • Do not keep the battery where static electricity can apply. • Always remove the battery...
...the battery from the battery charger during transport turn the safety key to "0", remove the battery and wait at least 5 seconds. Loosen the lower knobs. 3. Storage • Always remove the battery for long periods. 19 Fold the handle. 428 - 002 - To set ...the product in a dry space where there is between 5°C and 45°C and out of the product. 4. Transportation, storage and disposal Introduction WARNING: To prevent unintentional start during storage. • Do not keep the battery where static electricity can apply. • Always remove the battery...
Owner Manual
Page 20
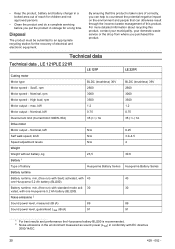
..., contact your municipality, your domestic waste service or the shop from where you can help to an appropriate recycling station for the recovery of electrical and electronic equipment. High load, rpm 3500 Motor output - kW 1.2 Motor output - SavE, rpm 2600 Motor speed - max. Nominal, kW N/A Self walk speed, km/h N/A Speed adjustment levels N/A Weight Weight without battery, kg 23,5 Battery 1 Type of battery Husqvarna Battery Series Battery runtime Battery runtime, min, (free run ) with standard mode acti- 30...
..., contact your municipality, your domestic waste service or the shop from where you can help to an appropriate recycling station for the recovery of electrical and electronic equipment. High load, rpm 3500 Motor output - kW 1.2 Motor output - SavE, rpm 2600 Motor speed - max. Nominal, kW N/A Self walk speed, km/h N/A Speed adjustment levels N/A Weight Weight without battery, kg 23,5 Battery 1 Type of battery Husqvarna Battery Series Battery runtime Battery runtime, min, (free run ) with standard mode acti- 30...

Owner Manual
Page 21
... levels 3 Sound pressure level at the operators ear, dB (A) Vibration levels 4 Handle, m/s2 Cutting Cutting height, mm Cutting width, cm Blade Bagger capacity, litre LE 121P 77 0.45 - 0.52 20-75 mm 51 Collect 592 87 04-01 Mulch 592 87 06-01 65 LE 221R 77 0.45 - 0.52 20-75 mm 51 Collect 592 87 04-01 Mulch 592 87 06-01 65 Approved batteries...
... levels 3 Sound pressure level at the operators ear, dB (A) Vibration levels 4 Handle, m/s2 Cutting Cutting height, mm Cutting width, cm Blade Bagger capacity, litre LE 121P 77 0.45 - 0.52 20-75 mm 51 Collect 592 87 04-01 Mulch 592 87 06-01 65 LE 221R 77 0.45 - 0.52 20-75 mm 51 Collect 592 87 04-01 Mulch 592 87 06-01 65 Approved batteries...


