Parts Manual
Page 3
...-Lo, 13-16 X.750 2 Belt/Rear Baffle 1 Drive, AWD 1 Transmission, AWD 1 12 X 5/8, Hi/Lo Thread 2 Rear Transmission 1 Transmission, AWD 1 AWD, Rear 1 Drive 2 Stripper 1 Hi-Lo, 13-16 X.750 1 Shoulder, 1/4-20 Tri-lobe 1 Hi-Lo, 5/16 X 1.00 1 AWD, Front 1 Hi-Lo, 5/16-14 X 4.10 1 Drive 2 Drive, AWD, Husqvarna 1 Hi-Lo, 5/16 X 1.00 1 Height Adjuster Bracket 2 Return, Rear Transmission 1 Ergonomic 4 4-Point, Right Rear 1 4-Point, Left Front 1 4-Point, Right Front 1 Kit 1 25, 28, 29 "Rear, 11""" 2 Rear 2 Rear 2 2 2
...-Lo, 13-16 X.750 2 Belt/Rear Baffle 1 Drive, AWD 1 Transmission, AWD 1 12 X 5/8, Hi/Lo Thread 2 Rear Transmission 1 Transmission, AWD 1 AWD, Rear 1 Drive 2 Stripper 1 Hi-Lo, 13-16 X.750 1 Shoulder, 1/4-20 Tri-lobe 1 Hi-Lo, 5/16 X 1.00 1 AWD, Front 1 Hi-Lo, 5/16-14 X 4.10 1 Drive 2 Drive, AWD, Husqvarna 1 Hi-Lo, 5/16 X 1.00 1 Height Adjuster Bracket 2 Return, Rear Transmission 1 Ergonomic 4 4-Point, Right Rear 1 4-Point, Left Front 1 4-Point, Right Front 1 Kit 1 25, 28, 29 "Rear, 11""" 2 Rear 2 Rear 2 2 2

Owner Manual
Page 3
... good artificial light. • Avoid holes, ruts, bumps, rocks, or other safety devices in well ventilated areas. Preparation before operating • Clear the operating area of any source of ignition until fuel vapors have been given rides in the past could cause a slip and fall off . Operation on level ground, disengage the attachment, set parking brake, and stop engine. • Do not mow in speed or direction...
... good artificial light. • Avoid holes, ruts, bumps, rocks, or other safety devices in well ventilated areas. Preparation before operating • Clear the operating area of any source of ignition until fuel vapors have been given rides in the past could cause a slip and fall off . Operation on level ground, disengage the attachment, set parking brake, and stop engine. • Do not mow in speed or direction...
Owner Manual
Page 8
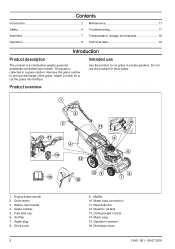
... levers 3. Grass catcher 5. Rear deflector 12. Attach a mulch kit to get rear discharge of the grass. Fuel tank cap 6. Operator's manual 16. Air filter 7. Discharge chute 1240 - 001 - 08.07.2019 Contents Introduction 2 Safety 4 Assembly 7 Maintenance 11 Troubleshooting 17 Transportation, storage and disposal 18 Operation 8 Technical data 19 Introduction Product description The product is collected in private gardens. The grass is a combustion engine-powered pedestrian-controlled lawn mower. Remove the grass catcher to cut grass in a grass catcher. Spark...
... levers 3. Grass catcher 5. Rear deflector 12. Attach a mulch kit to get rear discharge of the grass. Fuel tank cap 6. Operator's manual 16. Air filter 7. Discharge chute 1240 - 001 - 08.07.2019 Contents Introduction 2 Safety 4 Assembly 7 Maintenance 11 Troubleshooting 17 Transportation, storage and disposal 18 Operation 8 Technical data 19 Introduction Product description The product is collected in private gardens. The grass is a combustion engine-powered pedestrian-controlled lawn mower. Remove the grass catcher to cut grass in a grass catcher. Spark...
Owner Manual
Page 9
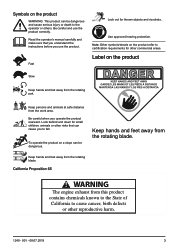
...small children, animals or other risks that you understand the instructions before you to the operator or others. Read the operator's manual carefully and make sure that can cause you use the product correctly. Fast Look out for other reproductive ...engine exhaust from this product contains chemicals known to the State of California to certification requirements for thrown objects and ricochets. Be careful and use the product. Keep persons and animals at safe distance from the rotating blade. Keep hands and feet away from the rotating part. Be careful when you operate...
...small children, animals or other risks that you understand the instructions before you to the operator or others. Read the operator's manual carefully and make sure that can cause you use the product correctly. Fast Look out for other reproductive ...engine exhaust from this product contains chemicals known to the State of California to certification requirements for thrown objects and ricochets. Be careful and use the product. Keep persons and animals at safe distance from the rotating blade. Keep hands and feet away from the rotating part. Be careful when you operate...
Owner Manual
Page 10
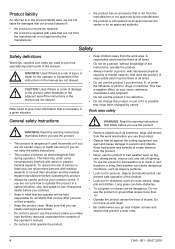
... changed by an approved authority. WARNING: Read the warning instructions that follow before you use your Husqvarna dealer before operating this product or use the product. • Objects that hit against the cutting equipment can eject and cause damage to persons and objects. Product liability As referred to in the product liability laws, we recommend persons with parts...
... changed by an approved authority. WARNING: Read the warning instructions that follow before you use your Husqvarna dealer before operating this product or use the product. • Objects that hit against the cutting equipment can eject and cause damage to persons and objects. Product liability As referred to in the product liability laws, we recommend persons with parts...

Owner Manual
Page 11
... an accident does occur. When the engine brake handle is not permitted to cut grass lawns only. Repair damages or let an authorised service agent do damage to Personal protective equipment on page 5. • Make sure that the blade does not hit the ground or other tasks. • Use personal protective equipment. Always walk when you operate the product. • Stop the...
... an accident does occur. When the engine brake handle is not permitted to cut grass lawns only. Repair damages or let an authorised service agent do damage to Personal protective equipment on page 5. • Make sure that the blade does not hit the ground or other tasks. • Use personal protective equipment. Always walk when you operate the product. • Stop the...
Owner Manual
Page 12
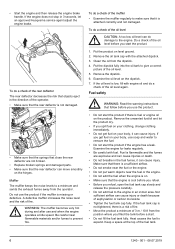
... use and when the engine operates at the top of the fuel tank. 6 1240 - 001 - 08.07.2019 Remove the oil tank cap with fuel. If you use soap and water to the engine in 3 seconds, let an approved Husqvarna service agent adjust the engine brake. Not sufficient airflow can cause injury or death because of fire. Heat causes the fuel to prevent fire. Keep a space at idle speed...
... use and when the engine operates at the top of the fuel tank. 6 1240 - 001 - 08.07.2019 Remove the oil tank cap with fuel. If you use soap and water to the engine in 3 seconds, let an approved Husqvarna service agent adjust the engine brake. Not sufficient airflow can cause injury or death because of fire. Heat causes the fuel to prevent fire. Keep a space at idle speed...
Owner Manual
Page 13
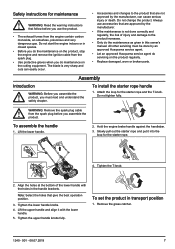
... servicing must read and understand the safety chapter. Hold the engine brake handle against the handlebar. 3. Remove the grass catcher. 1240 - 001 - 08.07.2019 7 Do not start the engine indoors or in closed spaces. • Before you do the maintenance as given in this owner's manual. WARNING: Remove the spark plug cable from the spark plug. • Use protective gloves when you do servicing on the cutting equipment. To install the starter rope handle 1. Attach...
... servicing must read and understand the safety chapter. Hold the engine brake handle against the handlebar. 3. Remove the grass catcher. 1240 - 001 - 08.07.2019 7 Do not start the engine indoors or in closed spaces. • Before you do the maintenance as given in this owner's manual. WARNING: Remove the spark plug cable from the spark plug. • Use protective gloves when you do servicing on the cutting equipment. To install the starter rope handle 1. Attach...
Owner Manual
Page 14
... oil level on page 6. Fill the oil tank and do a check of fire. 8 1240 - 001 - 08.07.2019 Open the fuel tank cap slowly to unlock the handle. 2. Fill slowly with a fuel can cause damage to the grass bag with a cloth and let remaining fuel dry off. 3. Clean the area around the fuel tank cap. 4. Before you spill fuel, remove it is correctly attached and adjusted. Tighten the fuel tank cap fully. Fill the fuel tank...
... oil level on page 6. Fill the oil tank and do a check of fire. 8 1240 - 001 - 08.07.2019 Open the fuel tank cap slowly to unlock the handle. 2. Fill slowly with a fuel can cause damage to the grass bag with a cloth and let remaining fuel dry off. 3. Clean the area around the fuel tank cap. 4. Before you spill fuel, remove it is correctly attached and adjusted. Tighten the fuel tank cap fully. Fill the fuel tank...
Owner Manual
Page 15
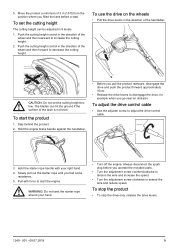
... the lawn is not level. To start . To adjust the drive control cable • Use the adjuster screw to start the engine. WARNING: Do not twist the starter rope around your right hand. 4. To set the cutting height too low. To use the drive on the wheels • Pull the drive levers in the direction of the handlebar. Hold the engine brake handle against the handlebar. • Before you pull the product rearward, disengage the drive and push...
... the lawn is not level. To start . To adjust the drive control cable • Use the adjuster screw to start the engine. WARNING: Do not twist the starter rope around your right hand. 4. To set the cutting height too low. To use the drive on the wheels • Pull the drive levers in the direction of the handlebar. Hold the engine brake handle against the handlebar. • Before you pull the product rearward, disengage the drive and push...

Owner Manual
Page 16
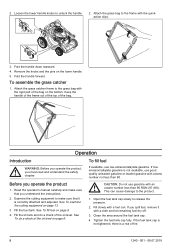
... the rear deflector and remove the mulch plug. 4. Mulched grass biodegrades quickly to the operator. 1. Put the grass catcher on top of the product makes grass clippings smaller. • To stop the engine, release the engine brake handle. Objects can eject and cause injury to give nutrients for the lawn. 1. Let the back shield close and make sure it is installed. 2. To change the product to To assemble the grass catcher...
... the rear deflector and remove the mulch plug. 4. Mulched grass biodegrades quickly to the operator. 1. Put the grass catcher on top of the product makes grass clippings smaller. • To stop the engine, release the engine brake handle. Objects can eject and cause injury to give nutrients for the lawn. 1. Let the back shield close and make sure it is installed. 2. To change the product to To assemble the grass catcher...
Owner Manual
Page 17
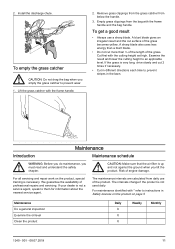
... of engine damage. Lift the grass catcher with * refer to instructions in the lawn. Remove grass clippings from the grass catcher from daily use a sharp blade. 2. Install the discharge chute. To empty the grass catcher CAUTION: Do not drag the bag when you must read and understand the safety chapter. A sharp blade also uses less energy than a blunt blade. • Do not cut surface of the product. CAUTION: Make sure that the air filter...
... of engine damage. Lift the grass catcher with * refer to instructions in the lawn. Remove grass clippings from the grass catcher from daily use a sharp blade. 2. Install the discharge chute. To empty the grass catcher CAUTION: Do not drag the bag when you must read and understand the safety chapter. A sharp blade also uses less energy than a blunt blade. • Do not cut surface of the product. CAUTION: Make sure that the air filter...

Owner Manual
Page 18
Maintenance Examine the cutting equipment Examine the cutting cover * Examine the engine brake handle * Examine the blade brake control * Examine the muffler * Examine the spark plug Replace the oil (the first time after 5 h of use, then after the engine is stopped. If you drain the engine oil. To replace the engine oil WARNING: Engine oil is in the engine can become cool before you do not see a leak, start the engine. To clean the inner surface of use a high pressure washer...
Maintenance Examine the cutting equipment Examine the cutting cover * Examine the engine brake handle * Examine the blade brake control * Examine the muffler * Examine the spark plug Replace the oil (the first time after 5 h of use, then after the engine is stopped. If you drain the engine oil. To replace the engine oil WARNING: Engine oil is in the engine can become cool before you do not see a leak, start the engine. To clean the inner surface of use a high pressure washer...

Owner Manual
Page 19
... instructions: a) Make sure that the electrode gap is damaged or blunt. Examine the cutting equipment for a long time cannot be replaced. Look at the blade to start remove the ignition cable from the spark plug. 3. Let a service center sharpen, replace and balance the blade. Always attach the blade with the angled ends pointing up in . 5. 2. To assemble the blade 1. To clean the air filter 1. Fill with a torque of the type recommended in the adapter...
... instructions: a) Make sure that the electrode gap is damaged or blunt. Examine the cutting equipment for a long time cannot be replaced. Look at the blade to start remove the ignition cable from the spark plug. 3. Let a service center sharpen, replace and balance the blade. Always attach the blade with the angled ends pointing up in . 5. 2. To assemble the blade 1. To clean the air filter 1. Fill with a torque of the type recommended in the adapter...

Owner Manual
Page 20
... blade is not bent. 6. Examine the engine shaft to do a test of wood. CAUTION: To prevent accidental start, always disconnect the spark plug cable and put the wire where it rotates freely. Lock the blade with a torque of wood. 7. Remove the blade bolt. 3. WARNING: Use heavy duty gloves. Attach the spring washer and tighten the bolt and washer with a block of 47-54 Nm. 2. To replace the blade 1. Pull the blade...
... blade is not bent. 6. Examine the engine shaft to do a test of wood. CAUTION: To prevent accidental start, always disconnect the spark plug cable and put the wire where it rotates freely. Lock the blade with a torque of wood. 7. Remove the blade bolt. 3. WARNING: Use heavy duty gloves. Attach the spring washer and tighten the bolt and washer with a block of 47-54 Nm. 2. To replace the blade 1. Pull the blade...

Owner Manual
Page 21
.... 2. Rear insert 3. Transmission pulley 4. Lock washer 13. Remove the spark plug cap from the spark plug. 3. Mulch plug 2. Idler bracket 5. Front belt keeper 9. Hard washer 12. Blade bolt 14. Idler pulley 8. Remove the drive cover. 1240 - 001 - 08.07.2019 15 Operate the product until the fuel tank is put with the muffler down , the engine can become damaged. 4. Blade adapter 7. Transmission assembly overview 2 3 6 7 1 5 4 3 8 14 9 10 11 12 13 1. Blade 11. Put the product on its side with the air filter down . Transmission cover...
.... 2. Rear insert 3. Transmission pulley 4. Lock washer 13. Remove the spark plug cap from the spark plug. 3. Mulch plug 2. Idler bracket 5. Front belt keeper 9. Hard washer 12. Blade bolt 14. Idler pulley 8. Remove the drive cover. 1240 - 001 - 08.07.2019 15 Operate the product until the fuel tank is put with the muffler down , the engine can become damaged. 4. Blade adapter 7. Transmission assembly overview 2 3 6 7 1 5 4 3 8 14 9 10 11 12 13 1. Blade 11. Put the product on its side with the air filter down . Transmission cover...

Owner Manual
Page 22
... rear insert. 8. Loosen the engine pulley with a 9/16" box wrench to the input shaft of the transmission. Remove the drive belt. 16 1240 - 001 - 08.07.2019 Remove the mulch plug. 13. Remove the belt cover and the ring. 14. 5. Remove the front belt keeper. 11. Attach locking pliers to remove the transmission pulley. 15. Disconnect the cable from the transmission and remove the idler pulley from the transmission pulley. 12. Remove the 3 idler pulleys from blade adapter and the idler assembly. 7. Remove the drive belt...
... rear insert. 8. Loosen the engine pulley with a 9/16" box wrench to the input shaft of the transmission. Remove the drive belt. 16 1240 - 001 - 08.07.2019 Remove the mulch plug. 13. Remove the belt cover and the ring. 14. 5. Remove the front belt keeper. 11. Attach locking pliers to remove the transmission pulley. 15. Disconnect the cable from the transmission and remove the idler pulley from the transmission pulley. 12. Remove the 3 idler pulleys from blade adapter and the idler assembly. 7. Remove the drive belt...
Owner Manual
Page 23
... tank Clean the fuel tank cap. Clean the air filter and the air filter housing. Clean the air filter. Fill the fuel tank with new fuel has expired. Let a servicing dealer adjust the carburetor. The engine does not operate smoothly at high speed. Troubleshooting Problem Possible cause Solution The engine does not start. There is dirty. The ignition cable is too low. The engine oil level is not connec- The fuel tank is bent. Adjust the electrode gap, clean or replace the spark plug. The carburetor must be adjusted. Adjust the carburetor. A blade...
... tank Clean the fuel tank cap. Clean the air filter and the air filter housing. Clean the air filter. Fill the fuel tank with new fuel has expired. Let a servicing dealer adjust the carburetor. The engine does not operate smoothly at high speed. Troubleshooting Problem Possible cause Solution The engine does not start. There is dirty. The ignition cable is too low. The engine oil level is not connec- The fuel tank is bent. Adjust the electrode gap, clean or replace the spark plug. The carburetor must be adjusted. Adjust the carburetor. A blade...
Owner Manual
Page 24
... for all chemicals, such as engine oil or fuel, at a service center or at a time. Sharpen or replace the blades. The grass is no leaks or fumes. Lower the cutting height and cut irregularly. One or more of the product and fuel, make sure that are not sufficiently sharp. Set the cutting height at an applicable disposal location • Safely attach the product during transportation to...
... for all chemicals, such as engine oil or fuel, at a service center or at a time. Sharpen or replace the blades. The grass is no leaks or fumes. Lower the cutting height and cut irregularly. One or more of the product and fuel, make sure that are not sufficiently sharp. Set the cutting height at an applicable disposal location • Safely attach the product during transportation to...

Owner Manual
Page 25
... operating speed, environmental conditions and other values. 2 Use engine oil of 1.2 dB (A). 5 Vibration level according to SAE standard J1349/ISO1585. Reported data for the engine installed on the final product will depend on the expected outside temperature. 3 Noise emissions in the environment measured as sound power (LWA) in /mm Fuel and lubrication system Fuel, unleaded, minimum octane number Fuel tank capacity, US gal l Oil tank capacity, US gal/l Engine oil 2 Weight...
... operating speed, environmental conditions and other values. 2 Use engine oil of 1.2 dB (A). 5 Vibration level according to SAE standard J1349/ISO1585. Reported data for the engine installed on the final product will depend on the expected outside temperature. 3 Noise emissions in the environment measured as sound power (LWA) in /mm Fuel and lubrication system Fuel, unleaded, minimum octane number Fuel tank capacity, US gal l Oil tank capacity, US gal/l Engine oil 2 Weight...

