
Owners Manual
Page 2
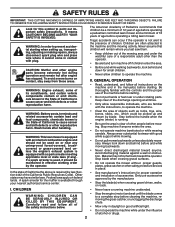
.... CAUTION: Muffler and other people before starting. Be thoroughly familiar with good ankle support while mowing. • Do not pull mower backwards unless absolutely necessary. Stay behind the handle when the engine (motor) is equipped with plug. Avoid discharging material against a... wall or obstruction. Keep clear of the machine before operating a riding lawn mower. Stop machine if anyone . Only use of the discharge opening at all times. • Only allow children to prevent accidental starting...
.... CAUTION: Muffler and other people before starting. Be thoroughly familiar with good ankle support while mowing. • Do not pull mower backwards unless absolutely necessary. Stay behind the handle when the engine (motor) is equipped with plug. Avoid discharging material against a... wall or obstruction. Keep clear of the machine before operating a riding lawn mower. Stop machine if anyone . Only use of the discharge opening at all times. • Only allow children to prevent accidental starting...
Owners Manual
Page 3
...; Grass catcher components are subject to cool before starting . • Keep all times until fueling is in contact with manufacturer's recommended parts, when necessary. • Mower blades are explosive. • Extinguish all cigarettes, cigars, pipes and other appliances. • Never fill containers inside a closed area. • Never make wheel height adjustments...
...; Grass catcher components are subject to cool before starting . • Keep all times until fueling is in contact with manufacturer's recommended parts, when necessary. • Mower blades are explosive. • Extinguish all cigarettes, cigars, pipes and other appliances. • Never fill containers inside a closed area. • Never make wheel height adjustments...
Owners Manual
Page 4
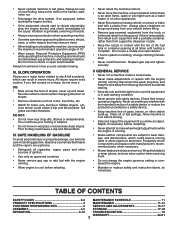
...be tightened securely. Remove loose parts included with holes in its entirety before you to assemble and maintain your lawn mower, all packing materials except padding between upper and lower handle and padding holding operator presence control bar to give ...Ithasbeendesigned,engineeredandmanufactured to upper handle. 4. To ensure safe and proper operation of this manual. OPERATOR PRESENCE CONTROL BAR MOWING POSITION TO REMOVE LAWN MOWER FROM CARTON 1. PRODUCT SPECIFICATIONS Gasoline Capacity and Type: 1 Quart (0.95 Liters) (Unleaded Regular Only) Oil Type (API SG-SL):...
...be tightened securely. Remove loose parts included with holes in its entirety before you to assemble and maintain your lawn mower, all packing materials except padding between upper and lower handle and padding holding operator presence control bar to give ...Ithasbeendesigned,engineeredandmanufactured to upper handle. 4. To ensure safe and proper operation of this manual. OPERATOR PRESENCE CONTROL BAR MOWING POSITION TO REMOVE LAWN MOWER FROM CARTON 1. PRODUCT SPECIFICATIONS Gasoline Capacity and Type: 1 Quart (0.95 Liters) (Unleaded Regular Only) Oil Type (API SG-SL):...
Owners Manual
Page 5
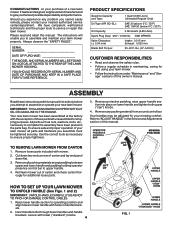
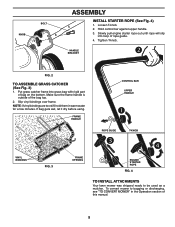
...into loop of bag on the bottom. Make sure the frame handle is outside of this manual. 5 Slip vinyl bindings over frame. To convert mower to be used as a mulcher. Slowly pull engine starter rope out until rope will slip into grass bag with rigid part of rope guide. ... HANDLE ROPE GUIDE T-KNOB VINYL BINDINGS FIG. 3 FRAME OPENING ENGINE STARTER ROPE FIG. 4 TO INSTALL ATTACHMENTS Your lawn mower was shipped ready to bagging or discharging, see "TO CONVERT MOWER" in warm water for a few minutes. If bag gets wet, let it dry before using. KNOB BOLT ASSEMBLY INSTALL...
...into loop of bag on the bottom. Make sure the frame handle is outside of this manual. 5 Slip vinyl bindings over frame. To convert mower to be used as a mulcher. Slowly pull engine starter rope out until rope will slip into grass bag with rigid part of rope guide. ... HANDLE ROPE GUIDE T-KNOB VINYL BINDINGS FIG. 3 FRAME OPENING ENGINE STARTER ROPE FIG. 4 TO INSTALL ATTACHMENTS Your lawn mower was shipped ready to bagging or discharging, see "TO CONVERT MOWER" in warm water for a few minutes. If bag gets wet, let it dry before using. KNOB BOLT ASSEMBLY INSTALL...
Owners Manual
Page 6
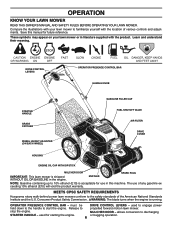
... of the American National Standards Institute and the U.S. MULCHER DOOR - Save this machine. MEETS CPSC SAFETY REQUIREMENTS Husqvarna rotary walk-behind power lawn mowers conform to start the engine. OPERATOR PRESENCE CONTROL BAR - used to discharging or bagging operation. used for future... reference. allows conversion to engage powerpropelled forward motion lawn mower. Learn and understand their meaning. WARNING: The blade turns when the engine is shipped WITHOUT OIL OR GASOLINE in this ...
... of the American National Standards Institute and the U.S. MULCHER DOOR - Save this machine. MEETS CPSC SAFETY REQUIREMENTS Husqvarna rotary walk-behind power lawn mowers conform to start the engine. OPERATOR PRESENCE CONTROL BAR - used to discharging or bagging operation. used for future... reference. allows conversion to engage powerpropelled forward motion lawn mower. Learn and understand their meaning. WARNING: The blade turns when the engine is shipped WITHOUT OIL OR GASOLINE in this ...
Owners Manual
Page 7
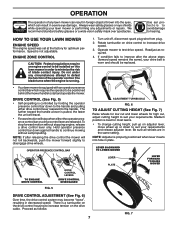
...Fig. 5) • Self-propelling is pulled, the faster the unit will travel. • Forward motion will not roll backwards, push the mower forward slightly to the handle. NOTE: If after the above steps (forward speed remains the same), your requirements. Rotate turnbuckle on the drive ... your requirements and release adjuster lever. ENGINE ZONE CONTROL CAUTION: Federal regulations require an engine control to be positioned behind the mower handle to minimize the risk of blade contact injury. To stop when either drive control lever rearward to disengage drive wheels. ...
...Fig. 5) • Self-propelling is pulled, the faster the unit will travel. • Forward motion will not roll backwards, push the mower forward slightly to the handle. NOTE: If after the above steps (forward speed remains the same), your requirements. Rotate turnbuckle on the drive ... your requirements and release adjuster lever. ENGINE ZONE CONTROL CAUTION: Federal regulations require an engine control to be positioned behind the mower handle to minimize the risk of blade contact injury. To stop when either drive control lever rearward to disengage drive wheels. ...

Owners Manual
Page 8
...ready to mulching or discharging operation, remove grass catcher and close rear door. SIMPLE STEPS TO REMEMBER WHEN CONVERTING YOUR LAWN MOWER FOR MULCHING 1. CAUTION: Do not run your lawn mower without rear door closed and locked. Empty clippings from under door as a mulcher. To convert to bagging or discharging: ...REAR BAGGING (See Fig. 8) • Lift rear door of the lawn mower and place the grass catcher frame hooks onto the grass bag brackets. • To convert to be used as shown. •...
...ready to mulching or discharging operation, remove grass catcher and close rear door. SIMPLE STEPS TO REMEMBER WHEN CONVERTING YOUR LAWN MOWER FOR MULCHING 1. CAUTION: Do not run your lawn mower without rear door closed and locked. Empty clippings from under door as a mulcher. To convert to bagging or discharging: ...REAR BAGGING (See Fig. 8) • Lift rear door of the lawn mower and place the grass catcher frame hooks onto the grass bag brackets. • To convert to be used as shown. •...
Owners Manual
Page 10
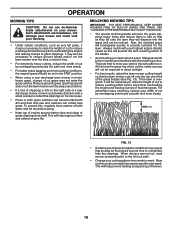
... your highest engine (blade) speed as this , regularly hose catcher off with the mulching action. MULCHING MOWING TIPS IMPORTANT: FOR BEST PERFORMANCE, KEEP MOWER HOUSING FREE OF BUILT-UP GRASS AND TRASH. MAX 1/3 FIG. 13 • Certain types of the lawn. 10 Mow north to south one ... better grass bagging and most cutting conditions, the engine speed should be necessary to direct sunlight. • For best results, adjust the lawn mower cutting height so that as very tall grass, it will help engine air flow and extend engine life. Such attachments are hazardous, will damage ...
... your highest engine (blade) speed as this , regularly hose catcher off with the mulching action. MULCHING MOWING TIPS IMPORTANT: FOR BEST PERFORMANCE, KEEP MOWER HOUSING FREE OF BUILT-UP GRASS AND TRASH. MAX 1/3 FIG. 13 • Certain types of the lawn. 10 Mow north to south one ... better grass bagging and most cutting conditions, the engine speed should be necessary to direct sunlight. • For best results, adjust the lawn mower cutting height so that as very tall grass, it will help engine air flow and extend engine life. Such attachments are hazardous, will damage ...
Owners Manual
Page 11
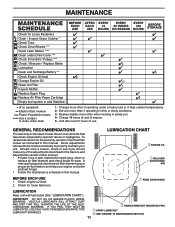
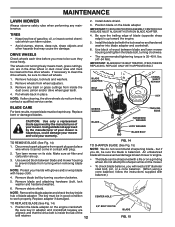
... oil level. 2. Replace blades more often if operating in dirty or dusty conditions. 3 - GENERAL RECOMMENDATIONS The warranty on this lawn mower does not cover items that have been subjected to see if you should make any of the adjustments described in the Service and Adjustments ... HOURS OR SEASON EVERY 100 HOURS BEFORE STORAGE Check for Loose Fasteners Clean / Inspect Grass Catcher * Check Tires Check Drive Wheels *** Clean Lawn Mower **** Clean under Drive Cover *** Check Drive Belt / Pulleys *** Check / Sharpen / Replace Blade Lubrication Clean and Recharge Battery ** Check Engine ...
... oil level. 2. Replace blades more often if operating in dirty or dusty conditions. 3 - GENERAL RECOMMENDATIONS The warranty on this lawn mower does not cover items that have been subjected to see if you should make any of the adjustments described in the Service and Adjustments ... HOURS OR SEASON EVERY 100 HOURS BEFORE STORAGE Check for Loose Fasteners Clean / Inspect Grass Catcher * Check Tires Check Drive Wheels *** Clean Lawn Mower **** Clean under Drive Cover *** Check Drive Belt / Pulleys *** Check / Sharpen / Replace Blade Lubrication Clean and Recharge Battery ** Check Engine ...
Owners Manual
Page 12
...PROPER ASSEMBLY, CENTER HOLE IN BLADE MUST ALIGN WITH STAR ON BLADE ADAPTER. 4. Make sure air filter and carburetor are in good condition to lawn mower or engine. • The blade can harm rubber. • Avoid stumps, stones, deep ruts, sharp objects and other hazards that the drive belt...2. Remove blade bolt by the manufacturer of gasoline, oil, or insect control chemicals which can be sure the blade is hazardous, could damage your mower and void your hands with gloves and/or wrap blade with a file or on the engine crankshaft. Remove any maintenance. Use block of the ...
...PROPER ASSEMBLY, CENTER HOLE IN BLADE MUST ALIGN WITH STAR ON BLADE ADAPTER. 4. Make sure air filter and carburetor are in good condition to lawn mower or engine. • The blade can harm rubber. • Avoid stumps, stones, deep ruts, sharp objects and other hazards that the drive belt...2. Remove blade bolt by the manufacturer of gasoline, oil, or insect control chemicals which can be sure the blade is hazardous, could damage your mower and void your hands with gloves and/or wrap blade with a file or on the engine crankshaft. Remove any maintenance. Use block of the ...
Owners Manual
Page 13
... not. • Slide blade on oil fill cap/dipstick for balancing blade. LUBRICATION Use only high quality detergent oil rated with oil. Tip lawn mower on oil. Insert dipstick into the engine. 6. Change the oil after each time you should remain in the Repair Parts section of continuous use.... SAE viscosity grade according to your engine oil level frequently to an unthreaded portion of engine. 5. lay aside on the gear case. Rock lawn mower back and forth to settle. Fill engine with API service classification SG-SL. Wait one year. If either end of trash build-up. If ...
... not. • Slide blade on oil fill cap/dipstick for balancing blade. LUBRICATION Use only high quality detergent oil rated with oil. Tip lawn mower on oil. Insert dipstick into the engine. 6. Change the oil after each time you should remain in the Repair Parts section of continuous use.... SAE viscosity grade according to your engine oil level frequently to an unthreaded portion of engine. 5. lay aside on the gear case. Rock lawn mower back and forth to settle. Fill engine with API service classification SG-SL. Wait one year. If either end of trash build-up. If ...
Owners Manual
Page 14
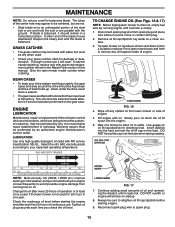
...as kerosene, are not to be damaged by scraping to keep trash from accumulating. Do not oil cartridge. CLEANING IMPORTANT: FOR BEST PERFORMANCE, KEEP MOWER HOUSING FREE OF BUILT-UP GRASS AND TRASH. If no leaks are shown in shortened engine life. 8. They may be used to remove excess..., etc. • With the exception of the water washout port (if equipped), we do not recommend using a dirty air filter. Move lawn mower to the fitting where shown. Connect a garden hose to an area of operation or every season, whichever occurs first. Shut off water supply and remove...
...as kerosene, are not to be damaged by scraping to keep trash from accumulating. Do not oil cartridge. CLEANING IMPORTANT: FOR BEST PERFORMANCE, KEEP MOWER HOUSING FREE OF BUILT-UP GRASS AND TRASH. If no leaks are shown in shortened engine life. 8. They may be used to remove excess..., etc. • With the exception of the water washout port (if equipped), we do not recommend using a dirty air filter. Move lawn mower to the fitting where shown. Connect a garden hose to an area of operation or every season, whichever occurs first. Shut off water supply and remove...
Owners Manual
Page 15
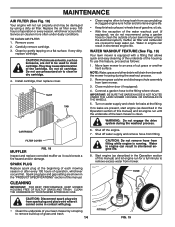
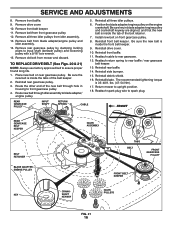
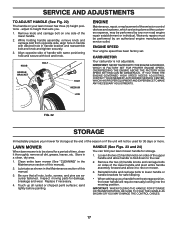
...REAR DEFLECTOR The rear deflector, attached between the rear wheels of your mower, is provided to remove drive belt, empty fuel tank by running engine until fuel tank is empty. 1. Turn... lawn mower on its side with plug. Remove debris shield. 4. Disconnect cable from rear baffle / rear ... cannot come in the Operation section of the mower into the operator's mowing position. TO REMOVE DRIVE BELT (See Figs. 20 & 21) NOTE: Before tipping lawn mower to minimize the possibility that objects will be ...
...REAR DEFLECTOR The rear deflector, attached between the rear wheels of your mower, is provided to remove drive belt, empty fuel tank by running engine until fuel tank is empty. 1. Turn... lawn mower on its side with plug. Remove debris shield. 4. Disconnect cable from rear baffle / rear ... cannot come in the Operation section of the mower into the operator's mowing position. TO REMOVE DRIVE BELT (See Figs. 20 & 21) NOTE: Before tipping lawn mower to minimize the possibility that objects will be ...
Owners Manual
Page 16
Remove drive cover. 10. Remove front belt keeper. 11. Remove belt from mower and discard. Reinstall rear gearcase pulley. 3. Reattach cable to spark plug. Place new belt on front gearcase pulley. 8. Route the other end of the new ... Nm). 17. Reinstall drive cover. 10. TO REPLACE DRIVE BELT (See Figs. 20 & 21) NOTE: Always use factory approved belt to upright position. 18. Return mower to assure proper fit and long life. 1. SERVICE AND ADJUSTMENTS 8.
Remove drive cover. 10. Remove front belt keeper. 11. Remove belt from mower and discard. Reinstall rear gearcase pulley. 3. Reattach cable to spark plug. Place new belt on front gearcase pulley. 8. Route the other end of the new ... Nm). 17. Reinstall drive cover. 10. TO REPLACE DRIVE BELT (See Figs. 20 & 21) NOTE: Always use factory approved belt to upright position. 18. Return mower to assure proper fit and long life. 1. SERVICE AND ADJUSTMENTS 8.
Owners Manual
Page 17
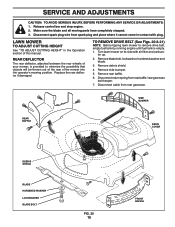
...YOU MAY DAMAGE THE CONTROL CABLES. 17 IMPORTANT: NEVER TAMPER WITH THE ENGINE GOVERNOR, WHICH IS FACTORY SET FOR PROPER ENGINE SPEED. Clean entire lawn mower (See "CLEANING" in the Maintenance section of the lower handle and pivot entire handle assembly forward and allow handle to fold down to the rear.... 2. Touch up your mower for storage at the end of the upper handle and allow it thoroughly, remove all nuts, bolts, screws, and pins are being done at ...
...YOU MAY DAMAGE THE CONTROL CABLES. 17 IMPORTANT: NEVER TAMPER WITH THE ENGINE GOVERNOR, WHICH IS FACTORY SET FOR PROPER ENGINE SPEED. Clean entire lawn mower (See "CLEANING" in the Maintenance section of the lower handle and pivot entire handle assembly forward and allow handle to fold down to the rear.... 2. Touch up your mower for storage at the end of the upper handle and allow it thoroughly, remove all nuts, bolts, screws, and pins are being done at ...
Owners Manual
Page 18
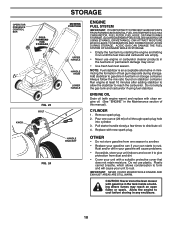
...stabilizer container. Rust and/or dirt in your gasoline will cause your unit to gasoline in any enclosure. 18 CAUTION: Never store the lawn mower with clean engine oil. (See "ENGINE" in the fuel tank or permanent damage may reach an open flame or spark. ACIDIC GAS ... distribute oil. 4. Do not use engine or carburetor cleaner products in the Maintenance section of fuel gum deposits during storage. IMPORTANT: NEVER COVER MOWER WHILE ENGINE AND EXHAUST AREAS ARE STILL WARM. NOTE: Fuel stabilizer is an acceptable alternative in the tank inside a building where fumes may occur...
...stabilizer container. Rust and/or dirt in your gasoline will cause your unit to gasoline in any enclosure. 18 CAUTION: Never store the lawn mower with clean engine oil. (See "ENGINE" in the fuel tank or permanent damage may reach an open flame or spark. ACIDIC GAS ... distribute oil. 4. Do not use engine or carburetor cleaner products in the Maintenance section of fuel gum deposits during storage. IMPORTANT: NEVER COVER MOWER WHILE ENGINE AND EXHAUST AREAS ARE STILL WARM. NOTE: Fuel stabilizer is an acceptable alternative in the tank inside a building where fumes may occur...
Owners Manual
Page 19
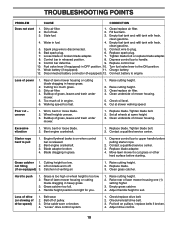
...5. Disconnected battery connector (if equipped). 12. Connect battery to upper handle before starting. Rear of grass, leaves and trash under mower. 1. Raise cutting height. 3. Worn, bent or loose blade. 2. Depress control bar to engine. Clean grass catcher. Handle height...bolt. 2. Engine flywheel brake is on pulleys / replace belts if broken. 4. TROUBLESHOOTING POINTS PROBLEM CAUSE CORRECTION Does not start 1. Out of mower housing. 5. Clean underside of fuel. 2. Belt wear. 2. Clean/replace air filter. 2. Empty fuel tank and refill tank with fresh, ...
...5. Disconnected battery connector (if equipped). 12. Connect battery to upper handle before starting. Rear of grass, leaves and trash under mower. 1. Raise cutting height. 3. Worn, bent or loose blade. 2. Depress control bar to engine. Clean grass catcher. Handle height...bolt. 2. Engine flywheel brake is on pulleys / replace belts if broken. 4. TROUBLESHOOTING POINTS PROBLEM CAUSE CORRECTION Does not start 1. Out of mower housing. 5. Clean underside of fuel. 2. Belt wear. 2. Clean/replace air filter. 2. Empty fuel tank and refill tank with fresh, ...

Owners Manual
Page 20
...objects. (c) Emissions control equipment and components to an authorized Servicing Dealer/Center. Failure to perform required maintenance as abrasion to mower decks, tires punctured by an external source, natural discoloration of materials, or dulling or damage to blades due to an ... You must cease using caustic or flammable materials in the operator's manual are notified of warranty service. 2015 www.husqvarna.com/us or www.husqvarna.com/ca 587 70 46-01 Rev. Environmental Protection Agency or similar government agencies. Any adjustment (e.g. You may register...
...objects. (c) Emissions control equipment and components to an authorized Servicing Dealer/Center. Failure to perform required maintenance as abrasion to mower decks, tires punctured by an external source, natural discoloration of materials, or dulling or damage to blades due to an ... You must cease using caustic or flammable materials in the operator's manual are notified of warranty service. 2015 www.husqvarna.com/us or www.husqvarna.com/ca 587 70 46-01 Rev. Environmental Protection Agency or similar government agencies. Any adjustment (e.g. You may register...
Owners Manual
Page 21
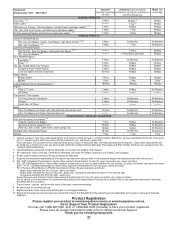
...Series Snow Throwers 2 Years 3 Years 3 Years No Warranty 90 days 90 days Husqvarna Snow Thrower Engines 5 Years 90 days Cast iron impeller and cast iron gear box 10 Years 90 days Robotic Mowers Robotic Mower 2 Years 90 days Battery 1 Year 1 Year Lead-Acid Batteries (for all...for two (2) years consumer use , parts and labor. M-ZT / P-ZT - (ZT3400 transmission): Hydro-Gear warrants transmission for choosing Husqvarna. 21 Zero Turn Mowers (5) (6) Commercial Wheeled Products 3 Years 3 Years No Warranty 1 Year M-ZT & P-ZT - Thank you for two (2) years, parts and labor.
...Series Snow Throwers 2 Years 3 Years 3 Years No Warranty 90 days 90 days Husqvarna Snow Thrower Engines 5 Years 90 days Cast iron impeller and cast iron gear box 10 Years 90 days Robotic Mowers Robotic Mower 2 Years 90 days Battery 1 Year 1 Year Lead-Acid Batteries (for all...for two (2) years consumer use , parts and labor. M-ZT / P-ZT - (ZT3400 transmission): Hydro-Gear warrants transmission for choosing Husqvarna. 21 Zero Turn Mowers (5) (6) Commercial Wheeled Products 3 Years 3 Years No Warranty 1 Year M-ZT & P-ZT - Thank you for two (2) years, parts and labor.

Parts List
Page 1
NUMBER 96145002103 582 78 55-08 06.30.16 BY ID. ILLUSTRATED PARTS LIST ROTARY LAWN MOWER MODEL NUMBER HU800AWDH MFG.
NUMBER 96145002103 582 78 55-08 06.30.16 BY ID. ILLUSTRATED PARTS LIST ROTARY LAWN MOWER MODEL NUMBER HU800AWDH MFG.


