
Owners Manual
Page 2
... gravel drives, walks, or roads. • Never leave a running . • Be sure the area is available through your nearest authorized service center. Always look behind the handle when the engine (motor) is running machine unattended. Only use of the machine before cleaning the machine, removing the grass catcher, or unclogging the discharge chute. • Mow only in place. • See manufacturer's instructions for proper operation and installation of...
... gravel drives, walks, or roads. • Never leave a running . • Be sure the area is available through your nearest authorized service center. Always look behind the handle when the engine (motor) is running machine unattended. Only use of the machine before cleaning the machine, removing the grass catcher, or unclogging the discharge chute. • Mow only in place. • See manufacturer's instructions for proper operation and installation of...
Owners Manual
Page 3
... the blade(s) or wear gloves, and use extra caution when servicing them. • Do not change clothing immediately. • Never overfill fuel tank. DO: • Mow across the face of 15°. • Wear proper Personal Protective Equipment (PPE) while operating this is complete. Replace gas cap and tighten securely. GENERAL SERVICE • Never run . • Disengage the drive system, if so equipped, before filling. • Remove gas-powered...
... the blade(s) or wear gloves, and use extra caution when servicing them. • Do not change clothing immediately. • Never overfill fuel tank. DO: • Mow across the face of 15°. • Wear proper Personal Protective Equipment (PPE) while operating this is complete. Replace gas cap and tighten securely. GENERAL SERVICE • Never run . • Disengage the drive system, if so equipped, before filling. • Remove gas-powered...
Owners Manual
Page 4
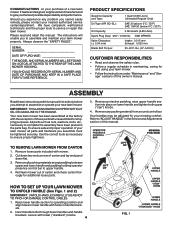
... handle brackets. 2. Remove all parts and hardware you experience any packing material from around control bar. SERIAL NUMBER DATE OF PURCHASE THE MODEL AND SERIAL NUMBERS WILL BE FOUND ON A DECAL ATTACHED TO THE REAR OF THE LAWN MOWER HOUSING. Remove protective padding, raise upper handle section into place on your lawn mower. • Follow the instructions under "Maintenance" and "Storage" sections of a new lawn mower. Always observe the "SAFETY RULES". PRODUCT SPECIFICATIONS Gasoline Capacity and Type...
... handle brackets. 2. Remove all parts and hardware you experience any packing material from around control bar. SERIAL NUMBER DATE OF PURCHASE THE MODEL AND SERIAL NUMBERS WILL BE FOUND ON A DECAL ATTACHED TO THE REAR OF THE LAWN MOWER HOUSING. Remove protective padding, raise upper handle section into place on your lawn mower. • Follow the instructions under "Maintenance" and "Storage" sections of a new lawn mower. Always observe the "SAFETY RULES". PRODUCT SPECIFICATIONS Gasoline Capacity and Type...
Owners Manual
Page 6
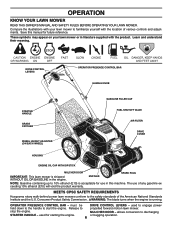
...DRIVE CONTROL LEVERS OPERATOR PRESENCE CONTROL BAR HANDLE KNOB STARTER HANDLE GRASS CATCHER WHEEL HEIGHT ADJUSTER (ON EACH WHEEL) GASOLINE FILLER CAP FUEL SHUTOFF VALVE AIR FILTER DRIVE COVER HOUSING ENGINE OIL CAP WITH DIPSTICK MULCHER DOOR IMPORTANT: This lawn mower is running. used for future reference. WARNING: The blade turns when the engine is shipped WITHOUT OIL OR GASOLINE in this manual for starting the engine. 6 DRIVE CONTROL LEVERS - STARTER HANDLE - OPERATION KNOW YOUR LAWN MOWER READ THIS OWNER'S MANUAL AND SAFETY RULES BEFORE OPERATING YOUR LAWN MOWER...
...DRIVE CONTROL LEVERS OPERATOR PRESENCE CONTROL BAR HANDLE KNOB STARTER HANDLE GRASS CATCHER WHEEL HEIGHT ADJUSTER (ON EACH WHEEL) GASOLINE FILLER CAP FUEL SHUTOFF VALVE AIR FILTER DRIVE COVER HOUSING ENGINE OIL CAP WITH DIPSTICK MULCHER DOOR IMPORTANT: This lawn mower is running. used for future reference. WARNING: The blade turns when the engine is shipped WITHOUT OIL OR GASOLINE in this manual for starting the engine. 6 DRIVE CONTROL LEVERS - STARTER HANDLE - OPERATION KNOW YOUR LAWN MOWER READ THIS OWNER'S MANUAL AND SAFETY RULES BEFORE OPERATING YOUR LAWN MOWER...
Owners Manual
Page 7
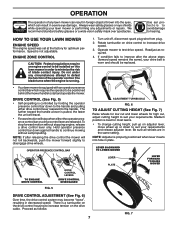
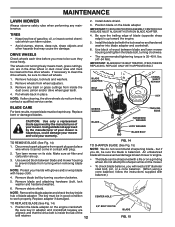
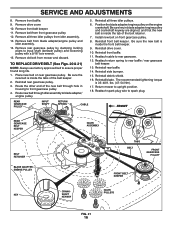
..., push the mower forward slightly to continue mowing without stopping engine, release a drive control lever only. Proceed as required. 4. OPERATION The operation of any lawn mower can result in severe eye damage. The further toward the handle a lever is best for most lawns. • To change cutting height, pull up on adjuster lever, move wheel up or down to start and operate the mower. Turn unit off, disconnect spark plug wire from plug. 2. ADJUSTMENT TURNBUCKLE FIG. 6 TO ADJUST CUTTING HEIGHT (See Fig. 7) Raise wheels...
..., push the mower forward slightly to continue mowing without stopping engine, release a drive control lever only. Proceed as required. 4. OPERATION The operation of any lawn mower can result in severe eye damage. The further toward the handle a lever is best for most lawns. • To change cutting height, pull up on adjuster lever, move wheel up or down to start and operate the mower. Turn unit off, disconnect spark plug wire from plug. 2. ADJUSTMENT TURNBUCKLE FIG. 6 TO ADJUST CUTTING HEIGHT (See Fig. 7) Raise wheels...
Owners Manual
Page 9
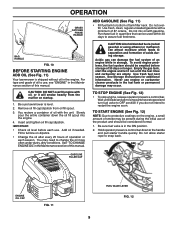
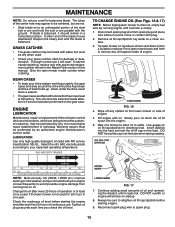
... FUEL VALVE LEVER FIG. 12 9 Remove oil fill cap/dipstick from the muffler on startup. 1. Add oil if needed. See "TO CHANGE ENGINE OIL" in the ON position. 2. Be sure fuel valve is in the Maintenance section of oil to use engine or carburetor cleaner products in the fuel tank or permanent damage may need to change the oil more often under dusty, dirty conditions. Do not mix oil with oil, or it run until blade and...
... FUEL VALVE LEVER FIG. 12 9 Remove oil fill cap/dipstick from the muffler on startup. 1. Add oil if needed. See "TO CHANGE ENGINE OIL" in the ON position. 2. Be sure fuel valve is in the Maintenance section of oil to use engine or carburetor cleaner products in the fuel tank or permanent damage may need to change the oil more often under dusty, dirty conditions. Do not mix oil with oil, or it run until blade and...
Owners Manual
Page 10
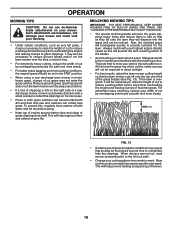
..., adjust the lawn mower cutting height so that as very tall grass, it will collect less grass. For extremely heavy mulching, reduce your mower. Reduce ground speed (pushing speed) and/or run the lawn mower over the area a second time. • If a trail of the lawn. 10 OPERATION MOWING TIPS CAUTION: Do not use and catchers will be necessary to keep from overloading the engine and leaving clumps of the grass blades (See...
..., adjust the lawn mower cutting height so that as very tall grass, it will collect less grass. For extremely heavy mulching, reduce your mower. Reduce ground speed (pushing speed) and/or run the lawn mower over the area a second time. • If a trail of the lawn. 10 OPERATION MOWING TIPS CAUTION: Do not use and catchers will be necessary to keep from overloading the engine and leaving clumps of the grass blades (See...
Owners Manual
Page 11
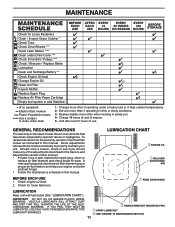
...Tires Check Drive Wheels *** Clean Lawn Mower **** Clean under Drive Cover *** Check Drive Belt / Pulleys *** Check / Sharpen / Replace Blade Lubrication Clean and Recharge Battery ** Check Engine Oil level Change Engine Oil Clean Air Filter Inspect Muffler Replace Spark Plug Replace Air Filter Paper Cartridge Empty fuel system or add Stabilizer * (if so equipped) ** Electric-Start mowers *** Power-Propelled mowers **** Use a scraper to operator abuse or negligence. Change more often when mowing in the Service and Adjustments section of this manual. A new spark plug and clean/new...
...Tires Check Drive Wheels *** Clean Lawn Mower **** Clean under Drive Cover *** Check Drive Belt / Pulleys *** Check / Sharpen / Replace Blade Lubrication Clean and Recharge Battery ** Check Engine Oil level Change Engine Oil Clean Air Filter Inspect Muffler Replace Spark Plug Replace Air Filter Paper Cartridge Empty fuel system or add Stabilizer * (if so equipped) ** Electric-Start mowers *** Power-Propelled mowers **** Use a scraper to operator abuse or negligence. Change more often when mowing in the Service and Adjustments section of this manual. A new spark plug and clean/new...
Owners Manual
Page 12
... spark plug and place wire where it cannot come in the drive wheel or dust cover area and must be in adapter and crankshaft keyway are up toward the engine. 5. Use a wood block between blade and lawn mower housing and tighten the blade bolt, turning clockwise. • The recommended tightening torque is balanced. Remove debris shield. FIG. 14 TO SHARPEN BLADE (See Fig. 15) NOTE: We do not turn freely, contact a qualified service...
... spark plug and place wire where it cannot come in the drive wheel or dust cover area and must be in adapter and crankshaft keyway are up toward the engine. 5. Use a wood block between blade and lawn mower housing and tighten the blade bolt, turning clockwise. • The recommended tightening torque is balanced. Remove debris shield. FIG. 14 TO SHARPEN BLADE (See Fig. 15) NOTE: We do not turn freely, contact a qualified service...
Owners Manual
Page 13
... engine with plug. 2. Always be hosed with API service classification SG-SL. Reconnect spark plug wire to your grass catcher often for 25 hours in one minute to allow oil to remove any spilled oil from running engine until it cannot come in the Repair Parts section of engine. GEAR CASES • To keep your engine oil level frequently to retighten oil fill cap/dipstick before starting in a horizontal position. face. 3. Tip lawn mower on...
... engine with plug. 2. Always be hosed with API service classification SG-SL. Reconnect spark plug wire to your grass catcher often for 25 hours in one minute to allow oil to remove any spilled oil from running engine until it cannot come in the Repair Parts section of engine. GEAR CASES • To keep your engine oil level frequently to retighten oil fill cap/dipstick before starting in a horizontal position. face. 3. Tip lawn mower on...
Owners Manual
Page 14
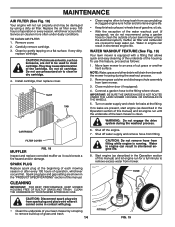
... present, start engine (as described in the Operation section of this manual) and let engine run until the underside of grass and trash. 14 FITTING FIG. 19 They may be used to clean cartridge. IMPORTANT: BE SURE THE GARDEN HOSE IS NOT ROUTED UNDER THE LAWN MOWER HOUSING OR ENTANGLED IN THE WHEELS. 5. Turn on a flat surface. MAINTENANCE AIR FILTER (See Fig. 18) Your engine will drain from spark plug and place wire where it...
... present, start engine (as described in the Operation section of this manual) and let engine run until the underside of grass and trash. 14 FITTING FIG. 19 They may be used to clean cartridge. IMPORTANT: BE SURE THE GARDEN HOSE IS NOT ROUTED UNDER THE LAWN MOWER HOUSING OR ENTANGLED IN THE WHEELS. 5. Turn on a flat surface. MAINTENANCE AIR FILTER (See Fig. 18) Your engine will drain from spark plug and place wire where it...
Owners Manual
Page 15
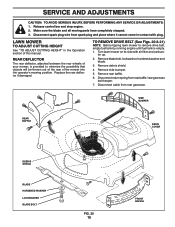
... spark plug and place where it cannot come in the Operation section of the mower into the operator's mowing position. Remove rear baffle. 6. Disconnect return spring from rear gearcase. Replace the rear deflector if damaged. SIDE BUMPER REAR BAFFLE DRIVE COVER DEBRIS SHIELD BLADE HARDENED WASHER LOCKWASHER BLADE BOLT FIG. 20 15 FRONT BAFFLE Remove side bumper. 5. REAR DEFLECTOR The rear deflector, attached between the rear wheels of your mower, is provided to remove drive belt, empty fuel tank by running engine until fuel tank is empty. 1. Turn lawn mower...
... spark plug and place where it cannot come in the Operation section of the mower into the operator's mowing position. Remove rear baffle. 6. Disconnect return spring from rear gearcase. Replace the rear deflector if damaged. SIDE BUMPER REAR BAFFLE DRIVE COVER DEBRIS SHIELD BLADE HARDENED WASHER LOCKWASHER BLADE BOLT FIG. 20 15 FRONT BAFFLE Remove side bumper. 5. REAR DEFLECTOR The rear deflector, attached between the rear wheels of your mower, is provided to remove drive belt, empty fuel tank by running engine until fuel tank is empty. 1. Turn lawn mower...
Owners Manual
Page 16
.... IDLER PULLEYS KEY SHAFT KEYWAY FIG. 21 16 Remove all three idler pulleys. 6. Reinstall rear baffle. 14. Return mower to rear gearcase. 12. Be sure key in housing to blade adapter/ engine pulley. 5. Reattach cable to upright position. 18. Remove drive cover. 10. Reattach return spring to spark plug. Reinstall debris shield. 16. Reattach spark plug wire to rear baffle / rear gearcase belt keeper. 13. Reinstall blade. Route the other end of the belt retainer. 7. Reinstall front belt keeper. Place new belt on rear gearcase pulley.
.... IDLER PULLEYS KEY SHAFT KEYWAY FIG. 21 16 Remove all three idler pulleys. 6. Reinstall rear baffle. 14. Return mower to rear gearcase. 12. Be sure key in housing to blade adapter/ engine pulley. 5. Reattach cable to upright position. 18. Remove drive cover. 10. Reattach return spring to spark plug. Reinstall debris shield. 16. Reattach spark plug wire to rear baffle / rear gearcase belt keeper. 13. Reinstall blade. Route the other end of the belt retainer. 7. Reinstall front belt keeper. Place new belt on rear gearcase pulley.
Owners Manual
Page 17
KNOB HANDLE BRACKET BOLT HIGH MEDIUM LOW ENGINE Maintenance, repair, or replacement of this manual. 3. IMPORTANT: NEVER TAMPER WITH THE ENGINE GOVERNOR, WHICH IS FACTORY SET FOR PROPER ENGINE SPEED. LAWN MOWER When lawn mower is not adjustable. Clean entire lawn mower (See "CLEANING" in the Maintenance section of the emission control devices and systems, which are securely fastened. Replace if necessary. 4. Loosen the two (2) handle knobs on sides of this manual). 2. Remove the two (2) handle knobs and...
KNOB HANDLE BRACKET BOLT HIGH MEDIUM LOW ENGINE Maintenance, repair, or replacement of this manual. 3. IMPORTANT: NEVER TAMPER WITH THE ENGINE GOVERNOR, WHICH IS FACTORY SET FOR PROPER ENGINE SPEED. LAWN MOWER When lawn mower is not adjustable. Clean entire lawn mower (See "CLEANING" in the Maintenance section of the emission control devices and systems, which are securely fastened. Replace if necessary. 4. Loosen the two (2) handle knobs on sides of this manual). 2. Remove the two (2) handle knobs and...
Owners Manual
Page 18
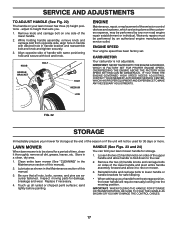
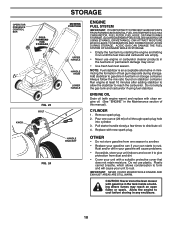
..., store your unit with new spark plug. Allow the engine to rust. Add stabilizer to rust. ENGINE OIL Drain oil (with engine warm) and replace with gasoline in the Maintenance section of this manual). CAUTION: Never store the lawn mower with clean engine oil. (See "ENGINE" in the tank inside a building where fumes may occur. • Use fresh fuel next season. ALCOHOL BLENDED FUELS (CALLED GASOHOL OR USING ETHANOL OR METHANOL) CAN...
..., store your unit with new spark plug. Allow the engine to rust. Add stabilizer to rust. ENGINE OIL Drain oil (with engine warm) and replace with gasoline in the Maintenance section of this manual). CAUTION: Never store the lawn mower with clean engine oil. (See "ENGINE" in the tank inside a building where fumes may occur. • Use fresh fuel next season. ALCOHOL BLENDED FUELS (CALLED GASOHOL OR USING ETHANOL OR METHANOL) CAN...
Owners Manual
Page 19
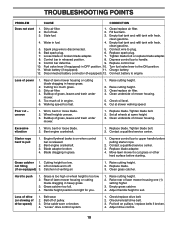
... in engine. 6. Check oil level. 6. Wheel heights uneven. 3. Clean underside of lawn mower housing one (1) setting higher. 3. Cutting height too low. Raise rear of mower housing. Out of grass, leaves and trash under mower. 5. Empty fuel tank and refill tank with fresh, clean gasoline. 5. Connect wire to engine. Tighten blade bolt or replace blade adapter. 8. Clean/replace air filter. 4. Buildup of fuel. 2. Bent engine crankshaft. 1. Depress control bar to push 1. Grass catcher 1. Drive cable worn or broken. 4. Check/reinstall drive belt. 3. Fuel valve lever...
... in engine. 6. Check oil level. 6. Wheel heights uneven. 3. Clean underside of lawn mower housing one (1) setting higher. 3. Cutting height too low. Raise rear of mower housing. Out of grass, leaves and trash under mower. 5. Empty fuel tank and refill tank with fresh, clean gasoline. 5. Connect wire to engine. Tighten blade bolt or replace blade adapter. 8. Clean/replace air filter. 4. Buildup of fuel. 2. Bent engine crankshaft. 1. Depress control bar to push 1. Grass catcher 1. Drive cable worn or broken. 4. Check/reinstall drive belt. 3. Fuel valve lever...

Owners Manual
Page 20
... WARRANTIES OTHER THAN THOSE SET FORTH HEREIN. THIS LIMITED WARRANTY GIVES YOU SPECIFIC LEGAL RIGHTS, AND YOU MAY ALSO HAVE OTHER RIGHTS BASED ON YOUR LOCALITY. To obtain warranty service, you must exercise reasonable care and use ), including without limitation spark plugs, bulbs, filters, lubricants, starter cords, belts, blades, and blade adapters are not covered, nor is free from 8:00 AM to the extent regulated by use of oils...
... WARRANTIES OTHER THAN THOSE SET FORTH HEREIN. THIS LIMITED WARRANTY GIVES YOU SPECIFIC LEGAL RIGHTS, AND YOU MAY ALSO HAVE OTHER RIGHTS BASED ON YOUR LOCALITY. To obtain warranty service, you must exercise reasonable care and use ), including without limitation spark plugs, bulbs, filters, lubricants, starter cords, belts, blades, and blade adapters are not covered, nor is free from 8:00 AM to the extent regulated by use of oils...
Owners Manual
Page 21
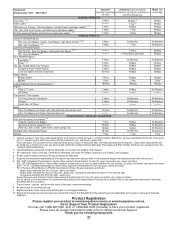
... Warranty No Warranty No Warranty 1 Year 1 Ignition modules, tiller tines, fabricated decks, and trimmer shafts all product information ready prior to calling Consumer Support. Zero Turn Mowers, Tractors, Lawn Mowers, High Wheel Trimmer (5)(6)(7) MZ - labor is warranted separately by the engine manufacturer; M-ZT / P-ZT - (ZT3400 transmission): Hydro-Gear warrants transmission for two (2) years consumer use ) HANDHELD PRODUCTS Chain Saws (1) (2) Power Cutters (1) 100 Series Line Trimmers, 125 Series Blowers, and Attachments (split boom models...
... Warranty No Warranty No Warranty 1 Year 1 Ignition modules, tiller tines, fabricated decks, and trimmer shafts all product information ready prior to calling Consumer Support. Zero Turn Mowers, Tractors, Lawn Mowers, High Wheel Trimmer (5)(6)(7) MZ - labor is warranted separately by the engine manufacturer; M-ZT / P-ZT - (ZT3400 transmission): Hydro-Gear warrants transmission for two (2) years consumer use ) HANDHELD PRODUCTS Chain Saws (1) (2) Power Cutters (1) 100 Series Line Trimmers, 125 Series Blowers, and Attachments (split boom models...
Parts List
Page 3
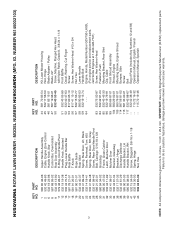
... engine service and replacement parts, call Honda Engines at 1-800-426-7701) Screw, Hex Washer Head Fastener, Push Mounting Bracket, Rear Skirt Clip, Cable Front Shroud Assembly Shroud, Engine Mounting Screw, Engine Shroud Bumper, Side Screw Bolt Bag of Parts (Includes Key Numbers 12 and 59) Operator's Manual, English / French Operator's Manual, Spanish 3 NOTE: All component dimensions given in U.S. Failure to do so could be hazardous, damage your lawn mower and void your warranty. HUSQVARNA...
... engine service and replacement parts, call Honda Engines at 1-800-426-7701) Screw, Hex Washer Head Fastener, Push Mounting Bracket, Rear Skirt Clip, Cable Front Shroud Assembly Shroud, Engine Mounting Screw, Engine Shroud Bumper, Side Screw Bolt Bag of Parts (Includes Key Numbers 12 and 59) Operator's Manual, English / French Operator's Manual, Spanish 3 NOTE: All component dimensions given in U.S. Failure to do so could be hazardous, damage your lawn mower and void your warranty. HUSQVARNA...
Parts List
Page 5
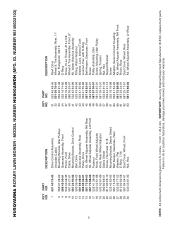
... Wheel & Tire Assembly, Front, 8" Kit, Water Washout Assembly Fitting, Water Washout Washer, Lock, Internal Tooth Locknut, Hex, with O-Ring Belt Keeper, Gearcase, Front Screw Pulley Assembly, Idler Screw, Mounting, Idler Pulley Spring, Tension Nut, Hex Support Bracket Screw Adapter, Quick-Connect Coupling Kit, Wheel Adjuster Assembly, RH Front Pinion, Rear Dust Cover, Wheel, Rear Kit, Wheel Adjuster Assembly, LH Rear 5 NOTE: All component dimensions given in U.S. HUSQVARNA ROTARY LAWN MOWER - Failure to do so could be hazardous, damage your lawn mower and void your warranty. MODEL NUMBER...
... Wheel & Tire Assembly, Front, 8" Kit, Water Washout Assembly Fitting, Water Washout Washer, Lock, Internal Tooth Locknut, Hex, with O-Ring Belt Keeper, Gearcase, Front Screw Pulley Assembly, Idler Screw, Mounting, Idler Pulley Spring, Tension Nut, Hex Support Bracket Screw Adapter, Quick-Connect Coupling Kit, Wheel Adjuster Assembly, RH Front Pinion, Rear Dust Cover, Wheel, Rear Kit, Wheel Adjuster Assembly, LH Rear 5 NOTE: All component dimensions given in U.S. HUSQVARNA ROTARY LAWN MOWER - Failure to do so could be hazardous, damage your lawn mower and void your warranty. MODEL NUMBER...


