

Owners Manual
Page 1
... ces instructions avant d'utiliser cette machine. L'utilisation d'essence contenant plus de 10 % d'éthanol annulera la garantie du produit. 532 44 59-31 Rev 1 Operator's Manual Manuel de L'Opérateur HU775H / 961450007 Please read the operator's manual carefully and make sure you understand the instructions before using the machine.
... ces instructions avant d'utiliser cette machine. L'utilisation d'essence contenant plus de 10 % d'éthanol annulera la garantie du produit. 532 44 59-31 Rev 1 Operator's Manual Manuel de L'Opérateur HU775H / 961450007 Please read the operator's manual carefully and make sure you understand the instructions before using the machine.
Owners Manual
Page 2
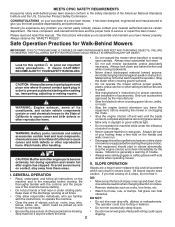
...8226; See manufacturer's instructions for proper operation and installation of accessories. The operator could cause slipping. 2 MEETS CPSC SAFETY REQUIREMENTS Husqvarna rotary walk-behind before and while moving backwards. • Never direct discharged material toward the operator. The instructions will enable you...is clear of a new lawn mower. extremely hot during operation and remain hot after handling. • Never operate machine in the manual(s) before starting . • Do not put hands or feet near drop-offs, ditches or embankments. II. SLOPE OPERATION Slopes are...
...8226; See manufacturer's instructions for proper operation and installation of accessories. The operator could cause slipping. 2 MEETS CPSC SAFETY REQUIREMENTS Husqvarna rotary walk-behind before and while moving backwards. • Never direct discharged material toward the operator. The instructions will enable you...is clear of a new lawn mower. extremely hot during operation and remain hot after handling. • Never operate machine in the manual(s) before starting . • Do not put hands or feet near drop-offs, ditches or embankments. II. SLOPE OPERATION Slopes are...
Owners Manual
Page 3
... accidental starting. • Keep nuts and bolts, especially blade attachement bolts, tight and keep wire away from your nearest authorized service center. If this operator's manual. Check their proper operation regularly. • Keep machine free of ignition. • Use only an approved container. • Never remove gas cap or add fuel...
... accidental starting. • Keep nuts and bolts, especially blade attachement bolts, tight and keep wire away from your nearest authorized service center. If this operator's manual. Check their proper operation regularly. • Keep machine free of ignition. • Use only an approved container. • Never remove gas cap or add fuel...

Owners Manual
Page 4
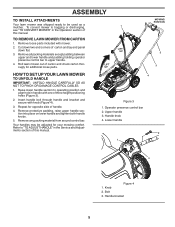
...of your new lawn mower. Setup LOOSE PARTS Use the chart below to ensure proper tightness. Frame handle 3. ASSEMBLY Read these instructions and this manual for future reference. All parts such as necessary to verify that all parts and hardware you attempt to assemble or operate your lawn mower, ...Put grass catcher frame into grass bag with the exception of bag on your lawn mower to complete the assembly have been 2 shipped. Save this manual in literature supplied with the location of the bag top (Figure 2). 2. If bag gets wet, let it dry before you assemble must be ...
...of your new lawn mower. Setup LOOSE PARTS Use the chart below to ensure proper tightness. Frame handle 3. ASSEMBLY Read these instructions and this manual for future reference. All parts such as necessary to verify that all parts and hardware you attempt to assemble or operate your lawn mower, ...Put grass catcher frame into grass bag with the exception of bag on your lawn mower to complete the assembly have been 2 shipped. Save this manual in literature supplied with the location of the bag top (Figure 2). 2. If bag gets wet, let it dry before you assemble must be ...
Owners Manual
Page 5
...upper handle section into place on lower handle and tighten both handle knobs. 5. Refer to "TO ADJUST HANDLE" in the Operation section of this manual. Upper handle 3. Lower handle 2 1 3 Figure 4 1. To convert mower to bagging or discharging, see "TO CONVERT MOWER" in the Service... and Adjustments section of this manual. 4 Figure 3 1. Handle knob 4. Handle bracket 5 Cut down two end corners of carton and check carton thorougly for additional loose parts. 1 LIFT...
...upper handle section into place on lower handle and tighten both handle knobs. 5. Refer to "TO ADJUST HANDLE" in the Operation section of this manual. Upper handle 3. Lower handle 2 1 3 Figure 4 1. To convert mower to bagging or discharging, see "TO CONVERT MOWER" in the Service... and Adjustments section of this manual. 4 Figure 3 1. Handle knob 4. Handle bracket 5 Cut down two end corners of carton and check carton thorougly for additional loose parts. 1 LIFT...
Owners Manual
Page 10
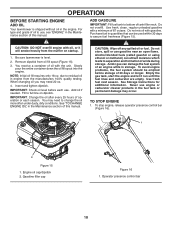
...: Initial oil fill requires only 18 oz. Insert and tighten dipstick. Be sure lawnmower is shipped without oil in the Maintenance section of this manual. To avoid engine problems, the fuel system should be used within 30 days to use . For type and grade of acids during storage. ... or use engine or carburetor cleaner products in the Maintenance section of 30 days or longer. IMPORTANT: Check oil level before storage of this manual. Add oil if needed. Acidic gas can damage the fuel system of tank filler neck. To stop engine, release operator presence control bar ...
...: Initial oil fill requires only 18 oz. Insert and tighten dipstick. Be sure lawnmower is shipped without oil in the Maintenance section of this manual. To avoid engine problems, the fuel system should be used within 30 days to use . For type and grade of acids during storage. ... or use engine or carburetor cleaner products in the Maintenance section of 30 days or longer. IMPORTANT: Check oil level before storage of this manual. Add oil if needed. Acidic gas can damage the fuel system of tank filler neck. To stop engine, release operator presence control bar ...
Owners Manual
Page 12
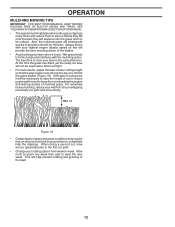
... pattern from overloading the engine and leaving clumps of mulched grass. Always mulch with the mulching action. SEE "CLEANING" IN THE MAINTENANCE SECTION OF THIS MANUAL. • The special mulching blade will not be necessary to raise the height of cut to reduce pushing effort and to keep from week to...
... pattern from overloading the engine and leaving clumps of mulched grass. Always mulch with the mulching action. SEE "CLEANING" IN THE MAINTENANCE SECTION OF THIS MANUAL. • The special mulching blade will not be necessary to raise the height of cut to reduce pushing effort and to keep from week to...
Owners Manual
Page 13
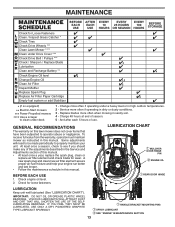
...lubricated (See "LUBRICATION CHART"). Replace blades more often if operating in dirty or dusty conditions. 3 - GENERAL RECOMMENDATIONS The warranty on this manual. Check for loose fasteners. To receive full value from the warranty, operator must maintain mower as instructed in this lawn mower does not ... once a season, check to see if you should make any of the adjustments described in the Service and Adjustments section of this manual. Change more often if operating under deck 1 - Some adjustments will need to be made periodically to properly maintain your engine run better...
...lubricated (See "LUBRICATION CHART"). Replace blades more often if operating in dirty or dusty conditions. 3 - GENERAL RECOMMENDATIONS The warranty on this manual. Check for loose fasteners. To receive full value from the warranty, operator must maintain mower as instructed in this lawn mower does not ... once a season, check to see if you should make any of the adjustments described in the Service and Adjustments section of this manual. Change more often if operating under deck 1 - Some adjustments will need to be made periodically to properly maintain your engine run better...
Owners Manual
Page 17
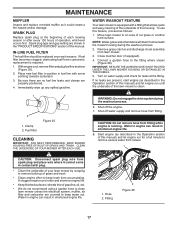
..., proceed as it cannot come in shortened engine life. 1. Place new fuel filter in position in shortened engine life. 8. To use this manual) and let engine run until the underside of the housing. Connect a garden hose to keep trash from fitting while engine is clean. 1 ...garden hose to clean lawn mower unless the electrical system, muffler, air filter and carburetor are shown in the Operation section of this manual. Hose 2. CLEAN THE UNDERSIDE OF YOUR MOWER AFTER EACH USE. MAINTENANCE MUFFLER Inspect and replace corroded muffler as follows: 1. IMPORTANT:...
..., proceed as it cannot come in shortened engine life. 1. Place new fuel filter in position in shortened engine life. 8. To use this manual) and let engine run until the underside of the housing. Connect a garden hose to keep trash from fitting while engine is clean. 1 ...garden hose to clean lawn mower unless the electrical system, muffler, air filter and carburetor are shown in the Operation section of this manual. Hose 2. CLEAN THE UNDERSIDE OF YOUR MOWER AFTER EACH USE. MAINTENANCE MUFFLER Inspect and replace corroded muffler as follows: 1. IMPORTANT:...
Owners Manual
Page 18
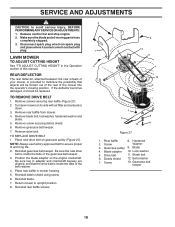
... stopped. 3. Remove screw securing debris shield. 6. Remove rear baffle from spark plug and place where it should be thrown out of the rear of this manual. Reinstall gearcase belt keeper. Lock washer 5. Position the blade adapter on gearcase pulley (Figure 27). Reinstall blade. 7. Reinstall rear baffle screws. 2 1 3 2 2 13 5 4 12 6 7 8 9 10 11...
... stopped. 3. Remove screw securing debris shield. 6. Remove rear baffle from spark plug and place where it should be thrown out of the rear of this manual. Reinstall gearcase belt keeper. Lock washer 5. Position the blade adapter on gearcase pulley (Figure 27). Reinstall blade. 7. Reinstall rear baffle screws. 2 1 3 2 2 13 5 4 12 6 7 8 9 10 11...
Owners Manual
Page 20
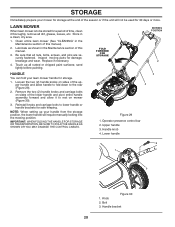
... damage, breakage and wear. NOTE: When setting up all rusted or chipped paint surfaces; Lubricate as shown in the Maintenance section of this manual). 2. Reinstall knobs and carriage bolts to the rear (Figure 29). 2. Bolt 3. Touch up your handle from the storage position, the...securely fastened. Operator presence control bar 2. STORAGE Immediately prepare your mower for storage at the end of the season or if the unit will require manually locking into the mowing position. Clean entire lawn mower (See "CLEANING" in a clean, dry area. 1. Loosen the two (2) handle knobs ...
... damage, breakage and wear. NOTE: When setting up all rusted or chipped paint surfaces; Lubricate as shown in the Maintenance section of this manual). 2. Reinstall knobs and carriage bolts to the rear (Figure 29). 2. Bolt 3. Touch up your handle from the storage position, the...securely fastened. Operator presence control bar 2. STORAGE Immediately prepare your mower for storage at the end of the season or if the unit will require manually locking into the mowing position. Clean entire lawn mower (See "CLEANING" in a clean, dry area. 1. Loosen the two (2) handle knobs ...
Owners Manual
Page 21
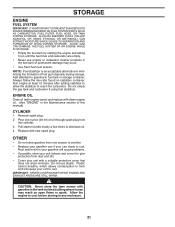
... before storing in fuel tank or storage container. ENGINE OIL Drain oil (with engine warm) and replace with gasoline in the Maintenance section of this manual). Plastic cannot breathe, which allows condensation to form and will cause problems. • If possible, store your unit indoors and cover it run until the...
... before storing in fuel tank or storage container. ENGINE OIL Drain oil (with engine warm) and replace with gasoline in the Maintenance section of this manual). Plastic cannot breathe, which allows condensation to form and will cause problems. • If possible, store your unit indoors and cover it run until the...
Owners Manual
Page 23
... warranties. The following the preventative maintenance, storage, fuel and oil usages as otherwise directed in the enclosed operator's manual. Husqvarna is not authorized to the original purchaser of the following are NOT considered defects in which case they may be taken...purposes and, in the operator's manual. In addition, you purchased the unit from defects in either NO WARRANTY (whether statutory, contractual or otherwise) or a reduced warranty if the product is either No Warranty or a Shortened Warranty Period. Husqvarna will result in material or workmanship....
... warranties. The following the preventative maintenance, storage, fuel and oil usages as otherwise directed in the enclosed operator's manual. Husqvarna is not authorized to the original purchaser of the following are NOT considered defects in which case they may be taken...purposes and, in the operator's manual. In addition, you purchased the unit from defects in either NO WARRANTY (whether statutory, contractual or otherwise) or a reduced warranty if the product is either No Warranty or a Shortened Warranty Period. Husqvarna will result in material or workmanship....
Owners Manual
Page 24
... you to register your Husqvarna unit to an authorized Husqvarna Servicing Dealer/Center and arrange for the deck shell only mechanical components/parts such as listed in the operator's manual; (f) Abuse, misuse, neglect, modifications, alterations, normal wear, improper servicing, ...emission performance requirements listed in the operator's manual; (k) Tampering with , rocks, or other materials due to provide or perform required maintenance services as prescribed in your nearest authorized Husqvarna Servicing Dealer, call Husqvarna, at www.husqvarna.com. 11. The following : (e) ...
... you to register your Husqvarna unit to an authorized Husqvarna Servicing Dealer/Center and arrange for the deck shell only mechanical components/parts such as listed in the operator's manual; (f) Abuse, misuse, neglect, modifications, alterations, normal wear, improper servicing, ...emission performance requirements listed in the operator's manual; (k) Tampering with , rocks, or other materials due to provide or perform required maintenance services as prescribed in your nearest authorized Husqvarna Servicing Dealer, call Husqvarna, at www.husqvarna.com. 11. The following : (e) ...
Parts List
Page 3
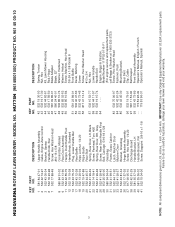
HU775H (96145001000) PRODUCT NO. 961 45 00-10 KEY PART NO. NO. 1 581 84 47-01 2 532 42 74-97 3 532 43 00-34 6 532 18 ... Briggs & Stratton at 1-800-233-3723) Screw, Hex Washer Head Fastener, Push Mounting Bracket, Rear Skirt Clip, Cable Belt Keeper Front Shroud Assembly Operator's Manual, English / French Operator's Manual, Spanish 3 NOTE: All component dimensions given in U.S. inches. 1 inch = 25.4 mm. Failure to do so could be hazardous, damage your lawn mower and...
HU775H (96145001000) PRODUCT NO. 961 45 00-10 KEY PART NO. NO. 1 581 84 47-01 2 532 42 74-97 3 532 43 00-34 6 532 18 ... Briggs & Stratton at 1-800-233-3723) Screw, Hex Washer Head Fastener, Push Mounting Bracket, Rear Skirt Clip, Cable Belt Keeper Front Shroud Assembly Operator's Manual, English / French Operator's Manual, Spanish 3 NOTE: All component dimensions given in U.S. inches. 1 inch = 25.4 mm. Failure to do so could be hazardous, damage your lawn mower and...


