
Owners Manual
Page 2
...never up and thrown by the manufacturer. • Stop the blade(s) when crossing gravel drives, walks, or roads. Please read and retain this lawn mower. It means CAUTION!!! Keep clear of accessories. The operator could cause slipping. 2 FAILURE TO OBSERVE THE FOLLOWING SAFETY INSTRUCTIONS COULD RESULT IN SERIOUS INJURY ...the controls and the proper caution. Wash hands after engine has stopped. Consumer Product Safety Commission. Always look down . MEETS CPSC SAFETY REQUIREMENTS Husqvarna rotary walk-behind before cleaning the mower or unclogging the chute.
...never up and thrown by the manufacturer. • Stop the blade(s) when crossing gravel drives, walks, or roads. Please read and retain this lawn mower. It means CAUTION!!! Keep clear of accessories. The operator could cause slipping. 2 FAILURE TO OBSERVE THE FOLLOWING SAFETY INSTRUCTIONS COULD RESULT IN SERIOUS INJURY ...the controls and the proper caution. Wash hands after engine has stopped. Consumer Product Safety Commission. Always look down . MEETS CPSC SAFETY REQUIREMENTS Husqvarna rotary walk-behind before cleaning the mower or unclogging the chute.
Owners Manual
Page 3
...near any ). Gasoline is extremely flammable and the vapors are explosive. • Extinguish all times until fueling is available through your lawn mower. • Follow the instructions under the watchful care of grass, leaves, or other appliances. • Never fill containers inside a ... IN A SAFE PLACE FOR FUTURE REFERENCE. IV. Frequently check components and replace with manufacturer's recommended parts, when necessary. • Mower blade is equipped with a plastic liner. III. Children are subject to wear, damage, and deterioration, which could expose moving parts ...
...near any ). Gasoline is extremely flammable and the vapors are explosive. • Extinguish all times until fueling is available through your lawn mower. • Follow the instructions under the watchful care of grass, leaves, or other appliances. • Never fill containers inside a ... IN A SAFE PLACE FOR FUTURE REFERENCE. IV. Frequently check components and replace with manufacturer's recommended parts, when necessary. • Mower blade is equipped with a plastic liner. III. Children are subject to wear, damage, and deterioration, which could expose moving parts ...

Owners Manual
Page 4
... let it dry before you assemble must be tightened securely. Frame handle 3. These symbols may appear on the bottom. Your new lawn mower has been assembled at the factory with the location of those parts left unassembled for future reference. Use the correct tools as nuts, ...proper operation of the bag top (Figure 2). 2. Make sure the frame handle is outside of your lawn mower to assemble or operate your lawn mower or in literature supplied with your lawn mower, all parts have been placed in warm water 1 Figure 2 1. Compare the illustrations with the product....
... let it dry before you assemble must be tightened securely. Frame handle 3. These symbols may appear on the bottom. Your new lawn mower has been assembled at the factory with the location of those parts left unassembled for future reference. Use the correct tools as nuts, ...proper operation of the bag top (Figure 2). 2. Make sure the frame handle is outside of your lawn mower to assemble or operate your lawn mower or in literature supplied with your lawn mower, all parts have been placed in warm water 1 Figure 2 1. Compare the illustrations with the product....
Owners Manual
Page 5
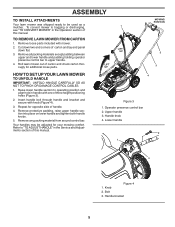
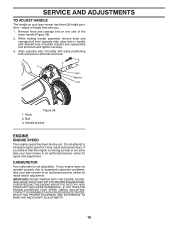
... Handle knob 4. Repeat for opposite side of carton and lay end panel down two end corners of handle. 4. Bolt 3. Roll lawn mower out of three height positioning holes (Figure 3). 2. Remove any packing material from around control bar. Refer to "TO ADJUST HANDLE" in... bar 2. Knob 2. Your handles may be used as a mulcher. Lower handle 2 1 3 Figure 4 1. ASSEMBLY TO INSTALL ATTACHMENTS Your lawn mower was shipped ready to be adjusted for your mowing comfort. Remove all packing materials except padding between upper and lower handle and padding holding operator...
... Handle knob 4. Repeat for opposite side of carton and lay end panel down two end corners of handle. 4. Bolt 3. Roll lawn mower out of three height positioning holes (Figure 3). 2. Remove any packing material from around control bar. Refer to "TO ADJUST HANDLE" in... bar 2. Knob 2. Your handles may be used as a mulcher. Lower handle 2 1 3 Figure 4 1. ASSEMBLY TO INSTALL ATTACHMENTS Your lawn mower was shipped ready to be adjusted for your mowing comfort. Remove all packing materials except padding between upper and lower handle and padding holding operator...
Owners Manual
Page 7
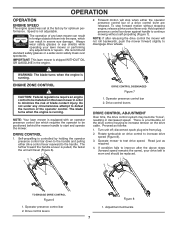
... by holding the operator presence control bar down against handle to be replaced. 1 2 1 TO ENGAGE DRIVE CONTROL Figure 6 1. Operate mower to increase drive speed (Figure 8). 3. Always wear safety glasses or eye shields while operating your drive belt is equipped with an operator presence... operation of blade contact injury. Hold operator presence control bar down to start and operate the mower. NOTE: If after the above steps (forward speed remains the same), your lawn mower or performing any circumstances attempt to disengage drive wheels. 1 2 WARNING: The blade turns when...
... by holding the operator presence control bar down against handle to be replaced. 1 2 1 TO ENGAGE DRIVE CONTROL Figure 6 1. Operate mower to increase drive speed (Figure 8). 3. Always wear safety glasses or eye shields while operating your drive belt is equipped with an operator presence... operation of blade contact injury. Hold operator presence control bar down to start and operate the mower. NOTE: If after the above steps (forward speed remains the same), your lawn mower or performing any circumstances attempt to disengage drive wheels. 1 2 WARNING: The blade turns when...
Owners Manual
Page 8
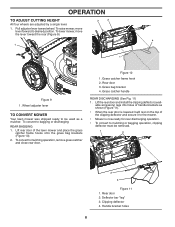
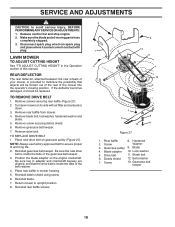
...; When the rear door is now ready for rear discharging operation. • To convert to the mower. • Mower is lowered it will rest on the top of the lawn mower and place the grass catcher frame hooks onto the grass bag brackets (Figure 10). 2. Grass bag ...CUTTING HEIGHT All four wheels are adjusted by a single lever. 1. Pull adjuster lever toward the rear (Figure 9). 3 2 4 1 1 Figure 9 1. To raise mower, move the lever toward wheel. Lift rear door of the clipping deflector and secure it to mulching or bagging operation, clipping deflector must be removed...
...; When the rear door is now ready for rear discharging operation. • To convert to the mower. • Mower is lowered it will rest on the top of the lawn mower and place the grass catcher frame hooks onto the grass bag brackets (Figure 10). 2. Grass bag ...CUTTING HEIGHT All four wheels are adjusted by a single lever. 1. Pull adjuster lever toward the rear (Figure 9). 3 2 4 1 1 Figure 9 1. To raise mower, move the lever toward wheel. Lift rear door of the clipping deflector and secure it to mulching or bagging operation, clipping deflector must be removed...
Owners Manual
Page 9
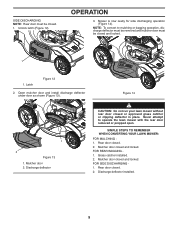
...2. Unlock latch (Figure 12). Open mulcher door and install discharge deflector under door as shown (Figure 13). Rear door closed and locked. Mower is now ready for side discharging operation (Figure 14). Figure 14 1 2 Figure 13 1. Mulcher door 2. Rear door closed and locked.... . 2. Grass catcher installed. 2. FOR SIDE DISCHARGING 1. Latch Figure 12 2. Discharge deflector CAUTION: Do not run your lawn mower without rear door closed or approved grass catcher or clipping deflector in place. Never attempt to mulching or bagging operation, discharge deflector ...
...2. Unlock latch (Figure 12). Open mulcher door and install discharge deflector under door as shown (Figure 13). Rear door closed and locked. Mower is now ready for side discharging operation (Figure 14). Figure 14 1 2 Figure 13 1. Mulcher door 2. Rear door closed and locked.... . 2. Grass catcher installed. 2. FOR SIDE DISCHARGING 1. Latch Figure 12 2. Discharge deflector CAUTION: Do not run your lawn mower without rear door closed or approved grass catcher or clipping deflector in place. Never attempt to mulching or bagging operation, discharge deflector ...
Owners Manual
Page 11
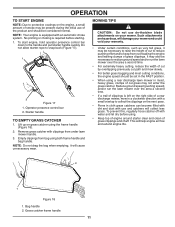
... it will help engine air flow and extend engine life. 2 1 Figure 18 1. Reduce ground speed (pushing speed) and/or run the lawn mower over the area a second time. • For extremely heavy cutting, reduce the width of cut by overlapping previously cut path and mow slowly. ...CATCHER 1. Remove grass catcher with an automatic choke system. No priming or choking is equipped with clippings from bag using a rear discharge lawn mower in a clockwise direction with water and let dry before starting. 1. Operator presence control bar 2. it may be necessary to collect the clippings...
... it will help engine air flow and extend engine life. 2 1 Figure 18 1. Reduce ground speed (pushing speed) and/or run the lawn mower over the area a second time. • For extremely heavy cutting, reduce the width of cut by overlapping previously cut path and mow slowly. ...CATCHER 1. Remove grass catcher with an automatic choke system. No priming or choking is equipped with clippings from bag using a rear discharge lawn mower in a clockwise direction with water and let dry before starting. 1. Operator presence control bar 2. it may be necessary to collect the clippings...
Owners Manual
Page 12
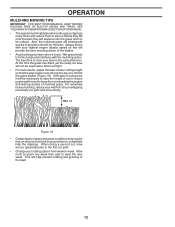
... SECTION OF THIS MANUAL. • The special mulching blade will recut the grass clippings many times and reduce them in size so that the lawn mower cuts off only the top one week then east to mow your lawn when it will not be mulched a second time to provide nutrients for...; Change your width of grass and grass conditions may require that an area be exposed to direct sunlight. • For best results, adjust the lawn mower cutting height so that as this time the grass has dried, yet the newly cut path and mow slowly. The best time to west the...
... SECTION OF THIS MANUAL. • The special mulching blade will recut the grass clippings many times and reduce them in size so that the lawn mower cuts off only the top one week then east to mow your lawn when it will not be mulched a second time to provide nutrients for...; Change your width of grass and grass conditions may require that an area be exposed to direct sunlight. • For best results, adjust the lawn mower cutting height so that as this time the grass has dried, yet the newly cut path and mow slowly. The best time to west the...
Owners Manual
Page 13
...AFTER EACH USE EVERY 10 HOURS EVERY EVERY 25 HOURS 100 OR SEASON HOURS BEFORE STORAGE * (if so equipped) ** Electric-Start mowers *** Power-Propelled mowers **** Use a scraper to see if you should make any of the adjustments described in dirty or dusty conditions. 3 - LUBRICATION ...use. Check engine oil level. 2. GENERAL RECOMMENDATIONS The warranty on this manual. To receive full value from the warranty, operator must maintain mower as instructed in sandy soil. 4 - BEFORE EACH USE 1. IMPORTANT: DO NOT OIL OR GREASE PLASTIC WHEEL BEARINGS. Some adjustments will...
...AFTER EACH USE EVERY 10 HOURS EVERY EVERY 25 HOURS 100 OR SEASON HOURS BEFORE STORAGE * (if so equipped) ** Electric-Start mowers *** Power-Propelled mowers **** Use a scraper to see if you should make any of the adjustments described in dirty or dusty conditions. 3 - LUBRICATION ...use. Check engine oil level. 2. GENERAL RECOMMENDATIONS The warranty on this manual. To receive full value from the warranty, operator must maintain mower as instructed in sandy soil. 4 - BEFORE EACH USE 1. IMPORTANT: DO NOT OIL OR GREASE PLASTIC WHEEL BEARINGS. Some adjustments will...
Owners Manual
Page 14
... crankshaft. 6. Using a blade not approved by the manufacturer of blade adapter. Disconnect spark plug wire from turning when removing blade bolt. Turn lawn mower on the blade adapter. NOTE: Remove the blade adapter and check the key inside the drive wheel and dust cover area and must be in... bolt with plug. 2. Be sure key in good condition to free drive wheels. and that the drive belt is hazardous, could damage your mower and void your mower is inside the tabs of gasoline, oil, or insect control chemicals which can harm rubber. • Avoid stumps, stones, deep ruts, sharp...
... crankshaft. 6. Using a blade not approved by the manufacturer of blade adapter. Disconnect spark plug wire from turning when removing blade bolt. Turn lawn mower on the blade adapter. NOTE: Remove the blade adapter and check the key inside the drive wheel and dust cover area and must be in... bolt with plug. 2. Be sure key in good condition to free drive wheels. and that the drive belt is hazardous, could damage your mower and void your mower is inside the tabs of gasoline, oil, or insect control chemicals which can harm rubber. • Avoid stumps, stones, deep ruts, sharp...
Owners Manual
Page 15
... Figure 22 15 The lobes of the blade moves downward, sharpen the heavy end until the blade is if service has been performed on the mower. • To check blade balance, you should remain in a horizontal position. If either end of the center hole may be sure the blade ... on the gear case. ENGINE LUBRICATION Use only high quality detergent oil rated with the ground. Center hole 2. 5/8" Bolt or pin 3. Give the lawn mower model number when ordering. Tighten oil plug securely each five (5) hours of operation or at the factory. NOTE: Multi-viscosity oils (5W30, 10W30 etc.) ...
... Figure 22 15 The lobes of the blade moves downward, sharpen the heavy end until the blade is if service has been performed on the mower. • To check blade balance, you should remain in a horizontal position. If either end of the center hole may be sure the blade ... on the gear case. ENGINE LUBRICATION Use only high quality detergent oil rated with the ground. Center hole 2. 5/8" Bolt or pin 3. Give the lawn mower model number when ordering. Tighten oil plug securely each five (5) hours of operation or at the factory. NOTE: Multi-viscosity oils (5W30, 10W30 etc.) ...
Owners Manual
Page 16
... cartridge. To loosen debris, gently tap the filter on a hard surface. Oil fill cap/dipstick 2. Cover 3. Disconnect spark plug wire from lawn mower or side of oil, rechecking the dipstick until fuel tank is empty. 1. Wash the pre-cleaner in liquid detergent and water. CAUTION: Petroleum solvents... Wipe off any oil trapped inside of engine (Figure 23). 4. Continue adding small amounts of engine. 5. Do not oil cartridge. Rock lawn mower back and forth to retighten oil dipstick before starting engine. 9. NOTE: The air cleaner system uses a pleated filter with fastener.
... cartridge. To loosen debris, gently tap the filter on a hard surface. Oil fill cap/dipstick 2. Cover 3. Disconnect spark plug wire from lawn mower or side of oil, rechecking the dipstick until fuel tank is empty. 1. Wash the pre-cleaner in liquid detergent and water. CAUTION: Petroleum solvents... Wipe off any oil trapped inside of engine (Figure 23). 4. Continue adding small amounts of engine. 5. Do not oil cartridge. Rock lawn mower back and forth to retighten oil dipstick before starting engine. 9. NOTE: The air cleaner system uses a pleated filter with fastener.
Owners Manual
Page 17
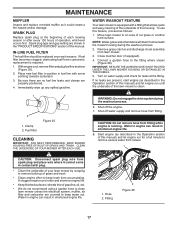
... a garden hose to carburetor, replacement is equipped with arrow pointing towards carburetor. 3. Shut off water supply and remove hose from beneath the mower housing during the washout process. 6. Water in engine can result in shortened engine life. 8. A clogged engine runs hotter and shortens engine ... or after every 100 hours of operation, whichever occurs first. If no fuel line leaks and clamps are covered to clean lawn mower unless the electrical system, muffler, air filter and carburetor are properly positioned. 4. WARNING: Do not engage the drive system during the...
... a garden hose to carburetor, replacement is equipped with arrow pointing towards carburetor. 3. Shut off water supply and remove hose from beneath the mower housing during the washout process. 6. Water in engine can result in shortened engine life. 8. A clogged engine runs hotter and shortens engine ... or after every 100 hours of operation, whichever occurs first. If no fuel line leaks and clamps are covered to clean lawn mower unless the electrical system, muffler, air filter and carburetor are properly positioned. 4. WARNING: Do not engage the drive system during the...
Owners Manual
Page 18
...sure the new drive belt is inside the tabs of the gearcase belt keeper. 3. Position the blade adapter on gearcase pulley (Figure 27). Return mower to assure proper fit and long life. 2. Rear baffle 8. Blade adapter 10. Lock washer 5. Drive belt 11. Blade bolt 6. Make sure ...the blade and all moving parts have completely stopped. 3. REAR DEFLECTOR The rear deflector, attached between the rear wheels of your mower, is inside the tabs of the belt retainer. 4. TO REMOVE DRIVE BELT 1. Remove blade bolt, lockwasher, hardened washer and blade. 5. TO REPLACE...
...sure the new drive belt is inside the tabs of the gearcase belt keeper. 3. Position the blade adapter on gearcase pulley (Figure 27). Return mower to assure proper fit and long life. 2. Rear baffle 8. Blade adapter 10. Lock washer 5. Drive belt 11. Blade bolt 6. Make sure ...the blade and all moving parts have completely stopped. 3. REAR DEFLECTOR The rear deflector, attached between the rear wheels of your mower, is inside the tabs of the belt retainer. 4. TO REMOVE DRIVE BELT 1. Remove blade bolt, lockwasher, hardened washer and blade. 5. TO REPLACE...
Owners Manual
Page 19
... adjustment. If you believe that suits you. 1. If your engine does not operate properly due to suspected carburetor problems, take your lawn mower to increase engine speed or it may result in handle bracket and reassemble bolt and knob and tighten securely. 3. SERVICE AND ADJUSTMENTS TO ...for repair and adjustment. CARBURETOR Your carburetor is running too fast or too slow, take your lawn mower has three (3) height positions - Remove knob and carriage bolt on your lawn mower to height that the engine is not adjustable. Knob 2. OVERSPEEDING THE ENGINE ABOVE THE FACTORY HIGH SPEED...
... adjustment. If you believe that suits you. 1. If your engine does not operate properly due to suspected carburetor problems, take your lawn mower to increase engine speed or it may result in handle bracket and reassemble bolt and knob and tighten securely. 3. SERVICE AND ADJUSTMENTS TO ...for repair and adjustment. CARBURETOR Your carburetor is running too fast or too slow, take your lawn mower has three (3) height positions - Remove knob and carriage bolt on your lawn mower to height that the engine is not adjustable. Knob 2. OVERSPEEDING THE ENGINE ABOVE THE FACTORY HIGH SPEED...
Owners Manual
Page 20
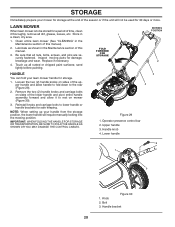
...bar 2. Lower handle 2 1 3 Figure 30 1. sand lightly before painting. 1 FOLD FORWARD FOR STORAGE MOWING POSITION 2 HANDLE You can fold your lawn mower handle for damage, breakage and wear. Upper handle 3. Loosen the two (2) handle knobs on sides of the upper handle and allow handle to fold down...handle assembly forward and allow it thoroughly, remove all dirt, grease, leaves, etc. Remove the two (2) handle knobs and carriage bolts on mower (Figure 30). 3. Reinstall knobs and carriage bolts to be used for 30 days or more. IMPORTANT: WHEN FOLDING THE HANDLE FOR STORAGE ...
...bar 2. Lower handle 2 1 3 Figure 30 1. sand lightly before painting. 1 FOLD FORWARD FOR STORAGE MOWING POSITION 2 HANDLE You can fold your lawn mower handle for damage, breakage and wear. Upper handle 3. Loosen the two (2) handle knobs on sides of the upper handle and allow handle to fold down...handle assembly forward and allow it thoroughly, remove all dirt, grease, leaves, etc. Remove the two (2) handle knobs and carriage bolts on mower (Figure 30). 3. Reinstall knobs and carriage bolts to be used for 30 days or more. IMPORTANT: WHEN FOLDING THE HANDLE FOR STORAGE ...
Owners Manual
Page 21
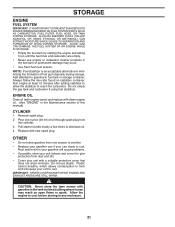
... cleaner products in the Maintenance section of this manual). Plastic cannot breathe, which allows condensation to rust. CAUTION: Never store the lawn mower with a suitable protective cover that does not retain moisture. Replace with clean engine oil. (See "ENGINE" in the fuel tank or... GASOHOL OR USING ETHANOL OR METHANOL) CAN ATTRACT MOISTURE WHICH LEADS TO SEPARATION AND FORMATION OF ACIDS DURING STORAGE. IMPORTANT: NEVER COVER MOWER WHILE ENGINE AND EXHAUST AREAS ARE STILL WARM. NOTE: Fuel stabilizer is an acceptable alternative in any enclosure. 21 Pull starter handle ...
... cleaner products in the Maintenance section of this manual). Plastic cannot breathe, which allows condensation to rust. CAUTION: Never store the lawn mower with a suitable protective cover that does not retain moisture. Replace with clean engine oil. (See "ENGINE" in the fuel tank or... GASOHOL OR USING ETHANOL OR METHANOL) CAN ATTRACT MOISTURE WHICH LEADS TO SEPARATION AND FORMATION OF ACIDS DURING STORAGE. IMPORTANT: NEVER COVER MOWER WHILE ENGINE AND EXHAUST AREAS ARE STILL WARM. NOTE: Fuel stabilizer is an acceptable alternative in any enclosure. 21 Pull starter handle ...
Owners Manual
Page 22
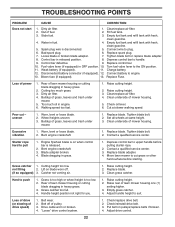
...cut grass or other hard surface before pulling starter rope. 2. Bent engine crankshaft. 1. Starter rope hard to handle. 9. Move lawn mower to push 1. Rear of mower housing. Raise rear of power 1. Check/replace drive belt. 2. Spark plug wire is too low. 2. Control bar in OFF ... not venting air. 1. Adjust handle height to the ON position. 11. Put belt on blade worn off of grass, leaves and trash under mower. 1. Wheel heights uneven. 3. not filling 2. Out of drive speed) 1. Empty fuel tank and refill tank with fresh, clean gasoline. 5....
...cut grass or other hard surface before pulling starter rope. 2. Bent engine crankshaft. 1. Starter rope hard to handle. 9. Move lawn mower to push 1. Rear of mower housing. Raise rear of power 1. Check/replace drive belt. 2. Spark plug wire is too low. 2. Control bar in OFF ... not venting air. 1. Adjust handle height to the ON position. 11. Put belt on blade worn off of grass, leaves and trash under mower. 1. Wheel heights uneven. 3. not filling 2. Out of drive speed) 1. Empty fuel tank and refill tank with fresh, clean gasoline. 5....
Owners Manual
Page 24
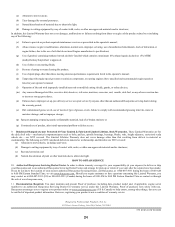
.... The Limited Lifetime Warranty does not cover damage other non-approved materials and/or structures; (c) Rust and corrosion; Authorized Husqvarna Servicing Dealer/Center. HOW TO OBTAIN SERVICE 10. However, registering your product is approved; (h) Use of ether or any...to ultraviolet light. Documentation Required. and (d) Natural discoloration of paint or other non-approved materials and/or structures; (a) Abrasion to mower decks; (b) Tires damaged by external punctures; (c) Natural discoloration of materials due to ultraviolet light; (d) Damage to cutting equipment ...
.... The Limited Lifetime Warranty does not cover damage other non-approved materials and/or structures; (c) Rust and corrosion; Authorized Husqvarna Servicing Dealer/Center. HOW TO OBTAIN SERVICE 10. However, registering your product is approved; (h) Use of ether or any...to ultraviolet light. Documentation Required. and (d) Natural discoloration of paint or other non-approved materials and/or structures; (a) Abrasion to mower decks; (b) Tires damaged by external punctures; (c) Natural discoloration of materials due to ultraviolet light; (d) Damage to cutting equipment ...


