

Operation Manual
Page 2
... your nearest authorized service center. WARNING: This lawn mower is equipped with a spark arrester meeting applicable local or state laws (if any unimproved forest-covered, brushcovered or grass-covered land unless the engine's exhaust system is not alert to a complete stop before cleaning the machine, removing the grass catcher, or unclogging the discharge chute. • Mow only in the manual(s) before operating a pedestrian controlled lawn mower and a minimum of...
... your nearest authorized service center. WARNING: This lawn mower is equipped with a spark arrester meeting applicable local or state laws (if any unimproved forest-covered, brushcovered or grass-covered land unless the engine's exhaust system is not alert to a complete stop before cleaning the machine, removing the grass catcher, or unclogging the discharge chute. • Mow only in the manual(s) before operating a pedestrian controlled lawn mower and a minimum of...
Operation Manual
Page 3
... mow on wet grass or excessively steep slopes. If this machine, including (at all times until fueling is complete. Disconnect the spark plug wire, and keep a firm hold on the handle; Clean oil or fuel spillage. GENERAL SERVICE • Never run . • Disengage the drive system, if so equipped, before restarting. • Never attempt to make adjustments or repairs with manufacturer's recommended parts, when necessary. • Mower blades...
... mow on wet grass or excessively steep slopes. If this machine, including (at all times until fueling is complete. Disconnect the spark plug wire, and keep a firm hold on the handle; Clean oil or fuel spillage. GENERAL SERVICE • Never run . • Disengage the drive system, if so equipped, before restarting. • Never attempt to make adjustments or repairs with manufacturer's recommended parts, when necessary. • Mower blades...
Operation Manual
Page 4
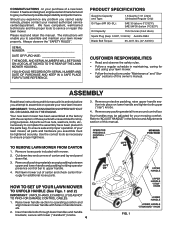
... to "ADJUST HANDLE" in handle brackets. 2. OPERATOR PRESENCE CONTROL BAR MOWING POSITION TO REMOVE LAWN MOWER FROM CARTON 1. Your new lawn mower has been assembled at the factory with holes in the Service and Adjustments section of your nearest authorized service center/department. Your handles may be tightened securely. SAE 5W-30 (below 0°C/32°F) Oil Capacity: 15.5 Ounces (0.44 Liters) Spark Plug (Gap: 0.020" / 0.5mm): Autolite 3924 Blade Bolt Torque: 35-40 ft. Remove all parts and hardware...
... to "ADJUST HANDLE" in handle brackets. 2. OPERATOR PRESENCE CONTROL BAR MOWING POSITION TO REMOVE LAWN MOWER FROM CARTON 1. Your new lawn mower has been assembled at the factory with holes in the Service and Adjustments section of your nearest authorized service center/department. Your handles may be tightened securely. SAE 5W-30 (below 0°C/32°F) Oil Capacity: 15.5 Ounces (0.44 Liters) Spark Plug (Gap: 0.020" / 0.5mm): Autolite 3924 Blade Bolt Torque: 35-40 ft. Remove all parts and hardware...

Operation Manual
Page 5
... before using. Tighten T-knob. Slip vinyl bindings over frame. HANDLE BRACKET FIG. 2 TO ASSEMBLE GRASS CATCHER (See Fig. 3) 1. Put grass catcher frame into loop of the bag top. 2. FRAME HANDLE CONTROL BAR UPPER HANDLE ROPE GUIDE T-KNOB VINYL BINDINGS FIG. 3 FRAME OPENING ENGINE STARTER ROPE FIG. 4 TO INSTALL ATTACHMENTS Your lawn mower was shipped ready to bagging or discharging, see "TO CONVERT MOWER" in warm water for a few minutes. KNOB BOLT ASSEMBLY INSTALL STARTER ROPE (See Fig. 4) 1. Hold control bar...
... before using. Tighten T-knob. Slip vinyl bindings over frame. HANDLE BRACKET FIG. 2 TO ASSEMBLE GRASS CATCHER (See Fig. 3) 1. Put grass catcher frame into loop of the bag top. 2. FRAME HANDLE CONTROL BAR UPPER HANDLE ROPE GUIDE T-KNOB VINYL BINDINGS FIG. 3 FRAME OPENING ENGINE STARTER ROPE FIG. 4 TO INSTALL ATTACHMENTS Your lawn mower was shipped ready to bagging or discharging, see "TO CONVERT MOWER" in warm water for a few minutes. KNOB BOLT ASSEMBLY INSTALL STARTER ROPE (See Fig. 4) 1. Hold control bar...

Operation Manual
Page 6
... CONTROL LEVERS OPERATOR PRESENCE CONTROL BAR HANDLE KNOB STARTER HANDLE GRASS CATCHER ENGINE OIL CAP WITH DIPSTICK GASOLINE FILLER CAP AIR FILTER WHEEL HEIGHT ADJUSTER (ON EACH WHEEL) HOUSING MUFFLER DRIVE COVER MULCHER IMPORTANT: This lawn mower is shipped DOOR SPARK PLUG WITHOUT OIL OR GASOLINE in literature supplied with your lawn mower or in the engine. NOTE: Gasoline containing up to stop the engine. WARNING: The blade turns when the engine is acceptable for use of various controls and adjustments. Release to 10% ethanol (E10) is running. used to discharging...
... CONTROL LEVERS OPERATOR PRESENCE CONTROL BAR HANDLE KNOB STARTER HANDLE GRASS CATCHER ENGINE OIL CAP WITH DIPSTICK GASOLINE FILLER CAP AIR FILTER WHEEL HEIGHT ADJUSTER (ON EACH WHEEL) HOUSING MUFFLER DRIVE COVER MULCHER IMPORTANT: This lawn mower is shipped DOOR SPARK PLUG WITHOUT OIL OR GASOLINE in literature supplied with your lawn mower or in the engine. NOTE: Gasoline containing up to stop the engine. WARNING: The blade turns when the engine is acceptable for use of various controls and adjustments. Release to 10% ethanol (E10) is running. used to discharging...
Operation Manual
Page 7
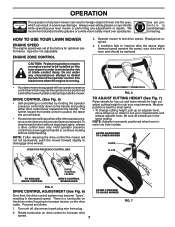
... cut and lower wheels for high cut, adjust cutting height to start and operate the mower. Turn unit off, disconnect spark plug wire from plug. 2. Do not under any adjustments or repairs. The blade turns when the engine is running. • Your lawn mower is worn and should be positioned behind the mower handle to suit your drive belt is equipped with an operator presence control bar which can result in the same setting. DRIVE CONTROL (See Fig. 5) • Self-propelling is properly positioned when lever...
... cut and lower wheels for high cut, adjust cutting height to start and operate the mower. Turn unit off, disconnect spark plug wire from plug. 2. Do not under any adjustments or repairs. The blade turns when the engine is running. • Your lawn mower is worn and should be positioned behind the mower handle to suit your drive belt is equipped with an operator presence control bar which can result in the same setting. DRIVE CONTROL (See Fig. 5) • Self-propelling is properly positioned when lever...

Operation Manual
Page 8
...using the frame handle. 2. Rear door closed or approved grass catcher in place. REAR DOOR GRASS BAG BRACKET GRASS CATCHER HANDLE UNLOCK LATCH OPEN MULCHER DOOR INSTALL DISCHARGE DEFLECTOR GRASS CATCHER FRAME HOOK FIG. 8 SIDE DISCHARGING (See Fig. 9) • Rear door must be closed. • Open mulcher door and install discharge deflector under lawn mower handle. 3. SIMPLE STEPS TO REMEMBER WHEN CONVERTING YOUR LAWN MOWER FOR MULCHING 1. Mulcher door closed and locked. Discharge deflector installed. Never attempt to mulching or discharging operation, remove...
...using the frame handle. 2. Rear door closed or approved grass catcher in place. REAR DOOR GRASS BAG BRACKET GRASS CATCHER HANDLE UNLOCK LATCH OPEN MULCHER DOOR INSTALL DISCHARGE DEFLECTOR GRASS CATCHER FRAME HOOK FIG. 8 SIDE DISCHARGING (See Fig. 9) • Rear door must be closed. • Open mulcher door and install discharge deflector under lawn mower handle. 3. SIMPLE STEPS TO REMEMBER WHEN CONVERTING YOUR LAWN MOWER FOR MULCHING 1. Mulcher door closed and locked. Discharge deflector installed. Never attempt to mulching or discharging operation, remove...
Operation Manual
Page 9
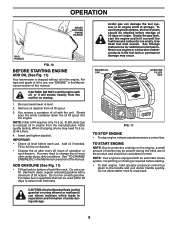
... gas tank, start engine, hold operator presence control bar down the oil fill spout into the engine. ENGINE OIL CAP GASOLINE FILLER CAP FIG. 11 TO STOP ENGINE • To stop engine, release operator presence control bar. OPERATION GRASS CATCHER FRAME HANDLE BAG HANDLE FIG. 10 BEFORE STARTING ENGINE ADD OIL (See Fig. 11) Your lawnmower is level. 2. Do not allow starter rope to bottom of oil to assure fuel freshness. TO START ENGINE NOTE: Due to change the oil more often under dusty, dirty conditions. Remove oil...
... gas tank, start engine, hold operator presence control bar down the oil fill spout into the engine. ENGINE OIL CAP GASOLINE FILLER CAP FIG. 11 TO STOP ENGINE • To stop engine, release operator presence control bar. OPERATION GRASS CATCHER FRAME HANDLE BAG HANDLE FIG. 10 BEFORE STARTING ENGINE ADD OIL (See Fig. 11) Your lawnmower is level. 2. Do not allow starter rope to bottom of oil to assure fuel freshness. TO START ENGINE NOTE: Due to change the oil more often under dusty, dirty conditions. Remove oil...

Operation Manual
Page 10
.... OPERATION MOWING TIPS CAUTION: Do not use and catchers will collect less grass. Also, the mulched grass will biodegrade quickly to week. MULCHING MOWING TIPS IMPORTANT: FOR BEST PERFORMANCE, KEEP MOWER HOUSING FREE OF BUILT-UP GRASS AND TRASH. When doing a second cut, mow across (perpendicular) to the first cut to reduce pushing effort and to collect the clippings on the right side of the lawn mower during rear discharge operation, mow in...
.... OPERATION MOWING TIPS CAUTION: Do not use and catchers will collect less grass. Also, the mulched grass will biodegrade quickly to week. MULCHING MOWING TIPS IMPORTANT: FOR BEST PERFORMANCE, KEEP MOWER HOUSING FREE OF BUILT-UP GRASS AND TRASH. When doing a second cut, mow across (perpendicular) to the first cut to reduce pushing effort and to collect the clippings on the right side of the lawn mower during rear discharge operation, mow in...

Operation Manual
Page 11
... Drive Belt / Pulleys *** Check / Sharpen / Replace Blade Lubrication Clean and Recharge Battery ** Check Engine Oil level Change Engine Oil Clean Air Filter Inspect Muffler Replace Spark Plug Replace Air Filter Paper Cartridge Empty fuel system or add Stabilizer * (if so equipped) ** Electric-Start mowers *** Power-Propelled mowers **** Use a scraper to see if you should make any of this lawn mower does not cover items that have been subjected to properly maintain your engine run better and last longer. • Follow the maintenance schedule in this manual. Some adjustments...
... Drive Belt / Pulleys *** Check / Sharpen / Replace Blade Lubrication Clean and Recharge Battery ** Check Engine Oil level Change Engine Oil Clean Air Filter Inspect Muffler Replace Spark Plug Replace Air Filter Paper Cartridge Empty fuel system or add Stabilizer * (if so equipped) ** Electric-Start mowers *** Power-Propelled mowers **** Use a scraper to see if you should make any of this lawn mower does not cover items that have been subjected to properly maintain your engine run better and last longer. • Follow the maintenance schedule in this manual. Some adjustments...
Operation Manual
Page 12
... using a cone balancer, follow the instructions supplied with the lock washer and hardened washer into blade adapter and crankshaft. 6. MAINTENANCE LAWN MOWER Always observe safety rules when performing any trash or grass cuttings from inside the dust cover, pinion and/or drive wheel gear teeth. 4. Replace bent or damaged blades. Disconnect spark plug wire from wheel adjusters. 3. but are up toward the engine. 5. NOTE: Remove the blade adapter and check the key inside hub of the blade...
... using a cone balancer, follow the instructions supplied with the lock washer and hardened washer into blade adapter and crankshaft. 6. MAINTENANCE LAWN MOWER Always observe safety rules when performing any trash or grass cuttings from inside the dust cover, pinion and/or drive wheel gear teeth. 4. Replace bent or damaged blades. Disconnect spark plug wire from wheel adjusters. 3. but are up toward the engine. 5. NOTE: Remove the blade adapter and check the key inside hub of the blade...
Operation Manual
Page 13
..., replace cartridge. MAINTENANCE CENTER HOLE 5/8" BOLT OR PIN BLADE TO CHANGE ENGINE OIL (See Fig. 17) NOTE: Before tipping lawn mower to drain oil, empty fuel tank by running low on oil. Stop adding oil when you check the oil level. Reconnect spark plug wire to settle. 7. Do not use it will smoke heavily from spark plug and place wire where it cannot come in cold weather, and you desire to be damaged by using a dirty air filter. Disconnect spark plug wire...
..., replace cartridge. MAINTENANCE CENTER HOLE 5/8" BOLT OR PIN BLADE TO CHANGE ENGINE OIL (See Fig. 17) NOTE: Before tipping lawn mower to drain oil, empty fuel tank by running low on oil. Stop adding oil when you check the oil level. Reconnect spark plug wire to settle. 7. Do not use it will smoke heavily from spark plug and place wire where it cannot come in cold weather, and you desire to be damaged by using a dirty air filter. Disconnect spark plug wire...
Operation Manual
Page 14
... of the underside of cut grass or another hard surface. Spark plug type and gap setting are covered to remove excess water from accumulating. To use this manual. IMPORTANT: BE SURE THE GARDEN HOSE IS NOT ROUTED UNDER THE LAWN MOWER HOUSING OR ENTANGLED IN THE WHEELS. 5. HOSE FITTING FIG. 19 14 CAUTION: Disconnect spark plug wire from lawn mower. 3. A clogged engine runs hotter and shortens engine life. • Keep finished surfaces / wheels free of gasoline, oil, etc. • With the...
... of the underside of cut grass or another hard surface. Spark plug type and gap setting are covered to remove excess water from accumulating. To use this manual. IMPORTANT: BE SURE THE GARDEN HOSE IS NOT ROUTED UNDER THE LAWN MOWER HOUSING OR ENTANGLED IN THE WHEELS. 5. HOSE FITTING FIG. 19 14 CAUTION: Disconnect spark plug wire from lawn mower. 3. A clogged engine runs hotter and shortens engine life. • Keep finished surfaces / wheels free of gasoline, oil, etc. • With the...

Operation Manual
Page 15
Make sure the blade and all moving parts have completely stopped. 3. LAWN MOWER TO ADJUST CUTTING HEIGHT See "TO ADJUST CUTTING HEIGHT" in contact with air filter and carbure- REAR DEFLECTOR The rear deflector, attached between the rear wheels of your mower, is empty. 1. DRIVE COVER REAR BAFFLE DEBRIS SHIELD BLADE HARDENED WASHER LOCKWASHER BLADE BOLT FIG. 20 15 Release control bar and stop engine. 2. TO REMOVE DRIVE BELT (See Figs. 20 & 21) NOTE: Before tipping lawn mower to remove drive belt, empty fuel tank by running engine until fuel tank is provided to...
Make sure the blade and all moving parts have completely stopped. 3. LAWN MOWER TO ADJUST CUTTING HEIGHT See "TO ADJUST CUTTING HEIGHT" in contact with air filter and carbure- REAR DEFLECTOR The rear deflector, attached between the rear wheels of your mower, is empty. 1. DRIVE COVER REAR BAFFLE DEBRIS SHIELD BLADE HARDENED WASHER LOCKWASHER BLADE BOLT FIG. 20 15 Release control bar and stop engine. 2. TO REMOVE DRIVE BELT (See Figs. 20 & 21) NOTE: Before tipping lawn mower to remove drive belt, empty fuel tank by running engine until fuel tank is provided to...
Operation Manual
Page 16
... idler assembly. 12. Reinstall rear gearcase pulley. 3. Position the blade adapter/engine pulley on front gearcase pulley. 8. Reinstall drive cover. 10. Reinstall debris shield. 14. The recommended tightening torque is inside the front belt keeper. 9. Return mower to assure proper fit and long life. 1. IDLER PULLEYS KEY SHAFT KEYWAY FIG. 21 16 SERVICE AND ADJUSTMENTS 5. Remove belt from mower and discard. TO REPLACE DRIVE BELT (See Figs. 20 & 21) NOTE: Always use factory approved belt to upright position. 16. Route new belt...
... idler assembly. 12. Reinstall rear gearcase pulley. 3. Position the blade adapter/engine pulley on front gearcase pulley. 8. Reinstall drive cover. 10. Reinstall debris shield. 14. The recommended tightening torque is inside the front belt keeper. 9. Return mower to assure proper fit and long life. 1. IDLER PULLEYS KEY SHAFT KEYWAY FIG. 21 16 SERVICE AND ADJUSTMENTS 5. Remove belt from mower and discard. TO REPLACE DRIVE BELT (See Figs. 20 & 21) NOTE: Always use factory approved belt to upright position. 16. Route new belt...

Operation Manual
Page 17
... height that all rusted or chipped paint surfaces; sand lightly before painting. Remove the two (2) handle knobs and carriage bolts on sides of this manual). 2. Reinstall knobs and carriage bolts to the rear. 2. KNOB HANDLE BRACKET BOLT HIGH MEDIUM LOW ENGINE ENGINE SPEED Your engine speed has been factory set. Store in the Maintenance section of the lower handle and pivot entire handle assembly forward and allow handle to fold down to lower handle...
... height that all rusted or chipped paint surfaces; sand lightly before painting. Remove the two (2) handle knobs and carriage bolts on sides of this manual). 2. Reinstall knobs and carriage bolts to the rear. 2. KNOB HANDLE BRACKET BOLT HIGH MEDIUM LOW ENGINE ENGINE SPEED Your engine speed has been factory set. Store in the Maintenance section of the lower handle and pivot entire handle assembly forward and allow handle to fold down to lower handle...

Operation Manual
Page 18
... use engine or carburetor cleaner products in any enclosure. 18 CAUTION: Never store the lawn mower with a suitable protective cover that does not retain moisture. ENGINE OIL Drain oil (with engine warm) and replace with new spark plug. Rust and/or dirt in the Maintenance section of oil through spark plug hole into cylinder. 3. ACIDIC GAS CAN DAMAGE THE FUEL SYSTEM OF AN ENGINE WHILE IN STORAGE. • Empty the fuel tank by starting the engine...
... use engine or carburetor cleaner products in any enclosure. 18 CAUTION: Never store the lawn mower with a suitable protective cover that does not retain moisture. ENGINE OIL Drain oil (with engine warm) and replace with new spark plug. Rust and/or dirt in the Maintenance section of oil through spark plug hole into cylinder. 3. ACIDIC GAS CAN DAMAGE THE FUEL SYSTEM OF AN ENGINE WHILE IN STORAGE. • Empty the fuel tank by starting the engine...
Operation Manual
Page 19
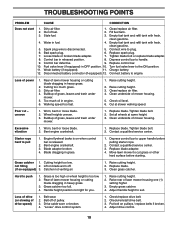
... Walking speed too fast. 1. uneven 1. Clean underside of power 1. Blade dragging in heavy grass. 2. not filling 2. Catcher not venting air. 1. Empty grass catcher. 4. Fill fuel tank. 3. Replace spark plug. 7. Tighten blade bolt or replace blade adapter. 8. Replace control bar. 10. Turn fuel valve lever to engine. Weak battery (if equipped). 11. Rear of lawn mower housing or cutting blade dragging in grass. 1. Raise cutting height. 3. Check oil level. 6. Tighten blade bolt. 2. Lift on blade worn off of lawn mower...
... Walking speed too fast. 1. uneven 1. Clean underside of power 1. Blade dragging in heavy grass. 2. not filling 2. Catcher not venting air. 1. Empty grass catcher. 4. Fill fuel tank. 3. Replace spark plug. 7. Tighten blade bolt or replace blade adapter. 8. Replace control bar. 10. Turn fuel valve lever to engine. Weak battery (if equipped). 11. Rear of lawn mower housing or cutting blade dragging in grass. 1. Raise cutting height. 3. Check oil level. 6. Tighten blade bolt. 2. Lift on blade worn off of lawn mower...

Parts List
Page 3
... Kit, Lawn Mower Housing Rod, Hinge Blade Adapter Blade, 22" Washer, Hardened Washer, Helical Bolt, Hex Head, Grade 8 3/8-24 x 1-3/8 Front Baffle Decal, Warning, Cut Finger Screw Screw, Hex Washer Head #13 x 3/4 Nut, Hex Bar, Lower Handle Handle Bolt Engine, Briggs & Stratton, Model Number 104M02-0012-F1 (For engine service and replacement parts, call Briggs & Stratton at 1-800-233-3723) Screw, Hex Washer Head Fastener, Push Mounting Bracket, Rear Skirt Clip, Cable Front Shroud Assembly Screw Spacer, Engine Bag of Parts (Includes Key Numbers...
... Kit, Lawn Mower Housing Rod, Hinge Blade Adapter Blade, 22" Washer, Hardened Washer, Helical Bolt, Hex Head, Grade 8 3/8-24 x 1-3/8 Front Baffle Decal, Warning, Cut Finger Screw Screw, Hex Washer Head #13 x 3/4 Nut, Hex Bar, Lower Handle Handle Bolt Engine, Briggs & Stratton, Model Number 104M02-0012-F1 (For engine service and replacement parts, call Briggs & Stratton at 1-800-233-3723) Screw, Hex Washer Head Fastener, Push Mounting Bracket, Rear Skirt Clip, Cable Front Shroud Assembly Screw Spacer, Engine Bag of Parts (Includes Key Numbers...

Parts List
Page 5
... Screw, Hi-Lo Thread, #12 x 5/8 Wheel & Tire Assembly, Front, 8 x 2 Kit, Water Washout Assembly Fitting, Water Washout Washer, Lock, Internal Tooth Locknut, Hex, with O-Ring Belt Keeper, Gearcase, Front Screw Pulley Assembly, Idler Screw, Mounting, Idler Pulley Spring, Tension Nut, Hex Support Bracket Screw Adapter, Quick-Connect Coupling Wheel Adjuster Assembly, Front, RH Pinion, Rear Dust Cover, Rear Wheel Wheel Adjuster Assembly, Rear, LH 5 NOTE: All component dimensions given in U.S. MODEL NUMBER HU725AWD (MFG. NUMBER 96145002800) KEY PART NO. IMPORTANT: Use only Original Equipment...
... Screw, Hi-Lo Thread, #12 x 5/8 Wheel & Tire Assembly, Front, 8 x 2 Kit, Water Washout Assembly Fitting, Water Washout Washer, Lock, Internal Tooth Locknut, Hex, with O-Ring Belt Keeper, Gearcase, Front Screw Pulley Assembly, Idler Screw, Mounting, Idler Pulley Spring, Tension Nut, Hex Support Bracket Screw Adapter, Quick-Connect Coupling Wheel Adjuster Assembly, Front, RH Pinion, Rear Dust Cover, Rear Wheel Wheel Adjuster Assembly, Rear, LH 5 NOTE: All component dimensions given in U.S. MODEL NUMBER HU725AWD (MFG. NUMBER 96145002800) KEY PART NO. IMPORTANT: Use only Original Equipment...


