
Owners Manual
Page 2
... (if any unimproved forest-covered, brush-covered or grass-covered land unless the engine's exhaust system is clear of other safety protective devices in the manual(s) before starting the engine (motor). • If the equipment should be picked up and thrown by the operator. Vibration is not alert to operate the...
... (if any unimproved forest-covered, brush-covered or grass-covered land unless the engine's exhaust system is clear of other safety protective devices in the manual(s) before starting the engine (motor). • If the equipment should be picked up and thrown by the operator. Vibration is not alert to operate the...
Owners Manual
Page 3
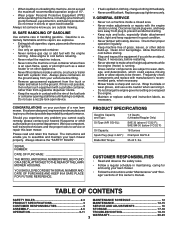
.... • Never make wheel height adjustments while the engine (motor) is spilled on the ground. Please read and retain this manual. lbs. TABLE OF CONTENTS SAFETY RULES 2-3 MAINTENANCE SCHEDULE 12 PRODUCT SPECIFICATIONS 3 MAINTENANCE 12-15 CUSTOMER RESPONSIBILITIES 3 SERVICE AND ADJUSTMENTS... if necessary, before storing. • Stop and inspect the equipment if you cannot easily remedy, please contact your nearest Husqvarna or other debris build-up. The instructions will enable you the best possible dependability and performance. SERIAL NUMBER DATE OF PURCHASE ...
.... • Never make wheel height adjustments while the engine (motor) is spilled on the ground. Please read and retain this manual. lbs. TABLE OF CONTENTS SAFETY RULES 2-3 MAINTENANCE SCHEDULE 12 PRODUCT SPECIFICATIONS 3 MAINTENANCE 12-15 CUSTOMER RESPONSIBILITIES 3 SERVICE AND ADJUSTMENTS... if necessary, before storing. • Stop and inspect the equipment if you cannot easily remedy, please contact your nearest Husqvarna or other debris build-up. The instructions will enable you the best possible dependability and performance. SERIAL NUMBER DATE OF PURCHASE ...
Owners Manual
Page 4
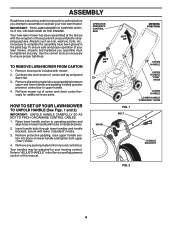
... tools as nuts, washers, bolts, etc., necessary to assemble or operate your new lawn mower. ASSEMBLY Read these instructions and this manual in the Service andAdjustments section of this manual. Remove loose parts included with the exception of your mowing comfort. OPERATOR PRESENCE CONTROL BAR LIFT UP HOW TO SET UP YOUR...
... tools as nuts, washers, bolts, etc., necessary to assemble or operate your new lawn mower. ASSEMBLY Read these instructions and this manual in the Service andAdjustments section of this manual. Remove loose parts included with the exception of your mowing comfort. OPERATOR PRESENCE CONTROL BAR LIFT UP HOW TO SET UP YOUR...

Owners Manual
Page 5
Put grass catcher frame into loop of this manual. 5 Make sure the frame handle is outside of bag on the bottom. INSTALL STARTER ROPE (See Fig. 4) 1. Place throttle control in the Operation section of ...
Put grass catcher frame into loop of this manual. 5 Make sure the frame handle is outside of bag on the bottom. INSTALL STARTER ROPE (See Fig. 4) 1. Place throttle control in the Operation section of ...

Owners Manual
Page 6
... SAFETY RULES BEFORE OPERATING YOUR LAWN MOWER. Compare the illustrations with your lawn mower or in this manual for starting the engine. MULCHER DOOR HOUSING SPARK PLUG MEETS CPSC SAFETY REQUIREMENTS Husqvarna rotary walk-behind power lawn mowers conform to familiarize yourself with the product. and allows you to start the blade...
... SAFETY RULES BEFORE OPERATING YOUR LAWN MOWER. Compare the illustrations with your lawn mower or in this manual for starting the engine. MULCHER DOOR HOUSING SPARK PLUG MEETS CPSC SAFETY REQUIREMENTS Husqvarna rotary walk-behind power lawn mowers conform to familiarize yourself with the product. and allows you to start the blade...

Owners Manual
Page 10
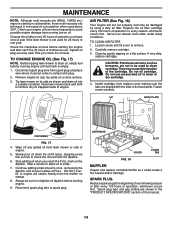
... the muffler on dipstick. • Change the oil after every 25 hours of 30 days or longer. For type and grade of this manual. You may need 20 oz. 4. Do not over fill engine with oil, or it will cause unnecessary wear. CAUTION: Wipe off any spilled oil.... 12 BEFORE STARTING ENGINE ADD OIL (See Fig. 13) Your lawnmower is level. 2. Insert and tighten dipstick. Do not mix oil with a minimum of this manual. Never use . See "TO CHANGE ENGINE OIL" in the fuel tank or permanent damage may need to use gasoline near an open flame. CAUTION...
... the muffler on dipstick. • Change the oil after every 25 hours of 30 days or longer. For type and grade of this manual. You may need 20 oz. 4. Do not over fill engine with oil, or it will cause unnecessary wear. CAUTION: Wipe off any spilled oil.... 12 BEFORE STARTING ENGINE ADD OIL (See Fig. 13) Your lawnmower is level. 2. Insert and tighten dipstick. Do not mix oil with a minimum of this manual. Never use . See "TO CHANGE ENGINE OIL" in the fuel tank or permanent damage may need to use gasoline near an open flame. CAUTION...

Owners Manual
Page 11
... can become filled with dirt and dust with use of cut by overlapping previously cut path. SEE "CLEANING" IN THE MAINTENANCE SECTION OF THIS MANUAL. • The special mulching blade will be present during the initial use and catchers will help engine air flow and extend engine life. Also...
... can become filled with dirt and dust with use of cut by overlapping previously cut path. SEE "CLEANING" IN THE MAINTENANCE SECTION OF THIS MANUAL. • The special mulching blade will be present during the initial use and catchers will help engine air flow and extend engine life. Also...
Owners Manual
Page 12
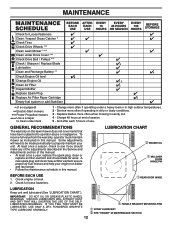
... the adjustments described in dirty or dusty conditions. 3 - At least once a season, check to see if you should make any of this manual. • At least once a year, replace the spark plug, clean or replace air filter element and check blade for wear. GENERAL...* (if so equipped) ** Electric-Start mowers *** Power-Propelled mowers **** Use a scraper to clean under a heavy load or in this manual. Service more often when mowing in this manual. LUBRICATION CHART ➁ ENGINE OIL ➀ MULCHER DOOR HINGE PIN BEFORE EACH USE 1. And after each 5 hours of season. 5 ...
... the adjustments described in dirty or dusty conditions. 3 - At least once a season, check to see if you should make any of this manual. • At least once a year, replace the spark plug, clean or replace air filter element and check blade for wear. GENERAL...* (if so equipped) ** Electric-Start mowers *** Power-Propelled mowers **** Use a scraper to clean under a heavy load or in this manual. Service more often when mowing in this manual. LUBRICATION CHART ➁ ENGINE OIL ➀ MULCHER DOOR HINGE PIN BEFORE EACH USE 1. And after each 5 hours of season. 5 ...
Owners Manual
Page 14
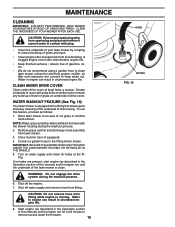
... oil level more often under dusty conditions. Check the crankcase oil level before starting engine. 9. Tighten oil plug securely each five (5) hours of this manual. 14 Remove engine oil cap; Install cartridge, then replace cover making sure the tabs are shown in the "PRODUCT SPECIFICATIONS" section of continuous use pressurized...
... oil level more often under dusty conditions. Check the crankcase oil level before starting engine. 9. Tighten oil plug securely each five (5) hours of this manual. 14 Remove engine oil cap; Install cartridge, then replace cover making sure the tabs are shown in the "PRODUCT SPECIFICATIONS" section of continuous use pressurized...
Owners Manual
Page 15
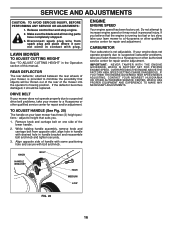
... remove any build-up of the lawn mower is clean. Shut off the engine. 7. Start engine (as described in the Operation section of this manual) and let engine run until the underside of grass and trash. • Clean engine often to remove excess water from lawn mower. 3. CLEAN... and remove hose from beneath the mower housing during the washout process. 6. Water in engine can result in shortened engine life. 8. To use this manual) and let engine run for leaks at least twice a season. CAUTION: Disconnect spark plug wire from fitting while engine is equipped with a ...
... remove any build-up of the lawn mower is clean. Shut off the engine. 7. Start engine (as described in the Operation section of this manual) and let engine run until the underside of grass and trash. • Clean engine often to remove excess water from lawn mower. 3. CLEAN... and remove hose from beneath the mower housing during the washout process. 6. Water in engine can result in shortened engine life. 8. To use this manual) and let engine run for leaks at least twice a season. CAUTION: Disconnect spark plug wire from fitting while engine is equipped with a ...
Owners Manual
Page 16
... and tighten securely. 3. Align opposite side of handle with same positioning hole and secure with desired hole in the Operation section of this manual. If you . 1. SERVICE AND ADJUSTMENTS CAUTION: TO AVOID SERIOUS INJURY, BEFORE PERFORMING ANY SERVICE OR ADJUSTMENTS: 1. DRIVE BELT If your... ABOVE THE FACTORY HIGH SPEED SETTING CAN BE DANGEROUS. IF YOU THINK THE ENGINE-GOVERNED HIGH SPEED NEEDS ADJUSTING, CONTACT YOUR NEAREST HUSQVARNA OR OTHER AUTHORIZED SERVICE CENTER, WHICH HAS PROPER EQUIPMENT AND EXPERIENCE TO MAKE ANY NECESSARY ADJUSTMENTS. If the deflector becomes ...
... and tighten securely. 3. Align opposite side of handle with same positioning hole and secure with desired hole in the Operation section of this manual. If you . 1. SERVICE AND ADJUSTMENTS CAUTION: TO AVOID SERIOUS INJURY, BEFORE PERFORMING ANY SERVICE OR ADJUSTMENTS: 1. DRIVE BELT If your... ABOVE THE FACTORY HIGH SPEED SETTING CAN BE DANGEROUS. IF YOU THINK THE ENGINE-GOVERNED HIGH SPEED NEEDS ADJUSTING, CONTACT YOUR NEAREST HUSQVARNA OR OTHER AUTHORIZED SERVICE CENTER, WHICH HAS PROPER EQUIPMENT AND EXPERIENCE TO MAKE ANY NECESSARY ADJUSTMENTS. If the deflector becomes ...
Owners Manual
Page 17
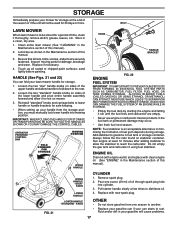
..., bolts, screws, and pins are empty. • Never use engine or carburetor cleaner products in the Maintenance section of this manual). sand lightly before painting. ALCOHOL BLENDED FUELS (CALLED GASOHOL OR USING ETHANOL OR METHANOL) CAN ATTRACT MOISTURE WHICH LEADS TO SEPARATION ...during storage. Inspect moving parts for storage. 1. Replace if necessary. 4. Loosen the two "star" handle knobs on sides of this manual). 2. OPERATOR PRESENCE CONTROL BAR FOLD FORWARD FOR STORAGE MOWING POSITION UPPER HANDLE KNOB HANDLE BRACKET ENGINE FIG. 22 FUEL SYSTEM IMPORTANT: IT...
..., bolts, screws, and pins are empty. • Never use engine or carburetor cleaner products in the Maintenance section of this manual). sand lightly before painting. ALCOHOL BLENDED FUELS (CALLED GASOHOL OR USING ETHANOL OR METHANOL) CAN ATTRACT MOISTURE WHICH LEADS TO SEPARATION ...during storage. Inspect moving parts for storage. 1. Replace if necessary. 4. Loosen the two "star" handle knobs on sides of this manual). 2. OPERATOR PRESENCE CONTROL BAR FOLD FORWARD FOR STORAGE MOWING POSITION UPPER HANDLE KNOB HANDLE BRACKET ENGINE FIG. 22 FUEL SYSTEM IMPORTANT: IT...

Owners Manual
Page 18
... refill tank with fresh, clean gasoline. 5. Connect wire to give protection from dust and dirt. • Cover your unit to a Husqvarna or other authorized repair center. Depress control bar to the ON position. 11. Replace control bar. 10. Do not use plastic. Dirty air &#...breathe, which allows condensation to form and will cause your unit with gasoline in OFF position. 10. Connect battery to cool before storing in manual unless directed to rust. Allow the engine to engine. 18 Disconnected battery connector (if equipped). 12. Spark plug wire is disconnected. 5. ...
... refill tank with fresh, clean gasoline. 5. Connect wire to give protection from dust and dirt. • Cover your unit to a Husqvarna or other authorized repair center. Depress control bar to the ON position. 11. Replace control bar. 10. Do not use plastic. Dirty air &#...breathe, which allows condensation to form and will cause your unit with gasoline in OFF position. 10. Connect battery to cool before storing in manual unless directed to rust. Allow the engine to engine. 18 Disconnected battery connector (if equipped). 12. Spark plug wire is disconnected. 5. ...
Owners Manual
Page 19
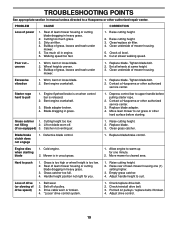
TROUBLESHOOTING POINTS See appropriate section in manual unless directed to a Husqvarna or other authorized service center. 3. Raise cutting height. 2. Cut at same height. 3. Set all wheels at slower walking speed. Worn, ...full. 4. Empty grass catcher. 4. "Loose" drive control system. 1. Too much grass. 3. Check oil level. 6. Wheel heights uneven. 3. Excessive vibration 1. Contact a Husqvarna or other authorized repair center. Cutting height too low. Replace blade/brake control. Mower is released. 2. Move mower to pull 1. Raise cutting height. 2. Loss of...
TROUBLESHOOTING POINTS See appropriate section in manual unless directed to a Husqvarna or other authorized service center. 3. Raise cutting height. 2. Cut at same height. 3. Set all wheels at slower walking speed. Worn, ...full. 4. Empty grass catcher. 4. "Loose" drive control system. 1. Too much grass. 3. Check oil level. 6. Wheel heights uneven. 3. Excessive vibration 1. Contact a Husqvarna or other authorized repair center. Cutting height too low. Replace blade/brake control. Mower is released. 2. Move mower to pull 1. Raise cutting height. 2. Loss of...
Owners Manual
Page 20
...a 30 Day Limited Warranty. THIS WARRANTY IS GIVEN ONLY BY HUSQVARNA, AND MAY BE MODIFIED ONLY BY HUSQVARNA. In most cases, these items are NOT manufactured by Husqvarna in the enclosed operator's manual. Husqvarna is not authorized to any questions concerning transmission / transaxle warranty ...coverage, contact Husqvarna directly at the time of models equipped with the product at any warranty...
...a 30 Day Limited Warranty. THIS WARRANTY IS GIVEN ONLY BY HUSQVARNA, AND MAY BE MODIFIED ONLY BY HUSQVARNA. In most cases, these items are NOT manufactured by Husqvarna in the enclosed operator's manual. Husqvarna is not authorized to any questions concerning transmission / transaxle warranty ...coverage, contact Husqvarna directly at the time of models equipped with the product at any warranty...

Owners Manual
Page 21
.... Reinforced Stamped (Armor Protected) 10 Year Limited & Fabricated Limited Lifetime, Deck Warranties. Authorized Husqvarna Servicing Dealer/Center. Documentation Required. The Limited Lifetime Warranty does not cover damage other than those meeting emission performance requirements listed in the operator's manual; (k) Tampering with engine speed governor or emission components, or running engines above specified...
.... Reinforced Stamped (Armor Protected) 10 Year Limited & Fabricated Limited Lifetime, Deck Warranties. Authorized Husqvarna Servicing Dealer/Center. Documentation Required. The Limited Lifetime Warranty does not cover damage other than those meeting emission performance requirements listed in the operator's manual; (k) Tampering with engine speed governor or emission components, or running engines above specified...
Parts List
Page 3
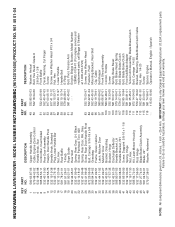
inches. 1 inch = 25.4 mm. MODEL NUMBER HU725AWD/BBC (96143010400) PRODUCT NO. 961 45 01-04 KEY .../Clutch Bolt, Carriage 1/4-20 Bracket, Mounting, Blade Brake/Clutch Cable Nut, Hex 1/4-20 Screw Spacer, Engine Operator's Manual, English / Spanish 3 NOTE: All component dimensions given in U.S. IMPORTANT: Use only Original Equipment Manufacturer (O.E.M.) replacement parts.... Failure to do so could be hazardous, damage your lawn mower and void your warranty. HUSQVARNA LAWN MOWER - NO. 1 580 63 87-06 2 579 48 42-02 6 532 18 23-98 8 585...
inches. 1 inch = 25.4 mm. MODEL NUMBER HU725AWD/BBC (96143010400) PRODUCT NO. 961 45 01-04 KEY .../Clutch Bolt, Carriage 1/4-20 Bracket, Mounting, Blade Brake/Clutch Cable Nut, Hex 1/4-20 Screw Spacer, Engine Operator's Manual, English / Spanish 3 NOTE: All component dimensions given in U.S. IMPORTANT: Use only Original Equipment Manufacturer (O.E.M.) replacement parts.... Failure to do so could be hazardous, damage your lawn mower and void your warranty. HUSQVARNA LAWN MOWER - NO. 1 580 63 87-06 2 579 48 42-02 6 532 18 23-98 8 585...


