
Owners Manual
Page 2
... TO OBSERVE THE FOLLOWING SAFETY INSTRUCTIONS COULD RESULT IN SERIOUS INJURY OR DEATH. I. never run. • Disengage the self-propelled mechanism or drive clutch on a slope, do not mow it should start to the State of your nearest authorized service center. Only use of accessories. CAUTION: Always disconnect spark plug wire and place wire where it cannot contact spark plug in place. 2 • See manufacturer's instructions for holes, ruts, or...
... TO OBSERVE THE FOLLOWING SAFETY INSTRUCTIONS COULD RESULT IN SERIOUS INJURY OR DEATH. I. never run. • Disengage the self-propelled mechanism or drive clutch on a slope, do not mow it should start to the State of your nearest authorized service center. Only use of accessories. CAUTION: Always disconnect spark plug wire and place wire where it cannot contact spark plug in place. 2 • See manufacturer's instructions for holes, ruts, or...
Owners Manual
Page 3
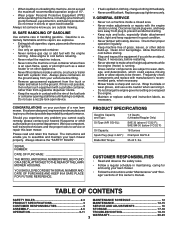
... and retain this lawn mower. PRODUCT SPECIFICATIONS Gasoline Capacity and Type: Oil Type (API SG-SL): Oil Capacity: Spark Plug (Gap: 0.020"): Blade Bolt Torque: 1.6 Quarts (Unleaded Regular Only) SAE 30 (above 0°C/32°F); TABLE OF CONTENTS SAFETY RULES 2-3 MAINTENANCE SCHEDULE 12 PRODUCT SPECIFICATIONS 3 MAINTENANCE 12-15 CUSTOMER RESPONSIBILITIES 3 SERVICE AND ADJUSTMENTS 16 ASSEMBLY 4-5 STORAGE 17-18 OPERATION 6-11 TROUBLESHOOTING 18-19 WARRANTY 20-23 3 Allow engine to cool before filling. • Remove gas-powered equipment from...
... and retain this lawn mower. PRODUCT SPECIFICATIONS Gasoline Capacity and Type: Oil Type (API SG-SL): Oil Capacity: Spark Plug (Gap: 0.020"): Blade Bolt Torque: 1.6 Quarts (Unleaded Regular Only) SAE 30 (above 0°C/32°F); TABLE OF CONTENTS SAFETY RULES 2-3 MAINTENANCE SCHEDULE 12 PRODUCT SPECIFICATIONS 3 MAINTENANCE 12-15 CUSTOMER RESPONSIBILITIES 3 SERVICE AND ADJUSTMENTS 16 ASSEMBLY 4-5 STORAGE 17-18 OPERATION 6-11 TROUBLESHOOTING 18-19 WARRANTY 20-23 3 Allow engine to cool before filling. • Remove gas-powered equipment from...
Owners Manual
Page 4
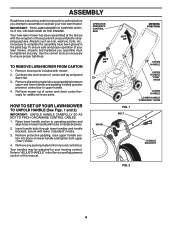
... new lawn mower has been assembled at . 3. OPERATOR PRESENCE CONTROL BAR LIFT UP HOW TO SET UP YOUR LAWN MOWER TO UNFOLD HANDLE (See Figs. 1 and 2) IMPORTANT: UNFOLD HANDLE CAREFULLY SO AS NOT TO PINCH OR DAMAGE CONTROL CABLES. 1. Your handles may be tightened securely. Roll lawn mower out of those parts left unassembled for additional loose parts. Cut down flat the factory with holes in the parts bag. Insert handle bolts through lower handles and handle brackets...
... new lawn mower has been assembled at . 3. OPERATOR PRESENCE CONTROL BAR LIFT UP HOW TO SET UP YOUR LAWN MOWER TO UNFOLD HANDLE (See Figs. 1 and 2) IMPORTANT: UNFOLD HANDLE CAREFULLY SO AS NOT TO PINCH OR DAMAGE CONTROL CABLES. 1. Your handles may be tightened securely. Roll lawn mower out of those parts left unassembled for additional loose parts. Cut down flat the factory with holes in the parts bag. Insert handle bolts through lower handles and handle brackets...
Owners Manual
Page 6
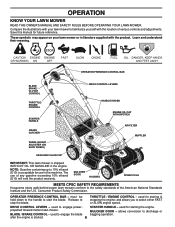
... with the product. OPERATOR PRESENCE CONTROL BAR BLADE BRAKE/ CLUTCH CONTROL THROTTLE/ ENGINE CONTROL STARTER HANDLE GRASS CATCHER WHEEL HEIGHT ADJUSTER (ON EACH WHEEL) DRIVE CONTROL LEVERS HANDLE KNOBS ENGINE OIL CAP WITH DIPSTICK AIR FILTER MUFFLER GASOLINE FILLER CAP IMPORTANT: This lawn mower is started. 6 MULCHER DOOR HOUSING SPARK PLUG MEETS CPSC SAFETY REQUIREMENTS Husqvarna rotary walk-behind power lawn mowers conform to select either FAST or SLOW engine speed. and allows you to the safety standards of various controls and adjustments. used for future reference. MULCHER...
... with the product. OPERATOR PRESENCE CONTROL BAR BLADE BRAKE/ CLUTCH CONTROL THROTTLE/ ENGINE CONTROL STARTER HANDLE GRASS CATCHER WHEEL HEIGHT ADJUSTER (ON EACH WHEEL) DRIVE CONTROL LEVERS HANDLE KNOBS ENGINE OIL CAP WITH DIPSTICK AIR FILTER MUFFLER GASOLINE FILLER CAP IMPORTANT: This lawn mower is started. 6 MULCHER DOOR HOUSING SPARK PLUG MEETS CPSC SAFETY REQUIREMENTS Husqvarna rotary walk-behind power lawn mowers conform to select either FAST or SLOW engine speed. and allows you to the safety standards of various controls and adjustments. used for future reference. MULCHER...

Owners Manual
Page 7
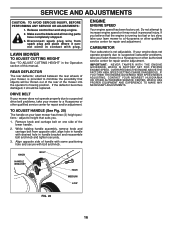
... blade, push the blade/brake control lever forward (1) and hold the operator presence control bar down to the handle (2). HOW TO USE YOUR LAWN MOWER THROTTLE/ENGINE CONTROL (See Fig. 5) The engine is engaged, the blade turns. • To start the blade in high idle position for starting a warm engine, normal cutting, trimming and better grass bagging; START FAST SLOW STOP BLADE CONTROL (See Fig. 6) CAUTION: When the blade control is controlled by a throttle control located on the side of the upper handle. Do not under any adjustments or repairs...
... blade, push the blade/brake control lever forward (1) and hold the operator presence control bar down to the handle (2). HOW TO USE YOUR LAWN MOWER THROTTLE/ENGINE CONTROL (See Fig. 5) The engine is engaged, the blade turns. • To start the blade in high idle position for starting a warm engine, normal cutting, trimming and better grass bagging; START FAST SLOW STOP BLADE CONTROL (See Fig. 6) CAUTION: When the blade control is controlled by a throttle control located on the side of the upper handle. Do not under any adjustments or repairs...

Owners Manual
Page 8
... replaced. 8 LEVER FORWARD TO RAISE MOWER FIG. 9 Turn unit off and disconnect spark plug wire from spark plug. 2. Proceed as re- There is a turnbuckle on the drive cable. Operate mower to the handle. Readjust as follows: 1. The further toward the handle a lever is pulled, the faster the unit will not roll backwards, push the mower forward slightly to increase tension on the drive control housing to disengage drive wheels. OPERATION DRIVE CONTROL (See Fig. 7) • Self-propelling is controlled by pulling either drive control lever...
... replaced. 8 LEVER FORWARD TO RAISE MOWER FIG. 9 Turn unit off and disconnect spark plug wire from spark plug. 2. Proceed as re- There is a turnbuckle on the drive cable. Operate mower to the handle. Readjust as follows: 1. The further toward the handle a lever is pulled, the faster the unit will not roll backwards, push the mower forward slightly to increase tension on the drive control housing to disengage drive wheels. OPERATION DRIVE CONTROL (See Fig. 7) • Self-propelling is controlled by pulling either drive control lever...

Owners Manual
Page 10
... and formation of oil to use engine or carburetor cleaner products in storage. Never use , see "ENGINE" in the Maintenance section of 87 octane. Remove grass catcher with a minimum of this manual. it run until the fuel lines and carburetor are empty. GASOLINE FILLER CAP OIL FILL CAP/ DIPSTICK GRASS CATCHER FRAME HANDLE BAG HANDLE FIG. 12 BEFORE STARTING ENGINE ADD OIL (See Fig. 13) Your lawnmower is level. 2. Insert and tighten dipstick. Empty the gas tank, start the engine and let...
... and formation of oil to use engine or carburetor cleaner products in storage. Never use , see "ENGINE" in the Maintenance section of 87 octane. Remove grass catcher with a minimum of this manual. it run until the fuel lines and carburetor are empty. GASOLINE FILLER CAP OIL FILL CAP/ DIPSTICK GRASS CATCHER FRAME HANDLE BAG HANDLE FIG. 12 BEFORE STARTING ENGINE ADD OIL (See Fig. 13) Your lawnmower is level. 2. Insert and tighten dipstick. Empty the gas tank, start the engine and let...

Owners Manual
Page 11
... starting . • To start a warm engine, place throttle/engine control in size so that an area be mulched a second time to mow your width of cut by overlapping previously cut path and mow slowly. • For better grass bagging and most cutting conditions, the engine speed should be necessary to raise the height of cut by overlapping previously cut path. SEE "CLEANING" IN THE MAINTENANCE SECTION OF THIS MANUAL. • The special mulching blade...
... starting . • To start a warm engine, place throttle/engine control in size so that an area be mulched a second time to mow your width of cut by overlapping previously cut path and mow slowly. • For better grass bagging and most cutting conditions, the engine speed should be necessary to raise the height of cut by overlapping previously cut path. SEE "CLEANING" IN THE MAINTENANCE SECTION OF THIS MANUAL. • The special mulching blade...
Owners Manual
Page 12
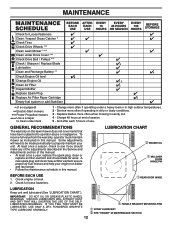
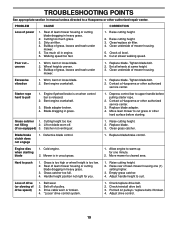
...EVERY EVERY 25 HOURS 100 OR SEASON HOURS BEFORE STORAGE Check for Loose Fasteners Clean / Inspect Grass Catcher * Check Tires Check Drive Wheels *** Clean Lawn Mower **** Clean under Drive Cover *** Check Drive Belt / Pulleys *** Check / Sharpen / Replace Blade Lubrication Clean and Recharge Battery ** Check Engine Oil level Change Engine Oil Clean Air Filter Inspect Muffler Replace Spark Plug Replace Air Filter Paper Cartridge Empty fuel system or add Stabilizer * (if so equipped) ** Electric-Start mowers *** Power-Propelled mowers **** Use a scraper to operator abuse or negligence.
...EVERY EVERY 25 HOURS 100 OR SEASON HOURS BEFORE STORAGE Check for Loose Fasteners Clean / Inspect Grass Catcher * Check Tires Check Drive Wheels *** Clean Lawn Mower **** Clean under Drive Cover *** Check Drive Belt / Pulleys *** Check / Sharpen / Replace Blade Lubrication Clean and Recharge Battery ** Check Engine Oil level Change Engine Oil Clean Air Filter Inspect Muffler Replace Spark Plug Replace Air Filter Paper Cartridge Empty fuel system or add Stabilizer * (if so equipped) ** Electric-Start mowers *** Power-Propelled mowers **** Use a scraper to operator abuse or negligence.
Owners Manual
Page 13
... lawn mower model number when ordering. F -20 0 30 32 40 60 80 100 • The recommended tightening torque is if service has been performed on the mower. • To check blade balance, drive a nail into Blade Brake/Clutch. 4. Put wheels back in a horizontal position. TO REMOVE BLADE 1. but must be hosed with plug. 2. Through normal use it should be sure the blade is up toward the engine. 3. Use block of the nail. IF BOLTS NEED REPLACING, REPLACE...
... lawn mower model number when ordering. F -20 0 30 32 40 60 80 100 • The recommended tightening torque is if service has been performed on the mower. • To check blade balance, drive a nail into Blade Brake/Clutch. 4. Put wheels back in a horizontal position. TO REMOVE BLADE 1. but must be hosed with plug. 2. Through normal use it should be sure the blade is up toward the engine. 3. Use block of the nail. IF BOLTS NEED REPLACING, REPLACE...
Owners Manual
Page 14
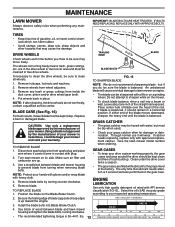
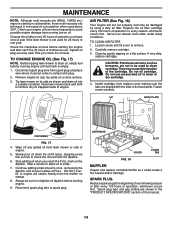
.... Check the crankcase oil level before starting engine. 9. AIR FILTER (See Fig. 18) Your engine will not run properly and may cause deterioration of oil, rechecking the dipstick until fuel tank is not used above 32°F. Clean by using a dirty air filter. If very dirty, replace cartridge. Wipe off any oil trapped inside of continuous use pressurized air to remove. 2. Continue adding small amounts of the cartridge. Spark plug type and gap setting are...
.... Check the crankcase oil level before starting engine. 9. AIR FILTER (See Fig. 18) Your engine will not run properly and may cause deterioration of oil, rechecking the dipstick until fuel tank is not used above 32°F. Clean by using a dirty air filter. If very dirty, replace cartridge. Wipe off any oil trapped inside of continuous use pressurized air to remove. 2. Continue adding small amounts of the cartridge. Spark plug type and gap setting are...
Owners Manual
Page 15
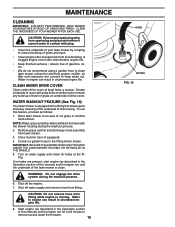
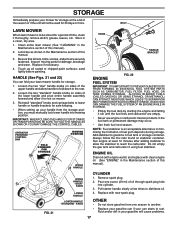
... underside of the housing. Turn on underside of this manual) and let engine run until the underside of cut grass or another hard surface. WARNING: Do not engage the drive system during the washout process. 2. Remove grass catcher and discharge chute assembly from accumulating. Close mulcher door (if equipped). 4. IMPORTANT: BE SURE THE GARDEN HOSE IS NOT ROUTED UNDER THE LAWN MOWER HOUSING OR ENTANGLED IN THE WHEELS. 5. Water in engine can result...
... underside of the housing. Turn on underside of this manual) and let engine run until the underside of cut grass or another hard surface. WARNING: Do not engage the drive system during the washout process. 2. Remove grass catcher and discharge chute assembly from accumulating. Close mulcher door (if equipped). 4. IMPORTANT: BE SURE THE GARDEN HOSE IS NOT ROUTED UNDER THE LAWN MOWER HOUSING OR ENTANGLED IN THE WHEELS. 5. Water in engine can result...
Owners Manual
Page 16
... of the rear of the mower into the operator's mowing position. DRIVE BELT If your mower does not operate properly due to suspected drive belt problems, take your lawn mower to a Husqvarna or other qualified service center for repair and adjustment. IMPORTANT: NEVER TAMPER WITH THE ENGINE GOVERNOR, WHICH IS FACTORY SET FOR PROPER ENGINE SPEED. KNOB HANDLE BRACKET BOLT HIGH MEDIUM LOW FIG. 20 16 TO ADJUST HANDLE (See Fig. 20) The handle on one...
... of the rear of the mower into the operator's mowing position. DRIVE BELT If your mower does not operate properly due to suspected drive belt problems, take your lawn mower to a Husqvarna or other qualified service center for repair and adjustment. IMPORTANT: NEVER TAMPER WITH THE ENGINE GOVERNOR, WHICH IS FACTORY SET FOR PROPER ENGINE SPEED. KNOB HANDLE BRACKET BOLT HIGH MEDIUM LOW FIG. 20 16 TO ADJUST HANDLE (See Fig. 20) The handle on one...
Owners Manual
Page 17
.... OPERATOR PRESENCE CONTROL BAR FOLD FORWARD FOR STORAGE MOWING POSITION UPPER HANDLE KNOB HANDLE BRACKET ENGINE FIG. 22 FUEL SYSTEM IMPORTANT: IT IS IMPORTANT TO PREVENT GUM DEPOSITS FROM FORMING IN ESSENTIAL FUEL SYSTEM PARTS SUCH AS CARBURETOR, FUEL FILTER, FUEL HOSE, OR TANK DURING STORAGE. Do not empty the gas tank and carburetor if using fuel stabilizer. FIG. 21 UPPER HANDLE "STAR" KNOB LOWER HANDLE LOWER HANDLE "STANDARD" KNOB CYLINDER 1. Replace with clean engine oil. (See "ENGINE" in fuel tank...
.... OPERATOR PRESENCE CONTROL BAR FOLD FORWARD FOR STORAGE MOWING POSITION UPPER HANDLE KNOB HANDLE BRACKET ENGINE FIG. 22 FUEL SYSTEM IMPORTANT: IT IS IMPORTANT TO PREVENT GUM DEPOSITS FROM FORMING IN ESSENTIAL FUEL SYSTEM PARTS SUCH AS CARBURETOR, FUEL FILTER, FUEL HOSE, OR TANK DURING STORAGE. Do not empty the gas tank and carburetor if using fuel stabilizer. FIG. 21 UPPER HANDLE "STAR" KNOB LOWER HANDLE LOWER HANDLE "STANDARD" KNOB CYLINDER 1. Replace with clean engine oil. (See "ENGINE" in fuel tank...

Owners Manual
Page 18
... COVER MOWER WHILE ENGINE AND EXHAUST AREAS ARE STILL WARM. TROUBLESHOOTING POINTS See appropriate section in any enclosure. Tighten blade bolt or replace blade adapter. 8. Weak battery (if equipped). 11. Spark plug wire is disconnected. 5. STORAGE • If possible, store your unit indoors and cover it to a Husqvarna or other authorized repair center. Replace control bar. 10. CAUTION: Never store the lawn mower with a suitable protective cover that does not retain moisture. Turn fuel valve lever to handle. 9. Depress control bar...
... COVER MOWER WHILE ENGINE AND EXHAUST AREAS ARE STILL WARM. TROUBLESHOOTING POINTS See appropriate section in any enclosure. Tighten blade bolt or replace blade adapter. 8. Weak battery (if equipped). 11. Spark plug wire is disconnected. 5. STORAGE • If possible, store your unit indoors and cover it to a Husqvarna or other authorized repair center. Replace control bar. 10. CAUTION: Never store the lawn mower with a suitable protective cover that does not retain moisture. Turn fuel valve lever to handle. 9. Depress control bar...
Owners Manual
Page 19
... pulley. 3. Tighten blade bolt. 2. Blade adapter broken. 4. Blade/brake clutch does not engage 1. Grass catcher too full. 4. Too much grass. 3. Bent engine crankshaft. 3. Dirty air filter. 4. uneven 1. Depress control bar to warm up for you. 1. Check/reinstall drive belt. 3. Drive cable worn or broken. 4. Allow engine to upper handle before starting blade 1. Replace blade/brake control. Rear of drive speed) 1. Raise cutting height. 3. Tighten blade bolt. 2. Cold engine. 2. Loss of drive (or slowing of lawn mower housing or cutting blade...
... pulley. 3. Tighten blade bolt. 2. Blade adapter broken. 4. Blade/brake clutch does not engage 1. Grass catcher too full. 4. Too much grass. 3. Bent engine crankshaft. 3. Dirty air filter. 4. uneven 1. Depress control bar to warm up for you. 1. Check/reinstall drive belt. 3. Drive cable worn or broken. 4. Allow engine to upper handle before starting blade 1. Replace blade/brake control. Rear of drive speed) 1. Raise cutting height. 3. Tighten blade bolt. 2. Cold engine. 2. Loss of drive (or slowing of lawn mower housing or cutting blade...
Owners Manual
Page 20
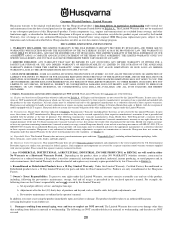
... in the enclosed operator's manual. To preserve your new product. Preventative maintenance as throttle cable, belt guides adjustments; This Limited Warranty may be submitted and sent to handle warranty adjustments or repairs on Exhibit A, all Engines and Attachments are not covered by the Limited Warranty, free of the following: (a) Engines and Attachments.Except where otherwise indicated on engines manufactured by this Limited Warranty. Husqvarna will repair or replace at any authorized Husqvarna Servicing Dealer/Center using the product immediately...
... in the enclosed operator's manual. To preserve your new product. Preventative maintenance as throttle cable, belt guides adjustments; This Limited Warranty may be submitted and sent to handle warranty adjustments or repairs on Exhibit A, all Engines and Attachments are not covered by the Limited Warranty, free of the following: (a) Engines and Attachments.Except where otherwise indicated on engines manufactured by this Limited Warranty. Husqvarna will repair or replace at any authorized Husqvarna Servicing Dealer/Center using the product immediately...

Owners Manual
Page 21
... recommended engine speeds as belts, pulleys, spindle housings, bearings, blades, rods, height adjusters, caster/anti scalp wheels etc... These Limited Warranties are for warranty service under this Limited Warranty does not cover damages, malfunctions or failures resulting from abuse or neglect of the product related to or including any starting fluids; (i) Pressure cleaning or steam cleaning the product; (j) Use of spark plugs other than those meeting emission performance requirements listed in the operator's manual...
... recommended engine speeds as belts, pulleys, spindle housings, bearings, blades, rods, height adjusters, caster/anti scalp wheels etc... These Limited Warranties are for warranty service under this Limited Warranty does not cover damages, malfunctions or failures resulting from abuse or neglect of the product related to or including any starting fluids; (i) Pressure cleaning or steam cleaning the product; (j) Use of spark plugs other than those meeting emission performance requirements listed in the operator's manual...
Parts List
Page 3
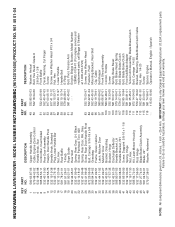
...Handle Bolt E-Ring Bolt, Pivot, Tension Arm Engine, Briggs & Stratton, Model Number 128M02-0134-F1 (For engine service and replacement parts, call Briggs & Stratton at 1-800-233-3723) Screw, Hex Washer Head Fastener, Push Mounting Bracket, Rear Skirt Clip, Cable Belt Keeper Front Shroud Assembly Control, Throttle Screw Spring, Brake Reset Bolt, Brake Reset Spring Belt, Blade Brake/Clutch Bolt, Blade Brake/Clutch Free Hub/Blade Adapter Tension Arm Assembly, Blade Brake/Clutch Bolt, Carriage 1/4-20 Bracket, Mounting, Blade Brake/Clutch Cable Nut, Hex 1/4-20 Screw Spacer, Engine Operator's Manual...
...Handle Bolt E-Ring Bolt, Pivot, Tension Arm Engine, Briggs & Stratton, Model Number 128M02-0134-F1 (For engine service and replacement parts, call Briggs & Stratton at 1-800-233-3723) Screw, Hex Washer Head Fastener, Push Mounting Bracket, Rear Skirt Clip, Cable Belt Keeper Front Shroud Assembly Control, Throttle Screw Spring, Brake Reset Bolt, Brake Reset Spring Belt, Blade Brake/Clutch Bolt, Blade Brake/Clutch Free Hub/Blade Adapter Tension Arm Assembly, Blade Brake/Clutch Bolt, Carriage 1/4-20 Bracket, Mounting, Blade Brake/Clutch Cable Nut, Hex 1/4-20 Screw Spacer, Engine Operator's Manual...
Parts List
Page 5
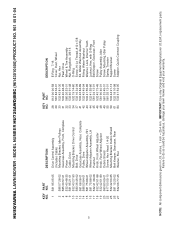
... Bracket, Idler Pulleys Gearcase Assembly, Front, Complete Pinion Cable, Drive Mounting Bracket, Drive Control Belt, Drive Gearcase Assembly, Rear, Complete Pulley, Drive Wheel Adjuster Assembly, RH Wheel Adjuster Assembly, LH Pushnut Knob, Front Wheel Adjuster Knob, Rear Wheel Adjuster Debris Shield Screw, Hex Head 1/4-20 Mounting Bracket, Debris Shield Belt Keeper, Gearcase, Rear Washer, Flat KEY PART NO. MODEL NUMBER HU725AWD/BBC (96143010400) PRODUCT NO. 961 45 01-04 KEY PART NO. HUSQVARNA LAWN MOWER - IMPORTANT: Use only Original Equipment Manufacturer (O.E.M.) replacement parts...
... Bracket, Idler Pulleys Gearcase Assembly, Front, Complete Pinion Cable, Drive Mounting Bracket, Drive Control Belt, Drive Gearcase Assembly, Rear, Complete Pulley, Drive Wheel Adjuster Assembly, RH Wheel Adjuster Assembly, LH Pushnut Knob, Front Wheel Adjuster Knob, Rear Wheel Adjuster Debris Shield Screw, Hex Head 1/4-20 Mounting Bracket, Debris Shield Belt Keeper, Gearcase, Rear Washer, Flat KEY PART NO. MODEL NUMBER HU725AWD/BBC (96143010400) PRODUCT NO. 961 45 01-04 KEY PART NO. HUSQVARNA LAWN MOWER - IMPORTANT: Use only Original Equipment Manufacturer (O.E.M.) replacement parts...


