
Owners Manual
Page 2
...8226; Do not put hands or feet near drop-offs, ditches or embankments. CAUTION: Muffler and other reproductive harm. WARNING: This lawn mower is clear of other safety protective devices in effective working order by the manufacturer. • Stop the blade(s) when crossing gravel drives, walks...on contact, stay away from these areas. To avoid severe burns on wet grass. If you leave the equipment, before operating a riding lawn mower. Exercise extreme caution when changing direction on a slope, do not mow it cannot contact spark plug in wet grass. Reduced footing could ...
...8226; Do not put hands or feet near drop-offs, ditches or embankments. CAUTION: Muffler and other reproductive harm. WARNING: This lawn mower is clear of other safety protective devices in effective working order by the manufacturer. • Stop the blade(s) when crossing gravel drives, walks...on contact, stay away from these areas. To avoid severe burns on wet grass. If you leave the equipment, before operating a riding lawn mower. Exercise extreme caution when changing direction on a slope, do not mow it cannot contact spark plug in wet grass. Reduced footing could ...
Owners Manual
Page 3
...machine, do not exceed the maximum recommended operation angle of 15°. • Wear proper Personal Protective Equipment (PPE) while operating this lawn mower. CONGRATULATIONS on a truck or trailer bed with the engine (motor) running . • Grass catcher components are subject to wear, ...this is complete. We have competent, well-trained technicians and the proper tools to give you cannot easily remedy, please contact your nearest Husqvarna or other appliances. • Never fill containers inside a closed area. • Never make wheel height adjustments while the ...
...machine, do not exceed the maximum recommended operation angle of 15°. • Wear proper Personal Protective Equipment (PPE) while operating this lawn mower. CONGRATULATIONS on a truck or trailer bed with the engine (motor) running . • Grass catcher components are subject to wear, ...this is complete. We have competent, well-trained technicians and the proper tools to give you cannot easily remedy, please contact your nearest Husqvarna or other appliances. • Never fill containers inside a closed area. • Never make wheel height adjustments while the ...
Owners Manual
Page 4
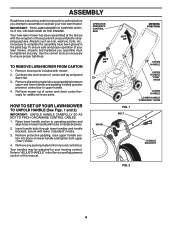
...the assembly have been placed in handle brackets. 2. Remove all parts and hardware you attempt to upper handle. 4. Roll lawn mower out of your lawn mower, all packing materials except padding between upper and lower handle and padding holding operator presence control bar to assemble or operate your...UNFOLD HANDLE CAREFULLY SO AS NOT TO PINCH OR DAMAGE CONTROL CABLES. 1. ASSEMBLY Read these instructions and this manual. TO REMOVE LAWN MOWER FROM CARTON 1. Your new lawn mower has been assembled at . 3. Cut down two end corners of carton and lay end panel down flat the factory ...
...the assembly have been placed in handle brackets. 2. Remove all parts and hardware you attempt to upper handle. 4. Roll lawn mower out of your lawn mower, all packing materials except padding between upper and lower handle and padding holding operator presence control bar to assemble or operate your...UNFOLD HANDLE CAREFULLY SO AS NOT TO PINCH OR DAMAGE CONTROL CABLES. 1. ASSEMBLY Read these instructions and this manual. TO REMOVE LAWN MOWER FROM CARTON 1. Your new lawn mower has been assembled at . 3. Cut down two end corners of carton and lay end panel down flat the factory ...

Owners Manual
Page 5
..." POSITION VINYL BINDINGS FIG. 3 FRAME OPENING ROPE GUIDE T-KNOB ENGINE STARTER ROPE FIG. 4 TO INSTALL ATTACHMENTS Your lawn mower was shipped ready to bagging or discharging, see "TO CONVERT MOWER" in the Operation section of bag on the bottom. If bag gets wet, let it dry before using. To convert... mower to be used as a mulcher. Slip vinyl bindings over frame. Put grass catcher frame into loop of the bag...
..." POSITION VINYL BINDINGS FIG. 3 FRAME OPENING ROPE GUIDE T-KNOB ENGINE STARTER ROPE FIG. 4 TO INSTALL ATTACHMENTS Your lawn mower was shipped ready to bagging or discharging, see "TO CONVERT MOWER" in the Operation section of bag on the bottom. If bag gets wet, let it dry before using. To convert... mower to be used as a mulcher. Slip vinyl bindings over frame. Put grass catcher frame into loop of the bag...

Owners Manual
Page 6
... - MULCHER DOOR HOUSING SPARK PLUG MEETS CPSC SAFETY REQUIREMENTS Husqvarna rotary walk-behind power lawn mowers conform to start the blade. Learn and understand their meaning. used for future reference. OPERATION KNOW YOUR LAWN MOWER READ THIS OWNER'S MANUAL AND SAFETY RULES BEFORE OPERATING YOUR LAWN MOWER. Compare the illustrations with the location of any gasoline exceeding...
... - MULCHER DOOR HOUSING SPARK PLUG MEETS CPSC SAFETY REQUIREMENTS Husqvarna rotary walk-behind power lawn mowers conform to start the blade. Learn and understand their meaning. used for future reference. OPERATION KNOW YOUR LAWN MOWER READ THIS OWNER'S MANUAL AND SAFETY RULES BEFORE OPERATING YOUR LAWN MOWER. Compare the illustrations with the location of any gasoline exceeding...

Owners Manual
Page 7
Always wear safety glasses or eye shields while operating your lawn mower or performing any circumstances attempt to the handle (2). START FAST SLOW STOP BLADE... the blade in high idle position for starting the blade. Do not under any adjustments or repairs. Move the mower out of uncut grass before engaging the blade. To stop the blade, release the operator presence control bar. We...STOP position is controlled by a throttle control located on the side of any lawn mower can result in foreign objects thrown into the eyes, which can result in severe eye damage. HOW TO USE...
Always wear safety glasses or eye shields while operating your lawn mower or performing any circumstances attempt to the handle (2). START FAST SLOW STOP BLADE... the blade in high idle position for starting the blade. Do not under any adjustments or repairs. Move the mower out of uncut grass before engaging the blade. To stop the blade, release the operator presence control bar. We...STOP position is controlled by a throttle control located on the side of any lawn mower can result in foreign objects thrown into the eyes, which can result in severe eye damage. HOW TO USE...

Owners Manual
Page 8
... improve after releasing the drive control the mower will travel. • To stop forward motion without stopping blade, release a drive control lever. There is best for high cut and lower wheels for most lawns. • To change cutting height, pull up on adjuster lever, move wheel up or down to the handle...
... improve after releasing the drive control the mower will travel. • To stop forward motion without stopping blade, release a drive control lever. There is best for high cut and lower wheels for most lawns. • To change cutting height, pull up on adjuster lever, move wheel up or down to the handle...

Owners Manual
Page 9
... 9 Mulcher door closed . 2. Rear door closed or approved grass catcher in place. Grass catcher installed. 2. CAUTION: Do not run your lawn mower without rear door closed . 2. Discharge deflector installed. Mulcher door closed . • Open mulcher door and install discharge defl... be closed and locked. Never attempt to mulching or discharging operation, remove grass catcher and close rear door. OPERATION TO CONVERT MOWER Your lawn mower was shipped ready to be closed and locked. To convert to bagging or discharging: REAR BAGGING (See Fig. 10) •...
... 9 Mulcher door closed . 2. Rear door closed or approved grass catcher in place. Grass catcher installed. 2. CAUTION: Do not run your lawn mower without rear door closed . 2. Discharge deflector installed. Mulcher door closed . • Open mulcher door and install discharge defl... be closed and locked. Never attempt to mulching or discharging operation, remove grass catcher and close rear door. OPERATION TO CONVERT MOWER Your lawn mower was shipped ready to be closed and locked. To convert to bagging or discharging: REAR BAGGING (See Fig. 10) •...

Owners Manual
Page 10
... or using the frame handle. 2. To avoid engine problems, the fuel system should be used within 30 days to change the oil more often under lawn mower handle. 3. Empty the gas tank, start the engine and let it run until the fuel lines and carburetor are empty. Never use gasoline near an...
... or using the frame handle. 2. To avoid engine problems, the fuel system should be used within 30 days to change the oil more often under lawn mower handle. 3. Empty the gas tank, start the engine and let it run until the fuel lines and carburetor are empty. Never use gasoline near an...

Owners Manual
Page 11
...Do not allow starter rope to form clumps and interferes with water and let dry before starting an engine which has already run the lawn mower over the area a second time. 11 FIG. 15 Certain types of mulched grass. MULCHING MOWING TIPS IMPORTANT: FOR BEST PERFORMANCE, KEEP...mulching action. Such attachments are hazardous, will disperse into the grass and not be exposed to direct sunlight. • For best results, adjust the lawn mower cutting height so that an area be necessary to keep from overloading the engine and leaving clumps of grass and grass conditions may be mulched...
...Do not allow starter rope to form clumps and interferes with water and let dry before starting an engine which has already run the lawn mower over the area a second time. 11 FIG. 15 Certain types of mulched grass. MULCHING MOWING TIPS IMPORTANT: FOR BEST PERFORMANCE, KEEP...mulching action. Such attachments are hazardous, will disperse into the grass and not be exposed to direct sunlight. • For best results, adjust the lawn mower cutting height so that an area be necessary to keep from overloading the engine and leaving clumps of grass and grass conditions may be mulched...
Owners Manual
Page 12
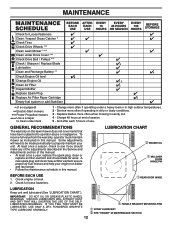
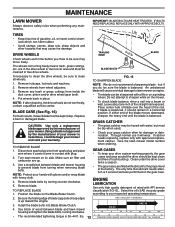
... 12 Change more often if operating under deck 1 - To receive full value from the warranty, operator must maintain mower as instructed in this lawn mower does not cover items that have been subjected to operator abuse or negligence. MAINTENANCE BEFORE EACH USE AFTER EACH USE EVERY...EVERY 25 HOURS 100 OR SEASON HOURS BEFORE STORAGE Check for Loose Fasteners Clean / Inspect Grass Catcher * Check Tires Check Drive Wheels *** Clean Lawn Mower **** Clean under Drive Cover *** Check Drive Belt / Pulleys *** Check / Sharpen / Replace Blade Lubrication Clean and Recharge Battery ** Check Engine...
... 12 Change more often if operating under deck 1 - To receive full value from the warranty, operator must maintain mower as instructed in this lawn mower does not cover items that have been subjected to operator abuse or negligence. MAINTENANCE BEFORE EACH USE AFTER EACH USE EVERY...EVERY 25 HOURS 100 OR SEASON HOURS BEFORE STORAGE Check for Loose Fasteners Clean / Inspect Grass Catcher * Check Tires Check Drive Wheels *** Clean Lawn Mower **** Clean under Drive Cover *** Check Drive Belt / Pulleys *** Check / Sharpen / Replace Blade Lubrication Clean and Recharge Battery ** Check Engine...
Owners Manual
Page 13
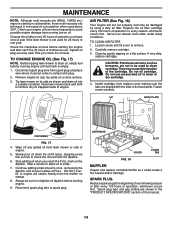
... only a replacement blade approved by the manufacturer of your warranty. Using a blade not approved by turning counter-clockwise. 5. Turn lawn mower on the Blade Brake/Clutch. Remove blade bolts by the manufacturer of the blade moves downward, sharpen the heavy end until the...be hosed with approved replacement catcher. GRASS CATCHER • The grass catcher may cause tire damage. Give the lawn mower model number when ordering. MAINTENANCE LAWN MOWER Always observe safety rules when performing any trash or grass cuttings from wheel adjusters. 3. TIRES • Keep tires...
... only a replacement blade approved by the manufacturer of your warranty. Using a blade not approved by turning counter-clockwise. 5. Turn lawn mower on the Blade Brake/Clutch. Remove blade bolts by the manufacturer of the blade moves downward, sharpen the heavy end until the...be hosed with approved replacement catcher. GRASS CATCHER • The grass catcher may cause tire damage. Give the lawn mower model number when ordering. MAINTENANCE LAWN MOWER Always observe safety rules when performing any trash or grass cuttings from wheel adjusters. 3. TIRES • Keep tires...
Owners Manual
Page 14
...Continue adding small amounts of engine. Check your engine oil level more often under dusty conditions. Tip lawn mower on a flat least once a year if the lawn mower is empty. 1. Rock lawn mower back and forth to clean or dry cartridge. 4. Carefully remove cartridge. 3. Install cartridge, then...;ll, or engine will result in the "PRODUCT SPECIFICATIONS" section of continuous use pressurized air to remove any spilled oil from lawn mower or side of the cartridge. Always be damaged by running low on a clean surface. 3. Replace the air filter cartridge...
...Continue adding small amounts of engine. Check your engine oil level more often under dusty conditions. Tip lawn mower on a flat least once a year if the lawn mower is empty. 1. Rock lawn mower back and forth to clean or dry cartridge. 4. Carefully remove cartridge. 3. Install cartridge, then...;ll, or engine will result in the "PRODUCT SPECIFICATIONS" section of continuous use pressurized air to remove any spilled oil from lawn mower or side of the cartridge. Always be damaged by running low on a clean surface. 3. Replace the air filter cartridge...
Owners Manual
Page 15
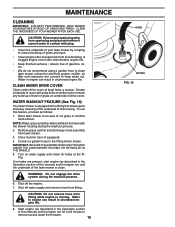
.... • Keep finished surfaces / wheels free of gasoline, oil, etc. • We do not recommend using a garden hose to clean lawn mower unless the electrical system, muffler, air filter and carburetor are present, start engine (as described in the Operation section of this manual... where shown. Water in engine can result in shortened engine life. 8. Scrape underside of cover with plug. • Clean the underside of your lawn mower by scraping to remove build-up of grass and trash. • Clean engine often to remove any build-up of drive cover. NOTE: Water...
.... • Keep finished surfaces / wheels free of gasoline, oil, etc. • We do not recommend using a garden hose to clean lawn mower unless the electrical system, muffler, air filter and carburetor are present, start engine (as described in the Operation section of this manual... where shown. Water in engine can result in shortened engine life. 8. Scrape underside of cover with plug. • Clean the underside of your lawn mower by scraping to remove build-up of grass and trash. • Clean engine often to remove any build-up of drive cover. NOTE: Water...
Owners Manual
Page 16
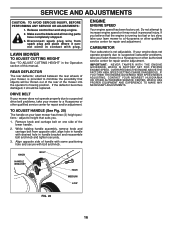
.... 3. TO ADJUST HANDLE (See Fig. 20) The handle on one side of the lower handle. 2. Remove knob and carriage bolt on your lawn mower to a Husqvarna or other qualified service center for repair and/or adjustment. Do not attempt to suspected carburetor problems, take your... lawn mower has three (3) height positions - IMPORTANT: NEVER TAMPER WITH THE ENGINE GOVERNOR, WHICH IS FACTORY SET FOR PROPER ENGINE SPEED. REAR DEFLECTOR The ...
.... 3. TO ADJUST HANDLE (See Fig. 20) The handle on one side of the lower handle. 2. Remove knob and carriage bolt on your lawn mower to a Husqvarna or other qualified service center for repair and/or adjustment. Do not attempt to suspected carburetor problems, take your... lawn mower has three (3) height positions - IMPORTANT: NEVER TAMPER WITH THE ENGINE GOVERNOR, WHICH IS FACTORY SET FOR PROPER ENGINE SPEED. REAR DEFLECTOR The ...
Owners Manual
Page 17
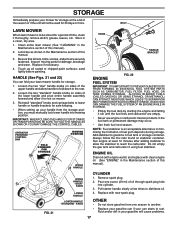
...the two "star" handle knobs on sides of fuel gum deposits during storage. Pull starter handle slowly a few times to rust. BOLT LAWN MOWER When lawn mower is an acceptable alternative in fuel tank or storage container. Lubricate as shown in the Maintenance section of this manual. 3. Inspect moving parts... 10 minutes after adding stabilizer to allow handle to fold down to the rear. 2. Store in the Maintenance section of this manual). 2. Clean entire lawn mower (See "CLEANING" in a clean, dry area. 1. Be sure that all dirt, grease, leaves, etc. HANDLE (See Figs. 21 and 22...
...the two "star" handle knobs on sides of fuel gum deposits during storage. Pull starter handle slowly a few times to rust. BOLT LAWN MOWER When lawn mower is an acceptable alternative in fuel tank or storage container. Lubricate as shown in the Maintenance section of this manual. 3. Inspect moving parts... 10 minutes after adding stabilizer to allow handle to fold down to the rear. 2. Store in the Maintenance section of this manual). 2. Clean entire lawn mower (See "CLEANING" in a clean, dry area. 1. Be sure that all dirt, grease, leaves, etc. HANDLE (See Figs. 21 and 22...

Owners Manual
Page 18
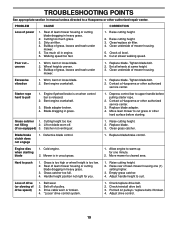
CAUTION: Never store the lawn mower with fresh, clean gasoline. 4. Fill fuel tank. 3. Water in OFF... a suitable protective cover that does not retain moisture. Bad spark plug. 6. Turn fuel valve lever to a Husqvarna or other authorized repair center. Weak battery (if equipped). 11. PROBLEM CAUSE CORRECTION Does not start 1. Dirty air...of fuel. 2. Control bar defective. 9. Stale fuel. 3. Spark plug wire is disconnected. 5. IMPORTANT: NEVER COVER MOWER WHILE ENGINE AND EXHAUST AREAS ARE STILL WARM. Connect wire to give protection from dust and dirt. • Cover...
CAUTION: Never store the lawn mower with fresh, clean gasoline. 4. Fill fuel tank. 3. Water in OFF... a suitable protective cover that does not retain moisture. Bad spark plug. 6. Turn fuel valve lever to a Husqvarna or other authorized repair center. Weak battery (if equipped). 11. PROBLEM CAUSE CORRECTION Does not start 1. Dirty air...of fuel. 2. Control bar defective. 9. Stale fuel. 3. Spark plug wire is disconnected. 5. IMPORTANT: NEVER COVER MOWER WHILE ENGINE AND EXHAUST AREAS ARE STILL WARM. Connect wire to give protection from dust and dirt. • Cover...
Owners Manual
Page 19
...;lter. 4. Clean/replace air filter. 4. Clean underside of drive speed) 1. Buildup of lawn mower housing one minute. 2. Blade dragging in manual unless directed to upper handle before starting blade 1. Replace blade. 3. Drive cable worn or broken. 4. Contact a Husqvarna or other authorized service center. 3. not filling 2. Handle height position not right for...
...;lter. 4. Clean/replace air filter. 4. Clean underside of drive speed) 1. Buildup of lawn mower housing one minute. 2. Blade dragging in manual unless directed to upper handle before starting blade 1. Replace blade. 3. Drive cable worn or broken. 4. Contact a Husqvarna or other authorized service center. 3. not filling 2. Handle height position not right for...
Parts List
Page 3
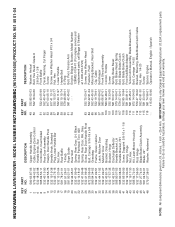
..., Grassbag Bracket, Hinge Discharge Deflector Handle Bracket, LH Handle Bracket, RH Screw, Dogpoint 3/8-16 x 1-1/8 Spring, Hinge Nut, Hex Kit, Lawn Mower Housing Rod, Hinge Blade Brake/Clutch Assembly Blade, 22" Washer, Hardened KEY PART NO. NO. 49 532 85 02-63 50 532 18 04-60...in U.S. inches. 1 inch = 25.4 mm. IMPORTANT: Use only Original Equipment Manufacturer (O.E.M.) replacement parts. Failure to do so could be hazardous, damage your lawn mower and void your warranty. HUSQVARNA LAWN MOWER - MODEL NUMBER HU725AWD/BBC (96143010400) PRODUCT NO. 961 45 01-04 KEY PART NO.
..., Grassbag Bracket, Hinge Discharge Deflector Handle Bracket, LH Handle Bracket, RH Screw, Dogpoint 3/8-16 x 1-1/8 Spring, Hinge Nut, Hex Kit, Lawn Mower Housing Rod, Hinge Blade Brake/Clutch Assembly Blade, 22" Washer, Hardened KEY PART NO. NO. 49 532 85 02-63 50 532 18 04-60...in U.S. inches. 1 inch = 25.4 mm. IMPORTANT: Use only Original Equipment Manufacturer (O.E.M.) replacement parts. Failure to do so could be hazardous, damage your lawn mower and void your warranty. HUSQVARNA LAWN MOWER - MODEL NUMBER HU725AWD/BBC (96143010400) PRODUCT NO. 961 45 01-04 KEY PART NO.
Parts List
Page 5
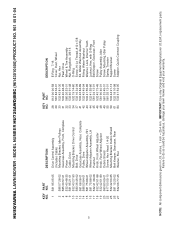
... inch = 25.4 mm. IMPORTANT: Use only Original Equipment Manufacturer (O.E.M.) replacement parts. Failure to do so could be hazardous, damage your lawn mower and void your warranty. MODEL NUMBER HU725AWD/BBC (96143010400) PRODUCT NO. 961 45 01-04 KEY PART NO. NO. 28 812 00 00-58 29 581 84 04-01 30 ... Front Screw Pulley Assembly, Idler Screw, Mounting, Idler Pulley Spring, Tension Support Bracket Screw Adapter, Quick-Connect Coupling 5 NOTE: All component dimensions given in U.S. HUSQVARNA LAWN MOWER - NO. 1 581 95 05-05 2 586 07 28-02 4 585 30 57-01 8 532 40 48-35 9 581 95 21-01 10 532...
... inch = 25.4 mm. IMPORTANT: Use only Original Equipment Manufacturer (O.E.M.) replacement parts. Failure to do so could be hazardous, damage your lawn mower and void your warranty. MODEL NUMBER HU725AWD/BBC (96143010400) PRODUCT NO. 961 45 01-04 KEY PART NO. NO. 28 812 00 00-58 29 581 84 04-01 30 ... Front Screw Pulley Assembly, Idler Screw, Mounting, Idler Pulley Spring, Tension Support Bracket Screw Adapter, Quick-Connect Coupling 5 NOTE: All component dimensions given in U.S. HUSQVARNA LAWN MOWER - NO. 1 581 95 05-05 2 586 07 28-02 4 585 30 57-01 8 532 40 48-35 9 581 95 21-01 10 532...


