

Owners Manual
Page 1
HU700L Operator's Manual 532 43 81-57 Rev. 2 06.07.11 BY Printed in U.S.A.
HU700L Operator's Manual 532 43 81-57 Rev. 2 06.07.11 BY Printed in U.S.A.

Owners Manual
Page 2
...!!! WARNING: Battery posts, terminals and related accessories contain lead and lead compounds, chemicals known to the State of ignition. • Use only an approved container. • Never remove gas cap or add fuel with the instructions, to cause cancer and birth defects or other engine parts become extremely hot during operation and remain hot after handling. • Stop the blade(s) when crossing gravel drives, walks, or...
...!!! WARNING: Battery posts, terminals and related accessories contain lead and lead compounds, chemicals known to the State of ignition. • Use only an approved container. • Never remove gas cap or add fuel with the instructions, to cause cancer and birth defects or other engine parts become extremely hot during operation and remain hot after handling. • Stop the blade(s) when crossing gravel drives, walks, or...
Owners Manual
Page 3
...; Never tamper with manufacturer's recommended parts, when necessary. • Mower blade is sharp and can cut. It has been designed, engineered and manufactured to assemble and maintain your vehicle before filling. • Remove gas-powered equipment from your lawn mower properly. Always observe the "SAFETY RULES". PRODUCT SPECIFICATIONS Gasoline Capacity and Type: Oil Type (API SG-SL): Oil Capacity: Spark Plug: Valve Clearance: (± 0.04 mm) Blade Bolt Torque: 1.0 Quarts (Unleaded Regular Only) SAE...
...; Never tamper with manufacturer's recommended parts, when necessary. • Mower blade is sharp and can cut. It has been designed, engineered and manufactured to assemble and maintain your vehicle before filling. • Remove gas-powered equipment from your lawn mower properly. Always observe the "SAFETY RULES". PRODUCT SPECIFICATIONS Gasoline Capacity and Type: Oil Type (API SG-SL): Oil Capacity: Spark Plug: Valve Clearance: (± 0.04 mm) Blade Bolt Torque: 1.0 Quarts (Unleaded Regular Only) SAE...
Owners Manual
Page 4
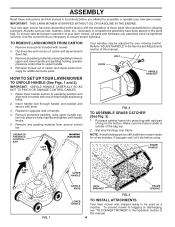
... in the Operation section of this manual. 4 TO REMOVE LAWN MOWER FROM CARTON 1. Remove loose parts included with knob. 3. HOW TO SET UP YOUR LAWN MOWER TO UNFOLD HANDLE (See Figs. 1 and 2) IMPORTANT: UNFOLD HANDLE CAREFULLY SO AS NOT TO PINCH OR DAMAGE CONTROL CABLES. 1. Make sure the frame handle is outside of the bag top. 2. Remove any packing material from around control bar. BOLT KNOB HANDLE BRACKET FIG. 2 TO ASSEMBLE GRASS CATCHER (See Fig. 3) 1. Cut down...
... in the Operation section of this manual. 4 TO REMOVE LAWN MOWER FROM CARTON 1. Remove loose parts included with knob. 3. HOW TO SET UP YOUR LAWN MOWER TO UNFOLD HANDLE (See Figs. 1 and 2) IMPORTANT: UNFOLD HANDLE CAREFULLY SO AS NOT TO PINCH OR DAMAGE CONTROL CABLES. 1. Make sure the frame handle is outside of the bag top. 2. Remove any packing material from around control bar. BOLT KNOB HANDLE BRACKET FIG. 2 TO ASSEMBLE GRASS CATCHER (See Fig. 3) 1. Cut down...
Owners Manual
Page 5
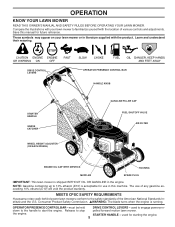
... the location of various controls and adjustments. DRIVE CONTROL LEVERS STARTER HANDLE GRASS CATCHER WHEEL HEIGHT ADJUSTER (ON EACH WHEEL) OPERATOR PRESENCE CONTROL BAR HANDLE KNOB GASOLINE FILLER CAP FUEL SHUTOFF VALVE AIR FILTER ENGINE OIL CAP WITH DIPSTICK HOUSING MUFFLER SPARK PLUG IMPORTANT: This lawn mower is running. The use in the engine. used for starting the engine. 5 the engine. Learn and understand their meaning. used to 10% ethanol (E10) is acceptable for future reference. OPERATOR PRESENCE CONTROL BAR - WARNING: The blade turns when the engine is...
... the location of various controls and adjustments. DRIVE CONTROL LEVERS STARTER HANDLE GRASS CATCHER WHEEL HEIGHT ADJUSTER (ON EACH WHEEL) OPERATOR PRESENCE CONTROL BAR HANDLE KNOB GASOLINE FILLER CAP FUEL SHUTOFF VALVE AIR FILTER ENGINE OIL CAP WITH DIPSTICK HOUSING MUFFLER SPARK PLUG IMPORTANT: This lawn mower is running. The use in the engine. used for starting the engine. 5 the engine. Learn and understand their meaning. used to 10% ethanol (E10) is acceptable for future reference. OPERATOR PRESENCE CONTROL BAR - WARNING: The blade turns when the engine is...
Owners Manual
Page 6
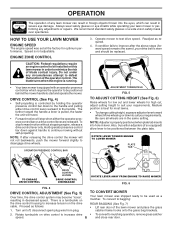
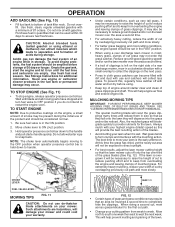
... TO USE YOUR LAWN MOWER ENGINE SPEED The engine speed was shipped ready to increase drive speed. 6 LEVER ROTATE LEVER AWAY FROM ENGINE TO RAISE MOWER FIG. 6 TO CONVERT MOWER Your lawn mower was set at the factory for high cut, adjust cutting height to improve after releasing the drive control the mower will stop forward motion without self-propelling. CAUTION: Federal regulations require an engine control to be installed on drive control to be positioned behind the mower handle to mulching operation, remove grass catcher and close rear door...
... TO USE YOUR LAWN MOWER ENGINE SPEED The engine speed was shipped ready to increase drive speed. 6 LEVER ROTATE LEVER AWAY FROM ENGINE TO RAISE MOWER FIG. 6 TO CONVERT MOWER Your lawn mower was set at the factory for high cut, adjust cutting height to improve after releasing the drive control the mower will stop forward motion without self-propelling. CAUTION: Federal regulations require an engine control to be installed on drive control to be positioned behind the mower handle to mulching operation, remove grass catcher and close rear door...
Owners Manual
Page 7
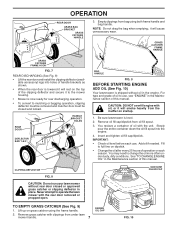
... under lawn mower handle. 7 ENGINE OIL CAP FIG. 10 For type and grade of handle brackets as shown. • When the rear door is shipped without rear door closed and locked. Add oil if needed. CLIPPING DEFLECTOR FIG. 8 CAUTION: Do not run your lawn mower without oil in place. Never attempt to the mower housing. • Mower is level. 2. Remove grass catcher with oil, or it will rest on startup. 1. REAR DOOR HANDLE BRACKET HOLES DEFLECTOR BAR "LEG" BAG HANDLE FIG. 9 BEFORE STARTING ENGINE ADD OIL...
... under lawn mower handle. 7 ENGINE OIL CAP FIG. 10 For type and grade of handle brackets as shown. • When the rear door is shipped without rear door closed and locked. Add oil if needed. CLIPPING DEFLECTOR FIG. 8 CAUTION: Do not run your lawn mower without oil in place. Never attempt to the mower housing. • Mower is level. 2. Remove grass catcher with oil, or it will rest on startup. 1. REAR DOOR HANDLE BRACKET HOLES DEFLECTOR BAR "LEG" BAG HANDLE FIG. 9 BEFORE STARTING ENGINE ADD OIL...
Owners Manual
Page 8
... dust with your highest engine (blade) speed as this time the grass has dried, yet the newly cut path and mow slowly. Empty the gas tank, start the engine and let it will collect less grass. TO STOP ENGINE (See Fig. 11) • To stop engine, release operator presence control bar. For extremely heavy mulching, reduce your warranty. • • 8 FIG. 12 Certain types of grass and grass conditions may be...
... dust with your highest engine (blade) speed as this time the grass has dried, yet the newly cut path and mow slowly. Empty the gas tank, start the engine and let it will collect less grass. TO STOP ENGINE (See Fig. 11) • To stop engine, release operator presence control bar. For extremely heavy mulching, reduce your warranty. • • 8 FIG. 12 Certain types of grass and grass conditions may be...
Owners Manual
Page 9
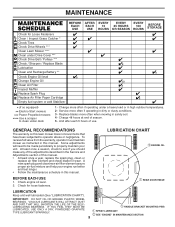
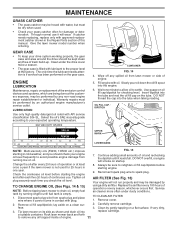
... Check for Loose Fasteners Clean / Inspect Grass Catcher * Check Tires Check Drive Wheels *** Clean Lawn Mower **** Clean under Drive Cover *** Check Drive Belt / Pulleys *** Check / Sharpen / Replace Blade Lubrication Clean and Recharge Battery ** Check Engine Oil level Change Engine Oil Clean Air Filter Inspect Muffler Replace Spark Plug Replace Air Filter Paper Cartridge Empty fuel system or add Stabilizer * (if so equipped) ** Electric-Start mowers *** Power-Propelled mowers **** Use a scraper to see if you should make any of the adjustments described in the Service and Adjustments...
... Check for Loose Fasteners Clean / Inspect Grass Catcher * Check Tires Check Drive Wheels *** Clean Lawn Mower **** Clean under Drive Cover *** Check Drive Belt / Pulleys *** Check / Sharpen / Replace Blade Lubrication Clean and Recharge Battery ** Check Engine Oil level Change Engine Oil Clean Air Filter Inspect Muffler Replace Spark Plug Replace Air Filter Paper Cartridge Empty fuel system or add Stabilizer * (if so equipped) ** Electric-Start mowers *** Power-Propelled mowers **** Use a scraper to see if you should make any of the adjustments described in the Service and Adjustments...
Owners Manual
Page 10
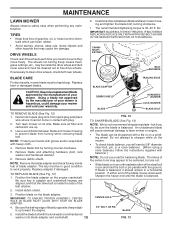
... that the drive belt is up . 3. Remove blade and attaching hardware (bolt, lock washer and hardened washer). 6. TIRES • Keep tires free of the belt retainer. The wheels not turning freely means trash, grass cuttings, etc., may appear to be cleaned out to clean drive wheels, check both rear wheels. 6. lbs. Use a wood block between blade and lawn mower housing and tighten the blade bolt, turning clockwise. • The recommended tightening torque is balanced. 2. NOTE: Remove the blade adapter and check the key inside hub...
... that the drive belt is up . 3. Remove blade and attaching hardware (bolt, lock washer and hardened washer). 6. TIRES • Keep tires free of the belt retainer. The wheels not turning freely means trash, grass cuttings, etc., may appear to be cleaned out to clean drive wheels, check both rear wheels. 6. lbs. Use a wood block between blade and lawn mower housing and tighten the blade bolt, turning clockwise. • The recommended tightening torque is balanced. 2. NOTE: Remove the blade adapter and check the key inside hub...
Owners Manual
Page 11
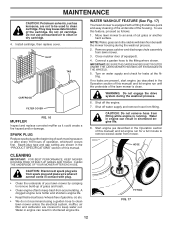
... gear case and area around the drive should check your grass catcher often for damage or deterioration. Remove cover. 2. Carefully remove cartridge. The only time the lubricant needs attention is empty. 1. Select the oil's SAE viscosity grade according to retighten oil fill cap/dipstick before starting engine. 9. Disconnect spark plug wire from lawn mower or side of engine. 5. TO CLEAN AIR FILTER 1. Through normal use . Insert dipstick into the tube and...
... gear case and area around the drive should check your grass catcher often for damage or deterioration. Remove cover. 2. Carefully remove cartridge. The only time the lubricant needs attention is empty. 1. Select the oil's SAE viscosity grade according to retighten oil fill cap/dipstick before starting engine. 9. Disconnect spark plug wire from lawn mower or side of engine. 5. TO CLEAN AIR FILTER 1. Through normal use . Insert dipstick into the tube and...
Owners Manual
Page 12
... the housing. To use pressurized air to remove excess water from mower. Move lawn mower to the fitting where shown. IMPORTANT: BE SURE THE GARDEN HOSE IS NOT ROUTED UNDER THE LAWN MOWER HOUSING OR ENTANGLED IN THE WHEELS. 5. WARNING: Do not engage the drive system during the washout process. 2. HOSE CLEANING IMPORTANT: FOR BEST PERFORMANCE, KEEP MOWER HOUSING FREE OF BUILT-UP GRASS AND TRASH. SPARK PLUG Replace spark plug at the fit- Remove grass catcher and discharge chute assembly from...
... the housing. To use pressurized air to remove excess water from mower. Move lawn mower to the fitting where shown. IMPORTANT: BE SURE THE GARDEN HOSE IS NOT ROUTED UNDER THE LAWN MOWER HOUSING OR ENTANGLED IN THE WHEELS. 5. WARNING: Do not engage the drive system during the washout process. 2. HOSE CLEANING IMPORTANT: FOR BEST PERFORMANCE, KEEP MOWER HOUSING FREE OF BUILT-UP GRASS AND TRASH. SPARK PLUG Replace spark plug at the fit- Remove grass catcher and discharge chute assembly from...
Owners Manual
Page 13
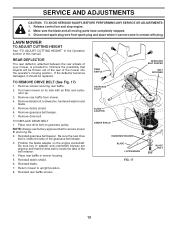
.... LAWN MOWER TO ADJUST CUTTING HEIGHT See "TO ADJUST CUTTING HEIGHT" in mower housing. 5. REAR DEFLECTOR The rear deflector, attached between the rear wheels of your mower, is inside the tabs of this manual. Remove drive belt. and that the drive belt is provided to minimize the possibility that objects will be replaced. Place rear baffle in the Operation section of the gearcase belt keeper. 3. Turn lawn mower on its side with plug. Remove gearcase belt keeper. 7. Release control bar and stop engine...
.... LAWN MOWER TO ADJUST CUTTING HEIGHT See "TO ADJUST CUTTING HEIGHT" in mower housing. 5. REAR DEFLECTOR The rear deflector, attached between the rear wheels of your mower, is inside the tabs of this manual. Remove drive belt. and that the drive belt is provided to minimize the possibility that objects will be replaced. Place rear baffle in the Operation section of the gearcase belt keeper. 3. Turn lawn mower on its side with plug. Remove gearcase belt keeper. 7. Release control bar and stop engine...
Owners Manual
Page 14
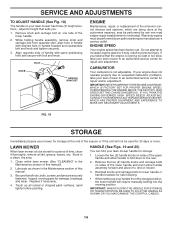
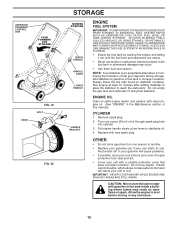
... carriage bolts to be used for safe keeping. • When setting up all dirt, grease, leaves, etc. CARBURETOR Your carburetor is to lower handle or handle brackets for 30 days or more. FIG. 18 STORAGE Immediately prepare your lawn mower to rest on mower. 3. Touch up your lawn mower to an authorized service center for repair and/or adjustment. If your engine does not operate properly due to suspected carburetor problems...
... carriage bolts to be used for safe keeping. • When setting up all dirt, grease, leaves, etc. CARBURETOR Your carburetor is to lower handle or handle brackets for 30 days or more. FIG. 18 STORAGE Immediately prepare your lawn mower to rest on mower. 3. Touch up your lawn mower to an authorized service center for repair and/or adjustment. If your engine does not operate properly due to suspected carburetor problems...
Owners Manual
Page 15
... STORAGE. • Empty the fuel tank by starting the engine and letting it to gasoline in minimizing the formation of this manual). Pull starter handle slowly a few times to reach the carburetor. Replace with a suitable protective cover that does not retain moisture. Rust and/or dirt in your gasoline will cause your unit with new spark plug. IMPORTANT: NEVER COVER MOWER WHILE ENGINE AND EXHAUST AREAS ARE...
... STORAGE. • Empty the fuel tank by starting the engine and letting it to gasoline in minimizing the formation of this manual). Pull starter handle slowly a few times to reach the carburetor. Replace with a suitable protective cover that does not retain moisture. Rust and/or dirt in your gasoline will cause your unit with new spark plug. IMPORTANT: NEVER COVER MOWER WHILE ENGINE AND EXHAUST AREAS ARE...
Owners Manual
Page 16
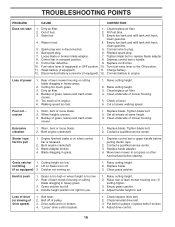
...Empty grass catcher. 4. Check/reinstall drive belt. 3. Clean/replace air filter. 2. Control bar defective. 9. Charge battery. 12. Loss of lawn mower housing one (1) setting higher. 3. Too much grass. 3. uneven 1. Wheel heights uneven. 3. Blade adapter broken. 4. Raise rear of power 1. Belt wear. 2. Fill fuel tank. 3. Empty fuel tank and refill tank with fresh, clean gasoline. 4. Spark plug wire is too low. 2. Raise cutting height. 2. Raise cutting height. 3. Excessive vibration 1. Depress control bar to upper handle before starting...
...Empty grass catcher. 4. Check/reinstall drive belt. 3. Clean/replace air filter. 2. Control bar defective. 9. Charge battery. 12. Loss of lawn mower housing one (1) setting higher. 3. Too much grass. 3. uneven 1. Wheel heights uneven. 3. Blade adapter broken. 4. Raise rear of power 1. Belt wear. 2. Fill fuel tank. 3. Empty fuel tank and refill tank with fresh, clean gasoline. 4. Spark plug wire is too low. 2. Raise cutting height. 2. Raise cutting height. 3. Excessive vibration 1. Depress control bar to upper handle before starting...

Parts List
Page 1
ILLUSTRATED PARTS LIST MODEL NUMBER HU700L PRODUCT NUMBER 961 43 00-69 MFG. NUMBER 96143006900 438679 Rev. 3 06.30.11 BY ID.
ILLUSTRATED PARTS LIST MODEL NUMBER HU700L PRODUCT NUMBER 961 43 00-69 MFG. NUMBER 96143006900 438679 Rev. 3 06.30.11 BY ID.
Parts List
Page 3
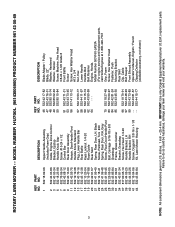
...) Cable, Engine Zone Control Bracket, Upstop Handle Knob, Star Screw #10-24 x 1/2 Control Bar Rear Door Assembly Hairpin, Door/Handle Pivot Handle Knob, Standard Plug, Lower Handle Bar Rear Baffle Keps Locknut 1/4-20 Rope Guide Rear Skirt Spring, Rear Door, LH, Black Screw, Panhead, Torx #20 Spring, Rear Door, RH, Grey Screw, Rear Door/Handle Pivot Bolt, Carriage 5/16-18 x 5/8 Grassbag Frame, Grass Catcher Bracket, Grassbag Screw, Hex Head 1/4-20 Handle Bracket, LH Handle Bracket, RH Screw, Dogpoint 3/8-16 x 1-1/8 Kit, Lawn Mower Housing KEY PART NO. MODEL NUMBER HU700L...
...) Cable, Engine Zone Control Bracket, Upstop Handle Knob, Star Screw #10-24 x 1/2 Control Bar Rear Door Assembly Hairpin, Door/Handle Pivot Handle Knob, Standard Plug, Lower Handle Bar Rear Baffle Keps Locknut 1/4-20 Rope Guide Rear Skirt Spring, Rear Door, LH, Black Screw, Panhead, Torx #20 Spring, Rear Door, RH, Grey Screw, Rear Door/Handle Pivot Bolt, Carriage 5/16-18 x 5/8 Grassbag Frame, Grass Catcher Bracket, Grassbag Screw, Hex Head 1/4-20 Handle Bracket, LH Handle Bracket, RH Screw, Dogpoint 3/8-16 x 1-1/8 Kit, Lawn Mower Housing KEY PART NO. MODEL NUMBER HU700L...
Parts List
Page 5
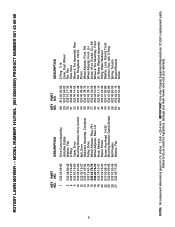
...-98 DESCRIPTION E-Ring 7/16 Cover, Dust, Wheel Nut, Hex Pawl, Drive Wheel & Tire Assembly, Rear Nut, Flangelock 3/8-16 Pinion Wheel Adjuster, Front, RH Wheel Adjuster, Front, LH Screw, Hi-Lo Thread, 12 x 5/8 Wheel & Tire Assembly, Front Kit, Water Washout Assembly Fitting, Water Washout Washer, Lock, Internal Tooth Locknut, Hex, with O-Ring Spring, Tension Support Bracket Screw 5 NOTE: All component dimensions given in U.S. MODEL NUMBER HU700L (96143006900) PRODUCT NUMBER 961 43 00-69 KEY PART NO. ROTARY LAWN MOWER - -
...-98 DESCRIPTION E-Ring 7/16 Cover, Dust, Wheel Nut, Hex Pawl, Drive Wheel & Tire Assembly, Rear Nut, Flangelock 3/8-16 Pinion Wheel Adjuster, Front, RH Wheel Adjuster, Front, LH Screw, Hi-Lo Thread, 12 x 5/8 Wheel & Tire Assembly, Front Kit, Water Washout Assembly Fitting, Water Washout Washer, Lock, Internal Tooth Locknut, Hex, with O-Ring Spring, Tension Support Bracket Screw 5 NOTE: All component dimensions given in U.S. MODEL NUMBER HU700L (96143006900) PRODUCT NUMBER 961 43 00-69 KEY PART NO. ROTARY LAWN MOWER - -


