

Owners Manual
Page 2
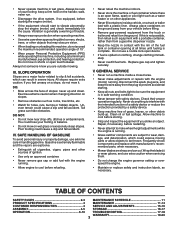
..., adjusting or making repairs, always disconnect spark plug wire and place wire where it should be a minimum of 12 year of age before operating a pedestrian controlled lawn mower and a minimum of 16 years of objects such as rocks, toys, wire, bones, sticks, etc., which could be used on the machine and in the manual(s) before cleaning the machine, removing the grass catcher, or unclogging the discharge chute. • Mow...
..., adjusting or making repairs, always disconnect spark plug wire and place wire where it should be a minimum of 12 year of age before operating a pedestrian controlled lawn mower and a minimum of 16 years of objects such as rocks, toys, wire, bones, sticks, etc., which could be used on the machine and in the manual(s) before cleaning the machine, removing the grass catcher, or unclogging the discharge chute. • Mow...
Owners Manual
Page 3
... not change clothing immediately. • Never overfill fuel tank. Do not use a nozzle lock-open device. • If fuel is spilled on slopes. • Remove obstacles such as necessary. Check their proper operation regularly. Allow machine to cool before filling. • Remove gas-powered equipment from the plug to prevent accidental starting the engine (motor). • If the equipment should start to make adjustments or repairs with the...
... not change clothing immediately. • Never overfill fuel tank. Do not use a nozzle lock-open device. • If fuel is spilled on slopes. • Remove obstacles such as necessary. Check their proper operation regularly. Allow machine to cool before filling. • Remove gas-powered equipment from the plug to prevent accidental starting the engine (motor). • If the equipment should start to make adjustments or repairs with the...

Owners Manual
Page 4
... DAMAGE CONTROL CABLES. 1. Ithasbeendesigned,engineeredandmanufactured to assemble and maintain your purchase of this owner's manual. Use the correct tools as nuts, washers, bolts, etc., necessary to service or repair this lawn mower. Insert handle bolts through lower handles and handle brackets; Your new lawn mower has been assembled at the factory with holes in the Service and Adjustments section of a new lawn mower. Remove protective padding, raise upper handle section into place on your lawn mower properly. Remove any problem you assemble...
... DAMAGE CONTROL CABLES. 1. Ithasbeendesigned,engineeredandmanufactured to assemble and maintain your purchase of this owner's manual. Use the correct tools as nuts, washers, bolts, etc., necessary to service or repair this lawn mower. Insert handle bolts through lower handles and handle brackets; Your new lawn mower has been assembled at the factory with holes in the Service and Adjustments section of a new lawn mower. Remove protective padding, raise upper handle section into place on your lawn mower properly. Remove any problem you assemble...
Owners Manual
Page 6
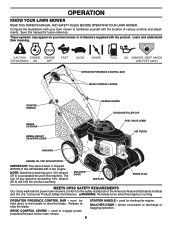
...Release to start the blade. OPERATION KNOW YOUR LAWN MOWER READ THIS OWNER'S MANUAL AND SAFETY RULES BEFORE OPERATING YOUR LAWN MOWER. These symbols may appear on your lawn mower to engage powerpropelled forward motion lawn mower. 6 STARTER HANDLE - must be held down to the handle to stop the blade. used to familiarize yourself with the product. Learn and understand their meaning. OPERATOR PRESENCE CONTROL BAR DRIVE CONTROL LEVERS STARTER HANDLE GRASS CATCHER WHEEL HEIGHT ADJUSTER LEVER HANDLE KNOBS GASOLINE FILLER CAP FUEL VALVE LEVER AIR FILTER HOUSING ENGINE OIL CAP WITH...
...Release to start the blade. OPERATION KNOW YOUR LAWN MOWER READ THIS OWNER'S MANUAL AND SAFETY RULES BEFORE OPERATING YOUR LAWN MOWER. These symbols may appear on your lawn mower to engage powerpropelled forward motion lawn mower. 6 STARTER HANDLE - must be held down to the handle to stop the blade. used to familiarize yourself with the product. Learn and understand their meaning. OPERATOR PRESENCE CONTROL BAR DRIVE CONTROL LEVERS STARTER HANDLE GRASS CATCHER WHEEL HEIGHT ADJUSTER LEVER HANDLE KNOBS GASOLINE FILLER CAP FUEL VALVE LEVER AIR FILTER HOUSING ENGINE OIL CAP WITH...
Owners Manual
Page 7
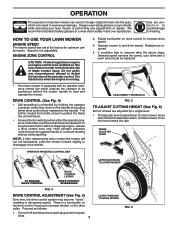
...disconnect spark plug wire from spark plug. 7 LEVER FORWARD TO RAISE MOWER FIG. 6 DRIVE CONTROL (See Fig. 4) • Self-propelling is worn and should be positioned behind the mower handle to test drive speed. Hold operator presence control bar down to the handle and pulling either the operator presence control bar or a drive control lever are adjusted by holding the operator presence control bar down against handle to disengage drive wheels. 2. ADJUSTMENT TURNBUCKLE FIG. 5 TO ADJUST CUTTING HEIGHT (See Fig. 6) All four wheels are released. ENGINE ZONE CONTROL...
...disconnect spark plug wire from spark plug. 7 LEVER FORWARD TO RAISE MOWER FIG. 6 DRIVE CONTROL (See Fig. 4) • Self-propelling is worn and should be positioned behind the mower handle to test drive speed. Hold operator presence control bar down to the handle and pulling either the operator presence control bar or a drive control lever are adjusted by holding the operator presence control bar down against handle to disengage drive wheels. 2. ADJUSTMENT TURNBUCKLE FIG. 5 TO ADJUST CUTTING HEIGHT (See Fig. 6) All four wheels are released. ENGINE ZONE CONTROL...

Owners Manual
Page 8
...or approved grass catcher in place. REAR DOOR GRASS BAG BRACKET GRASS CATCHER HANDLE GRASS CATCHER FRAME HOOK FIG. 7 UNLOCK LATCH OPEN MULCHER DOOR INSTALL DISCHARGE DEFLECTOR SIMPLE STEPS TO REMEMBER WHEN CONVERTING YOUR LAWN MOWER FOR MULCHING 1. Grass catcher installed. 2. MOWER IS NOW READY FOR DISCHARGING OPERATION FIG. 8 8 FOR REAR BAGGING 1. Mulcher door closed and locked. Rear door closed . 2. Rear door closed . 2. Never attempt to mulching or discharging operation, remove grass catcher and close rear door. CAUTION: Do not run your lawn mower without rear door closed...
...or approved grass catcher in place. REAR DOOR GRASS BAG BRACKET GRASS CATCHER HANDLE GRASS CATCHER FRAME HOOK FIG. 7 UNLOCK LATCH OPEN MULCHER DOOR INSTALL DISCHARGE DEFLECTOR SIMPLE STEPS TO REMEMBER WHEN CONVERTING YOUR LAWN MOWER FOR MULCHING 1. Grass catcher installed. 2. MOWER IS NOW READY FOR DISCHARGING OPERATION FIG. 8 8 FOR REAR BAGGING 1. Mulcher door closed and locked. Rear door closed . 2. Rear door closed . 2. Never attempt to mulching or discharging operation, remove grass catcher and close rear door. CAUTION: Do not run your lawn mower without rear door closed...

Owners Manual
Page 9
... bottom of 30 days or longer. Add oil if needed. Wait until the fuel lines and carburetor are empty. Empty the gas tank, start the engine and let it run until blade and all moving parts have stopped and turn fuel valve to OFF position if you do not intend to change the oil more often under lawn mower handle. 3. OPERATION TO EMPTY GRASS CATCHER (See Fig. 9) 1. Slowly pour the entire container...
... bottom of 30 days or longer. Add oil if needed. Wait until the fuel lines and carburetor are empty. Empty the gas tank, start the engine and let it run until blade and all moving parts have stopped and turn fuel valve to OFF position if you do not intend to change the oil more often under lawn mower handle. 3. OPERATION TO EMPTY GRASS CATCHER (See Fig. 9) 1. Slowly pour the entire container...
Owners Manual
Page 10
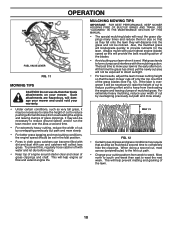
... dirt and dust with the mulching action. OPERATION OFF ON FUEL VALVE LEVER FIG. 11 MOWING TIPS CAUTION: Do not use and catchers will be mulched a second time to keep from overloading the engine and leaving clumps of the grass blades (See Fig. 12). Such attachments are hazardous, will provide the best recutting action of cut path. • Change your cutting pattern from week to west...
... dirt and dust with the mulching action. OPERATION OFF ON FUEL VALVE LEVER FIG. 11 MOWING TIPS CAUTION: Do not use and catchers will be mulched a second time to keep from overloading the engine and leaving clumps of the grass blades (See Fig. 12). Such attachments are hazardous, will provide the best recutting action of cut path. • Change your cutting pattern from week to west...
Owners Manual
Page 11
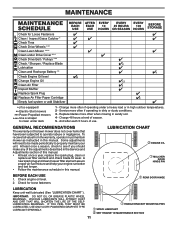
... THE SELFLUBRICATING BEARINGS. LUBRICATION CHART ➁ ENGINE OIL ➀ MULCHER DOOR HINGE PIN BEFORE EACH USE 1. MAINTENANCE Check for Loose Fasteners Clean / Inspect Grass Catcher * Check Tires Check Drive Wheels *** Clean Lawn Mower **** Clean under Drive Cover *** Check Drive Belt / Pulleys *** Check / Sharpen / Replace Blade Lubrication Clean and Recharge Battery ** Check Engine Oil level Change Engine Oil Clean Air Filter Inspect Muffler Replace Spark Plug Replace Air Filter Paper Cartridge Empty fuel system or add Stabilizer BEFORE EACH USE AFTER EVERY EVERY EVERY EACH 10...
... THE SELFLUBRICATING BEARINGS. LUBRICATION CHART ➁ ENGINE OIL ➀ MULCHER DOOR HINGE PIN BEFORE EACH USE 1. MAINTENANCE Check for Loose Fasteners Clean / Inspect Grass Catcher * Check Tires Check Drive Wheels *** Clean Lawn Mower **** Clean under Drive Cover *** Check Drive Belt / Pulleys *** Check / Sharpen / Replace Blade Lubrication Clean and Recharge Battery ** Check Engine Oil level Change Engine Oil Clean Air Filter Inspect Muffler Replace Spark Plug Replace Air Filter Paper Cartridge Empty fuel system or add Stabilizer BEFORE EACH USE AFTER EVERY EVERY EVERY EACH 10...
Owners Manual
Page 12
... blade - Use a wood block between blade and lawn mower housing and tighten the blade bolt, turning clockwise. • The recommended tightening torque is hazardous, could damage your mower and void your hands with gloves and/or wrap blade with plug. 2. Position the blade adapter on its side. and that may be cleaned out to clean the drive wheels, check both rear wheels. MAINTENANCE LAWN MOWER Always observe safety rules when performing any maintenance. TIRES • Keep tires free of your mower...
... blade - Use a wood block between blade and lawn mower housing and tighten the blade bolt, turning clockwise. • The recommended tightening torque is hazardous, could damage your mower and void your hands with gloves and/or wrap blade with plug. 2. Position the blade adapter on its side. and that may be cleaned out to clean the drive wheels, check both rear wheels. MAINTENANCE LAWN MOWER Always observe safety rules when performing any maintenance. TIRES • Keep tires free of your mower...
Owners Manual
Page 13
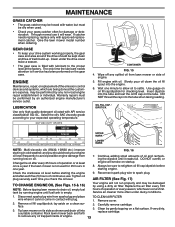
... lawn mower model number when ordering. Reconnect spark plug wire to remove any spilled oil from running engine until it cannot come in cold weather, and you check the oil level. 9. lay aside on oil fill cap/dipstick for 25 hours in one minute to allow oil to avoid possible engine damage from lawn mower or side of engine. 13 Carefully remove cartridge. 3. Use guage on a clean surface. 3. Service air cleaner more often under the drive cover...
... lawn mower model number when ordering. Reconnect spark plug wire to remove any spilled oil from running engine until it cannot come in cold weather, and you check the oil level. 9. lay aside on oil fill cap/dipstick for 25 hours in one minute to allow oil to avoid possible engine damage from lawn mower or side of engine. 13 Carefully remove cartridge. 3. Use guage on a clean surface. 3. Service air cleaner more often under the drive cover...

Owners Manual
Page 14
... in shortened engine life. 8. Remove grass catcher and discharge chute assembly from fitting. IMPORTANT: BE SURE THE GARDEN HOSE IS NOT ROUTED UNDER THE LAWN MOWER HOUSING OR ENTANGLED IN THE WHEELS. 5. CLEAN THE UNDERSIDE OF YOUR MOWER AFTER EACH USE. 6. CAUTION: Do not remove hose from spark plug and place wire where it could create a fire hazard and/or damage. Spark plug type and gap setting are shown in the Operation section of this manual) and let engine run for...
... in shortened engine life. 8. Remove grass catcher and discharge chute assembly from fitting. IMPORTANT: BE SURE THE GARDEN HOSE IS NOT ROUTED UNDER THE LAWN MOWER HOUSING OR ENTANGLED IN THE WHEELS. 5. CLEAN THE UNDERSIDE OF YOUR MOWER AFTER EACH USE. 6. CAUTION: Do not remove hose from spark plug and place wire where it could create a fire hazard and/or damage. Spark plug type and gap setting are shown in the Operation section of this manual) and let engine run for...
Owners Manual
Page 15
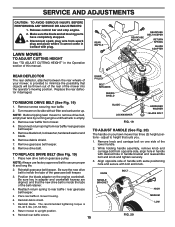
... ANY SERVICE OR ADJUSTMENTS: 1. REAR BAFFLE GEARCASE PULLEY GEARCASE BELT KEEPER RETURN SPRING BLADE ADAPTER REAR DEFLECTOR The rear deflector, attached between the rear wheels of your lawn mower has three (3) height positions - Remove debris shield. 7. Align opposite side of the lower handle. 8. Be sure the new drive belt is provided to remove drive belt, empty fuel tank by running engine until fuel tank is 35-40 ft. LAWN MOWER TO ADJUST CUTTING HEIGHT See "TO ADJUST CUTTING HEIGHT" in contact with bolt and knob. 2. FIG. 19 4. NOTE: Always use factory...
... ANY SERVICE OR ADJUSTMENTS: 1. REAR BAFFLE GEARCASE PULLEY GEARCASE BELT KEEPER RETURN SPRING BLADE ADAPTER REAR DEFLECTOR The rear deflector, attached between the rear wheels of your lawn mower has three (3) height positions - Remove debris shield. 7. Align opposite side of the lower handle. 8. Be sure the new drive belt is provided to remove drive belt, empty fuel tank by running engine until fuel tank is 35-40 ft. LAWN MOWER TO ADJUST CUTTING HEIGHT See "TO ADJUST CUTTING HEIGHT" in contact with bolt and knob. 2. FIG. 19 4. NOTE: Always use factory...
Owners Manual
Page 16
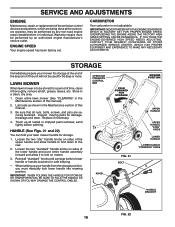
... used for 30 days or more. IMPORTANT: WHEN FOLDING THE HANDLE FOR STORAGE OR TRANSPORTATION, BE SURE TO FOLD THE HANDLE AS SHOWN OR YOU MAY DAMAGE THE CONTROL CABLES. SERVICE AND ADJUSTMENTS ENGINE Maintenance, repair, or replacement of the emission control devices and systems, which are securely fastened. Warranty repairs must manually lock lower handle into mowing position. IF YOU THINK THE ENGINE-GOVERNED HIGH SPEED NEEDS ADJUSTING, CONTACT YOUR NEAREST HUSQVARNA...
... used for 30 days or more. IMPORTANT: WHEN FOLDING THE HANDLE FOR STORAGE OR TRANSPORTATION, BE SURE TO FOLD THE HANDLE AS SHOWN OR YOU MAY DAMAGE THE CONTROL CABLES. SERVICE AND ADJUSTMENTS ENGINE Maintenance, repair, or replacement of the emission control devices and systems, which are securely fastened. Warranty repairs must manually lock lower handle into mowing position. IF YOU THINK THE ENGINE-GOVERNED HIGH SPEED NEEDS ADJUSTING, CONTACT YOUR NEAREST HUSQVARNA...
Owners Manual
Page 17
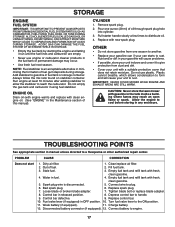
... ml) of fuel. 2. Remove spark plug. 2. IMPORTANT: NEVER COVER MOWER WHILE ENGINE AND EXHAUST AREAS ARE STILL WARM. Do not empty the gas tank and carburetor if using fuel stabilizer. Out of oil through spark plug hole into cylinder. 3. Fill fuel tank. 3. Spark plug wire is an acceptable alternative in the Maintenance section of fuel gum deposits during storage. Loose blade or broken blade adapter. 7. Depress control bar to engine. 17 Weak battery (if equipped). 11. Replace with clean engine oil. (See "ENGINE" in...
... ml) of fuel. 2. Remove spark plug. 2. IMPORTANT: NEVER COVER MOWER WHILE ENGINE AND EXHAUST AREAS ARE STILL WARM. Do not empty the gas tank and carburetor if using fuel stabilizer. Out of oil through spark plug hole into cylinder. 3. Fill fuel tank. 3. Spark plug wire is an acceptable alternative in the Maintenance section of fuel gum deposits during storage. Loose blade or broken blade adapter. 7. Depress control bar to engine. 17 Weak battery (if equipped). 11. Replace with clean engine oil. (See "ENGINE" in...
Owners Manual
Page 18
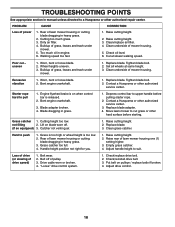
...Contact a Husqvarna or other authorized service center. Grass catcher too full. 4. Handle height position not right for you. 1. Put belt on when control bar is too low. 2. Walking speed too fast. 1. Bent engine crankshaft. 1. Raise cutting height. 2. Belt off . (if so equipped) 3. Check/replace drive belt. 2. Depress control bar to upper handle before starting. Replace blade adapter. 4. Move lawn mower to cut - Clean grass catcher. Loss of drive (or slowing of power 1. Poor cut grass or other authorized repair center. uneven 1. Tighten blade bolt...
...Contact a Husqvarna or other authorized service center. Grass catcher too full. 4. Handle height position not right for you. 1. Put belt on when control bar is too low. 2. Walking speed too fast. 1. Bent engine crankshaft. 1. Raise cutting height. 2. Belt off . (if so equipped) 3. Check/replace drive belt. 2. Depress control bar to upper handle before starting. Replace blade adapter. 4. Move lawn mower to cut - Clean grass catcher. Loss of drive (or slowing of power 1. Poor cut grass or other authorized repair center. uneven 1. Tighten blade bolt...

Owners Manual
Page 19
... limitation spark plugs, bulbs, filters, lubricants, starter cords, belts, blades, and blade adapters are your product is damage due to help ensure that normally wear out with you are covered by a separate emission control warranty contained in the operator's manual. (d) Depending on the chart below . (e) Damage related to abuse, misuse, neglect, modifications, alterations, use of unauthorized attachments, improper storage, or lack of lubrication or engine failure...
... limitation spark plugs, bulbs, filters, lubricants, starter cords, belts, blades, and blade adapters are your product is damage due to help ensure that normally wear out with you are covered by a separate emission control warranty contained in the operator's manual. (d) Depending on the chart below . (e) Damage related to abuse, misuse, neglect, modifications, alterations, use of unauthorized attachments, improper storage, or lack of lubrication or engine failure...
Owners Manual
Page 20
... consumer use . 9 Battery warranty does not include discharged or uncharged batteries. 10 Replacement parts and accessories are excluded from the "Limited Lifetime Warranty." 2 Handheld Battery powered products. PZ - (Pump & Wheel Motor or ZT5400 transmission) three (3) year warranty, as follows: Hydro-Gear warrants the first (1) year - Husqvarna warrants the labor in the initial warranty period; Snow Throwers and Tractors: Hydro-Gear warrants transmission for two (2) years, parts and labor. Zero Turn Mowers (5) (6) Other Wheeled Products See...
... consumer use . 9 Battery warranty does not include discharged or uncharged batteries. 10 Replacement parts and accessories are excluded from the "Limited Lifetime Warranty." 2 Handheld Battery powered products. PZ - (Pump & Wheel Motor or ZT5400 transmission) three (3) year warranty, as follows: Hydro-Gear warrants the first (1) year - Husqvarna warrants the labor in the initial warranty period; Snow Throwers and Tractors: Hydro-Gear warrants transmission for two (2) years, parts and labor. Zero Turn Mowers (5) (6) Other Wheeled Products See...
Parts List
Page 3
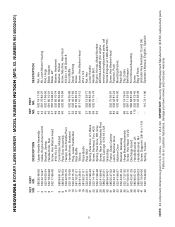
... Screw, Hex Washer Head #13 x 3/4 Nut, Hex Lower Handle Handle Bolt Engine, Honda, Model Number GCV160-LAOS3B (For engine service and replacement parts, call Honda Engines at 1-800-426-7701) Screw, Hex Washer Head Fastener, Push Mounting Bracket, Rear Skirt Clip, Cable Belt Keeper Front Shroud Assembly Screw Bag of Parts (Includes Key Numbers 12 and 59) Operator's Manual, English / Spanish 3 NOTE: All component dimensions given in U.S. IMPORTANT: Use only Original Equipment Manufacturer (O.E.M.) replacement parts. MODEL NUMBER HU700H (MFG.
... Screw, Hex Washer Head #13 x 3/4 Nut, Hex Lower Handle Handle Bolt Engine, Honda, Model Number GCV160-LAOS3B (For engine service and replacement parts, call Honda Engines at 1-800-426-7701) Screw, Hex Washer Head Fastener, Push Mounting Bracket, Rear Skirt Clip, Cable Belt Keeper Front Shroud Assembly Screw Bag of Parts (Includes Key Numbers 12 and 59) Operator's Manual, English / Spanish 3 NOTE: All component dimensions given in U.S. IMPORTANT: Use only Original Equipment Manufacturer (O.E.M.) replacement parts. MODEL NUMBER HU700H (MFG.
Parts List
Page 5
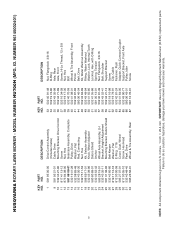
... 3/8-16 O-Ring Axle, Rear Axle, Front Screw, Hi-Lo Thread, 12 x 5/8 Nut, Hex Bolt Wheel & Tire Assembly, Front Pinion Belt, Drive Kit, Water Washout Assembly Fitting, Water Washout Washer, Lock, Internal Tooth Locknut, Hex, with O-Ring Spring, Tension Nut, Flangelock 3/8-16 Bolt, Shoulder Support Bracket Screw Clip, Cable Fastener, Push Adapter, Quick-Connect Coupler Support Bracket, Front Axle Pulley, Idler Screw 5 NOTE: All component dimensions given in U.S. HUSQVARNA ROTARY LAWN MOWER - MODEL NUMBER HU700H (MFG. NO. 1 581...
... 3/8-16 O-Ring Axle, Rear Axle, Front Screw, Hi-Lo Thread, 12 x 5/8 Nut, Hex Bolt Wheel & Tire Assembly, Front Pinion Belt, Drive Kit, Water Washout Assembly Fitting, Water Washout Washer, Lock, Internal Tooth Locknut, Hex, with O-Ring Spring, Tension Nut, Flangelock 3/8-16 Bolt, Shoulder Support Bracket Screw Clip, Cable Fastener, Push Adapter, Quick-Connect Coupler Support Bracket, Front Axle Pulley, Idler Screw 5 NOTE: All component dimensions given in U.S. HUSQVARNA ROTARY LAWN MOWER - MODEL NUMBER HU700H (MFG. NO. 1 581...


