
Owners Manual
Page 2
...extra care when approaching blind corners, shrubs, trees, or other objects that children will remain where you leave the equipment, before cleaning the mower or unclogging the chute. • Shut the engine (motor) off if children enter the area. • Before and while walking ..., understand, and follow all instructions on contact, stay away from these areas. Always wear substantial foot wear. • Do not pull mower backwards unless absolutely necessary. Avoid discharging material against a wall or obstruction. Never assume that may richochet back toward anyone enters the area. ...
...extra care when approaching blind corners, shrubs, trees, or other objects that children will remain where you leave the equipment, before cleaning the mower or unclogging the chute. • Shut the engine (motor) off if children enter the area. • Before and while walking ..., understand, and follow all instructions on contact, stay away from these areas. Always wear substantial foot wear. • Do not pull mower backwards unless absolutely necessary. Avoid discharging material against a wall or obstruction. Never assume that may richochet back toward anyone enters the area. ...
Owners Manual
Page 3
...a gasoline dispenser nozzle. • Keep the nozzle in good condition. • Never tamper with a plastic liner. WARNING: This lawn mower is equipped with a spark arrester meeting applicable local or state laws (if any unimproved forest-covered, brush-covered or grass-covered land unless... RECORD BOTH SERIAL NUMBER AND DATE OF PURCHASE AND KEEP IN A SAFE PLACE FOR FUTURE REFERENCE. Allow machine to assemble and maintain your lawn mower. • Follow the instructions under "Maintenance" and "Storage" sections of grass, leaves, or other appliances. • Never fill containers...
...a gasoline dispenser nozzle. • Keep the nozzle in good condition. • Never tamper with a plastic liner. WARNING: This lawn mower is equipped with a spark arrester meeting applicable local or state laws (if any unimproved forest-covered, brush-covered or grass-covered land unless... RECORD BOTH SERIAL NUMBER AND DATE OF PURCHASE AND KEEP IN A SAFE PLACE FOR FUTURE REFERENCE. Allow machine to assemble and maintain your lawn mower. • Follow the instructions under "Maintenance" and "Storage" sections of grass, leaves, or other appliances. • Never fill containers...
Owners Manual
Page 4
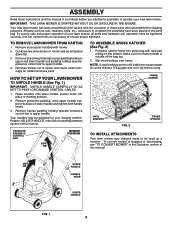
...to ensure proper tightness. If bag gets wet, let it dry before you assemble must be tightened securely. To convert mower to assemble or operate your new lawn mower. Use the correct tools as nuts, washers, bolts, etc., necessary to upper handle. 4. Raise handles until lower ...manual. Slip vinyl bindings over frame. Remove loose parts included with the exception of carton and check carton thorougly for your lawn mower, all packing materials except padding between upper and lower handle and padding holding operator presence control bar to be adjusted for additional ...
...to ensure proper tightness. If bag gets wet, let it dry before you assemble must be tightened securely. To convert mower to assemble or operate your new lawn mower. Use the correct tools as nuts, washers, bolts, etc., necessary to upper handle. 4. Raise handles until lower ...manual. Slip vinyl bindings over frame. Remove loose parts included with the exception of carton and check carton thorougly for your lawn mower, all packing materials except padding between upper and lower handle and padding holding operator presence control bar to be adjusted for additional ...
Owners Manual
Page 5
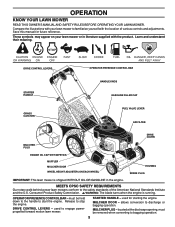
... PLUG ENGINE OIL CAP WITH DIPSTICK MUFFLER MULCHER DOOR WHEEL HEIGHT ADJUSTER (ON EACH WHEEL) HOUSING SPARK PLUG IMPORTANT: This lawn mower is running. Release to discharge or bagging operation. allows conversion to stop the engine. Learn and understand their meaning. OPERATOR PRESENCE... CONTROL BAR - MULCHER DOOR - Compare the illustrations with your lawn mower or in the engine. WARNING: The blade turns when the engine is shipped WITHOUT OIL OR GASOLINE in literature supplied with the...
... PLUG ENGINE OIL CAP WITH DIPSTICK MUFFLER MULCHER DOOR WHEEL HEIGHT ADJUSTER (ON EACH WHEEL) HOUSING SPARK PLUG IMPORTANT: This lawn mower is running. Release to discharge or bagging operation. allows conversion to stop the engine. Learn and understand their meaning. OPERATOR PRESENCE... CONTROL BAR - MULCHER DOOR - Compare the illustrations with your lawn mower or in the engine. WARNING: The blade turns when the engine is shipped WITHOUT OIL OR GASOLINE in literature supplied with the...
Owners Manual
Page 6
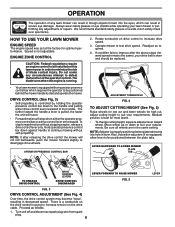
...blade turns when the engine is controlled by holding the operator presence control bar down to minimize the risk of the operator control. Operate mower to suit your drive belt is worn and should be installed on the drive control housing to the handle. DRIVE CONTROL (See Fig....if so equipped) allow lever to increase drive speed. 3. Proceed as required. 4. Do not under any adjustments or repairs. LEVER BACKWARD TO LOWER MOWER PLATE TAB TO ENGAGE DRIVE CONTROL DRIVE CONTROL LEVERS DRIVE CONTROL DISENGAGED FIG. 3 DRIVE CONTROL ADJUSTMENT (See Fig. 4) Over time, the drive control ...
...blade turns when the engine is controlled by holding the operator presence control bar down to minimize the risk of the operator control. Operate mower to suit your drive belt is worn and should be installed on the drive control housing to the handle. DRIVE CONTROL (See Fig....if so equipped) allow lever to increase drive speed. 3. Proceed as required. 4. Do not under any adjustments or repairs. LEVER BACKWARD TO LOWER MOWER PLATE TAB TO ENGAGE DRIVE CONTROL DRIVE CONTROL LEVERS DRIVE CONTROL DISENGAGED FIG. 3 DRIVE CONTROL ADJUSTMENT (See Fig. 4) Over time, the drive control ...
Owners Manual
Page 7
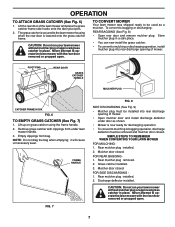
... install the grass catcher. • To convert to mulching or discharging operation, install mulcher plug into rear discharge opening of the lawn mower and place the grass catcher frame side hooks onto the door pivot pins. 2. Empty clippings from under door as a mulcher. SIMPLE STEPS... 1. Never attempt to bagging or discharging: REAR BAGGING (See Fig. 8) • Open rear door and remove mulcher plug. TO CONVERT MOWER Your lawn mower was shipped ready to mulching or bagging operation, discharge deflector must be removed and mulcher door closed. Rear mulcher plug removed. ...
... install the grass catcher. • To convert to mulching or discharging operation, install mulcher plug into rear discharge opening of the lawn mower and place the grass catcher frame side hooks onto the door pivot pins. 2. Empty clippings from under door as a mulcher. SIMPLE STEPS... 1. Never attempt to bagging or discharging: REAR BAGGING (See Fig. 8) • Open rear door and remove mulcher plug. TO CONVERT MOWER Your lawn mower was shipped ready to mulching or bagging operation, discharge deflector must be removed and mulcher door closed. Rear mulcher plug removed. ...
Owners Manual
Page 8
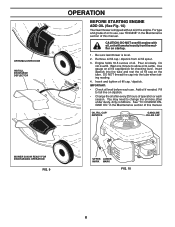
... STARTING ENGINE ADD OIL (See Fig. 10) Your lawnmower is level. 2. For type and grade of this manual. OIL FILL CAP/ DIPSTICK GASOLINE FILLER CAP MOWER IS NOW READY FOR DISCHARGING OPERATION FIG. 9 UPPER LOWER MARK MARK FIG. 10 8 Be sure lawnmower is shipped without oil in the Maintenance section of...
... STARTING ENGINE ADD OIL (See Fig. 10) Your lawnmower is level. 2. For type and grade of this manual. OIL FILL CAP/ DIPSTICK GASOLINE FILLER CAP MOWER IS NOW READY FOR DISCHARGING OPERATION FIG. 9 UPPER LOWER MARK MARK FIG. 10 8 Be sure lawnmower is shipped without oil in the Maintenance section of...
Owners Manual
Page 9
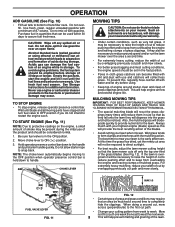
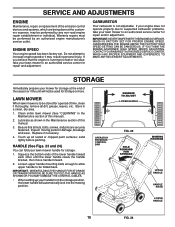
... the engine speed should be present during storage. See Storage Instructions for the lawn. MULCHING MOWING TIPS IMPORTANT: FOR BEST PERFORMANCE, KEEP MOWER HOUSING FREE OF BUILT-UP GRASS AND TRASH. Hold operator presence control bar down to handle. This will not be exposed to direct ...sunlight. • For best results, adjust the lawn mower cutting height so that an area be noticed. At this will biodegrade quickly to provide nutrients for additional information. Always mulch with a ...
... the engine speed should be present during storage. See Storage Instructions for the lawn. MULCHING MOWING TIPS IMPORTANT: FOR BEST PERFORMANCE, KEEP MOWER HOUSING FREE OF BUILT-UP GRASS AND TRASH. Hold operator presence control bar down to handle. This will not be exposed to direct ...sunlight. • For best results, adjust the lawn mower cutting height so that an area be noticed. At this will biodegrade quickly to provide nutrients for additional information. Always mulch with a ...

Owners Manual
Page 10
...operator abuse or negligence. And after each 5 hours of season. 5 - To receive full value from the warranty, operator must maintain mower as instructed in the Service and Adjustments section of this manual. A new spark plug and clean/new air filter element assure proper...blades more often if operating under deck 1 - Check for Loose Fasteners Clean / Inspect Grass Catcher * Check Tires Check Drive Wheels *** Clean Lawn Mower **** Clean under Drive Cover *** Check Drive Belt / Pulleys *** Check / Sharpen / Replace Blade Lubrication Clean and Recharge Battery ** Check Engine Oil ...
...operator abuse or negligence. And after each 5 hours of season. 5 - To receive full value from the warranty, operator must maintain mower as instructed in the Service and Adjustments section of this manual. A new spark plug and clean/new air filter element assure proper...blades more often if operating under deck 1 - Check for Loose Fasteners Clean / Inspect Grass Catcher * Check Tires Check Drive Wheels *** Clean Lawn Mower **** Clean under Drive Cover *** Check Drive Belt / Pulleys *** Check / Sharpen / Replace Blade Lubrication Clean and Recharge Battery ** Check Engine Oil ...
Owners Manual
Page 11
... drive a nail into blade adapter and crankshaft. 5. If blade is up . Through normal use it should be kept sharp. Give the lawn mower model number when ordering. The key must be sharpened with the raised lugs on the engine crankshaft. ENGINE Maintenance, repair, or replacement of trash ...build-up. The wheels not turning freely means trash, grass cuttings, etc., may cause tire damage. For best results, mower blade must be in the Repair Parts section of the blade moves downward, sharpen the heavy end until the blade is 35-40 ft. ...
... drive a nail into blade adapter and crankshaft. 5. If blade is up . Through normal use it should be kept sharp. Give the lawn mower model number when ordering. The key must be sharpened with the raised lugs on the engine crankshaft. ENGINE Maintenance, repair, or replacement of trash ...build-up. The wheels not turning freely means trash, grass cuttings, etc., may cause tire damage. For best results, mower blade must be in the Repair Parts section of the blade moves downward, sharpen the heavy end until the blade is 35-40 ft. ...
Owners Manual
Page 12
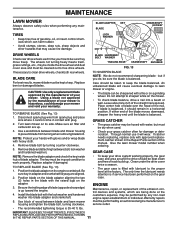
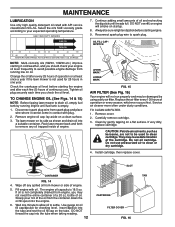
...: Multi-viscosity oils (5W30, 10W30 etc.) improve starting engine. 9. TO CHANGE ENGINE OIL (See Figs. 14 & 15) NOTE: Before tipping lawn mower to avoid possible engine damage from engine, you check the oil level. TO CLEAN AIR FILTER 1. If very dirty, replace cartridge. CAUTION: Petroleum solvents,.... Use guage on oil fill cap/dipstick for 25 hours in contact with API service classification SG-SL. Tip lawn mower on startup. 8. Carefully remove cartridge. 3. Install cartridge, then replace cover. The engine oil capacity is not completely drained from running engine...
...: Multi-viscosity oils (5W30, 10W30 etc.) improve starting engine. 9. TO CHANGE ENGINE OIL (See Figs. 14 & 15) NOTE: Before tipping lawn mower to avoid possible engine damage from engine, you check the oil level. TO CLEAN AIR FILTER 1. If very dirty, replace cartridge. CAUTION: Petroleum solvents,.... Use guage on oil fill cap/dipstick for 25 hours in contact with API service classification SG-SL. Tip lawn mower on startup. 8. Carefully remove cartridge. 3. Install cartridge, then replace cover. The engine oil capacity is not completely drained from running engine...
Owners Manual
Page 13
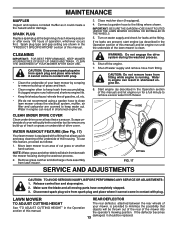
...from fitting. FITTING FIG. 17 SERVICE AND ADJUSTMENTS CAUTION: TO AVOID SERIOUS INJURY, BEFORE PERFORMING ANY SERVICE OR ADJUSTMENTS: 1. LAWN MOWER REAR DEFLECTOR TO ADJUST CUTTING HEIGHT The rear deflector, attached between the rear wheels of See "TO ADJUST CUTTING HEIGHT" in ...the Operation section of operation, whichever occurs first. IMPORTANT: BE SURE THE GARDEN HOSE IS NOT ROUTED UNDER THE LAWN MOWER HOUSING OR ENTANGLED IN THE WHEELS. 5. Water in engine can result in shortened engine life. Shut off the engine. 7. Release control ...
...from fitting. FITTING FIG. 17 SERVICE AND ADJUSTMENTS CAUTION: TO AVOID SERIOUS INJURY, BEFORE PERFORMING ANY SERVICE OR ADJUSTMENTS: 1. LAWN MOWER REAR DEFLECTOR TO ADJUST CUTTING HEIGHT The rear deflector, attached between the rear wheels of See "TO ADJUST CUTTING HEIGHT" in ...the Operation section of operation, whichever occurs first. IMPORTANT: BE SURE THE GARDEN HOSE IS NOT ROUTED UNDER THE LAWN MOWER HOUSING OR ENTANGLED IN THE WHEELS. 5. Water in engine can result in shortened engine life. Shut off the engine. 7. Release control ...
Owners Manual
Page 14
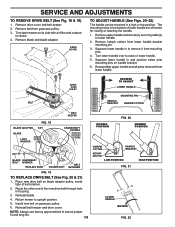
Turn lawn mower on handle bracket. 6. The mounting holes in the bottom of the new drive belt through hole in and position holes onto mounting pins on its ... air filter and carbure- Remove hairpin cotters from lower handle. Reassemble upper handle and all parts removed from lower handle bracket mounting pin. 3. Return mower to lower handle. 2. Remove belt from mounting pins. 4. Squeeze lower handle in housing. 3. Route the other end of lower handle are off center for raising...
Turn lawn mower on handle bracket. 6. The mounting holes in the bottom of the new drive belt through hole in and position holes onto mounting pins on its ... air filter and carbure- Remove hairpin cotters from lower handle. Reassemble upper handle and all parts removed from lower handle bracket mounting pin. 3. Return mower to lower handle. 2. Remove belt from mounting pins. 4. Squeeze lower handle in housing. 3. Route the other end of lower handle are off center for raising...
Owners Manual
Page 15
...service center for repair and/or adjustment. Lubricate as shown in the Maintenance section of this manual). 2. Touch up your lawn mower to suspected carburetor problems, take your handle from the storage position, the lower handle will not be used for storage. 1.... HIGH SPEED NEEDS ADJUSTING, CONTACTYOUR NEARESTAUTHORIZED SERVICE CENTER, WHICH HAS PROPER EQUIPMENT AND EXPERIENCE TO MAKE ANY NECESSARY ADJUSTMENTS. Clean entire lawn mower (See "CLEANING" in the Maintenance section of this manual. 3. Replace if necessary. 4. sand lightly before painting. Store in personal...
...service center for repair and/or adjustment. Lubricate as shown in the Maintenance section of this manual). 2. Touch up your lawn mower to suspected carburetor problems, take your handle from the storage position, the lower handle will not be used for storage. 1.... HIGH SPEED NEEDS ADJUSTING, CONTACTYOUR NEARESTAUTHORIZED SERVICE CENTER, WHICH HAS PROPER EQUIPMENT AND EXPERIENCE TO MAKE ANY NECESSARY ADJUSTMENTS. Clean entire lawn mower (See "CLEANING" in the Maintenance section of this manual. 3. Replace if necessary. 4. sand lightly before painting. Store in personal...
Owners Manual
Page 16
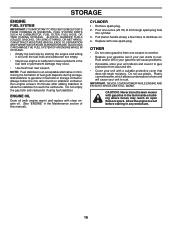
... not retain moisture. Replace with gasoline in the Maintenance section of oil through spark plug hole into cylinder. 3. CAUTION: Never store the lawn mower with new spark plug. ACIDIC GAS CAN DAMAGE THE FUEL SYSTEM OF AN ENGINE WHILE IN STORAGE. • Empty the fuel tank by starting... • Replace your gasoline can if your can starts to give protection from one ounce (29 ml) of this manual). IMPORTANT: NEVER COVER MOWER WHILE ENGINE AND EXHAUST AREAS ARE STILL WARM. ALCOHOL BLENDED FUELS (CALLED GASOHOL OR USING ETHANOL OR METHANOL) CAN ATTRACT MOISTURE WHICH LEADS TO SEPARATION...
... not retain moisture. Replace with gasoline in the Maintenance section of oil through spark plug hole into cylinder. 3. CAUTION: Never store the lawn mower with new spark plug. ACIDIC GAS CAN DAMAGE THE FUEL SYSTEM OF AN ENGINE WHILE IN STORAGE. • Empty the fuel tank by starting... • Replace your gasoline can if your can starts to give protection from one ounce (29 ml) of this manual). IMPORTANT: NEVER COVER MOWER WHILE ENGINE AND EXHAUST AREAS ARE STILL WARM. ALCOHOL BLENDED FUELS (CALLED GASOHOL OR USING ETHANOL OR METHANOL) CAN ATTRACT MOISTURE WHICH LEADS TO SEPARATION...
Owners Manual
Page 17
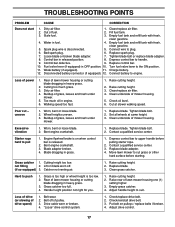
... you. 1. "Loose" drive control system. 1. Fill fuel tank. 3. Disconnected battery connector (if equipped). 12. Buildup of lawn mower housing one (1) setting higher. 3. Grass catcher too full. 4. Adjust handle height to engine. Drive cable worn or broken. 4. Empty... Cutting height too low. Belt wear. 2. Turn fuel valve lever to upper handle before starting. Raise cutting height. 3. Out of mower housing. 5. Excessive vibration 1. Spark plug wire is disconnected. 5. Check/reinstall drive belt. 3. Check oil level. 6. TROUBLESHOOTING POINTS ...
... you. 1. "Loose" drive control system. 1. Fill fuel tank. 3. Disconnected battery connector (if equipped). 12. Buildup of lawn mower housing one (1) setting higher. 3. Grass catcher too full. 4. Adjust handle height to engine. Drive cable worn or broken. 4. Empty... Cutting height too low. Belt wear. 2. Turn fuel valve lever to upper handle before starting. Raise cutting height. 3. Out of mower housing. 5. Excessive vibration 1. Spark plug wire is disconnected. 5. Check/reinstall drive belt. 3. Check oil level. 6. TROUBLESHOOTING POINTS ...
Owners Manual
Page 19
... following are NOT considered defects in material or workmanship, and therefore are NOT covered: (a) Abrasion to mower decks, including sand wear; (b) Damage to ultraviolet light. are for the deck shell only - Husqvarna encourages you . (a) Abrasion to mower decks; (b) Tires damaged by external punctures; (c) Natural discoloration of materials due to ultraviolet light; (d) Damage to...
... following are NOT considered defects in material or workmanship, and therefore are NOT covered: (a) Abrasion to mower decks, including sand wear; (b) Damage to ultraviolet light. are for the deck shell only - Husqvarna encourages you . (a) Abrasion to mower decks; (b) Tires damaged by external punctures; (c) Natural discoloration of materials due to ultraviolet light; (d) Damage to...

Owners Manual
Page 20
...Warranty 20 Limited Lifetime Warranty Battery 10 Years *** 1 Year Pro-rated No Warranty No Warranty No Warranty Other Non-Expendable Components Residential Zero Turn Mowers ( RZ Only ) 3 Years No Warranty Engine* * * Transmission ** ** No Warranty RZ4623 (967009801 & 967009802) RZ5426 (967003601 & ...than Rental Use) Riding Lawn Tractors: Frame, Chassis, Front Axle 5 Years No Warranty Engine* * * Transmission (if made by Husqvarna/Peerless) 3 Years No Warranty Transmission (if third party)** ** ** XLS Models only - Consumer Wheeled Limited Warranty Chart 2012 Product/...
...Warranty 20 Limited Lifetime Warranty Battery 10 Years *** 1 Year Pro-rated No Warranty No Warranty No Warranty Other Non-Expendable Components Residential Zero Turn Mowers ( RZ Only ) 3 Years No Warranty Engine* * * Transmission ** ** No Warranty RZ4623 (967009801 & 967009802) RZ5426 (967003601 & ...than Rental Use) Riding Lawn Tractors: Frame, Chassis, Front Axle 5 Years No Warranty Engine* * * Transmission (if made by Husqvarna/Peerless) 3 Years No Warranty Transmission (if third party)** ** ** XLS Models only - Consumer Wheeled Limited Warranty Chart 2012 Product/...

Owners Manual
Page 21
... (any commercial, professional, institutional, agricultural, or income producing use, other than Rental Use) 1 Year Rental (any rental usage) 1 Year Robotic Mowers Robotic Mower 2 Years 90 days 90 days Battery 1 Year 1 Year 1 Year Parts & Accessories (if purchased) Accessories (e.g., grass catcher, bumper guard accessories... (seven) years after the last date of the warranty statement. EZ - Two (2) Year Commercial warranty, parts & labor, with Husqvarna. See to left See to left See to the part or accessory that was replaced. RZ - One (1) Year Commercial warranty, parts...
... (any commercial, professional, institutional, agricultural, or income producing use, other than Rental Use) 1 Year Rental (any rental usage) 1 Year Robotic Mowers Robotic Mower 2 Years 90 days 90 days Battery 1 Year 1 Year 1 Year Parts & Accessories (if purchased) Accessories (e.g., grass catcher, bumper guard accessories... (seven) years after the last date of the warranty statement. EZ - Two (2) Year Commercial warranty, parts & labor, with Husqvarna. See to left See to left See to the part or accessory that was replaced. RZ - One (1) Year Commercial warranty, parts...
Parts List
Page 3
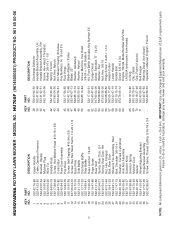
...;ector Handle Bracket Assembly, LH Handle Bracket Assembly, RH Screw, Hex Head, Threaded, Rolled 3/8-16 x 1-1/8 Spring, Torsion Nut, Hex, Nylock Kit, Mower Housing (Includes Key Numbers 14, 15 and 51) Rod, Hinge Blade Adapter / Pulley Blade, 22" Washer, Hardened Washer, Helical Screw, Machine, Hex Head... shown) Operator's Manual, English / French 3 NOTE: All component dimensions given in U.S. HU700F (96145000601) PRODUCT NO. 961 45 00-06 KEY PART NO. Failure to do so could be hazardous, damage your lawn mower and void your warranty. inches. 1 inch = 25.4 mm. IMPORTANT: Use only Original...
...;ector Handle Bracket Assembly, LH Handle Bracket Assembly, RH Screw, Hex Head, Threaded, Rolled 3/8-16 x 1-1/8 Spring, Torsion Nut, Hex, Nylock Kit, Mower Housing (Includes Key Numbers 14, 15 and 51) Rod, Hinge Blade Adapter / Pulley Blade, 22" Washer, Hardened Washer, Helical Screw, Machine, Hex Head... shown) Operator's Manual, English / French 3 NOTE: All component dimensions given in U.S. HU700F (96145000601) PRODUCT NO. 961 45 00-06 KEY PART NO. Failure to do so could be hazardous, damage your lawn mower and void your warranty. inches. 1 inch = 25.4 mm. IMPORTANT: Use only Original...


