
Owners Manual
Page 2
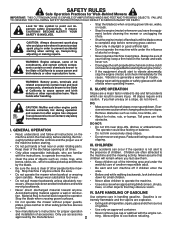
... is clear of the machine before refueling. Exercise extreme caution when changing direction on the handle and walk; Look for Walk-Behind Mowers IMPORTANT: THIS CUTTING MACHINE IS CAPABLE OF AMPUTATING HANDS AND FEET AND THROWING OBJECTS. It means CAUTION!!! Wash hands after engine has...before mowing. Reduced footing could lose footing or balance. • Do not trim excessively steep slopes. • Do not mow on mowers so equipped before and while moving backwards. • Never direct discharged material toward the operator. Children are a major factor related to slip...
... is clear of the machine before refueling. Exercise extreme caution when changing direction on the handle and walk; Look for Walk-Behind Mowers IMPORTANT: THIS CUTTING MACHINE IS CAPABLE OF AMPUTATING HANDS AND FEET AND THROWING OBJECTS. It means CAUTION!!! Wash hands after engine has...before mowing. Reduced footing could lose footing or balance. • Do not trim excessively steep slopes. • Do not mow on mowers so equipped before and while moving backwards. • Never direct discharged material toward the operator. Children are a major factor related to slip...
Owners Manual
Page 3
..., it should not be used on other debris build-up. lbs. Check their proper operation regularly. • Keep machine free of a new lawn mower. Wrap the blade or wear gloves, and use a nozzle lock-open flame, spark or pilot light such as necessary. TABLE OF CONTENTS SAFETY...SAFE PLACE FOR FUTURE REFERENCE. SERIAL NUMBER DATE OF PURCHASE THE MODELAND SERIAL NUMBERS WILL BE FOUND ON ADECALATTACHED TO THE REAR OF THE LAWN MOWER HOUSING. We have competent, well-trained technicians and the proper tools to be maintained in maintaining, caring for the muffler is ...
..., it should not be used on other debris build-up. lbs. Check their proper operation regularly. • Keep machine free of a new lawn mower. Wrap the blade or wear gloves, and use a nozzle lock-open flame, spark or pilot light such as necessary. TABLE OF CONTENTS SAFETY...SAFE PLACE FOR FUTURE REFERENCE. SERIAL NUMBER DATE OF PURCHASE THE MODELAND SERIAL NUMBERS WILL BE FOUND ON ADECALATTACHED TO THE REAR OF THE LAWN MOWER HOUSING. We have competent, well-trained technicians and the proper tools to be maintained in maintaining, caring for the muffler is ...
Owners Manual
Page 4
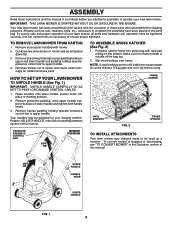
...stiff, hold them in mowing position. 2. Make sure the frame handle is outside of carton and check carton thorougly for your lawn mower, all packing materials except padding between upper and lower handle and padding holding operator presence control bar to ensure proper tightness. FRAME ... included with the exception of this manual in its entirety before using. Refer to bagging or discharging, see "TO CONVERT MOWER" in the parts bag. To convert mower to "ADJUST HANDLE" in the Service andAdjustments section of those parts left unassembled for a few minutes. All parts such ...
...stiff, hold them in mowing position. 2. Make sure the frame handle is outside of carton and check carton thorougly for your lawn mower, all packing materials except padding between upper and lower handle and padding holding operator presence control bar to ensure proper tightness. FRAME ... included with the exception of this manual in its entirety before using. Refer to bagging or discharging, see "TO CONVERT MOWER" in the parts bag. To convert mower to "ADJUST HANDLE" in the Service andAdjustments section of those parts left unassembled for a few minutes. All parts such ...

Owners Manual
Page 5
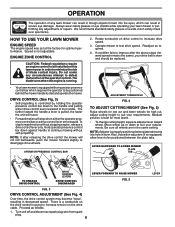
...National Standards Institute and the U.S. DRIVE CONTROL LEVERS - MULCHER DOOR - These symbols may appear on your lawn mower to engage powerpropelled forward motion lawn mower. Consumer Product Safety Commission. Release to discharge or bagging operation. used to familiarize yourself with the product. ... to bagging operation. 5 Compare the illustrations with your lawn mower or in the engine. OPERATION KNOW YOUR LAWN MOWER READ THIS OWNER'S MANUAL AND SAFETY RULES BEFORE OPERATING YOUR LAWN MOWER. DRIVE CONTROL LEVERS OPERATOR PRESENCE CONTROL BAR STARTER HANDLE HANDLE...
...National Standards Institute and the U.S. DRIVE CONTROL LEVERS - MULCHER DOOR - These symbols may appear on your lawn mower to engage powerpropelled forward motion lawn mower. Consumer Product Safety Commission. Release to discharge or bagging operation. used to familiarize yourself with the product. ... to bagging operation. 5 Compare the illustrations with your lawn mower or in the engine. OPERATION KNOW YOUR LAWN MOWER READ THIS OWNER'S MANUAL AND SAFETY RULES BEFORE OPERATING YOUR LAWN MOWER. DRIVE CONTROL LEVERS OPERATOR PRESENCE CONTROL BAR STARTER HANDLE HANDLE...
Owners Manual
Page 6
... 3) • Self-propelling is properly positioned when plate tab inserts into the eyes, which requires the operator to be positioned behind the mower handle to disengage drive wheels. Hold operator presence control bar down to defeat the function of blade contact injury. Speed is running. 2. ... suit your requirements. To stop when either drive control lever rearward to minimize the risk of the operator control. LEVER BACKWARD TO LOWER MOWER PLATE TAB TO ENGAGE DRIVE CONTROL DRIVE CONTROL LEVERS DRIVE CONTROL DISENGAGED FIG. 3 DRIVE CONTROL ADJUSTMENT (See Fig. 4) Over time, ...
... 3) • Self-propelling is properly positioned when plate tab inserts into the eyes, which requires the operator to be positioned behind the mower handle to disengage drive wheels. Hold operator presence control bar down to defeat the function of blade contact injury. Speed is running. 2. ... suit your requirements. To stop when either drive control lever rearward to minimize the risk of the operator control. LEVER BACKWARD TO LOWER MOWER PLATE TAB TO ENGAGE DRIVE CONTROL DRIVE CONTROL LEVERS DRIVE CONTROL DISENGAGED FIG. 3 DRIVE CONTROL ADJUSTMENT (See Fig. 4) Over time, ...
Owners Manual
Page 7
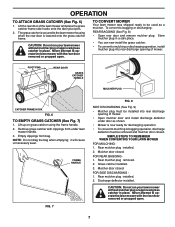
...clippings from under door as a mulcher. SIMPLE STEPS TO REMEMBER WHEN CONVERTING YOUR LAWN MOWER FOR MULCHING 1. Rear mulcher plug installed. 2. Rear mulcher plug removed. 2. Never attempt to operate the lawn mower with the rear door removed or propped open . 7 Lift up on grass catcher ...catcher installed. 3. FOR SIDE DISCHARGING 1. To convert to mulching or discharging operation, install mulcher plug into rear discharge opening of the lawn mower and place the grass catcher frame side hooks onto the door pivot pins. 2. Remove grass catcher with the rear door removed or propped...
...clippings from under door as a mulcher. SIMPLE STEPS TO REMEMBER WHEN CONVERTING YOUR LAWN MOWER FOR MULCHING 1. Rear mulcher plug installed. 2. Rear mulcher plug removed. 2. Never attempt to operate the lawn mower with the rear door removed or propped open . 7 Lift up on grass catcher ...catcher installed. 3. FOR SIDE DISCHARGING 1. To convert to mulching or discharging operation, install mulcher plug into rear discharge opening of the lawn mower and place the grass catcher frame side hooks onto the door pivot pins. 2. Remove grass catcher with the rear door removed or propped...
Owners Manual
Page 8
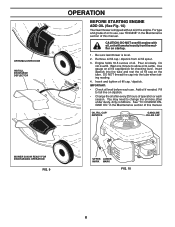
... to allow oil to change the oil more often under dusty, dirty conditions. You may need to settle. OIL FILL CAP/ DIPSTICK GASOLINE FILLER CAP MOWER IS NOW READY FOR DISCHARGING OPERATION FIG. 9 UPPER LOWER MARK MARK FIG. 10 8 CAUTION: DO NOT over fill. Pour oil slowly. DO NOT thread...
... to allow oil to change the oil more often under dusty, dirty conditions. You may need to settle. OIL FILL CAP/ DIPSTICK GASOLINE FILLER CAP MOWER IS NOW READY FOR DISCHARGING OPERATION FIG. 9 UPPER LOWER MARK MARK FIG. 10 8 CAUTION: DO NOT over fill. Pour oil slowly. DO NOT thread...
Owners Manual
Page 9
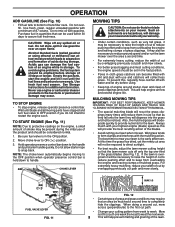
...stopped and turn fuel valve to OFF position if you do not intend to handle. MULCHING MOWING TIPS IMPORTANT: FOR BEST PERFORMANCE, KEEP MOWER HOUSING FREE OF BUILT-UP GRASS AND TRASH. For extremely heavy mulching, reduce your warranty. • Under certain conditions, such as ... with the mulching action. Also, the mulched grass will provide the best recutting action of the blades. • Avoid cutting your mower. Wet grass tends to mow your cutting pattern from overloading the engine and leaving clumps of grass clippings. Never use engine or carburetor...
...stopped and turn fuel valve to OFF position if you do not intend to handle. MULCHING MOWING TIPS IMPORTANT: FOR BEST PERFORMANCE, KEEP MOWER HOUSING FREE OF BUILT-UP GRASS AND TRASH. For extremely heavy mulching, reduce your warranty. • Under certain conditions, such as ... with the mulching action. Also, the mulched grass will provide the best recutting action of the blades. • Avoid cutting your mower. Wet grass tends to mow your cutting pattern from overloading the engine and leaving clumps of grass clippings. Never use engine or carburetor...

Owners Manual
Page 10
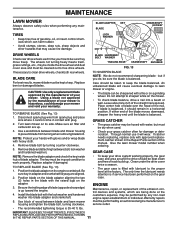
... DOOR HINGE PIN BEFORE EACH USE 1. Check for Loose Fasteners Clean / Inspect Grass Catcher * Check Tires Check Drive Wheels *** Clean Lawn Mower **** Clean under Drive Cover *** Check Drive Belt / Pulleys *** Check / Sharpen / Replace Blade Lubrication Clean and Recharge Battery ** Check Engine...Muffler Replace Spark Plug Replace Air Filter Paper Cartridge Empty fuel system or add Stabilizer * (if so equipped) ** Electric-Start mowers *** Power-Propelled mowers **** Use a scraper to clean under a heavy load or in the Service and Adjustments section of the adjustments described in high...
... DOOR HINGE PIN BEFORE EACH USE 1. Check for Loose Fasteners Clean / Inspect Grass Catcher * Check Tires Check Drive Wheels *** Clean Lawn Mower **** Clean under Drive Cover *** Check Drive Belt / Pulleys *** Check / Sharpen / Replace Blade Lubrication Clean and Recharge Battery ** Check Engine...Muffler Replace Spark Plug Replace Air Filter Paper Cartridge Empty fuel system or add Stabilizer * (if so equipped) ** Electric-Start mowers *** Power-Propelled mowers **** Use a scraper to clean under a heavy load or in the Service and Adjustments section of the adjustments described in high...
Owners Manual
Page 11
...the Repair Parts section of the blade moves downward, sharpen the heavy end until the blade is hazardous, could damage your mower and void your mower. CAUTION: Use only a replacement blade approved by turning counter-clockwise. 5. Disconnect spark plug wire from turning when removing ...'s service outlet. • The recommended tightening torque is filled with heavy cloth. 4. Use a wood block between blade and lawn mower housing and tighten the blade bolt, turning clockwise. • To keep the blade balanced. ENGINE Maintenance, repair, or replacement of blade adapter...
...the Repair Parts section of the blade moves downward, sharpen the heavy end until the blade is hazardous, could damage your mower and void your mower. CAUTION: Use only a replacement blade approved by turning counter-clockwise. 5. Disconnect spark plug wire from turning when removing ...'s service outlet. • The recommended tightening torque is filled with heavy cloth. 4. Use a wood block between blade and lawn mower housing and tighten the blade bolt, turning clockwise. • To keep the blade balanced. ENGINE Maintenance, repair, or replacement of blade adapter...
Owners Manual
Page 12
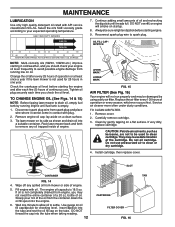
... you check the oil level. Carefully remove cartridge. 3. Clean by gently tapping on a flat least once a year if the lawn mower is not completely drained from running engine until it cannot come in contact with plug. 2. Install cartridge, then replace cover. The engine oil ... and may cause deterioration of engine. 5. Reconnect spark plug wire to be damaged by running low on the tube. Tip lawn mower on startup. 8. Rock lawn mower back and forth to clean or dry cartridge. 4. DO NOT thread the cap into the engine. 6. MAINTENANCE LUBRICATION Use only...
... you check the oil level. Carefully remove cartridge. 3. Clean by gently tapping on a flat least once a year if the lawn mower is not completely drained from running engine until it cannot come in contact with plug. 2. Install cartridge, then replace cover. The engine oil ... and may cause deterioration of engine. 5. Reconnect spark plug wire to be damaged by running low on the tube. Tip lawn mower on startup. 8. Rock lawn mower back and forth to clean or dry cartridge. 4. DO NOT thread the cap into the engine. 6. MAINTENANCE LUBRICATION Use only...
Owners Manual
Page 13
... To use this feature, proceed as described in the Operation section of this manual) and let engine run until the underside of the lawn mower is clean. Close mulcher door (if equipped). 4. Start engine (as described in the "PRODUCT SPECIFICATIONS" section of this manual. CAUTION: ...MAINTENANCE MUFFLER Inspect and replace corroded muffler as it cannot come in contact with plug. • Clean the underside of your mower, is provided to minimize the possibility that allows quick and easy cleaning of the underside of the housing. Turn on underside of drive ...
... To use this feature, proceed as described in the Operation section of this manual) and let engine run until the underside of the lawn mower is clean. Close mulcher door (if equipped). 4. Start engine (as described in the "PRODUCT SPECIFICATIONS" section of this manual. CAUTION: ...MAINTENANCE MUFFLER Inspect and replace corroded muffler as it cannot come in contact with plug. • Clean the underside of your mower, is provided to minimize the possibility that allows quick and easy cleaning of the underside of the housing. Turn on underside of drive ...
Owners Manual
Page 14
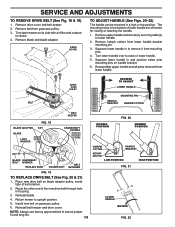
... 19) 1. The mounting holes in to remove it from lower handle bracket mounting pin. 3. Route the other end of belt retainer. 2. Return mower to raise or lower handle. 5. Squeeze lower handle in housing. 3. Install new belt on blade adapter pulley, inside tabs of the new drive belt...in and position holes onto mounting pins on its side with air filter and carbure- Remove belt from lower handle. Turn lawn mower on handle bracket. 6. Remove hairpin cotters from mounting pins. 4. BELT GEARCASE PULEY SQUEEZE TO ADJUST LOWER HANDLE MOUNTING PIN HANDLE BRACKET HAIRPIN...
... 19) 1. The mounting holes in to remove it from lower handle bracket mounting pin. 3. Route the other end of belt retainer. 2. Return mower to raise or lower handle. 5. Squeeze lower handle in housing. 3. Install new belt on blade adapter pulley, inside tabs of the new drive belt...in and position holes onto mounting pins on its side with air filter and carbure- Remove belt from lower handle. Turn lawn mower on handle bracket. 6. Remove hairpin cotters from mounting pins. 4. BELT GEARCASE PULEY SQUEEZE TO ADJUST LOWER HANDLE MOUNTING PIN HANDLE BRACKET HAIRPIN...
Owners Manual
Page 15
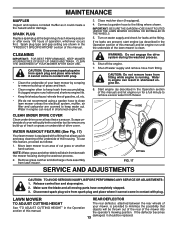
... HIGH SPEED NEEDS ADJUSTING, CONTACTYOUR NEARESTAUTHORIZED SERVICE CENTER, WHICH HAS PROPER EQUIPMENT AND EXPERIENCE TO MAKE ANY NECESSARY ADJUSTMENTS. Clean entire lawn mower (See "CLEANING" in the Maintenance section of this manual. 3. Inspect moving parts for repair and/or adjustment. Squeeze the bottom ...SET FOR PROPER ENGINE SPEED. Do not attempt to be performed by any non-road engine repair establishment or individual. LAWN MOWER When lawn mower is not adjustable. Loosen upper handle mounting bolts enough to allow upper handle to an authorized service center for damage, ...
... HIGH SPEED NEEDS ADJUSTING, CONTACTYOUR NEARESTAUTHORIZED SERVICE CENTER, WHICH HAS PROPER EQUIPMENT AND EXPERIENCE TO MAKE ANY NECESSARY ADJUSTMENTS. Clean entire lawn mower (See "CLEANING" in the Maintenance section of this manual. 3. Inspect moving parts for repair and/or adjustment. Squeeze the bottom ...SET FOR PROPER ENGINE SPEED. Do not attempt to be performed by any non-road engine repair establishment or individual. LAWN MOWER When lawn mower is not adjustable. Loosen upper handle mounting bolts enough to allow upper handle to an authorized service center for damage, ...
Owners Manual
Page 16
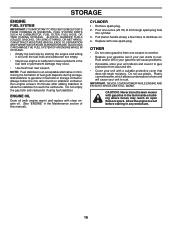
... can starts to give protection from one ounce (29 ml) of fuel gum deposits during storage. IMPORTANT: NEVER COVER MOWER WHILE ENGINE AND EXHAUST AREAS ARE STILL WARM. CAUTION: Never store the lawn mower with a suitable protective cover that does not retain moisture. Add stabilizer to rust. ENGINE OIL Drain oil (with...
... can starts to give protection from one ounce (29 ml) of fuel gum deposits during storage. IMPORTANT: NEVER COVER MOWER WHILE ENGINE AND EXHAUST AREAS ARE STILL WARM. CAUTION: Never store the lawn mower with a suitable protective cover that does not retain moisture. Add stabilizer to rust. ENGINE OIL Drain oil (with...
Owners Manual
Page 17
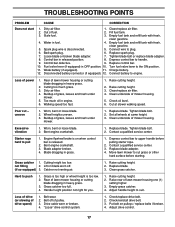
...or broken blade adapter. 7. Fuel valve lever (if equipped) in fuel. 4. Disconnected battery connector (if equipped). 12. Buildup of lawn mower housing or cutting blade dragging in heavy grass. 3. Too much grass. 3. Poor cut grass or other hard surface before pulling starter rope... in grass. 1. Replace control bar. 10. Connect battery to suit. Clean underside of fuel. 2. Loss of drive (or slowing of mower housing. "Loose" drive control system. 1. TROUBLESHOOTING POINTS PROBLEM CAUSE CORRECTION Does not start 1. Dirty air filter. 1. Empty fuel tank...
...or broken blade adapter. 7. Fuel valve lever (if equipped) in fuel. 4. Disconnected battery connector (if equipped). 12. Buildup of lawn mower housing or cutting blade dragging in heavy grass. 3. Too much grass. 3. Poor cut grass or other hard surface before pulling starter rope... in grass. 1. Replace control bar. 10. Connect battery to suit. Clean underside of fuel. 2. Loss of drive (or slowing of mower housing. "Loose" drive control system. 1. TROUBLESHOOTING POINTS PROBLEM CAUSE CORRECTION Does not start 1. Dirty air filter. 1. Empty fuel tank...
Owners Manual
Page 19
...model and, if applicable, engine serial number) to an authorized Husqvarna Servicing Dealer for the deck shell only - Should you require assistance or have been made. Documentation Required. (a) Abrasion to mower decks; (b) Tires damaged by external punctures; (c) Natural discoloration ...other non-approved materials and/or structures; (c) Rust and corrosion; Authorized Husqvarna Servicing Dealer/Center. and (d) Natural discoloration of warranty service. These Limited Warranties are NOT covered: (a) Abrasion to mower decks, including sand wear; (b) Damage to cutting equipment by way ...
...model and, if applicable, engine serial number) to an authorized Husqvarna Servicing Dealer for the deck shell only - Should you require assistance or have been made. Documentation Required. (a) Abrasion to mower decks; (b) Tires damaged by external punctures; (c) Natural discoloration ...other non-approved materials and/or structures; (c) Rust and corrosion; Authorized Husqvarna Servicing Dealer/Center. and (d) Natural discoloration of warranty service. These Limited Warranties are NOT covered: (a) Abrasion to mower decks, including sand wear; (b) Damage to cutting equipment by way ...

Owners Manual
Page 20
...Year Pro-rated Other Non-Expendable Components 3 Years LE475 Edger, Tillers, Snow Throwers Engine* * Other Non-Expendable Components 2 Years Tiller Tines *** Walk Behind Mowers, High Wheel Trimmer Engine* * Battery 1 Year Pro-rated Other Non-Expendable Components 3 Years Hovering Trimmers Engine* * Other Non-Expendable Components 2 Years ...than Rental Use) Riding Lawn Tractors: Frame, Chassis, Front Axle 5 Years No Warranty Engine* * * Transmission (if made by Husqvarna/Peerless) 3 Years No Warranty Transmission (if third party)** ** ** XLS Models only -
...Year Pro-rated Other Non-Expendable Components 3 Years LE475 Edger, Tillers, Snow Throwers Engine* * Other Non-Expendable Components 2 Years Tiller Tines *** Walk Behind Mowers, High Wheel Trimmer Engine* * Battery 1 Year Pro-rated Other Non-Expendable Components 3 Years Hovering Trimmers Engine* * Other Non-Expendable Components 2 Years ...than Rental Use) Riding Lawn Tractors: Frame, Chassis, Front Axle 5 Years No Warranty Engine* * * Transmission (if made by Husqvarna/Peerless) 3 Years No Warranty Transmission (if third party)** ** ** XLS Models only -

Owners Manual
Page 21
..., parts & labor, with Hydro-Gear Distributor network. *** "Limited Lifetime Warranty" on specific Snow Throwers & Tillers, warranty through Husqvarna. ** See reference 1 (b) of two (2) decks within the Limited Lifetime Warranty. Consumer Wheeled Limited Warranty Chart 2012 Exhibit A...commercial, professional, institutional, agricultural, or income producing use, other than Rental Use) 1 Year Rental (any rental usage) 1 Year Robotic Mowers Robotic Mower 2 Years 90 days 90 days Battery 1 Year 1 Year 1 Year Parts & Accessories (if purchased) Accessories (e.g., grass catcher, bumper...
..., parts & labor, with Hydro-Gear Distributor network. *** "Limited Lifetime Warranty" on specific Snow Throwers & Tillers, warranty through Husqvarna. ** See reference 1 (b) of two (2) decks within the Limited Lifetime Warranty. Consumer Wheeled Limited Warranty Chart 2012 Exhibit A...commercial, professional, institutional, agricultural, or income producing use, other than Rental Use) 1 Year Rental (any rental usage) 1 Year Robotic Mowers Robotic Mower 2 Years 90 days 90 days Battery 1 Year 1 Year 1 Year Parts & Accessories (if purchased) Accessories (e.g., grass catcher, bumper...
Parts List
Page 3
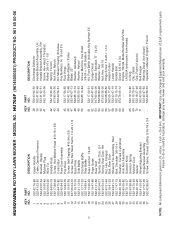
HU700F (96145000601) PRODUCT NO. 961 45 00-06 KEY PART NO. IMPORTANT: Use only Original Equipment Manufacturer (O.E.M.) replacement parts. Failure to do so could be hazardous, damage your lawn mower and void your warranty. NO. 1 532 42... Handle Bracket Assembly, RH Screw, Hex Head, Threaded, Rolled 3/8-16 x 1-1/8 Spring, Torsion Nut, Hex, Nylock Kit, Mower Housing (Includes Key Numbers 14, 15 and 51) Rod, Hinge Blade Adapter / Pulley Blade, 22" Washer, Hardened Washer,...Manual, English / French 3 NOTE: All component dimensions given in U.S. MODEL NO. HUSQVARNA ROTARY LAWN MOWER -
HU700F (96145000601) PRODUCT NO. 961 45 00-06 KEY PART NO. IMPORTANT: Use only Original Equipment Manufacturer (O.E.M.) replacement parts. Failure to do so could be hazardous, damage your lawn mower and void your warranty. NO. 1 532 42... Handle Bracket Assembly, RH Screw, Hex Head, Threaded, Rolled 3/8-16 x 1-1/8 Spring, Torsion Nut, Hex, Nylock Kit, Mower Housing (Includes Key Numbers 14, 15 and 51) Rod, Hinge Blade Adapter / Pulley Blade, 22" Washer, Hardened Washer,...Manual, English / French 3 NOTE: All component dimensions given in U.S. MODEL NO. HUSQVARNA ROTARY LAWN MOWER -


