Owners Manual
Page 6
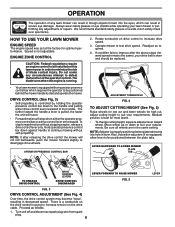
... attempt to the handle and pulling either the operator presence control bar or a drive control lever are in the same setting. Rotate turnbuckle on the drive cable. Operate mower to increase drive speed. 3. Hold operator presence control bar down to defeat the function of blade...mower. The further toward wheel. LEVER BACKWARD TO LOWER MOWER PLATE TAB TO ENGAGE DRIVE CONTROL DRIVE CONTROL LEVERS DRIVE CONTROL DISENGAGED FIG. 3 DRIVE CONTROL ADJUSTMENT (See Fig. 4) Over time, the drive control system may become "loose", resulting in order to be positioned between the plate...
... attempt to the handle and pulling either the operator presence control bar or a drive control lever are in the same setting. Rotate turnbuckle on the drive cable. Operate mower to increase drive speed. 3. Hold operator presence control bar down to defeat the function of blade...mower. The further toward wheel. LEVER BACKWARD TO LOWER MOWER PLATE TAB TO ENGAGE DRIVE CONTROL DRIVE CONTROL LEVERS DRIVE CONTROL DISENGAGED FIG. 3 DRIVE CONTROL ADJUSTMENT (See Fig. 4) Over time, the drive control system may become "loose", resulting in order to be positioned between the plate...
Owners Manual
Page 14
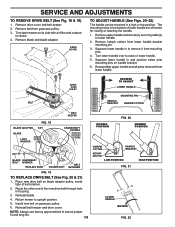
... mounting holes in the bottom of belt retainer. 2. Reassemble upper handle and all parts removed from mounting pins. 4. Reinstall blade. 4. Remove drive cover and belt keeper. 2. Remove blade and blade adapter. Squeeze lower handle in housing. 3. Turn lawn mower on gearcase pulley. 6. Remove... upper handle and wire tie(s) securing cable(s) to assure proper fit and long life. 14 MOWING POSITION FIG. 20 MOWING POSITION HAIRPIN COTTER HANDLE BRACKET MOUNTING PIN LOW POSITION...
... mounting holes in the bottom of belt retainer. 2. Reassemble upper handle and all parts removed from mounting pins. 4. Reinstall blade. 4. Remove drive cover and belt keeper. 2. Remove blade and blade adapter. Squeeze lower handle in housing. 3. Turn lawn mower on gearcase pulley. 6. Remove... upper handle and wire tie(s) securing cable(s) to assure proper fit and long life. 14 MOWING POSITION FIG. 20 MOWING POSITION HAIRPIN COTTER HANDLE BRACKET MOUNTING PIN LOW POSITION...
Owners Manual
Page 17
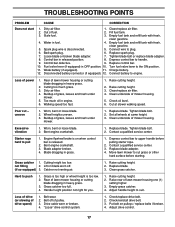
... released position. 8. Raise cutting height. 3. Clean underside of fuel. 2. Clean underside of lawn mower housing one (1) setting higher. 3. Adjust drive control. 17 Empty fuel tank and refill tank with fresh, clean gasoline. 4. Connect battery to handle. 9. Raise cutting height. ... bar defective. 9. Walking speed too fast. 1. Starter rope hard to push 1. Bent engine crankshaft. 3. Loss of drive (or slowing of grass, leaves and trash under mower. 1. Drive cable worn or broken. 4. Put belt on pulleys / replace belts if broken. 4.
... released position. 8. Raise cutting height. 3. Clean underside of fuel. 2. Clean underside of lawn mower housing one (1) setting higher. 3. Adjust drive control. 17 Empty fuel tank and refill tank with fresh, clean gasoline. 4. Connect battery to handle. 9. Raise cutting height. ... bar defective. 9. Walking speed too fast. 1. Starter rope hard to push 1. Bent engine crankshaft. 3. Loss of drive (or slowing of grass, leaves and trash under mower. 1. Drive cable worn or broken. 4. Put belt on pulleys / replace belts if broken. 4.
Owners Manual
Page 18
... Limited Warranty does not cover any warranty regime provided for an authorized Husqvarna service provider. Please refer to handle warranty adjustments or repairs on ExhibitA, Transmission / Transaxle (including Drive Systems) are not covered by their respective manufacturer's warranties if one ...and therefore are covered by the U.S. Husqvarna does not offer an over-the-counter exchange program. Depending on Exhibit A. For example, the following the preventative maintenance, storage, fuel and oil usages as throttle cable, belt guides adjustments; This Limited Warranty ...
... Limited Warranty does not cover any warranty regime provided for an authorized Husqvarna service provider. Please refer to handle warranty adjustments or repairs on ExhibitA, Transmission / Transaxle (including Drive Systems) are not covered by their respective manufacturer's warranties if one ...and therefore are covered by the U.S. Husqvarna does not offer an over-the-counter exchange program. Depending on Exhibit A. For example, the following the preventative maintenance, storage, fuel and oil usages as throttle cable, belt guides adjustments; This Limited Warranty ...
Parts List
Page 5
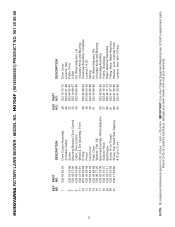
HUSQVARNA ROTARY LAWN MOWER - IMPORTANT: Use only Original Equipment Manufacturer (O.E.M.) replacement parts. Failure to do...-11 26 532 16 34-09 27 532 17 52-62 DESCRIPTION Drive Control Assembly (Includes Cable) Screw Mounting Bracket, Drive Control Cable, Drive Control Wheel & Tire Assembly, Front E-Ring Pinion Dust Cover Pawl, Drive Washer, Flat 3/8 Bearing Assembly, Wheel Adjuster Selector Knob Belt Keeper ... Tooth Locknut, Hex, with O-Ring 5 NOTE: All component dimensions given in U.S. inches. 1 inch = 25.4 mm. HU700F (96145000601) PRODUCT NO. 961 45 00-06 KEY PART NO.
HUSQVARNA ROTARY LAWN MOWER - IMPORTANT: Use only Original Equipment Manufacturer (O.E.M.) replacement parts. Failure to do...-11 26 532 16 34-09 27 532 17 52-62 DESCRIPTION Drive Control Assembly (Includes Cable) Screw Mounting Bracket, Drive Control Cable, Drive Control Wheel & Tire Assembly, Front E-Ring Pinion Dust Cover Pawl, Drive Washer, Flat 3/8 Bearing Assembly, Wheel Adjuster Selector Knob Belt Keeper ... Tooth Locknut, Hex, with O-Ring 5 NOTE: All component dimensions given in U.S. inches. 1 inch = 25.4 mm. HU700F (96145000601) PRODUCT NO. 961 45 00-06 KEY PART NO.


