
Operation Manual
Page 2
..., chemicals known to the State of the discharge opening at the lowest possible speed when on the machine and in the manual before operating a riding lawn mower. Wash hands after handling. Avoid discharging material against a wall or obstruction. Shut off ... before storage. 2 WARNING! Always look behind before and while backing. • Never direct discharged material toward the operator. Manually lock ignition switch. (See "MANUALLY LOCKING THE SmartSwitch™ IGNITION" in the Operation section of children. Operate only at all instructions on a slope. Tragic...
..., chemicals known to the State of the discharge opening at the lowest possible speed when on the machine and in the manual before operating a riding lawn mower. Wash hands after handling. Avoid discharging material against a wall or obstruction. Shut off ... before storage. 2 WARNING! Always look behind before and while backing. • Never direct discharged material toward the operator. Manually lock ignition switch. (See "MANUALLY LOCKING THE SmartSwitch™ IGNITION" in the Operation section of children. Operate only at all instructions on a slope. Tragic...
Operation Manual
Page 4
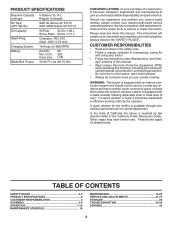
... technicians and the proper tools to give you are outside mowing. The instructions will enable you cannot easily remedy, please contact your purchase of this manual. • Wear proper Personal Protective Equipment (PPE) while operating this...
... technicians and the proper tools to give you are outside mowing. The instructions will enable you cannot easily remedy, please contact your purchase of this manual. • Wear proper Personal Protective Equipment (PPE) while operating this...
Operation Manual
Page 5
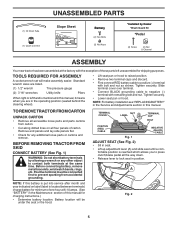
.... • Release lever to lock seat in the Maintenance section of carton. Before connecting battery, remove metal bracelets, wristwatch bands, rings, etc. A NOTE: If this manual. NOTE: For battery installation see "REPLACING BATTERY" in the Service and Adjustments section in the operating position (seated behind the steering wheel). • Lift seat... is reached which allows you are in this battery is put into service after month and year indicated on label (label is mentioned in this manual, it means when you to press clutch/brake pedal all four panels of this...
.... • Release lever to lock seat in the Maintenance section of carton. Before connecting battery, remove metal bracelets, wristwatch bands, rings, etc. A NOTE: If this manual. NOTE: For battery installation see "REPLACING BATTERY" in the Service and Adjustments section in the operating position (seated behind the steering wheel). • Lift seat... is reached which allows you are in this battery is put into service after month and year indicated on label (label is mentioned in this manual, it means when you to press clutch/brake pedal all four panels of this...
Operation Manual
Page 6
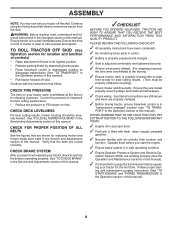
...All tires are routed correctly. CHECK FOR PROPER POSITION OF ALL BELTS See the figures that all instructions in the Operation section of this manual. PLEASE REVIEW THE FOLLOWING CHECKLIST: ✓ All assembly instructions have been completed. ✓ No remaining loose parts in carton. &#...that follow . ASSEMBLY NOTE: You may now roll your tractor, check to see "TO TRANSPORT" in the Operation section of this manual). Continue using the instructions that follow to operate your tractor off skid. WARNING: Before starting and transmission purging instructions (See "TO ...
...All tires are routed correctly. CHECK FOR PROPER POSITION OF ALL BELTS See the figures that all instructions in the Operation section of this manual. PLEASE REVIEW THE FOLLOWING CHECKLIST: ✓ All assembly instructions have been completed. ✓ No remaining loose parts in carton. &#...that follow . ASSEMBLY NOTE: You may now roll your tractor, check to see "TO TRANSPORT" in the Operation section of this manual). Continue using the instructions that follow to operate your tractor off skid. WARNING: Before starting and transmission purging instructions (See "TO ...

Operation Manual
Page 8
... other powered attachment while in reverse. (H) LIGHT SWITCH - Used to set forward movement of operation. (Q) 12-VOLT POWER PORT - Used for future reference. Save this manual for reverse movement of various controls and adjustments. Locks clutch/brake pedal into the brake position. (D) THROTTLE CONTROL - OPERATION KNOW YOUR TRACTOR READ THIS...
... other powered attachment while in reverse. (H) LIGHT SWITCH - Used to set forward movement of operation. (Q) 12-VOLT POWER PORT - Used for future reference. Save this manual for reverse movement of various controls and adjustments. Locks clutch/brake pedal into the brake position. (D) THROTTLE CONTROL - OPERATION KNOW YOUR TRACTOR READ THIS...
Operation Manual
Page 11
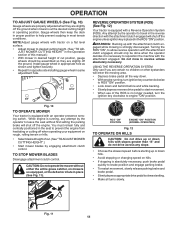
... ignition key counterclockwise to leave the seat without either the entire grass catcher, on rough, rolling terrain or hills. • Select desired height of this manual.) • With mower in most terrain conditions. NOTE:Adjust gauge wheels with slopes greater than 15° and do not drive across any slope. •...
... ignition key counterclockwise to leave the seat without either the entire grass catcher, on rough, rolling terrain or hills. • Select desired height of this manual.) • With mower in most terrain conditions. NOTE:Adjust gauge wheels with slopes greater than 15° and do not drive across any slope. •...
Operation Manual
Page 12
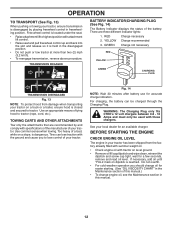
... Fig. 14 NOTE: Wait 30 minutes after battery use for accurate charge indication. There are recommended by placing freewheel control in this manual. 12 GREEN Charge not necessary RED YELLOW GREEN CHARGING PLUG TRANSMISSION DISENGAGED Fig. 13 NOTE: To protect hood from the factory already filled... with the ground and cause you should change oil for easier starting. (See "OIL VISCOSITY CHART" in the Maintenance section of this manual.) • To change engine oil, see the Maintenance section in freewheeling position. Use an appropriate means of tying hood to highest position...
... Fig. 14 NOTE: Wait 30 minutes after battery use for accurate charge indication. There are recommended by placing freewheel control in this manual. 12 GREEN Charge not necessary RED YELLOW GREEN CHARGING PLUG TRANSMISSION DISENGAGED Fig. 13 NOTE: To protect hood from the factory already filled... with the ground and cause you should change oil for easier starting. (See "OIL VISCOSITY CHART" in the Maintenance section of this manual.) • To change engine oil, see the Maintenance section in freewheeling position. Use an appropriate means of tying hood to highest position...
Operation Manual
Page 14
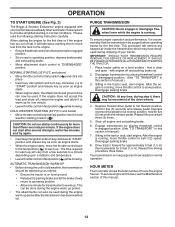
... for more than fifteen seconds per minute. Disengage transmission by placing freewheel control in engaged position. (See "TO TRANSPORT" in this manual. 14 Shut- Drive tractor forward for approximately 5 feet (1,5 m) then backwards for five (5) seconds and release pedal. To service ... run starter continuously for normal operation. Disengage parking brake CAUTION: At any trapped air inside the transmission which may be movement of manual.) 3. Repeat this procedure three (3) times. 5. When starting instruction carefully. This can be done during the engine warm up as...
... for more than fifteen seconds per minute. Disengage transmission by placing freewheel control in engaged position. (See "TO TRANSPORT" in this manual. 14 Shut- Drive tractor forward for approximately 5 feet (1,5 m) then backwards for five (5) seconds and release pedal. To service ... run starter continuously for normal operation. Disengage parking brake CAUTION: At any trapped air inside the transmission which may be movement of manual.) 3. Repeat this procedure three (3) times. 5. When starting instruction carefully. This can be done during the engine warm up as...
Operation Manual
Page 15
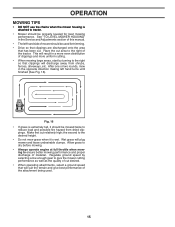
... well as the quality of cut desired. • When operating attachments, select a ground speed that will suit the terrain and give best performance of this manual. • The left hand turns until finished (See Fig. 16). OPERATION MOWING TIPS • DO NOT use tire chains when the mower housing is wet...
... well as the quality of cut desired. • When operating attachments, select a ground speed that will suit the terrain and give best performance of this manual. • The left hand turns until finished (See Fig. 16). OPERATION MOWING TIPS • DO NOT use tire chains when the mower housing is wet...
Operation Manual
Page 16
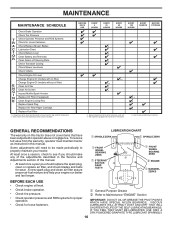
... negligence. Replace blades more often when mowing in Maintenance Section. Change more often when operating in high ambient temperatures 2 - GENERAL RECOMMENDATIONS The warranty on this manual. • At least once a year you should replace the spark plug, clean or replace air filter, and check blades and belts for wear. IF YOU... section of this tractor does not cover items that have been subjected to see if you should make any of the adjustments described in this manual.
... negligence. Replace blades more often when mowing in Maintenance Section. Change more often when operating in high ambient temperatures 2 - GENERAL RECOMMENDATIONS The warranty on this manual. • At least once a year you should replace the spark plug, clean or replace air filter, and check blades and belts for wear. IF YOU... section of this tractor does not cover items that have been subjected to see if you should make any of the adjustments described in this manual.
Operation Manual
Page 17
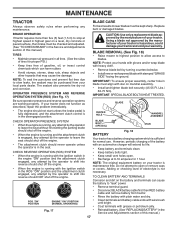
.... • Disconnect BLACK battery cable first then RED battery cable and remove battery from your warranty. Adding or checking level of this manual.) TIRES • Maintain proper air pressure in the Service and Adjustments section of electrolyte is hazardous, could damage your tractor and void ... immediately. • The engine should shut off the engine. • When the engine is in the Service and Adjustments section of this manual.) 17 IMPORTANT: SPECIAL BLADE BOLT IS HEAT TREATED. NOTE: The original equipment battery on a level, dry concrete or paved surface, then brake...
.... • Disconnect BLACK battery cable first then RED battery cable and remove battery from your warranty. Adding or checking level of this manual.) TIRES • Maintain proper air pressure in the Service and Adjustments section of electrolyte is hazardous, could damage your tractor and void ... immediately. • The engine should shut off the engine. • When the engine is in the Service and Adjustments section of this manual.) 17 IMPORTANT: SPECIAL BLADE BOLT IS HEAT TREATED. NOTE: The original equipment battery on a level, dry concrete or paved surface, then brake...
Operation Manual
Page 18
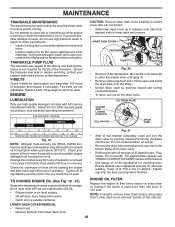
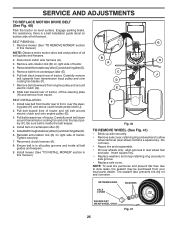
...to clean transmission. • Inspect cooling fan to avoid possible engine damage from running or while the transmission is used for the life of this manual. • Use gauge on the drain valve. Do not overfill. TO CHANGE ENGINE OIL (See Fig. 19 - 21) Determine temperature range...temperature. Select the oil's SAE viscosity grade according to slip from lower dash cover. 18 Change the oil after 100 hours of this manual. Tighten cap onto the tube securely when finished. To prevent possible damage to clean fan or transmission while engine is running low on ...
...to clean transmission. • Inspect cooling fan to avoid possible engine damage from running or while the transmission is used for the life of this manual. • Use gauge on the drain valve. Do not overfill. TO CHANGE ENGINE OIL (See Fig. 19 - 21) Determine temperature range...temperature. Select the oil's SAE viscosity grade according to slip from lower dash cover. 18 Change the oil after 100 hours of this manual. Tighten cap onto the tube securely when finished. To prevent possible damage to clean fan or transmission while engine is running low on ...

Operation Manual
Page 19
... "PRODUCT SPECIFICATIONS" section of operation, whichever occurs first. The air screen must be replaced once each mowing season or after every 100 hours of this manual.
... "PRODUCT SPECIFICATIONS" section of operation, whichever occurs first. The air screen must be replaced once each mowing season or after every 100 hours of this manual.
Operation Manual
Page 20
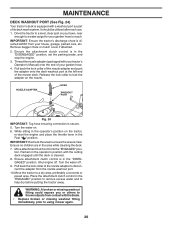
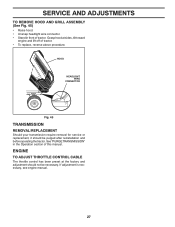
... deck engaged until the deck is in the "ENGAGED" position to remove excess water and to disconnect the adapter from contact with your tractor's Operator's Manual) onto the end of the mower deck. Pull back the lock collar of the nozzle adapter to help dry before putting the tractor away. It...
... deck engaged until the deck is in the "ENGAGED" position to remove excess water and to disconnect the adapter from contact with your tractor's Operator's Manual) onto the end of the mower deck. Pull back the lock collar of the nozzle adapter to help dry before putting the tractor away. It...
Operation Manual
Page 22
... hole for anti-sway bar will be helpful. TRANSAXLE BRACKET Fig. 27 NOTE: Depending on model, bracket (T) may be in this section of the manual. Move mower as needed to highest position. • If necessary, adjust gauge wheels before operating mower as shown. ANTI-SWAY BAR T. See Mower...on right side of mower. TS D D. Position hole in rear mower bracket (D). Fig. 29 22 Lift rear corner of mower and position slot in this manual. RIGHT SIDE REAR MOWER BRACKET S. C PLACE 90° END INTO HOLE S T S. Insert threaded rod end of link assembly through front hole in ...
... hole for anti-sway bar will be helpful. TRANSAXLE BRACKET Fig. 27 NOTE: Depending on model, bracket (T) may be in this section of the manual. Move mower as needed to highest position. • If necessary, adjust gauge wheels before operating mower as shown. ANTI-SWAY BAR T. See Mower...on right side of mower. TS D D. Position hole in rear mower bracket (D). Fig. 29 22 Lift rear corner of mower and position slot in this manual. RIGHT SIDE REAR MOWER BRACKET S. C PLACE 90° END INTO HOLE S T S. Insert threaded rod end of link assembly through front hole in ...
Operation Manual
Page 24
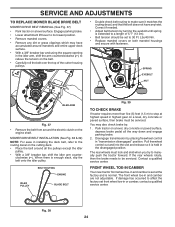
.... • With a 3/8" breaker bar, shift the idler arm counter- The rear wheels must be serviced. clockwise ( ). Engage parking brake. • Lower attachment lift lever to manually push the tractor forward. Correct if needed. • Adjust belt tension by placing freewheel control in the disengaged position. MOWER DRIVE BELT INSTALLATION (See Fig...
.... • With a 3/8" breaker bar, shift the idler arm counter- The rear wheels must be serviced. clockwise ( ). Engage parking brake. • Lower attachment lift lever to manually push the tractor forward. Correct if needed. • Adjust belt tension by placing freewheel control in the disengaged position. MOWER DRIVE BELT INSTALLATION (See Fig...
Operation Manual
Page 25
...electric clutch (G). 8. Do not lose). • Repair tire and reassemble. • On rear wheels only: align grooves in this manual.) NOTE: Observe entire motion drive belt and position of tractor. Engage parking brake. Disconnect clutch wire harness (A). 3. Pull belt slack ...in all pulley grooves and inside the belt keeper. 4. Installbeltthroughstationaryidler(C)andclutchingidler(D). 6. Insert square key. • Replace washers and snap retaining ring securely in this manual.) G B H A C J D E F Fig. 40 TO REMOVE WHEEL (See Fig. 41) • Block up axle securely. • ...
...electric clutch (G). 8. Do not lose). • Repair tire and reassemble. • On rear wheels only: align grooves in this manual.) NOTE: Observe entire motion drive belt and position of tractor. Engage parking brake. Disconnect clutch wire harness (A). 3. Pull belt slack ...in all pulley grooves and inside the belt keeper. 4. Installbeltthroughstationaryidler(C)andclutchingidler(D). 6. Insert square key. • Replace washers and snap retaining ring securely in this manual.) G B H A C J D E F Fig. 40 TO REMOVE WHEEL (See Fig. 41) • Block up axle securely. • ...

Operation Manual
Page 26
... REMOVE CABLES, REVERSE ORDER • BLACK cable first from chassis and then from the fully charged battery. • RED cable last from starting , follow this manual). Replace primary operation fuse with a 20 amp and the differential lock actuator fuse with remaining bolt and nut. Always wear eye protection when around batteries...
... REMOVE CABLES, REVERSE ORDER • BLACK cable first from chassis and then from the fully charged battery. • RED cable last from starting , follow this manual). Replace primary operation fuse with a 20 amp and the differential lock actuator fuse with remaining bolt and nut. Always wear eye protection when around batteries...
Operation Manual
Page 27
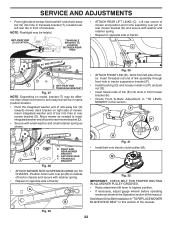
If adjustment is necessary, see engine manual. 27 See "PURGE TRANSMISSION" in front of tractor. Grasp hood at the factory and adjustment should be necessary. ENGINE TO ADJUST THROTTLE CONTROL CABLE The ... TO REMOVE HOOD AND GRILL ASSEMBLY (See Fig. 45) • Raise hood. • Unsnap headlight wire connector. • Stand in the Operation section of this manual.
If adjustment is necessary, see engine manual. 27 See "PURGE TRANSMISSION" in front of tractor. Grasp hood at the factory and adjustment should be necessary. ENGINE TO ADJUST THROTTLE CONTROL CABLE The ... TO REMOVE HOOD AND GRILL ASSEMBLY (See Fig. 45) • Raise hood. • Unsnap headlight wire connector. • Stand in the Operation section of this manual.
Operation Manual
Page 28
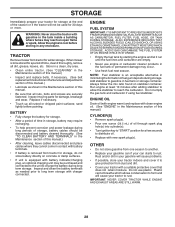
...time in storage, battery may be disconnected and battery cleaned thoroughly. (See "TO CLEAN BATTERY AND TERMINALS" in the Maintenance section of this manual.) • After cleaning, leave cables disconnected and place cables where they cannot come in contact with battery terminals. • If battery ... for winter storage. Plastic cannot breathe which allows condensation to distribute oil. • Replace with gasoline in the Maintenance section of this manual. • Be sure that does not retain moisture. IMPORTANT: NEVER COVER TRACTOR WHILE ENGINE AND EXHAUST AREAS ARE STILL WARM. 28...
...time in storage, battery may be disconnected and battery cleaned thoroughly. (See "TO CLEAN BATTERY AND TERMINALS" in the Maintenance section of this manual.) • After cleaning, leave cables disconnected and place cables where they cannot come in contact with battery terminals. • If battery ... for winter storage. Plastic cannot breathe which allows condensation to distribute oil. • Replace with gasoline in the Maintenance section of this manual. • Be sure that does not retain moisture. IMPORTANT: NEVER COVER TRACTOR WHILE ENGINE AND EXHAUST AREAS ARE STILL WARM. 28...


