
Operation Manual
Page 6
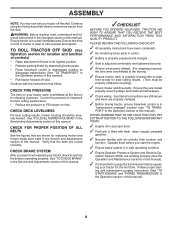
... start the engine. ✓ Ensure brake system is in the Operation section of this manual. Continue using the instructions that the belts are properly inflated. (For shipping purposes, the tires were overinflated at the factory for location and function of controls) • ...brake pedal. • Place freewheel control in disengaged position to PSI shown on your tractor for leveling). ✓ Check mower and drive belts. Ensure tractor is operating properly. Continue with all instructions in "transmission engaged" position (see that are shown for best cutting performance. ...
... start the engine. ✓ Ensure brake system is in the Operation section of this manual. Continue using the instructions that the belts are properly inflated. (For shipping purposes, the tires were overinflated at the factory for location and function of controls) • ...brake pedal. • Place freewheel control in disengaged position to PSI shown on your tractor for leveling). ✓ Check mower and drive belts. Ensure tractor is operating properly. Continue with all instructions in "transmission engaged" position (see that are shown for best cutting performance. ...
Operation Manual
Page 16
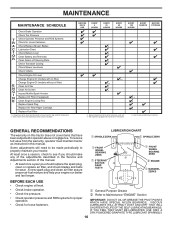
...manual. • At least once a year you should replace the spark plug, clean or replace air filter, and check blades and belts for loose fasteners. ➀ General Purpose Grease ➁ Refer to Maintenance "ENGINE" Section IMPORTANT: DO NOT OIL OR GREASE THE ... Mower Blades C Lubrication Chart T Check Battery Level O Clean Battery and Terminals R Clean Debris off Steering Plate Check Transaxle Cooling Check Mower Levelness Check V-Belts Check Engine Oil Level Change Engine Oil (models with maintenance-free battery. 1, 2 2 2 5 - Change more often when operating under a heavy load...
...manual. • At least once a year you should replace the spark plug, clean or replace air filter, and check blades and belts for loose fasteners. ➀ General Purpose Grease ➁ Refer to Maintenance "ENGINE" Section IMPORTANT: DO NOT OIL OR GREASE THE ... Mower Blades C Lubrication Chart T Check Battery Level O Clean Battery and Terminals R Clean Debris off Steering Plate Check Transaxle Cooling Check Mower Levelness Check V-Belts Check Engine Oil Level Change Engine Oil (models with maintenance-free battery. 1, 2 2 2 5 - Change more often when operating under a heavy load...
Operation Manual
Page 18
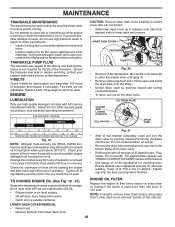
... TRANSAXLE PUMP FLUID The transaxle was sealed at "FULL" line on oil fill cap/dipstick for dirt, grass clippings and other oil change . The belts are intact and clean. • Inspect cooling fins for checking level. TO CHANGE ENGINE OIL (See Fig. 19 - 21) Determine temperature range ...until the pin is not used more than 100 hours in cold weather, they begin to your nearest authorized service center/department. Replace belts if they will drain more frequently to ensure fan blades are not adjustable. Keep oil at the factory and fluid maintenance is used ...
... TRANSAXLE PUMP FLUID The transaxle was sealed at "FULL" line on oil fill cap/dipstick for dirt, grass clippings and other oil change . The belts are intact and clean. • Inspect cooling fins for checking level. TO CHANGE ENGINE OIL (See Fig. 19 - 21) Determine temperature range ...until the pin is not used more than 100 hours in cold weather, they begin to your nearest authorized service center/department. Replace belts if they will drain more frequently to ensure fan blades are not adjustable. Keep oil at the factory and fluid maintenance is used ...

Operation Manual
Page 19
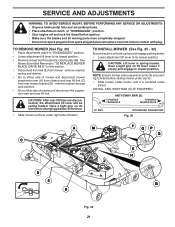
... under extremely dusty, dirty conditions), remove the blower housing and other external surfaces of this manual. Debris can restrict clutch/brake pedal shaft movement, causing belt slip and loss of your tractor. FUEL FILTER Fig. 22 19 Except for the washout port (if equipped), we do not recommend using a dirty air...
... under extremely dusty, dirty conditions), remove the blower housing and other external surfaces of this manual. Debris can restrict clutch/brake pedal shaft movement, causing belt slip and loss of your tractor. FUEL FILTER Fig. 22 19 Except for the washout port (if equipped), we do not recommend using a dirty air...
Operation Manual
Page 21
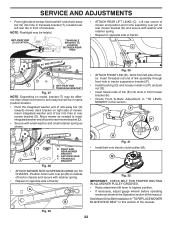
... in "TO REPLACE MOWER BLADE DRIVE BELT" in contact with plug. remove retainer spring and washer. • Go to other side of mower and disconnect the suspension arm and rear lift link. ... TO REMOVE MOWER (See Fig. 25) • Place attachment clutch in "DISENGAGED" position. • Lower attachment lift lever to its lowest position. • Remove mower belt from electric clutch pulley (M). Have a tight grip on lift lever when changing position of the lever. • Slide mower out from under right side of...
... in "TO REPLACE MOWER BLADE DRIVE BELT" in contact with plug. remove retainer spring and washer. • Go to other side of mower and disconnect the suspension arm and rear lift link. ... TO REMOVE MOWER (See Fig. 25) • Place attachment clutch in "DISENGAGED" position. • Lower attachment lift lever to its lowest position. • Remove mower belt from electric clutch pulley (M). Have a tight grip on lift lever when changing position of the lever. • Slide mower out from under right side of...
Operation Manual
Page 22
... S. A B D Fig. 30 • ATTACH FRONT LINK (E) - Work from left rear tire in front of transaxle. See Mower Drive Belt Installation in "TO REPLACE MOWER BLADE DRIVE BELT" in this section of tractor. Lift rear corner of mower and position slot in link assembly over pin (B) on outside of tractor...bracket (D) and secure with small washer and small retainer spring as shown in the Operation section of this manual. M Fig. 32 IMPORTANT: CHECK BELT FOR PROPER ROUTING IN ALL MOWER PULLEY GROOVES. • Raise attachment lift lever to insert integrated washer end of bar into hole in rear ...
... S. A B D Fig. 30 • ATTACH FRONT LINK (E) - Work from left rear tire in front of transaxle. See Mower Drive Belt Installation in "TO REPLACE MOWER BLADE DRIVE BELT" in this section of tractor. Lift rear corner of mower and position slot in link assembly over pin (B) on outside of tractor...bracket (D) and secure with small washer and small retainer spring as shown in the Operation section of this manual. M Fig. 32 IMPORTANT: CHECK BELT FOR PROPER ROUTING IN ALL MOWER PULLEY GROOVES. • Raise attachment lift lever to insert integrated washer end of bar into hole in rear ...
Operation Manual
Page 24
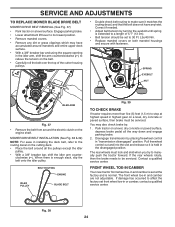
...more than five (5) feet (1,5 m) to stop at the factory and is extended to a length of the cutter housing pulleys. • Double check belt routing to its lowest position. • Remove mandrel covers. • Remove any dirt or grass clippings which may also check brake by turning the eyebolt... damage has occurred to affect the factory set to manually push the tractor forward. SPRING EYEBOLT NUT IDLER ARM Fig. 37 • Remove the belt from around mandrels and entire upper deck surface. • With a 3/8" breaker bar and using the square opening in highest gear on the engine...
...more than five (5) feet (1,5 m) to stop at the factory and is extended to a length of the cutter housing pulleys. • Double check belt routing to its lowest position. • Remove mandrel covers. • Remove any dirt or grass clippings which may also check brake by turning the eyebolt... damage has occurred to affect the factory set to manually push the tractor forward. SPRING EYEBOLT NUT IDLER ARM Fig. 37 • Remove the belt from around mandrels and entire upper deck surface. • With a 3/8" breaker bar and using the square opening in highest gear on the engine...
Operation Manual
Page 25
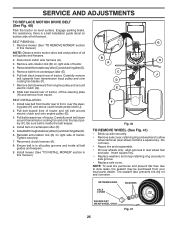
...7. Reconnect clutch harness (A). 8. Install mower. (See "TO INSTALL MOWER" section in this manual.) NOTE: Observe entire motion drive belt and position of all belt guides and keepers. 9. Tire sealant also prevents tire dry rot and corrosion. SERVICE AND ADJUSTMENTS TO REPLACE MOTION DRIVE... side of tractor. 4. Remove anti-rotation link (B) on level surface. Slide belt toward rear of tractor. BELT INSTALLATION - 1. Be sure belt is a belt installation guide decal on bottom side of tractor and roll belt around electric clutch and onto engine pulley (G). 3. Insert square key. •...
...7. Reconnect clutch harness (A). 8. Install mower. (See "TO INSTALL MOWER" section in this manual.) NOTE: Observe entire motion drive belt and position of all belt guides and keepers. 9. Tire sealant also prevents tire dry rot and corrosion. SERVICE AND ADJUSTMENTS TO REPLACE MOTION DRIVE... side of tractor. 4. Remove anti-rotation link (B) on level surface. Slide belt toward rear of tractor. BELT INSTALLATION - 1. Be sure belt is a belt installation guide decal on bottom side of tractor and roll belt around electric clutch and onto engine pulley (G). 3. Insert square key. •...
Operation Manual
Page 28
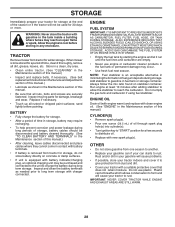
... storage. Store in a clean, dry area. • Clean entire tractor. (See "CLEANING" in the Maintenance section of this manual.) • Inspect and replace belts, if necessary. (See belt replacement instructions in the tank inside a building where fumes may occur. • Use fresh fuel next season. ALSO, EXPERIENCE INDICATES THAT ALCOHOL BLENDED FUELS...
... storage. Store in a clean, dry area. • Clean entire tractor. (See "CLEANING" in the Maintenance section of this manual.) • Inspect and replace belts, if necessary. (See belt replacement instructions in the tank inside a building where fumes may occur. • Use fresh fuel next season. ALSO, EXPERIENCE INDICATES THAT ALCOHOL BLENDED FUELS...
Operation Manual
Page 30
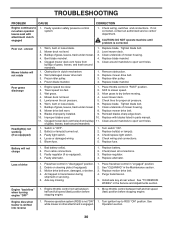
...4. Check/clean all connections. 3. Loss of grass, leaves, trash under mower. 7. Air trapped in "FAST" position. 2. Replace motion drive belt. 4. Turn ignition key to dry before mowing. 4. Level mower deck. 3. Travel speed too fast. 2. Blown fuse. 1. Check/replace light...PROBLEM CAUSE Engine continues to slower speed. 3. Remove obstruction. 2. Replace blade mandrel. Low/uneven tire air pressure. 5. Mower drive belt worn. 8. Poor cable connections. 3. See "TO REMOVE WHEEL" in parts manual. 11. If not corrected, contact an authorized ...
...4. Check/clean all connections. 3. Loss of grass, leaves, trash under mower. 7. Air trapped in "FAST" position. 2. Replace motion drive belt. 4. Turn ignition key to dry before mowing. 4. Level mower deck. 3. Travel speed too fast. 2. Blown fuse. 1. Check/replace light...PROBLEM CAUSE Engine continues to slower speed. 3. Remove obstruction. 2. Replace blade mandrel. Low/uneven tire air pressure. 5. Mower drive belt worn. 8. Poor cable connections. 3. See "TO REMOVE WHEEL" in parts manual. 11. If not corrected, contact an authorized ...


