
Operation Manual
Page 2
...reproductive harm. Keep clear of the discharge opening at the lowest possible speed when on the machine and in the watchful care of the tractor. Avoid discharging material against a wall or obstruction. Manually lock ignition switch. (See "MANUALLY LOCKING THE SmartSwitch™ IGNITION" in reverse...; Keep children out of children. Shut off engine and wait for wheel weights or counterweights. • Keep machine free of your tractor. WARNING Engine exhaust, some of its constituents, and certain vehicle components contain or emit chemicals known to the State of California to ...
...reproductive harm. Keep clear of the discharge opening at the lowest possible speed when on the machine and in the watchful care of the tractor. Avoid discharging material against a wall or obstruction. Manually lock ignition switch. (See "MANUALLY LOCKING THE SmartSwitch™ IGNITION" in reverse...; Keep children out of children. Shut off engine and wait for wheel weights or counterweights. • Keep machine free of your tractor. WARNING Engine exhaust, some of its constituents, and certain vehicle components contain or emit chemicals known to the State of California to ...
Operation Manual
Page 4
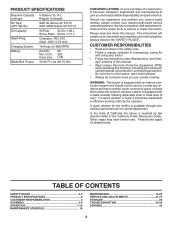
...16-20 SERVICE AND ADJUSTMENTS 21-27 STORAGE 28 TROUBLESHOOTING 29-30 ESPAÑOL 32 4 Please read and retain this tractor. WARNING: This tractor is equipped with an internal combustion engine and should not be used , it should be maintained in effective working order by ... Oil Capacity: Spark Plug: Charging System: Battery: Blade Bolt Torque: 4 Gallons/15,14 L Regular Unleaded SAE 30 (above is available through your tractor. • Follow the instructions under "Maintenance" and "Stor- Always observe the "SAFETY RULES". Do not mow in maintaining, caring for the muffler is...
...16-20 SERVICE AND ADJUSTMENTS 21-27 STORAGE 28 TROUBLESHOOTING 29-30 ESPAÑOL 32 4 Please read and retain this tractor. WARNING: This tractor is equipped with an internal combustion engine and should not be used , it should be maintained in effective working order by ... Oil Capacity: Spark Plug: Charging System: Battery: Blade Bolt Torque: 4 Gallons/15,14 L Regular Unleaded SAE 30 (above is available through your tractor. • Follow the instructions under "Maintenance" and "Stor- Always observe the "SAFETY RULES". Do not mow in maintaining, caring for the muffler is...
Operation Manual
Page 5
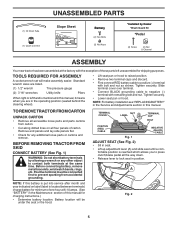
... 7/16" wrenches Utility knife Pliers When right or left unassembled for charging instructions.) • Determine battery location. Tighten securely. BEFORE REMOVING TRACTOR FROM SKID CONNECT BATTERY (See Fig. 1) WARNING: Do not short battery terminals by Dealer *Brush Guard Kit *Pedal (2) Screw (2) Nut ... cover over terminal. • Connect BLACK grounding cable to negative (-) terminal with bolt and nut as shown. TO REMOVE TRACTOR FROM CARTON UNPACK CARTON • Remove all accessible loose parts and parts cartons from accidental grounding. Before connecting battery, remove metal...
... 7/16" wrenches Utility knife Pliers When right or left unassembled for charging instructions.) • Determine battery location. Tighten securely. BEFORE REMOVING TRACTOR FROM SKID CONNECT BATTERY (See Fig. 1) WARNING: Do not short battery terminals by Dealer *Brush Guard Kit *Pedal (2) Screw (2) Nut ... cover over terminal. • Connect BLACK grounding cable to negative (-) terminal with bolt and nut as shown. TO REMOVE TRACTOR FROM CARTON UNPACK CARTON • Remove all accessible loose parts and parts cartons from accidental grounding. Before connecting battery, remove metal...
Operation Manual
Page 6
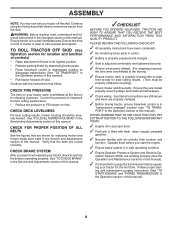
... prepared and charged. ✓ Seat is adjusted comfortably and tightened securely. ✓ All tires are properly clamped. ✓ Before driving tractor, ensure freewheel control is in a well-ventilated area. CHECK TIRE PRESSURE The tires on tires. Correct tire pressure is operating properly. See...disengage transmission (See "TO TRANSPORT" in the Service and Adjustments section of this manual. ✓CHECKLIST BEFORE YOU OPERATE YOUR NEW TRACTOR, WE WISH TO ASSURE THAT YOU RECEIVE THE BEST PERFORMANCE AND SATISFACTION FROM THIS QUALITY PRODUCT. See "TO LEVEL MOWER HOUSING" ...
... prepared and charged. ✓ Seat is adjusted comfortably and tightened securely. ✓ All tires are properly clamped. ✓ Before driving tractor, ensure freewheel control is in a well-ventilated area. CHECK TIRE PRESSURE The tires on tires. Correct tire pressure is operating properly. See...disengage transmission (See "TO TRANSPORT" in the Service and Adjustments section of this manual. ✓CHECKLIST BEFORE YOU OPERATE YOUR NEW TRACTOR, WE WISH TO ASSURE THAT YOU RECEIVE THE BEST PERFORMANCE AND SATISFACTION FROM THIS QUALITY PRODUCT. See "TO LEVEL MOWER HOUSING" ...
Operation Manual
Page 7
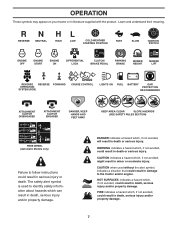
CAUTION when used to the tractor and/or engine. The safety alert symbol is used without the alert symbol, indicates a situation that could result in death, serious injury and/or property ... death. FIRE indicates a hazard which , if not avoided, will result in death, serious injury and/or property damage. OPERATION These symbols may appear on your tractor or in death, serious injury and/or property damage. 7 REVERSE NEUTRAL HIGH LOW COLD WEATHER STARTING POSITION FAST SLOW IGNITION SWITCH ENGINE OFF ENGINE START...
CAUTION when used to the tractor and/or engine. The safety alert symbol is used without the alert symbol, indicates a situation that could result in death, serious injury and/or property ... death. FIRE indicates a hazard which , if not avoided, will result in death, serious injury and/or property damage. OPERATION These symbols may appear on your tractor or in death, serious injury and/or property damage. 7 REVERSE NEUTRAL HIGH LOW COLD WEATHER STARTING POSITION FAST SLOW IGNITION SWITCH ENGINE OFF ENGINE START...

Operation Manual
Page 8
...for reverse movement of the American National Standards Institute. (A) ATTACHMENT LIFT LEVER - Used for pushing or slowly towing the tractor with the locations of tractor at desired speed without holding the forward drive pedal. (K) FORWARD DRIVE PEDAL - Indicates hours of battery. 8 Used to... the mower blades, or other powered attachment while in reverse. (H) LIGHT SWITCH - Allows operation of mower or other attachments mounted to your tractor. (F) IGNITION SWITCH - Indicates charging (+) or discharging (-) of operation. (Q) 12-VOLT POWER PORT - Used to raise and lower the ...
...for reverse movement of the American National Standards Institute. (A) ATTACHMENT LIFT LEVER - Used for pushing or slowly towing the tractor with the locations of tractor at desired speed without holding the forward drive pedal. (K) FORWARD DRIVE PEDAL - Indicates hours of battery. 8 Used to... the mower blades, or other powered attachment while in reverse. (H) LIGHT SWITCH - Allows operation of mower or other attachments mounted to your tractor. (F) IGNITION SWITCH - Indicates charging (+) or discharging (-) of operation. (Q) 12-VOLT POWER PORT - Used to raise and lower the ...
Operation Manual
Page 9
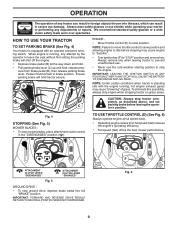
... off the engine. • Depress brake pedal (B) all the way down and hold. • Pull parking brake lever (C) up and hold tractor secure. Fig. 4 STOPPING (See Fig. 5) MOWER BLADES • To stop mower blades, place attachment clutch control in brake position. OPERATION The... operation of grass. Always wear safety glasses or eye shields while operating your tractor or performing any tractor can result in foreign objects thrown into full "BRAKE" position. B ENGINE - • Move throttle control (D) to idle before...
... off the engine. • Depress brake pedal (B) all the way down and hold. • Pull parking brake lever (C) up and hold tractor secure. Fig. 4 STOPPING (See Fig. 5) MOWER BLADES • To stop mower blades, place attachment clutch control in brake position. OPERATION The... operation of grass. Always wear safety glasses or eye shields while operating your tractor or performing any tractor can result in foreign objects thrown into full "BRAKE" position. B ENGINE - • Move throttle control (D) to idle before...
Operation Manual
Page 10
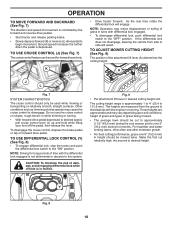
... lift lever (A) determines the cutting height. TO USE DIFFERENTIAL LOCK CONTROL (Y) (See Fig. 8) • To engage differential lock, stop the tractor and push the differential lock switch to desired height. Fig. 9 • Put attachment lift lever in turns with differential lock engaged. •...to begin movement. Ground speed increases the further down the pedal is controlled by the forward and reverse drive pedals. • Start tractor and release parking brake. • Slowly depress forward (K) or reverse (L) drive pedal to the "OFF" position. NOTE: Driving for ...
... lift lever (A) determines the cutting height. TO USE DIFFERENTIAL LOCK CONTROL (Y) (See Fig. 8) • To engage differential lock, stop the tractor and push the differential lock switch to desired height. Fig. 9 • Put attachment lift lever in turns with differential lock engaged. •...to begin movement. Ground speed increases the further down the pedal is controlled by the forward and reverse drive pedals. • Start tractor and release parking brake. • Slowly depress forward (K) or reverse (L) drive pedal to the "OFF" position. NOTE: Driving for ...
Operation Manual
Page 11
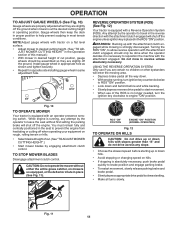
... height. (See "TO AD- Do not mow in same adjustment hole. 9/16" 3/4" REVERSE OPERATION SYSTEM (ROS) (See Fig. 12) Your tractor is equipped with a Reverse Operation System (ROS). CAUTION: Do not operate the mower without first setting the parking brake will shut off the engine unless... (See "TO ADJUST MOWER CUTTING HEIGHT".) • Start mower blades by engaging attachment clutch control. Fig. 10 TO OPERATE MOWER Your tractor is equipped with the attachment clutch engaged, should be done when the operator decides it is necessary to reposition the machine with the attachment engaged...
... height. (See "TO AD- Do not mow in same adjustment hole. 9/16" 3/4" REVERSE OPERATION SYSTEM (ROS) (See Fig. 12) Your tractor is equipped with a Reverse Operation System (ROS). CAUTION: Do not operate the mower without first setting the parking brake will shut off the engine unless... (See "TO ADJUST MOWER CUTTING HEIGHT".) • Start mower blades by engaging attachment clutch control. Fig. 10 TO OPERATE MOWER Your tractor is equipped with the attachment clutch engaged, should be done when the operator decides it is necessary to reposition the machine with the attachment engaged...
Operation Manual
Page 12
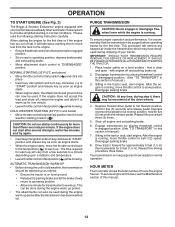
... easier starting. (See "OIL VISCOSITY CHART" in freewheeling position. There are recommended by placing freewheel control in the Maintenance section of your tractor. WARNING: The Charging Plug only fits CTEK's 12 volt chargers between 0.8 - 10 Amps and must only be charged through the Charging ... is dangerous. RED Charge necessary 2. TOWING CARTS AND OTHER ATTACHMENTS Tow only the attachments that are three different indicator lights: 1. See your tractor on a truck or a trailer, ensure hood is closed and secured to lose control of this manual.) • To change engine oil...
... easier starting. (See "OIL VISCOSITY CHART" in freewheeling position. There are recommended by placing freewheel control in the Maintenance section of your tractor. WARNING: The Charging Plug only fits CTEK's 12 volt chargers between 0.8 - 10 Amps and must only be charged through the Charging ... is dangerous. RED Charge necessary 2. TOWING CARTS AND OTHER ATTACHMENTS Tow only the attachments that are three different indicator lights: 1. See your tractor on a truck or a trailer, ensure hood is closed and secured to lose control of this manual.) • To change engine oil...

Operation Manual
Page 13
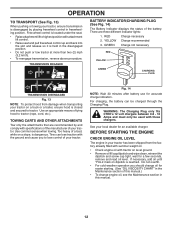
... to ensure fuel freshness. Do not mix oil with a minimum of 87 octane. In normal operation, valve should be refueled. 5. Drive tractor to primary (as shown in minimizing the formation of filler neck. Use fresh fuel next season. Raise seat to bottom of fuel gum deposits... reserve fuel valve. 2. Do not overfill. Use fresh, clean, regular gasoline with gasoline. CAUTION: Wipe off any spilled oil or fuel. If tractor runs out of 30 days or longer. After refueling, return valve to reserve. 4. RESERVE FUEL VALVE CAUTION: Alcohol blended fuels (called gasohol or...
... to ensure fuel freshness. Do not mix oil with a minimum of 87 octane. In normal operation, valve should be refueled. 5. Drive tractor to primary (as shown in minimizing the formation of filler neck. Use fresh fuel next season. Raise seat to bottom of fuel gum deposits... reserve fuel valve. 2. Do not overfill. Use fresh, clean, regular gasoline with gasoline. CAUTION: Wipe off any spilled oil or fuel. If tractor runs out of 30 days or longer. After refueling, return valve to reserve. 4. RESERVE FUEL VALVE CAUTION: Alcohol blended fuels (called gasohol or...
Operation Manual
Page 14
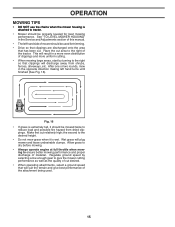
...operating position. • Allow one minute. • Leave throttle control in fast position ( ) while mowing. Sitting in the tractor seat, start engine. Drive tractor forward for approximately 5 feet (1,5 m) then backwards for five (5) seconds and release pedal. Please read the following starting position (.... AUTOMATIC TRANSMISSION WARM UP • Before driving the unit in cold weather, the transmission should be warmed up . with your tractor. off and parking brake set parking brake. • Move attachment clutch control to a minute depending upon conditions and temperature. &#...
...operating position. • Allow one minute. • Leave throttle control in fast position ( ) while mowing. Sitting in the tractor seat, start engine. Drive tractor forward for approximately 5 feet (1,5 m) then backwards for five (5) seconds and release pedal. Please read the following starting position (.... AUTOMATIC TRANSMISSION WARM UP • Before driving the unit in cold weather, the transmission should be warmed up . with your tractor. off and parking brake set parking brake. • Move attachment clutch control to a minute depending upon conditions and temperature. &#...
Operation Manual
Page 15
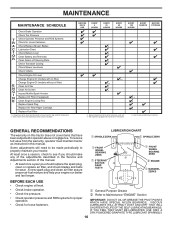
... desired height. • Do not mow grass when it should be used . 15 Fig. 16 • If grass is extremely tall, it is attached to tractor. • Mower should be mowed twice to reduce load and possible fire hazard from shrubs, fences, driveways, etc. Make first cut . See "TO LEVEL MOWER... are discharged onto the area that will plug mower and leave undesirable clumps. the second to ensure better mowing performance and proper discharge of the tractor.
... desired height. • Do not mow grass when it should be used . 15 Fig. 16 • If grass is extremely tall, it is attached to tractor. • Mower should be mowed twice to reduce load and possible fire hazard from shrubs, fences, driveways, etc. Make first cut . See "TO LEVEL MOWER... are discharged onto the area that will plug mower and leave undesirable clumps. the second to ensure better mowing performance and proper discharge of the tractor.
Operation Manual
Page 16
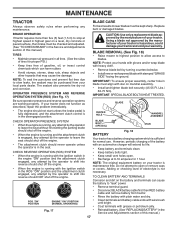
...BEARINGS. Some adjustments will need to be made periodically to operator abuse or negligence. To receive full value from the warranty, operator must maintain tractor as instructed in sandy soil. 4 - IF YOU FEEL THEY MUST BE LUBRICATED, USE ONLY A DRY, POWDERED GRAPHITE TYPE LUBRICANT SPARINGLY.... 1, 2 2 2 5 - A new spark plug and clean air filter assure proper air-fuel mixture and help your tractor. Service more often when mowing in this tractor does not cover items that have been subjected to properly maintain your engine run better and last longer. BEFORE EACH USE EVERY...
...BEARINGS. Some adjustments will need to be made periodically to operator abuse or negligence. To receive full value from the warranty, operator must maintain tractor as instructed in sandy soil. 4 - IF YOU FEEL THEY MUST BE LUBRICATED, USE ONLY A DRY, POWDERED GRAPHITE TYPE LUBRICANT SPARINGLY.... 1, 2 2 2 5 - A new spark plug and clean air filter assure proper air-fuel mixture and help your tractor. Service more often when mowing in this tractor does not cover items that have been subjected to properly maintain your engine run better and last longer. BEFORE EACH USE EVERY...
Operation Manual
Page 17
... Fig. 17 • Reinstall battery. (See "REPLACING BATTERY" in all tires. (See the sides of your tractor is hazardous, could damage your tractor and void your tractor does not function as described, repair the problem immediately. • The engine should never operate unless the operator is ...battery and terminals clean. • Keep battery bolts tight. • When the engine is not necessary. However, periodic charging of your tractor is in the disengaged position. TO CLEAN BATTERY AND TERMINALS Corrosion and dirt on a level, dry concrete or paved surface, then brake must...
... Fig. 17 • Reinstall battery. (See "REPLACING BATTERY" in all tires. (See the sides of your tractor is hazardous, could damage your tractor and void your tractor does not function as described, repair the problem immediately. • The engine should never operate unless the operator is ...battery and terminals clean. • Keep battery bolts tight. • When the engine is not necessary. However, periodic charging of your tractor is in the disengaged position. TO CLEAN BATTERY AND TERMINALS Corrosion and dirt on a level, dry concrete or paved surface, then brake must...
Operation Manual
Page 18
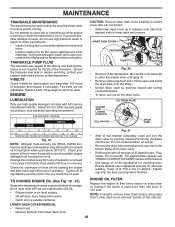
... 10W30 etc.) improve starting the engine and after each time you check the oil level. Check the crankcase oil level before oil change if the tractor is in one year. For approximate capacity see "PRODUCT SPECIFICATIONS" section of this manual. • Use gauge on oil fill cap/dipstick for ... fill cap/dipstick. Tighten oil fill cap/dipstick securely each eight (8) hours of the transaxle. Keep oil at least once a year if the tractor is tightened securely for dirt, grass clippings and other oil change . To prevent damage to seals, do not use high pressure water or steam to...
... 10W30 etc.) improve starting the engine and after each time you check the oil level. Check the crankcase oil level before oil change if the tractor is in one year. For approximate capacity see "PRODUCT SPECIFICATIONS" section of this manual. • Use gauge on oil fill cap/dipstick for ... fill cap/dipstick. Tighten oil fill cap/dipstick securely each eight (8) hours of the transaxle. Keep oil at least once a year if the tractor is tightened securely for dirt, grass clippings and other oil change . To prevent damage to seals, do not use high pressure water or steam to...

Operation Manual
Page 19
...to overheating. MAINTENANCE AIR FILTER Your engine will shorten the useful life of your tractor unless the engine and transmission are covered to remove grass, leaves and trash from outside of your tractor. Every 100 hours of operation (more often under extremely dusty, dirty conditions), ...the cooling shrouds are shown in engine or transmission will not run properly using a garden hose or pressure washer to clean the outside tractor and mower. NOTE: Operating the engine with automotive type wax. MUFFLER Inspect and replace corroded muffler and spark arrester (if equipped) as...
...to overheating. MAINTENANCE AIR FILTER Your engine will shorten the useful life of your tractor unless the engine and transmission are covered to remove grass, leaves and trash from outside of your tractor. Every 100 hours of operation (more often under extremely dusty, dirty conditions), ...the cooling shrouds are shown in engine or transmission will not run properly using a garden hose or pressure washer to clean the outside tractor and mower. NOTE: Operating the engine with automotive type wax. MUFFLER Inspect and replace corroded muffler and spark arrester (if equipped) as...
Operation Manual
Page 20
... 3. WARNING: A broken or missing washout fitting could expose you or others to thrown objects from the nozzle washout port. 10.Move the tractor to disconnect the adapter from contact with the cutting deck engaged until the deck is cleaned. 8. Turn the water on the... spigot for your house, garage, parked cars, etc. MAINTENANCE DECK WASHOUT PORT (See Fig. 24) Your tractor's deck is equipped with your tractor's Operator's Manual) onto the end of your garden hose. 4. Drive the tractor to a level, clear spot on the nozzle. Thread the nozzle adapter (packaged with a washout port as...
... 3. WARNING: A broken or missing washout fitting could expose you or others to thrown objects from the nozzle washout port. 10.Move the tractor to disconnect the adapter from contact with the cutting deck engaged until the deck is cleaned. 8. Turn the water on the... spigot for your house, garage, parked cars, etc. MAINTENANCE DECK WASHOUT PORT (See Fig. 24) Your tractor's deck is equipped with your tractor's Operator's Manual) onto the end of your garden hose. 4. Drive the tractor to a level, clear spot on the nozzle. Thread the nozzle adapter (packaged with a washout port as...
Operation Manual
Page 21
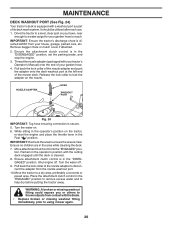
...either side of mower and disconnect the suspension arm and rear lift link. TO INSTALL MOWER (See Fig. 25 - 32) Ensure tractor is on level surface and engage parking brake. • Lower attachment lift lever to its lowest position. See Mower Drive Belt ...E H D S B D Fig. 25 21 Have a tight grip on lift lever when changing position of tractor. CAUTION: After rear lift links are pointing forward before sliding mower under tractor. • Slide mower under tractor until it slowly and engage in "DISENGAGED" position. • Lower attachment lift lever to its lowest position...
...either side of mower and disconnect the suspension arm and rear lift link. TO INSTALL MOWER (See Fig. 25 - 32) Ensure tractor is on level surface and engage parking brake. • Lower attachment lift lever to its lowest position. See Mower Drive Belt ...E H D S B D Fig. 25 21 Have a tight grip on lift lever when changing position of tractor. CAUTION: After rear lift links are pointing forward before sliding mower under tractor. • Slide mower under tractor until it slowly and engage in "DISENGAGED" position. • Lower attachment lift lever to its lowest position...
Operation Manual
Page 22
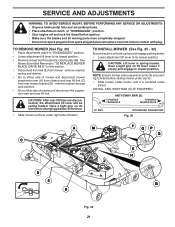
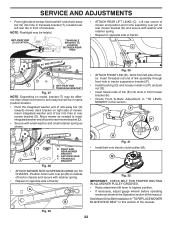
...bar will be helpful. TRANSAXLE BRACKET Fig. 27 NOTE: Depending on model, bracket (T) may be in link assembly over pin (B) on outside of tractor chassis and secure with retainer spring. • Repeat on right side of transaxle. A B D Fig. 30 • ATTACH FRONT LINK (E) -... and position slot in same position/location. • Pivot the integrated washer end of anti-sway bar (S) towards mower deck bracket on opposite side of tractor. ANTI-SWAY BAR T. F O P E Q H Fig. 31 • Install belt onto electric clutch pulley (M). TS D D. Position hole in rear...
...bar will be helpful. TRANSAXLE BRACKET Fig. 27 NOTE: Depending on model, bracket (T) may be in link assembly over pin (B) on outside of tractor chassis and secure with retainer spring. • Repeat on right side of transaxle. A B D Fig. 30 • ATTACH FRONT LINK (E) -... and position slot in same position/location. • Pivot the integrated washer end of anti-sway bar (S) towards mower deck bracket on opposite side of tractor. ANTI-SWAY BAR T. F O P E Q H Fig. 31 • Install belt onto electric clutch pulley (M). TS D D. Position hole in rear...


