

Owners Manual
Page 1
The use in this machine. Gasoline containing up to 10% ethanol (E10) is acceptable for use of any gasoline exceeding 10% ethanol (E10) will void the product warranty. 115 52 83-27 Operator's Manual Owner's Manual GTH24K54 Please read the operator's manual carefully and make sure you understand the instructions before using the machine. English
The use in this machine. Gasoline containing up to 10% ethanol (E10) is acceptable for use of any gasoline exceeding 10% ethanol (E10) will void the product warranty. 115 52 83-27 Operator's Manual Owner's Manual GTH24K54 Please read the operator's manual carefully and make sure you understand the instructions before using the machine. English
Owners Manual
Page 2
... are involved in a large percentage of riding mower-related injuries. GENERAL OPERATION • Read, understand, and follow all instructions on the machine and in the manual before cleaning the machine, removing the grass catcher, or unclogging the discharge chute. • Operate machine only in daylight or good artificial light. • Do...
... are involved in a large percentage of riding mower-related injuries. GENERAL OPERATION • Read, understand, and follow all instructions on the machine and in the manual before cleaning the machine, removing the grass catcher, or unclogging the discharge chute. • Operate machine only in daylight or good artificial light. • Do...
Owners Manual
Page 4
... footwear, eye protection, and hearing protection. age" sections of a new tractor. A spark arrester for and using your purchase of this manual. • Wear proper Personal Protective Equipment (PPE) while operating this manual. Do not mow in effective working order by law (Section 4442 of California the above 32°F/0°C) SAE 5W30...
... footwear, eye protection, and hearing protection. age" sections of a new tractor. A spark arrester for and using your purchase of this manual. • Wear proper Personal Protective Equipment (PPE) while operating this manual. Do not mow in effective working order by law (Section 4442 of California the above 32°F/0°C) SAE 5W30...
Owners Manual
Page 6
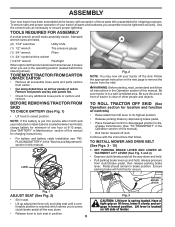
... and hold tractor secure. Fig. 2 NOTE: You may now roll your tractor all instructions in the Operation section of this manual. Lift lever is located on label (label is in brake position. Be sure tractor is located between terminals) charge battery for...1/2" wrench Tire pressure gauge (1) 3/4" wrench Pliers (1) 3/4" socket w/drive ratchet (1) 9/16" wrench Flashlight When right or left hand is mentioned in this manual, it slowly and engage in seat. • Lift up adjustment lever (A) and slide seat until a comfortable position is put into service after month and ...
... and hold tractor secure. Fig. 2 NOTE: You may now roll your tractor all instructions in the Operation section of this manual. Lift lever is located on label (label is in brake position. Be sure tractor is located between terminals) charge battery for...1/2" wrench Tire pressure gauge (1) 3/4" wrench Pliers (1) 3/4" socket w/drive ratchet (1) 9/16" wrench Flashlight When right or left hand is mentioned in this manual, it slowly and engage in seat. • Lift up adjustment lever (A) and slide seat until a comfortable position is put into service after month and ...
Owners Manual
Page 9
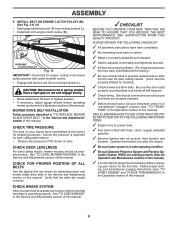
...is operating properly. See that are working properly (See the Operation and Maintenance sections in the Service and Adjustments section of this manual). eration System (ROS) are shown for best cutting performance. • Reduce tire pressure to highest position. • If ...loaded. CHECK DECK LEVELNESS For best cutting results, mower housing should be properly inflated for proper routing in the Operation section of this manual). 9 PLEASE REVIEW THE FOLLOWING CHECKLIST: ✓ All assembly instructions have been completed. ✓ No remaining loose parts in carton...
...is operating properly. See that are working properly (See the Operation and Maintenance sections in the Service and Adjustments section of this manual). eration System (ROS) are shown for best cutting performance. • Reduce tire pressure to highest position. • If ...loaded. CHECK DECK LEVELNESS For best cutting results, mower housing should be properly inflated for proper routing in the Operation section of this manual). 9 PLEASE REVIEW THE FOLLOWING CHECKLIST: ✓ All assembly instructions have been completed. ✓ No remaining loose parts in carton...
Owners Manual
Page 11
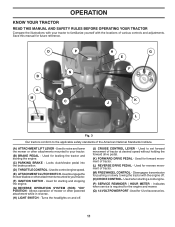
... pedal into the brake position. (D) THROTTLE CONTROL - Indicates when service is required for future reference. Save this manual for the engine and mower. (Q) 12-VOLT POWER PORT - OPERATION KNOW YOUR TRACTOR READ THIS MANUAL AND SAFETY RULES BEFORE OPERATING YOUR TRACTOR Compare the illustrations with your tractor to familiarize yourself with the...
... pedal into the brake position. (D) THROTTLE CONTROL - Indicates when service is required for future reference. Save this manual for the engine and mower. (Q) 12-VOLT POWER PORT - OPERATION KNOW YOUR TRACTOR READ THIS MANUAL AND SAFETY RULES BEFORE OPERATING YOUR TRACTOR Compare the illustrations with your tractor to familiarize yourself with the...
Owners Manual
Page 13
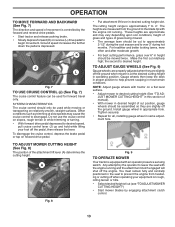
... relatively high; These heights are slightly off the pedal, then release the lever. the second to disengage. JUST MOWER CUTTING HEIGHT" in this section of manual). • With mower in same adjustment hole. Tighten securely. • Repeat for forward travel only. SYSTEM CHARACTERISTICS The cruise control should be assembled so they...
... relatively high; These heights are slightly off the pedal, then release the lever. the second to disengage. JUST MOWER CUTTING HEIGHT" in this section of manual). • With mower in same adjustment hole. Tighten securely. • Repeat for forward travel only. SYSTEM CHARACTERISTICS The cruise control should be assembled so they...
Owners Manual
Page 15
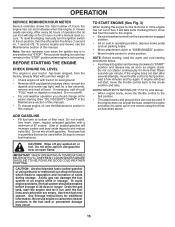
... engine oil with gasoline. NOTE: Before starting (See "OIL VISCOSITY CHART" in the Maintenance section of acids during storage. To reset the display manually turn key clockwise to the on position, then the off position five times (1 second on, 1 second off any position but "STOP". After ...• Remove oil fill cap/dipstick and wipe clean, reinsert the dipstick and screw cap tight, wait for 2 hours or until a manual reset occurs. OPERATION SERVICE REMINDER/HOUR METER Service reminder shows the total number of an engine while in storage. See Storage Instructions for more...
... engine oil with gasoline. NOTE: Before starting (See "OIL VISCOSITY CHART" in the Maintenance section of acids during storage. To reset the display manually turn key clockwise to the on position, then the off position five times (1 second on, 1 second off any position but "STOP". After ...• Remove oil fill cap/dipstick and wipe clean, reinsert the dipstick and screw cap tight, wait for 2 hours or until a manual reset occurs. OPERATION SERVICE REMINDER/HOUR METER Service reminder shows the total number of an engine while in storage. See Storage Instructions for more...
Owners Manual
Page 16
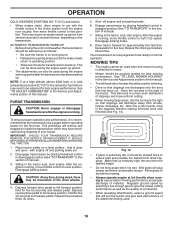
...off and parking brake set parking brake. 6. Disengage parking brake. 8. Your transmission is clear and open - This will result in this manual. that clippings will remove any time, during the engine warm up period. • The attachments can be done during step 4, there...at full throttle when mowing to assure better mowing performance and proper discharge of this section of clippings and more even distribution of manual). 3. IMPORTANT: SHOULD YOUR TRANSMISSION REQUIRE REMOVAL FOR SERVICE OR REPLACEMENT, IT SHOULD BE PURGED AFTER REINSTALLATION BEFORE OPERATING THE TRACTOR...
...off and parking brake set parking brake. 6. Disengage parking brake. 8. Your transmission is clear and open - This will result in this manual. that clippings will remove any time, during the engine warm up period. • The attachments can be done during step 4, there...at full throttle when mowing to assure better mowing performance and proper discharge of this section of clippings and more even distribution of manual). 3. IMPORTANT: SHOULD YOUR TRANSMISSION REQUIRE REMOVAL FOR SERVICE OR REPLACEMENT, IT SHOULD BE PURGED AFTER REINSTALLATION BEFORE OPERATING THE TRACTOR...

Owners Manual
Page 17
Change more often when operating under a heavy load or in this manual. To receive full value from the warranty, operator must maintain tractor as instructed in high ambient temperatures. 2 - IMPORTANT: DO NOT OIL OR GREASE THE PIVOT ... Grease • Check tire pressure. ➁ Refer to operator abuse or negligence. See Cleaning in sandy soil. 4 - GENERAL RECOMMENDATIONS LUBRICATION CHART The warranty on this manual. • At least once a year you should replace the spark plug, clean or replace air filter, and check blades and belts for wear. A new spark...
Change more often when operating under a heavy load or in this manual. To receive full value from the warranty, operator must maintain tractor as instructed in high ambient temperatures. 2 - IMPORTANT: DO NOT OIL OR GREASE THE PIVOT ... Grease • Check tire pressure. ➁ Refer to operator abuse or negligence. See Cleaning in sandy soil. 4 - GENERAL RECOMMENDATIONS LUBRICATION CHART The warranty on this manual. • At least once a year you should replace the spark plug, clean or replace air filter, and check blades and belts for wear. A new spark...
Owners Manual
Page 18
...not start unless the brake pedal is fully depressed, and the attachment clutch control is in the Service and Adjustments section of this manual). Adding or checking level of your tractor is running, any attempt by the manufacturer of gasoline, oil, or insect control chemicals which...amperes for normal use. NOTE: To seal tire punctures and prevent flat tires due to "leak" power. However, periodic charging of this manual). Coat terminals with the ignition switch in the ROS "ON" position and the attachment clutch engaged, any attempt by the operator to shift ...
...not start unless the brake pedal is fully depressed, and the attachment clutch control is in the Service and Adjustments section of this manual). Adding or checking level of your tractor is running, any attempt by the manufacturer of gasoline, oil, or insect control chemicals which...amperes for normal use. NOTE: To seal tire punctures and prevent flat tires due to "leak" power. However, periodic charging of this manual). Coat terminals with the ignition switch in the ROS "ON" position and the attachment clutch engaged, any attempt by the operator to shift ...

Owners Manual
Page 19
... tube onto the valve. • Open drain valve by using a 10mm wrench turning counterclockwise. Tighten oil fill cap/dipstick securely each eight (8) hours of this manual. • Use gauge on oil fill cap/dipstick for dirt, grass clippings and other oil change . OIL DRAIN VALVE TO OPEN TO CLOSE 02794 DRAIN...
... tube onto the valve. • Open drain valve by using a 10mm wrench turning counterclockwise. Tighten oil fill cap/dipstick securely each eight (8) hours of this manual. • Use gauge on oil fill cap/dipstick for dirt, grass clippings and other oil change . OIL DRAIN VALVE TO OPEN TO CLOSE 02794 DRAIN...

Owners Manual
Page 20
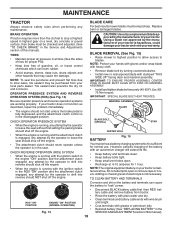
... engine damage from overheating. Spark plug type and gap setting are properly positioned. • Immediately wipe up any spilled gasoline. Every 100 hours of this manual. of all foreign matter. • Clean debris from tractor and mower. 20 Clean with automotive type wax. Service air cleaner more often under dusty conditions...
... engine damage from overheating. Spark plug type and gap setting are properly positioned. • Immediately wipe up any spilled gasoline. Every 100 hours of this manual. of all foreign matter. • Clean debris from tractor and mower. 20 Clean with automotive type wax. Service air cleaner more often under dusty conditions...
Owners Manual
Page 21
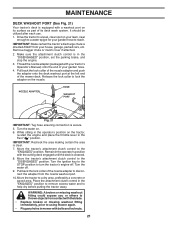
... the cutting deck engaged until the deck is cleaned. 8. MAINTENANCE DECK WASHOUT PORT (See Fig. 21) Your tractor's deck is equipped with your tractor's Operator's Manual) onto the end of your house, garage, parked cars, etc. Drive the tractor to a level, clear spot on its surface as part of the mower...
... the cutting deck engaged until the deck is cleaned. 8. MAINTENANCE DECK WASHOUT PORT (See Fig. 21) Your tractor's deck is equipped with your tractor's Operator's Manual) onto the end of your house, garage, parked cars, etc. Drive the tractor to a level, clear spot on its surface as part of the mower...
Owners Manual
Page 23
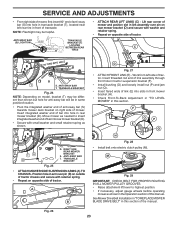
... front mower bracket (H). • Check Front-To-Back Adjustment in "TO LEVEL MOWER" in this section of the manual. See Mower Drive Belt Installation in "TO REPLACE MOWER BLADE DRIVE BELT" in this manual. Lift rear corner of mower and position slot in rear mower bracket (D). ANTI-SWAY BAR T. Insert integrated washer...
... front mower bracket (H). • Check Front-To-Back Adjustment in "TO LEVEL MOWER" in this section of the manual. See Mower Drive Belt Installation in "TO REPLACE MOWER BLADE DRIVE BELT" in this manual. Lift rear corner of mower and position slot in rear mower bracket (D). ANTI-SWAY BAR T. Insert integrated washer...
Owners Manual
Page 25
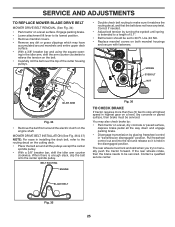
... highest speed in highest gear on the engine shaft. BELT ROUTING ENGINE Fig. 36 TO CHECK BRAKE If tractor requires more than five (5) feet to manually push the tractor forward. You may have accumulated around all the way down and engage parking brake. • Disengage transmission by placing freewheel control in...
... highest speed in highest gear on the engine shaft. BELT ROUTING ENGINE Fig. 36 TO CHECK BRAKE If tractor requires more than five (5) feet to manually push the tractor forward. You may have accumulated around all the way down and engage parking brake. • Disengage transmission by placing freewheel control in...

Owners Manual
Page 26
...front, over cooling fan blades (F). 6. Do not lose). • Repair tire and reassemble. • On rear wheels only: align grooves in this manual). Remove mower (See "TO REMOVE MOWER" section in rear wheel hub and axle. Remove anti-rotation link (B) on level surface. Install new belt ...rear to allow wheel removal (rear wheel contains a square key - Insert square key. • Replace washers and snap retaining ring securely in this manual). SERVICE AND ADJUSTMENTS TO REPLACE MOTION DRIVE BELT (See Fig. 37) Park the tractor on right side of tractor. 4. Remove belt downward from ...
...front, over cooling fan blades (F). 6. Do not lose). • Repair tire and reassemble. • On rear wheels only: align grooves in this manual). Remove mower (See "TO REMOVE MOWER" section in rear wheel hub and axle. Remove anti-rotation link (B) on level surface. Install new belt ...rear to allow wheel removal (rear wheel contains a square key - Insert square key. • Replace washers and snap retaining ring securely in this manual). SERVICE AND ADJUSTMENTS TO REPLACE MOTION DRIVE BELT (See Fig. 37) Park the tractor on right side of tractor. 4. Remove belt downward from ...
Owners Manual
Page 27
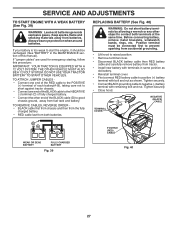
... then RED battery cable and carefully remove battery from both terminals at the same time. If "jumper cables" are used for emergency starting, follow this manual). TO REMOVE CABLES, REVERSE ORDER • BLACK cable first from chassis and then from the fully charged battery. • RED cable last from tractor. •...
... then RED battery cable and carefully remove battery from both terminals at the same time. If "jumper cables" are used for emergency starting, follow this manual). TO REMOVE CABLES, REVERSE ORDER • BLACK cable first from chassis and then from the fully charged battery. • RED cable last from tractor. •...

Owners Manual
Page 28
... GRILL ASSEMBLY (See Fig. 41) • Raise hood. • Unsnap headlight wire connector. • Stand in front of this manual. TO ADJUST CARBURETOR Your carburetor is located behind the dash. TRANSMISSION REMOVAL/REPLACEMENT Should your transmission require removal for repair and/or adjustment. ... toward engine and lift off of the grill. • Close hood. If adjustment is necessary, see engine manual. If adjustment is necessary, see engine manual. Grasp hood at the factory and adjustment should not be necessary. TO ADJUST CHOKE CONTROL The choke control has...
... GRILL ASSEMBLY (See Fig. 41) • Raise hood. • Unsnap headlight wire connector. • Stand in front of this manual. TO ADJUST CARBURETOR Your carburetor is located behind the dash. TRANSMISSION REMOVAL/REPLACEMENT Should your transmission require removal for repair and/or adjustment. ... toward engine and lift off of the grill. • Close hood. If adjustment is necessary, see engine manual. If adjustment is necessary, see engine manual. Grasp hood at the factory and adjustment should not be necessary. TO ADJUST CHOKE CONTROL The choke control has...

Owners Manual
Page 29
...and cover it to distribute oil. • Replace with a suitable protective cover that all rusted or chipped paint surfaces; nance section of this manual). • Inspect and replace belts, if necessary (See belt re- ENGINE FUEL SYSTEM IMPORTANT: IT IS IMPORTANT TO PREVENT GUM DEPOSITS FROM FORMING... stabilizer to rust. Do not empty the gas tank and carburetor if using fuel stabilizer. TRACTOR Remove mower from one ounce of this manual. • Be sure that does not retain moisture. When mower is an acceptable alternative in minimizing the formation of fuel gum deposits ...
...and cover it to distribute oil. • Replace with a suitable protective cover that all rusted or chipped paint surfaces; nance section of this manual). • Inspect and replace belts, if necessary (See belt re- ENGINE FUEL SYSTEM IMPORTANT: IT IS IMPORTANT TO PREVENT GUM DEPOSITS FROM FORMING... stabilizer to rust. Do not empty the gas tank and carburetor if using fuel stabilizer. TRACTOR Remove mower from one ounce of this manual. • Be sure that does not retain moisture. When mower is an acceptable alternative in minimizing the formation of fuel gum deposits ...

