

Owners Manual
Page 1
... product warranty. L'utilisation d'essence contenant plus de 10 % d'éthanol annulera la garantie du produit. 586 38 22-32 Operator's Manual Manuel de L'Opérateur GT52XLSi Please read the operator's manual carefully and make sure you understand the instructions before using the machine. Vous pouvez utiliser de l'essence contenant jusqu'à 10...
... product warranty. L'utilisation d'essence contenant plus de 10 % d'éthanol annulera la garantie du produit. 586 38 22-32 Operator's Manual Manuel de L'Opérateur GT52XLSi Please read the operator's manual carefully and make sure you understand the instructions before using the machine. Vous pouvez utiliser de l'essence contenant jusqu'à 10...

Owners Manual
Page 2
... before dismounting. Do no use on steep slopes. • Do not try to the State of this manual). • Disengage blades when not mowing. Manually lock ignition switch. (See "MANUALLY LOCKING THE SMARTSWITCH™ IGNITION" in . 2 Allow machine to operate the machine. • Clear the.... Avoid discharging material against a wall or obstruction. Material may lose traction. If you cannot back up and down a hill in the manual before operating. they can lose traction with specifications of the manufacturer of a load, while on the machine and in neutral, you feel ...
... before dismounting. Do no use on steep slopes. • Do not try to the State of this manual). • Disengage blades when not mowing. Manually lock ignition switch. (See "MANUALLY LOCKING THE SMARTSWITCH™ IGNITION" in . 2 Allow machine to operate the machine. • Clear the.... Avoid discharging material against a wall or obstruction. Material may lose traction. If you cannot back up and down a hill in the manual before operating. they can lose traction with specifications of the manufacturer of a load, while on the machine and in neutral, you feel ...

Owners Manual
Page 4
... available through your purchase of a new tractor. Do not mow in effective working order by law (Section 4442 of this manual. • Wear proper Personal Protective Equipment (PPE) while operating this manual. In the state of California the above 32°F/0°C) SAE 5W30 (below 32°F/0°C) W/Filter: 64 Oz./1,65...
... available through your purchase of a new tractor. Do not mow in effective working order by law (Section 4442 of this manual. • Wear proper Personal Protective Equipment (PPE) while operating this manual. In the state of California the above 32°F/0°C) SAE 5W30 (below 32°F/0°C) W/Filter: 64 Oz./1,65...

Owners Manual
Page 5
... FROM CARTON ADJUST SEAT (See Fig. 2) • Sit in a well-ventilated area. A UNPACK CARTON • Remove all instructions in this manual, it means when you to press clutch/brake pedal all the way down. • Release lever to raised position. PLACING BATTERY" in the "Service...at 6-10 amps. (See "BATTERY" in position. TOOLS REQUIRED FOR ASSEMBLY A socket wrench set will make assembly easier. Continue with the exception of this manual). • Roll tractor forward off the skid. fortable position is in seat. • Lift up adjustment lever (A) and slide seat until a com-...
... FROM CARTON ADJUST SEAT (See Fig. 2) • Sit in a well-ventilated area. A UNPACK CARTON • Remove all instructions in this manual, it means when you to press clutch/brake pedal all the way down. • Release lever to raised position. PLACING BATTERY" in the "Service...at 6-10 amps. (See "BATTERY" in position. TOOLS REQUIRED FOR ASSEMBLY A socket wrench set will make assembly easier. Continue with the exception of this manual). • Roll tractor forward off the skid. fortable position is in seat. • Lift up adjustment lever (A) and slide seat until a com-...

Owners Manual
Page 6
...inflated. (For shipping purposes, the tires were overinflated at proper level. ✓ Fuel tank is in the Operation section of this manual. Operate them before operating your tractor for leveling). ✓ Check mower and drive belts. Follow proper starting and transmission purging instructions... ITEMS: ✓ Engine oil is at the factory). ✓ Ensure mower deck is in the Service and Adjustments section of this manual). See "TO LEVEL MOWER HOUSING" in "transmission engaged" position (see that are routed correctly. PLEASE REVIEW THE FOLLOWING CHECKLIST: ✓...
...inflated. (For shipping purposes, the tires were overinflated at proper level. ✓ Fuel tank is in the Operation section of this manual. Operate them before operating your tractor for leveling). ✓ Check mower and drive belts. Follow proper starting and transmission purging instructions... ITEMS: ✓ Engine oil is at the factory). ✓ Ensure mower deck is in the Service and Adjustments section of this manual). See "TO LEVEL MOWER HOUSING" in "transmission engaged" position (see that are routed correctly. PLEASE REVIEW THE FOLLOWING CHECKLIST: ✓...

Owners Manual
Page 8
...when the parking brake is engaged. (F) SMARTSWITCH IGNITION (SSI) BUTTON - OPERATION KNOW YOUR TRACTOR READ THIS MANUAL AND SAFETY RULES BEFORE OPERATING YOUR TRACTOR Compare the illustrations with your tractor to familiarize yourself with the engine ...off . (I)* BATTERY INDICATOR BUTTON - Indicates charging (+) or discharging (-) of various controls and adjustments. Save this manual for 12 volt accessories. (S) BATTERY INDICATOR/CHARGING PLUG - Locks clutch/brake pedal into the brake position. (CC) PARKING BRAKE SYMBOL - P Z D ...
...when the parking brake is engaged. (F) SMARTSWITCH IGNITION (SSI) BUTTON - OPERATION KNOW YOUR TRACTOR READ THIS MANUAL AND SAFETY RULES BEFORE OPERATING YOUR TRACTOR Compare the illustrations with your tractor to familiarize yourself with the engine ...off . (I)* BATTERY INDICATOR BUTTON - Indicates charging (+) or discharging (-) of various controls and adjustments. Save this manual for 12 volt accessories. (S) BATTERY INDICATOR/CHARGING PLUG - Locks clutch/brake pedal into the brake position. (CC) PARKING BRAKE SYMBOL - P Z D ...
Owners Manual
Page 9
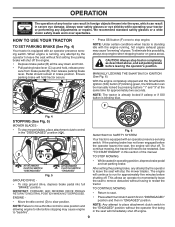
...the parking brake will stop engine when stopping tractor on grass areas. Pedal should remain in foreign objects thrown into full "BRAKE" position. MANUALLY LOCKING THE SMARTSWITCH IGNITION (See Fig. 6) With the engine completely stopped and the SmartSwitch Ignition (SSI) button (F) blinking green, the ... SAFETY SYSTEM Your tractor is blinking blue. NOTE: Failure to move throttle control to slow position and allowing engine to be manually locked by the operator to "backfire". • While seated in this possibility, always stop the mower blades. To eliminate this section ...
...the parking brake will stop engine when stopping tractor on grass areas. Pedal should remain in foreign objects thrown into full "BRAKE" position. MANUALLY LOCKING THE SMARTSWITCH IGNITION (See Fig. 6) With the engine completely stopped and the SmartSwitch Ignition (SSI) button (F) blinking green, the ... SAFETY SYSTEM Your tractor is blinking blue. NOTE: Failure to move throttle control to slow position and allowing engine to be manually locked by the operator to "backfire". • While seated in this possibility, always stop the mower blades. To eliminate this section ...

Owners Manual
Page 11
... no longer be done when the operator decides it is absolutely necessary, push brake pedal quickly to help prevent scalping in desired height of this manual.) • With mower in most terrain conditions.
... no longer be done when the operator decides it is absolutely necessary, push brake pedal quickly to help prevent scalping in desired height of this manual.) • With mower in most terrain conditions.

Owners Manual
Page 13
...) 1. Raise seat to bottom of filler neck. Ensure the indicator is an acceptable alternative in minimizing the formation of this manual.) • To change engine oil, see the Maintenance section in this manual. Press and hold the (1) and (3) buttons simultaneously for easier starting from one to solid blue. 3. The passcode may occur...
...) 1. Raise seat to bottom of filler neck. Ensure the indicator is an acceptable alternative in minimizing the formation of this manual.) • To change engine oil, see the Maintenance section in this manual. Press and hold the (1) and (3) buttons simultaneously for easier starting from one to solid blue. 3. The passcode may occur...

Owners Manual
Page 14
... system is not in cold weather, the transmission should be changed prior to first use. (See "RESETTING IGNITION SYSTEM PASSCODE" in this section of the manual.) SMARTSWITCH WARNING LIGHTS (See Fig. 19) The SmartSwitch Ignition is programmed with warning lights to indicate when any part of the normal five seconds), allowing...
... system is not in cold weather, the transmission should be changed prior to first use. (See "RESETTING IGNITION SYSTEM PASSCODE" in this section of the manual.) SMARTSWITCH WARNING LIGHTS (See Fig. 19) The SmartSwitch Ignition is programmed with warning lights to indicate when any part of the normal five seconds), allowing...

Owners Manual
Page 15
...procedure will plug mower and leave undesirable clumps. After the engine is recommended that the transmission be movement of manual.) 7. After one or two rounds, mow in this manual. Wet grass will remove any time, during step 4, there may have developed during shipping of this section...by selecting a low enough gear to give best performance of cut relatively high; Depress forward drive pedal to half (1/2) speed. Sitting in this manual. • The left hand turns until finished (See Fig. 20). After the engine is attached to reduce load and possible fire hazard from...
...procedure will plug mower and leave undesirable clumps. After the engine is recommended that the transmission be movement of manual.) 7. After one or two rounds, mow in this manual. Wet grass will remove any time, during step 4, there may have developed during shipping of this section...by selecting a low enough gear to give best performance of cut relatively high; Depress forward drive pedal to half (1/2) speed. Sitting in this manual. • The left hand turns until finished (See Fig. 20). After the engine is attached to reduce load and possible fire hazard from...

Owners Manual
Page 16
... operation. • Check for loose fasteners. ➀ General Purpose Grease ➁ Refer to see if you should make any of this manual. MAINTENANCE MAINTENANCE SCHEDULE BEFORE EACH USE EVERY 8 HOURS EVERY 25 HOURS EVERY 50 HOURS Check Brake Operation T Check Tire Pressure R Check Operator... receive full value from the warranty, operator must maintain tractor as instructed in the Service and Adjustments section of the adjustments described in this manual. • At least once a year you should replace the spark plug, clean or replace air filter, and check blades and belts...
... operation. • Check for loose fasteners. ➀ General Purpose Grease ➁ Refer to see if you should make any of this manual. MAINTENANCE MAINTENANCE SCHEDULE BEFORE EACH USE EVERY 8 HOURS EVERY 25 HOURS EVERY 50 HOURS Check Brake Operation T Check Tire Pressure R Check Operator... receive full value from the warranty, operator must maintain tractor as instructed in the Service and Adjustments section of the adjustments described in this manual. • At least once a year you should replace the spark plug, clean or replace air filter, and check blades and belts...

Owners Manual
Page 17
.... OPERATOR PRESENCE SYSTEM AND REVERSE OPERATION SYSTEM (ROS) (See Fig. 21) CAUTION: Use only a replacement blade approved by the manufacturer of this manual.) 17 TO CLEAN BATTERY AND TERMINALS Corrosion and dirt on the battery and terminals can harm rubber. • Avoid stumps, stones, deep ruts, ...CARE For best results mower blades must be checked and adjusted. (See "TO CHECK BRAKE" in the Service and Adjustments section of this manual.) TIRES • Maintain proper air pressure in the Service and Adjustments section of your tractor does not function as described, repair the ...
.... OPERATOR PRESENCE SYSTEM AND REVERSE OPERATION SYSTEM (ROS) (See Fig. 21) CAUTION: Use only a replacement blade approved by the manufacturer of this manual.) 17 TO CLEAN BATTERY AND TERMINALS Corrosion and dirt on the battery and terminals can harm rubber. • Avoid stumps, stones, deep ruts, ...CARE For best results mower blades must be checked and adjusted. (See "TO CHECK BRAKE" in the Service and Adjustments section of this manual.) TIRES • Maintain proper air pressure in the Service and Adjustments section of your tractor does not function as described, repair the ...

Owners Manual
Page 18
...ensure proper cooling. LOWER DASH COVER REMOVAL • Raise hood. • Remove fastener from "Lower dash cover removal" section of this manual. 18 CAUTION: Remove lower dash cover carefully to ensure cover tabs are not adjustable. OIL DRAIN VALVE CLOSED AND LOCKED POSITION YELLOW CAP...life of the drain valve. • Refill engine with API service classification SG-SL. For approximate capacity see "PRODUCT SPECIFICATIONS" section of this manual. • Use gauge on level surface. • Oil will result in increased oil consumption when used more freely when warm. •...
...ensure proper cooling. LOWER DASH COVER REMOVAL • Raise hood. • Remove fastener from "Lower dash cover removal" section of this manual. 18 CAUTION: Remove lower dash cover carefully to ensure cover tabs are not adjustable. OIL DRAIN VALVE CLOSED AND LOCKED POSITION YELLOW CAP...life of the drain valve. • Refill engine with API service classification SG-SL. For approximate capacity see "PRODUCT SPECIFICATIONS" section of this manual. • Use gauge on level surface. • Oil will result in increased oil consumption when used more freely when warm. •...

Owners Manual
Page 19
... replace corroded muffler and spark arrester (if equipped) as necessary. Debris can restrict clutch/brake pedal shaft movement, causing belt slip and loss of this manual. Water in "PRODUCT SPECIFICATIONS" section of drive. (See Fig. 27.) CAUTION: Avoid all gasoline, oil, etc. • Protect painted surfaces with a wire brush or compressed...
... replace corroded muffler and spark arrester (if equipped) as necessary. Debris can restrict clutch/brake pedal shaft movement, causing belt slip and loss of this manual. Water in "PRODUCT SPECIFICATIONS" section of drive. (See Fig. 27.) CAUTION: Avoid all gasoline, oil, etc. • Protect painted surfaces with a wire brush or compressed...
Owners Manual
Page 22
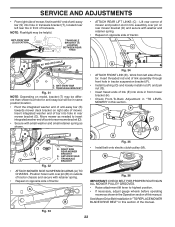
... transaxle bracket (T), located near left side of tractor. See Mower Drive Belt Installation in "TO REPLACE MOWER BLADE DRIVE BELT" in this section of the manual. ANTI-SWAY BAR (S) LOCATION TRANSAXLE BRACKET (T) LOCATED BETWEEN REAR TIRES • ATTACH REAR LIFT LINKS (C) - TRANSAXLE BRACKET Fig. 32 • ATTACH MOWER SIDE ...anti-sway bar (S) into rear mower bracket (D). • Secure with small washer and small retainer spring as shown in the Operation section of this manual. NOTE: Flashlight may be different than shown but hole for anti-sway bar will be helpful.
... transaxle bracket (T), located near left side of tractor. See Mower Drive Belt Installation in "TO REPLACE MOWER BLADE DRIVE BELT" in this section of the manual. ANTI-SWAY BAR (S) LOCATION TRANSAXLE BRACKET (T) LOCATED BETWEEN REAR TIRES • ATTACH REAR LIFT LINKS (C) - TRANSAXLE BRACKET Fig. 32 • ATTACH MOWER SIDE ...anti-sway bar (S) into rear mower bracket (D). • Secure with small washer and small retainer spring as shown in the Operation section of this manual. NOTE: Flashlight may be different than shown but hole for anti-sway bar will be helpful.

Owners Manual
Page 24
... be serviced. Fig. 42 24 BELT ROUTING ENGINE IDLER PULLEY BLADE BELT Fig. 43 TO CHECK BRAKE If tractor requires more than five (5) feet (1,5 m) to manually push the tractor forward. Pull freewheel control out and into the slot and release so it matches the routing decal, and that the belt does...
... be serviced. Fig. 42 24 BELT ROUTING ENGINE IDLER PULLEY BLADE BELT Fig. 43 TO CHECK BRAKE If tractor requires more than five (5) feet (1,5 m) to manually push the tractor forward. Pull freewheel control out and into the slot and release so it matches the routing decal, and that the belt does...

Owners Manual
Page 25
... your local parts dealer. Install belt through stationary idler (C) and clutching idler (D). 6. Insert square key. • Replace washers and snap retaining ring securely in this manual.) G B H A C J D E F Fig. 44 TO REMOVE WHEEL (See Fig. 45) • Block up axle securely. • Remove axle ... allow wheel removal (rear wheel contains a square key - BELT INSTALLATION - 1. Install mower. (See "TO INSTALL MOWER" section in this manual.) NOTE: Observe entire motion drive belt and position of tractor. 4. Reinstall anti-rotation link (B) on right side of all belt guides and ...
... your local parts dealer. Install belt through stationary idler (C) and clutching idler (D). 6. Insert square key. • Replace washers and snap retaining ring securely in this manual.) G B H A C J D E F Fig. 44 TO REMOVE WHEEL (See Fig. 45) • Block up axle securely. • Remove axle ... allow wheel removal (rear wheel contains a square key - BELT INSTALLATION - 1. Install mower. (See "TO INSTALL MOWER" section in this manual.) NOTE: Observe entire motion drive belt and position of tractor. 4. Reinstall anti-rotation link (B) on right side of all belt guides and ...

Owners Manual
Page 26
... ENGINE WITH A WEAK BATTERY (See Fig. 46) WARNING: Lead-acid batteries generate explosive gases. Keep sparks, flame and smoking materials away from starting , follow this manual). Always wear eye protection when around batteries. DO NOT USE YOUR TRACTOR BATTERY TO START OTHER VEHICLES. Tighten securely • Close hood.
... ENGINE WITH A WEAK BATTERY (See Fig. 46) WARNING: Lead-acid batteries generate explosive gases. Keep sparks, flame and smoking materials away from starting , follow this manual). Always wear eye protection when around batteries. DO NOT USE YOUR TRACTOR BATTERY TO START OTHER VEHICLES. Tighten securely • Close hood.

Owners Manual
Page 27
...not been engaged during a start attempt. • The blade switch symbol (EE) will blink if the attachment clutch control is not in operation, this manual. F EE CC TO REMOVE HOOD AND GRILL ASSEMBLY (See Fig. 50) • Raise hood. • Unsnap headlight wire connector. • Stand... the Reverse Operation System. FUNCTIONS • The SmartSwitch Ignition (SSI) Button (F) will blink in the event the engine shuts off of this manual. • After the first unsuccessful start attempt. • The Reverse Operation System (ROS) button (G) will be lit when Reverse Operation System...
...not been engaged during a start attempt. • The blade switch symbol (EE) will blink if the attachment clutch control is not in operation, this manual. F EE CC TO REMOVE HOOD AND GRILL ASSEMBLY (See Fig. 50) • Raise hood. • Unsnap headlight wire connector. • Stand... the Reverse Operation System. FUNCTIONS • The SmartSwitch Ignition (SSI) Button (F) will blink in the event the engine shuts off of this manual. • After the first unsuccessful start attempt. • The Reverse Operation System (ROS) button (G) will be lit when Reverse Operation System...

