
Operation Manual
Page 2
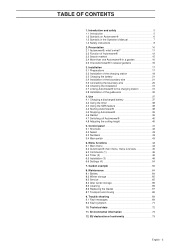
... wire 21 3.5 Connecting the boundary wire 29 3.6 Checking the installation 31 3.7 Linking Automower® to the charging station 31 3.8 Installation of Automower 12 2.3 Search method 15 2.4 More than one Automower® in a garden 16 2.5 One Automower® in the Operator's Manual 7 1.4 Safety instructions 8 2. EU declaration of conformity 73 English - 3 TABLE OF CONTENTS 1. Maintenance 64 8.1 Battery 64 8.2 Winter storage 65 8.3 Service 65 8.4 After winter storage 66 8.5 Cleaning 66 8.6 Replacing the blades...
... wire 21 3.5 Connecting the boundary wire 29 3.6 Checking the installation 31 3.7 Linking Automower® to the charging station 31 3.8 Installation of Automower 12 2.3 Search method 15 2.4 More than one Automower® in a garden 16 2.5 One Automower® in the Operator's Manual 7 1.4 Safety instructions 8 2. EU declaration of conformity 73 English - 3 TABLE OF CONTENTS 1. Maintenance 64 8.1 Battery 64 8.2 Winter storage 65 8.3 Service 65 8.4 After winter storage 66 8.5 Cleaning 66 8.6 Replacing the blades...
Operation Manual
Page 8
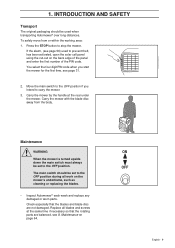
... blades. • Inspect Automower® each week and replace any damaged or worn parts. Maintenance WARNING When the mower is turned upside down the main switch must always be set to the OFF position. Press the STOP button to carry the mower. 3. INTRODUCTION AND SAFETY Transport The original packaging should be set to prevent theft, has been activated, open the solar cell panel using...
... blades. • Inspect Automower® each week and replace any damaged or worn parts. Maintenance WARNING When the mower is turned upside down the main switch must always be set to the OFF position. Press the STOP button to carry the mower. 3. INTRODUCTION AND SAFETY Transport The original packaging should be set to prevent theft, has been activated, open the solar cell panel using...

Operation Manual
Page 9
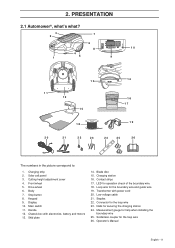
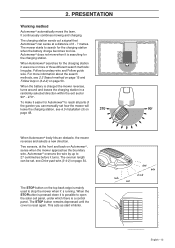
... be shortened nor extended. The low voltage cable must not run into. The wire is 250 m long. PRESENTATION 2. An installation of Husqvarna Automower® includes four main components: Automower®, an automatic lawn mower that the mower must not be purchased, with the installation is also used for any guide wires. Charging station, where your Automower® returns when the charge level in a loop around the edges of...
... be shortened nor extended. The low voltage cable must not run into. The wire is 250 m long. PRESENTATION 2. An installation of Husqvarna Automower® includes four main components: Automower®, an automatic lawn mower that the mower must not be purchased, with the installation is also used for any guide wires. Charging station, where your Automower® returns when the charge level in a loop around the edges of...
Operation Manual
Page 10
Cutting height adjustment cover 4. Front wheel 5. Body 7. Connector for operation check of the boundary wire 18. Operator's Manual English - 11 2. Solar cell panel 3. Keypad 9. Display 10. Chassis box with power cord 20. LED for the loop wire 23. Low voltage cable 21. Solderless coupler for help when installing the boundary wire 25. Main switch 11. Handle 12. Contact strips 17. Transformer with electronics, battery and motors 13. Measurement gauge for the...
Cutting height adjustment cover 4. Front wheel 5. Body 7. Connector for operation check of the boundary wire 18. Operator's Manual English - 11 2. Solar cell panel 3. Keypad 9. Display 10. Chassis box with power cord 20. LED for the loop wire 23. Low voltage cable 21. Solderless coupler for help when installing the boundary wire 25. Main switch 11. Handle 12. Contact strips 17. Transformer with electronics, battery and motors 13. Measurement gauge for the...
Operation Manual
Page 11
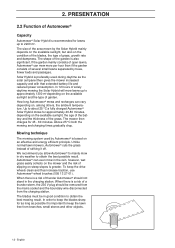
... mower then charges for approximately 40-80 minutes, depending on steep slopes is a risk of solely daytime mowing the Solar Hybrid will mow lawns up to keep the drive wheels clean and thus increase traction, use Automower® wheel brushes (505 13 27-01). The size of garden. Mowing technique The mowing system used during daytime as possible it off. In order to keep the blades sharp for lawns...
... mower then charges for approximately 40-80 minutes, depending on steep slopes is a risk of solely daytime mowing the Solar Hybrid will mow lawns up to keep the drive wheels clean and thus increase traction, use Automower® wheel brushes (505 13 27-01). The size of garden. Mowing technique The mowing system used during daytime as possible it off. In order to keep the blades sharp for lawns...
Operation Manual
Page 12
... guide wire. When Automower® searches for the charging station it is possible to 27 centimetres before it turns. When Automower® body hits an obstacle, the mower reverses and selects a new direction. For more of the garden you can be set how the mower will leave the charging station, see 6.5 Installation (3) on Automower®, sense when the mower approaches the boundary wire. The overrun length can manually set...
... guide wire. When Automower® searches for the charging station it is possible to 27 centimetres before it turns. When Automower® body hits an obstacle, the mower reverses and selects a new direction. For more of the garden you can be set how the mower will leave the charging station, see 6.5 Installation (3) on Automower®, sense when the mower approaches the boundary wire. The overrun length can manually set...
Operation Manual
Page 16
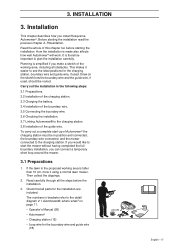
... guide wire. This makes it using a normal lawn mower. Before starting the installation. If the lawn in position and connected, the boundary wire connected, and the mower connected to the charging station. 3.8 Installation of Automower® the charging station must be routed. 3. Read carefully through all obstacles. Draw on page 11. • Operator's Manual (26) • Automower® • Charging station (15) • Loop wire for the installation are included: The numbers...
... guide wire. This makes it using a normal lawn mower. Before starting the installation. If the lawn in position and connected, the boundary wire connected, and the mower connected to the charging station. 3.8 Installation of Automower® the charging station must be routed. 3. Read carefully through all obstacles. Draw on page 11. • Operator's Manual (26) • Automower® • Charging station (15) • Loop wire for the installation are included: The numbers...
Operation Manual
Page 31
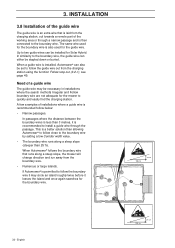
... passages. This is also used for Solar Hybrid. When Automower® follows the boundary wire that is laid from the charging station, out towards a remote part of the guide wire The guide wire is recommended follow close to two guide wires can be stapled down or buried. If Automower® is then connected to follow the guide wire out from the boundary wire. • Numerous or large...
... passages. This is also used for Solar Hybrid. When Automower® follows the boundary wire that is laid from the charging station, out towards a remote part of the guide wire The guide wire is recommended follow close to two guide wires can be stapled down or buried. If Automower® is then connected to follow the guide wire out from the boundary wire. • Numerous or large...

Operation Manual
Page 36
... the charging process is new or has been stored for a long period the battery will not be charged and needs to or under the body when the motor is made when both the charging strips on the mower touch the centre of the panel to the ON position. WARNING Read the safety instructions before starting. Open the solar cell panel using the cut-out...
... the charging process is new or has been stored for a long period the battery will not be charged and needs to or under the body when the motor is made when both the charging strips on the mower touch the centre of the panel to the ON position. WARNING Read the safety instructions before starting. Open the solar cell panel using the cut-out...
Operation Manual
Page 41
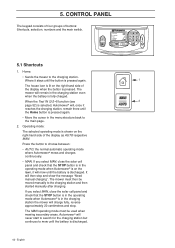
... the message "Need manual charging". English Operating mode: The selected operating mode is discharged. 42 - Home: • Sends the mower to choose between: • AUTO, the normal automatic operating mode where Automower® mows and charges continuously. • MAN. 5. Main menu Commands Timer Installation Settings 5.1 Shortcuts 1. The mower will then stop . The mower must be moved manually to mow until the battery is shown on the lawn, it reaches...
... the message "Need manual charging". English Operating mode: The selected operating mode is discharged. 42 - Home: • Sends the mower to choose between: • AUTO, the normal automatic operating mode where Automower® mows and charges continuously. • MAN. 5. Main menu Commands Timer Installation Settings 5.1 Shortcuts 1. The mower will then stop . The mower must be moved manually to mow until the battery is shown on the lawn, it reaches...

Operation Manual
Page 44
... Run all Exit angles Follow loop out Follow loop Installation shape Advanced Security Language Time and date Open Complex Normal Check loop PIN code Alarm Drive past wire Time lock SMS Follow loop in Corridor Test IN width Phone Periodical SMS number SMS test Test OUT SMS at SIM fault/alarm PIN Boundary Guide 1 Guide 2 delay delay delay Boundary Guide...
... Run all Exit angles Follow loop out Follow loop Installation shape Advanced Security Language Time and date Open Complex Normal Check loop PIN code Alarm Drive past wire Time lock SMS Follow loop in Corridor Test IN width Phone Periodical SMS number SMS test Test OUT SMS at SIM fault/alarm PIN Boundary Guide 1 Guide 2 delay delay delay Boundary Guide...

Operation Manual
Page 57
A change to indicate what Automower® is currently doing. English Sound 5 beeps over 2 seconds One long beep Short click sound Muffled long beep Short double beep Significance Starting blade disc Blade disc blocked A button on the keypad has been pressed Incorrect input The mower is removed from the charging station manually while charging is placed in progress. 6. MENU FUNCTIONS Sounds A number of audio messages are used to the setting has been made The mower is in the charging station manually. 58 -
A change to indicate what Automower® is currently doing. English Sound 5 beeps over 2 seconds One long beep Short click sound Muffled long beep Short double beep Significance Starting blade disc Blade disc blocked A button on the keypad has been pressed Incorrect input The mower is removed from the charging station manually while charging is placed in progress. 6. MENU FUNCTIONS Sounds A number of audio messages are used to the setting has been made The mower is in the charging station manually. 58 -

Operation Manual
Page 59
... per day. Automower® is necessary. Corridor width: Boundary wire 20 60 - Area: 600 m2. No guide wire is necessary. Search method: Irregular and Follow boundary wire in . Search method: Irregular and Follow boundary wire in . Search method: Irregular and Follow guide wire in the large open area. 7. GARDEN EXAMPLE Proposals for installation and settings Area: 1,800 m2. Timer: Operating time of...
... per day. Automower® is necessary. Corridor width: Boundary wire 20 60 - Area: 600 m2. No guide wire is necessary. Search method: Irregular and Follow boundary wire in . Search method: Irregular and Follow boundary wire in . Search method: Irregular and Follow guide wire in the large open area. 7. GARDEN EXAMPLE Proposals for installation and settings Area: 1,800 m2. Timer: Operating time of...
Operation Manual
Page 64
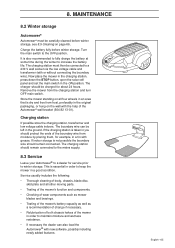
..., open the solar cell panel and set the main switch in you should remain connected. Charge the battery fully before winter storage, see 8.5 Cleaning on the wall with grease. Turn the main switch to increase the battery life. This is not possible the boundary wire should protect the ends of the Automower® wall bracket (504 82 13-01). Service usually includes the...
..., open the solar cell panel and set the main switch in you should remain connected. Charge the battery fully before winter storage, see 8.5 Cleaning on the wall with grease. Turn the main switch to increase the battery life. This is not possible the boundary wire should protect the ends of the Automower® wall bracket (504 82 13-01). Service usually includes the...
Operation Manual
Page 69
... wet grass, wait until the lawn has dried before using the mower.To keep the drive wheels clean and thus increase traction, use Automower® wheel brushes (505 13 27-01). Place Automower® in (3-2-2) on page 50. TROUBLE SHOOTING Fault message Outside working area slopes too much or has turned over. Automower® cannot find the charging station. The boundary wire has been routed the...
... wet grass, wait until the lawn has dried before using the mower.To keep the drive wheels clean and thus increase traction, use Automower® wheel brushes (505 13 27-01). Place Automower® in (3-2-2) on page 50. TROUBLE SHOOTING Fault message Outside working area slopes too much or has turned over. Automower® cannot find the charging station. The boundary wire has been routed the...

Operation Manual
Page 70
... time set cutting Increase the cutting height and then height. rotate when the mower is normal in relation to be removed and the grass and foreign objects removed. 9. Adjust the start and stop time settings for mowing, see 6.4 Timer (2) on Automower® needs to the set . Replace all the blades and screws so that the skid plate and blade disc rotate easily. The mower seems to Open. The mower mows for mowing are...
... time set cutting Increase the cutting height and then height. rotate when the mower is normal in relation to be removed and the grass and foreign objects removed. 9. Adjust the start and stop time settings for mowing, see 6.4 Timer (2) on Automower® needs to the set . Replace all the blades and screws so that the skid plate and blade disc rotate easily. The mower seems to Open. The mower mows for mowing are...
Operation Manual
Page 71
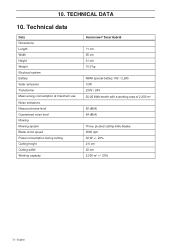
Technical data Data Dimensions Length Width Height Weight Electrical system Battery Solar cell panel Transformer Mean energy consumption at maximum use Noise emissions Measured noise level Guaranteed noise level Mowing Mowing system Blade motor speed Power consumption during cutting Cutting height Cutting width Working capacity Automower® Solar Hybrid 71 cm 55 cm 31 cm 10.0 kg NiMH special battery 18V / 2.2Ah 12W 230V / 24V 20-25 kWh/month with a working area of 2,200...
Technical data Data Dimensions Length Width Height Weight Electrical system Battery Solar cell panel Transformer Mean energy consumption at maximum use Noise emissions Measured noise level Guaranteed noise level Mowing Mowing system Blade motor speed Power consumption during cutting Cutting height Cutting width Working capacity Automower® Solar Hybrid 71 cm 55 cm 31 cm 10.0 kg NiMH special battery 18V / 2.2Ah 12W 230V / 24V 20-25 kWh/month with a working area of 2,200...
Operation Manual
Page 72
...text on the Husqvarna Automower® or its electronic components and batteries. Instead it shall be handed over to the applicable collection point for the environment and human health, which could otherwise be caused by inappropriate waste handling of electrical and It ...declaration of conformity EU Declaration of Conformity (only applies to Europe) Husqvarna AB, SE-561 82 Huskvarna, Sweden, tel.: +46-36-146500, hereby declares that robotic lawnmower Husqvarna Automower® Solar Hybrid from 2009's serial numbers and onwards (the year is disposed of correctly, you purchased the ...
...text on the Husqvarna Automower® or its electronic components and batteries. Instead it shall be handed over to the applicable collection point for the environment and human health, which could otherwise be caused by inappropriate waste handling of electrical and It ...declaration of conformity EU Declaration of Conformity (only applies to Europe) Husqvarna AB, SE-561 82 Huskvarna, Sweden, tel.: +46-36-146500, hereby declares that robotic lawnmower Husqvarna Automower® Solar Hybrid from 2009's serial numbers and onwards (the year is disposed of correctly, you purchased the ...

Parts List
Page 7
...AUTOMOWER SOLAR HYBRID CHASSIS UPPER Position Quantity Notes Kit 1 544 90 01-01 1 KEYBOARD 6 2 577 52 72-01 1 CABLE CLAMP 3 535 10 17-01 1 CAP 8 4 574 45 01-01 4 SCREW ITXPANT 5 575 98 63-01 1 SEALING STRIP (10 pcs) 6 5 574 87 47-02 1 SEALING STRIP 6 575 94 42-04 1 DISPLAY COVER compl 7 535 14 47-01 1 FILTER...1 LOCKWASHER 20 544 14 15-01 2 SENSOR compl 21 535 12 22-01 1 STEERING WHEEL 22 574 45 01-01 16 SCREW ITXPANT 23 575 94 38-01 1 CHASSIS 24 544 12 69-01 1 WIRING 25 578 78 90-01 2 PRINTED CIRCUIT ASSY 26 535 07 60-02 2 SCREW...
...AUTOMOWER SOLAR HYBRID CHASSIS UPPER Position Quantity Notes Kit 1 544 90 01-01 1 KEYBOARD 6 2 577 52 72-01 1 CABLE CLAMP 3 535 10 17-01 1 CAP 8 4 574 45 01-01 4 SCREW ITXPANT 5 575 98 63-01 1 SEALING STRIP (10 pcs) 6 5 574 87 47-02 1 SEALING STRIP 6 575 94 42-04 1 DISPLAY COVER compl 7 535 14 47-01 1 FILTER...1 LOCKWASHER 20 544 14 15-01 2 SENSOR compl 21 535 12 22-01 1 STEERING WHEEL 22 574 45 01-01 16 SCREW ITXPANT 23 575 94 38-01 1 CHASSIS 24 544 12 69-01 1 WIRING 25 578 78 90-01 2 PRINTED CIRCUIT ASSY 26 535 07 60-02 2 SCREW...

Parts List
Page 9
Page D AUTOMOWER SOLAR HYBRID CHASSIS LOWER Position 1 2 3 4 5 5 6 6 7 8 9 10 11 12 13 14 15 16 17 18 19 20 21 22 23 24 25 26 27 28 29 ...ASSY SCREW SCREW BRACKET BATTERY CABLE HOLDER SCREW ITXPANT LOCKING SPRING SCREW PRINTED CIRCUIT ASSY SCREW BUZZER NUT WASHER WASHER BALL BEARING BALL BEARING WASHER SPINDLE KIT compl WHEEL ASSY BEARING KIT compl WASHER BALL BEARING BALL BEARING WASHER COVER WASHER SCREW ITXPANT WHEEL PLUG WASHER SCREW CHASSIS GASKET SCREW DRIVE MOTOR compl, Linix MOTOR Dunker HUB REAR WHEEL HUB CAP SCREW IHCSFM COVER WASHER SEALING ...
Page D AUTOMOWER SOLAR HYBRID CHASSIS LOWER Position 1 2 3 4 5 5 6 6 7 8 9 10 11 12 13 14 15 16 17 18 19 20 21 22 23 24 25 26 27 28 29 ...ASSY SCREW SCREW BRACKET BATTERY CABLE HOLDER SCREW ITXPANT LOCKING SPRING SCREW PRINTED CIRCUIT ASSY SCREW BUZZER NUT WASHER WASHER BALL BEARING BALL BEARING WASHER SPINDLE KIT compl WHEEL ASSY BEARING KIT compl WASHER BALL BEARING BALL BEARING WASHER COVER WASHER SCREW ITXPANT WHEEL PLUG WASHER SCREW CHASSIS GASKET SCREW DRIVE MOTOR compl, Linix MOTOR Dunker HUB REAR WHEEL HUB CAP SCREW IHCSFM COVER WASHER SEALING ...


