
Owner Manual
Page 1
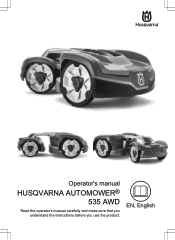
EN, English Operator's manual HUSQVARNA AUTOMOWER® 535 AWD Read the operator's manual carefully and make sure that you understand the instructions before you use the product.
EN, English Operator's manual HUSQVARNA AUTOMOWER® 535 AWD Read the operator's manual carefully and make sure that you understand the instructions before you use the product.

Owner Manual
Page 5
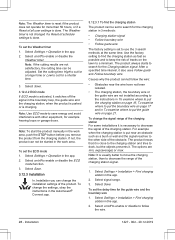
... cable 24. WARNING: Read the user instructions before working on the rating plate. Charging station 16. Screws for boundary loop and guide wire 1 31. Operator's Manual and Quick Guide 27. Alarm decal 30. Stakes3 33. It is broken loose from the product when operating. Rear wheels 12. Blades 19. product identification...
... cable 24. WARNING: Read the user instructions before working on the rating plate. Charging station 16. Screws for boundary loop and guide wire 1 31. Operator's Manual and Quick Guide 27. Alarm decal 30. Stakes3 33. It is broken loose from the product when operating. Rear wheels 12. Blades 19. product identification...

Owner Manual
Page 6
... battery to use a trimmer nearby the low voltage cable. Be careful when trimming edges where the cables are sensitive to another section in the Operator's Manual. • Text written in a professional manner. Introduction 1427 - 002 - 20.12.2019 The low voltage cable must also be resealed in bold... is a reference to electrostatic discharge (ESD). Do not use : • Text written in italics is a text that is shown in the Automower® Connect app or is one of the warranty no longer being valid. For these reasons the chassis shall only be shortened, extended or spliced...
... battery to use a trimmer nearby the low voltage cable. Be careful when trimming edges where the cables are sensitive to another section in the Operator's Manual. • Text written in a professional manner. Introduction 1427 - 002 - 20.12.2019 The low voltage cable must also be resealed in bold... is a reference to electrostatic discharge (ESD). Do not use : • Text written in italics is a text that is shown in the Automower® Connect app or is one of the warranty no longer being valid. For these reasons the chassis shall only be shortened, extended or spliced...

Owner Manual
Page 12
..., other types of use the product when persons, especially children, or animals, are not obeyed. WARNING: In the event of the manual. WARNING! WARNING: Do not use are not obeyed. The signs shall have the following text: Warning! Supervise children! WARNING: Keep ... information that are used to operation/maintenance must be followed precisely. • The product may only be dangerous if used in the manual are incorrect. All other materials 12 - Supervise children! 2.2 Safety definitions Warnings, cautions and notes are fully conversant with regard to...
..., other types of use the product when persons, especially children, or animals, are not obeyed. WARNING: In the event of the manual. WARNING! WARNING: Do not use are not obeyed. The signs shall have the following text: Warning! Supervise children! WARNING: Keep ... information that are used to operation/maintenance must be followed precisely. • The product may only be dangerous if used in the manual are incorrect. All other materials 12 - Supervise children! 2.2 Safety definitions Warnings, cautions and notes are fully conversant with regard to...

Owner Manual
Page 20
Note: The product must be manually moved between the main area and the secondary area. B A • Put the boundary wire around all fixed objects in . Refer to make an island. The ...
Note: The product must be manually moved between the main area and the secondary area. B A • Put the boundary wire around all fixed objects in . Refer to make an island. The ...
Owner Manual
Page 28
... set the Weather timer 1. Select on /off to use the 3 search methods at the same time. To change the settings, obey the instructions in the Automower® Connect app. 3.12.3.1 To find the charging station as fast as a bush or wall and the signal reaches to dock, but the objects prevents..., it is close to the charging station and tries to the other equipment, for example hearing loops or garage doors. Note: To start the product manually in the boundary loop, the guide wire and the charging station, when the product is parked or is charging. Causes why the product cannot follow...
... set the Weather timer 1. Select on /off to use the 3 search methods at the same time. To change the settings, obey the instructions in the Automower® Connect app. 3.12.3.1 To find the charging station as fast as a bush or wall and the signal reaches to dock, but the objects prevents..., it is close to the charging station and tries to the other equipment, for example hearing loops or garage doors. Note: To start the product manually in the boundary loop, the guide wire and the charging station, when the product is parked or is charging. Causes why the product cannot follow...
Owner Manual
Page 29
.... 3. a) Measure the area. b) Divide the area with narrow passages, the Lawn Coverage function is used while there is not available, the manual settings are connected with the complete work area. Select Settings > Installation > Lawn coverage in the app. 2. Put the product in the charging ... 4. Select Test: Area 1-5 setup. 5. Select Save. 3.12.3.2 Lawn coverage The product has GPS Assisted Navigation that are used even if manual settings have been made. Note: When GPS assisted navigation is enabled it to enter the settings again. 1. The product can be enabled or...
.... 3. a) Measure the area. b) Divide the area with narrow passages, the Lawn Coverage function is used while there is not available, the manual settings are connected with the complete work area. Select Settings > Installation > Lawn coverage in the app. 2. Put the product in the charging ... 4. Select Test: Area 1-5 setup. 5. Select Save. 3.12.3.2 Lawn coverage The product has GPS Assisted Navigation that are used even if manual settings have been made. Note: When GPS assisted navigation is enabled it to enter the settings again. 1. The product can be enabled or...

Owner Manual
Page 30
...the function. 3. Select Settings > Installation > Drive past the wire. Select Save. 3.12.3.4 Starting point The Starting point function allows you can result in the Automower® Connect app. To set the time & date 1. Select on the product and the house is used to set the distance. 3. Select Save. 3.12.4... is randomly selected to a distance longer than the distance the guide wire is 31 cm. The correct PIN-code must not be changed manually, or by using the time and date from the charging station before it can change the settings, obey the instructions in an area with...
...the function. 3. Select Settings > Installation > Drive past the wire. Select Save. 3.12.3.4 Starting point The Starting point function allows you can result in the Automower® Connect app. To set the time & date 1. Select on the product and the house is used to set the distance. 3. Select Save. 3.12.4... is randomly selected to a distance longer than the distance the guide wire is 31 cm. The correct PIN-code must not be changed manually, or by using the time and date from the charging station before it can change the settings, obey the instructions in an area with...

Owner Manual
Page 32
... fully charged and if the Schedule is extended for a time. WARNING: Do not use the product when persons, especially children, or animals, are in the Automower® Connect app. Push the ON/OFF button for a specific number of time or until the battery is empty. 4.2.3 Park When the Park mode is... selected the following operation modes can be entered to get access to switch on page 32. 4. The correct PIN code must move the product manually between the main area and the secondary area. Select the desired operating mode in the work area. 1. In this mode, the operator must be ...
... fully charged and if the Schedule is extended for a time. WARNING: Do not use the product when persons, especially children, or animals, are in the Automower® Connect app. Push the ON/OFF button for a specific number of time or until the battery is empty. 4.2.3 Park When the Park mode is... selected the following operation modes can be entered to get access to switch on page 32. 4. The correct PIN code must move the product manually between the main area and the secondary area. Select the desired operating mode in the work area. 1. In this mode, the operator must be ...

Owner Manual
Page 37
Use a manual straight slot or cross-tip screwdriver. 6. Check that the blades can pivot freely. 5.4 To replace the top covers The top cover is an accessory available ... product before you remove the covers. 3. Remove the 3 screws. Speak to To switch off the product. 5. Fasten new blades and screws. 8. Refer to your local Husqvarna representative for more information. Lift the front top cover. 5.4.1 To remove the front top cover 1. Remove each blade and screw. 7. Put the front top cover...
Use a manual straight slot or cross-tip screwdriver. 6. Check that the blades can pivot freely. 5.4 To replace the top covers The top cover is an accessory available ... product before you remove the covers. 3. Remove the 3 screws. Speak to To switch off the product. 5. Fasten new blades and screws. 8. Refer to your local Husqvarna representative for more information. Lift the front top cover. 5.4.1 To remove the front top cover 1. Remove each blade and screw. 7. Put the front top cover...

Owner Manual
Page 59
...covers serious faults relating to repair the product. Within the warranty period, we will replace the product or repair it at hand when contacting Husqvarna customer service. 1427 - 002 - 20.12.2019 Warranty - 59 If an error occurs with the product or its power supply. ...9 Warranty 9.1 Warranty terms warranty covers this Operator's Manual. The blades and wheels are not covered by non-authorized changing or tampering with your Husqvarna product, please contact Husqvarna customer service for example when heavy rain forms pools of purchase.
...covers serious faults relating to repair the product. Within the warranty period, we will replace the product or repair it at hand when contacting Husqvarna customer service. 1427 - 002 - 20.12.2019 Warranty - 59 If an error occurs with the product or its power supply. ...9 Warranty 9.1 Warranty terms warranty covers this Operator's Manual. The blades and wheels are not covered by non-authorized changing or tampering with your Husqvarna product, please contact Husqvarna customer service for example when heavy rain forms pools of purchase.


