
Owner Manual
Page 1
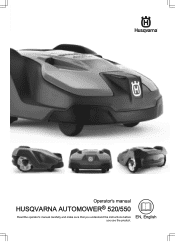
EN, English Operator's manual HUSQVARNA AUTOMOWER® 520/550 Read the operator's manual carefully and make sure that you understand the instructions before you use the product.
EN, English Operator's manual HUSQVARNA AUTOMOWER® 520/550 Read the operator's manual carefully and make sure that you understand the instructions before you use the product.

Owner Manual
Page 2
... of the guide wire 19 3.8 Checking the installation 21 3.9 Connectivity 21 3.10 How to start up the robotic lawnmower 22 3.11 Control panel 23 3.12 Automower® Connect menu 23 3.13 Settings - maintenance 43 5.2 Clean the robotic lawnmower 43 5.3 Replace the blades 43 5.4 Battery 44 5.5 Winter service 44 6 Troubleshooting 6.1 Introduction - Start 40 4.4 Operating mode - overview 24 3.14 Timer 24 3.15 Cutting height 26 3.16 Operation 26 3.17 Installation 27 3.18 Accessories 30 3.19...
... of the guide wire 19 3.8 Checking the installation 21 3.9 Connectivity 21 3.10 How to start up the robotic lawnmower 22 3.11 Control panel 23 3.12 Automower® Connect menu 23 3.13 Settings - maintenance 43 5.2 Clean the robotic lawnmower 43 5.3 Replace the blades 43 5.4 Battery 44 5.5 Winter service 44 6 Troubleshooting 6.1 Introduction - Start 40 4.4 Operating mode - overview 24 3.14 Timer 24 3.15 Cutting height 26 3.16 Operation 26 3.17 Installation 27 3.18 Accessories 30 3.19...

Owner Manual
Page 3
... robotic lawnmowers. A fully charged robotic lawnmower mows for 50 to use it must be registered as stolen in the buying and selling of knocking it is required, and small pieces of cut depends primarily on page 57. Contact your lawn will reduce the need of the grass. Husqvarna has a policy of continuous product development and reserves the right to maximum capacity listed in...
... robotic lawnmowers. A fully charged robotic lawnmower mows for 50 to use it must be registered as stolen in the buying and selling of knocking it is required, and small pieces of cut depends primarily on page 57. Contact your lawn will reduce the need of the grass. Husqvarna has a policy of continuous product development and reserves the right to maximum capacity listed in...

Owner Manual
Page 4
... garden in question, see Installation on page 27. 1.2.5.1 Search method 1 - Using the manual settings options, the 3 search methods can be set to stop the robotic lawnmower from operating out on the lawn. The STOP button also needs to avoid as much tracks forming as possible it gets close to keep the lawn free from branches, small stones and other objects. See Replace the blades...
... garden in question, see Installation on page 27. 1.2.5.1 Search method 1 - Using the manual settings options, the 3 search methods can be set to stop the robotic lawnmower from operating out on the lawn. The STOP button also needs to avoid as much tracks forming as possible it gets close to keep the lawn free from branches, small stones and other objects. See Replace the blades...
Owner Manual
Page 6
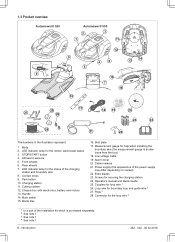
... loop and guide wire 2 27. Rear wheels 7. Main switch 15. Low voltage cable 19. Power supply (the appearance of the Installation kit which is broken loose from the box) 18. Alarm decal 20. Contact strips 9. Loop wire for loop wire 1 26. Body 2. STOP/START button 4. Charging station 11. Chassis box with electronics, battery and motors 13. Measurement gauge for securing the charging station 24. Extra blades 23. Screws...
... loop and guide wire 2 27. Rear wheels 7. Main switch 15. Low voltage cable 19. Power supply (the appearance of the Installation kit which is broken loose from the box) 18. Alarm decal 20. Contact strips 9. Loop wire for loop wire 1 26. Body 2. STOP/START button 4. Charging station 11. Chassis box with electronics, battery and motors 13. Measurement gauge for securing the charging station 24. Extra blades 23. Screws...

Owner Manual
Page 9
... guard, blade disc or body. Keep away from or within the working area: 1. Supervise children! • Use the PARK function or switch off the robotic lawnmower using the robotic lawnmower. • It is very loud. If a person or other objects on the lawn can only start when the main switch is set to a stoppage. • The robotic lawnmower must never be operated, maintained and repaired...
... guard, blade disc or body. Keep away from or within the working area: 1. Supervise children! • Use the PARK function or switch off the robotic lawnmower using the robotic lawnmower. • It is very loud. If a person or other objects on the lawn can only start when the main switch is set to a stoppage. • The robotic lawnmower must never be operated, maintained and repaired...
Owner Manual
Page 11
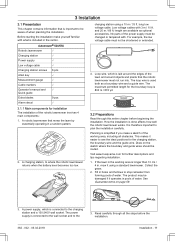
... the battery level becomes too low. 3.2 Preparations Read through all obstacles. Automower® 520/550 Robotic lawnmower √ Charging station √ Power supply √ Low voltage cable Charging station screws √ 6 pcs Allen key √ Measurement gauge √ Cable markers √ Operator's manual and Quick guide Extra blades √ 9 pcs Alarm decal √ charging station using a standard lawnmower. This makes it using a 10 m / 33 ft. Collect the grass. 2. The power supply...
... the battery level becomes too low. 3.2 Preparations Read through all obstacles. Automower® 520/550 Robotic lawnmower √ Charging station √ Power supply √ Low voltage cable Charging station screws √ 6 pcs Allen key √ Measurement gauge √ Cable markers √ Operator's manual and Quick guide Extra blades √ 9 pcs Alarm decal √ charging station using a standard lawnmower. This makes it using a 10 m / 33 ft. Collect the grass. 2. The power supply...

Owner Manual
Page 16
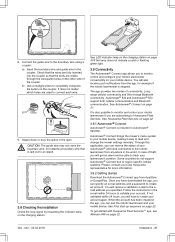
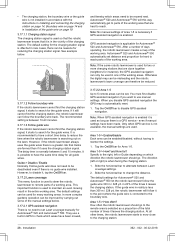
... . However, to achieve careful and silent operation, it collides with an edging or the like. All the grass along the ditch/kerbstone will turn around when it is level with the boundary wire. CAUTION: If the working area is level with the lawn (+/- 1 cm / 0.4 in . Otherwise the robotic lawnmower can drive over the path. Installation 362 - 002 - 06.02.2018...
... . However, to achieve careful and silent operation, it collides with an edging or the like. All the grass along the ditch/kerbstone will turn around when it is level with the boundary wire. CAUTION: If the working area is level with the lawn (+/- 1 cm / 0.4 in . Otherwise the robotic lawnmower can drive over the path. Installation 362 - 002 - 06.02.2018...
Owner Manual
Page 21
... 24 hours to read and change the mower settings remotely. To get an alarm and be able to connect each wire. 9. b) Use a multigrip pliers to Husqvarna Fleet Services. You will also receive push notifications from the app, for instance a boundary wire that the ends are visible through the transparent area on your lawnmower's position. See Automower® Connect on page 22...
... 24 hours to read and change the mower settings remotely. To get an alarm and be able to connect each wire. 9. b) Use a multigrip pliers to Husqvarna Fleet Services. You will also receive push notifications from the app, for instance a boundary wire that the ends are visible through the transparent area on your lawnmower's position. See Automower® Connect on page 22...
Owner Manual
Page 23
...: The robotic lawnmower is shown over the battery symbol when the robotic lawnmower charges its battery. Name your Husqvarna account. 14. When the pairing between the Automower® Connect app and the robotic lawnmower involves the following steps: 1. Set the Main switch to immediately stop the robotic lawnmower from forming along the guide wire. Enter the PIN code of the robotic lawnmower. A plug is available for...
...: The robotic lawnmower is shown over the battery symbol when the robotic lawnmower charges its battery. Name your Husqvarna account. 14. When the pairing between the Automower® Connect app and the robotic lawnmower involves the following steps: 1. Set the Main switch to immediately stop the robotic lawnmower from forming along the guide wire. Enter the PIN code of the robotic lawnmower. A plug is available for...
Owner Manual
Page 28
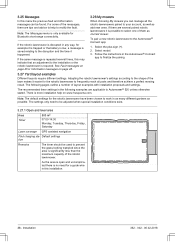
... the instructions in Installing and connecting the charging station on page 14, Boundary wire on page 14 and in Installation of the guide wire on the lawn. After a number of days operating, the robotic lawnmower creates a map of the charging station. When you want to reenter the settings. 1. Tap the On/Off bar for all other times, the robotic lawnmower starts to the boundary wire. Automower® 520 and Automower...
... the instructions in Installing and connecting the charging station on page 14, Boundary wire on page 14 and in Installation of the guide wire on the lawn. After a number of days operating, the robotic lawnmower creates a map of the charging station. When you want to reenter the settings. 1. Tap the On/Off bar for all other times, the robotic lawnmower starts to the boundary wire. Automower® 520 and Automower...
Owner Manual
Page 29
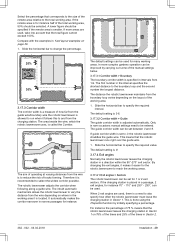
... the charging station in a direction within the 90°-270° exit sector. A lower figure should be used . Select the percentage that corresponds to the size of the times in Sector 2. 362 - 002 - 06.02.2018 Installation - 29 Slide the horizontal bar to specify the required interval. This means that the robotic lawnmower runs right over the guide wire. 1.
... the charging station in a direction within the 90°-270° exit sector. A lower figure should be used . Select the percentage that corresponds to the size of the times in Sector 2. 362 - 002 - 06.02.2018 Installation - 29 Slide the horizontal bar to specify the required interval. This means that the robotic lawnmower runs right over the guide wire. 1.
Owner Manual
Page 36
... charging sta- The settings only need for a guide wire in any way, for Bluetooth short-range connectivity. If the robotic lawnmower is saved relating to the disruption and the time it easier for the robotic lawnmower have been chosen to Automower® 520 unless otherwise stated. If there are several times, this installation. 36 - Follow the instructions in as many different gardens...
... charging sta- The settings only need for a guide wire in any way, for Bluetooth short-range connectivity. If the robotic lawnmower is saved relating to the disruption and the time it easier for the robotic lawnmower have been chosen to Automower® 520 unless otherwise stated. If there are several times, this installation. 36 - Follow the instructions in as many different gardens...
Owner Manual
Page 38
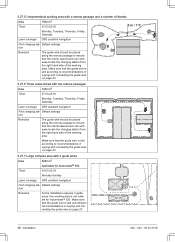
... linked with 3 guide wires Area 4000 m2 Applicable for Automower® 520. Default settings tion Remarks As the installation requires 3 guide wires, this working area. Default settings tion Remarks The guide wire should be placed along the narrow passage to ensure that the guide wire is not suitable for Automower® 550. Make sure that the robotic lawnmower can with ease locate the charging station from the...
... linked with 3 guide wires Area 4000 m2 Applicable for Automower® 520. Default settings tion Remarks As the installation requires 3 guide wires, this working area. Default settings tion Remarks The guide wire should be placed along the narrow passage to ensure that the guide wire is not suitable for Automower® 550. Make sure that the robotic lawnmower can with ease locate the charging station from the...
Owner Manual
Page 43
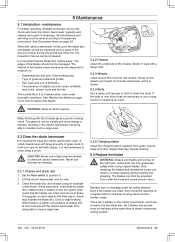
... the blade disc. A robotic lawnmower with slopes. Set the Main switch to clean the body. Grass on the robotic lawnmower, which are 3 blades on the wheels can result in the robotic lawnmower not being able to clean the robotic lawnmower. 5 Maintenance 5.1 Introduction - maintenance For better operating reliability and longer service life: check and clean the robotic lawnmower regularly and replace worn parts if necessary. The grass is not cut cleanly...
... the blade disc. A robotic lawnmower with slopes. Set the Main switch to clean the body. Grass on the robotic lawnmower, which are 3 blades on the wheels can result in the robotic lawnmower not being able to clean the robotic lawnmower. 5 Maintenance 5.1 Introduction - maintenance For better operating reliability and longer service life: check and clean the robotic lawnmower regularly and replace worn parts if necessary. The grass is not cut cleanly...

Owner Manual
Page 47
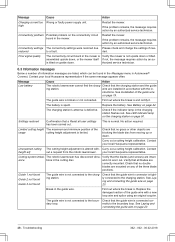
... and no action is obstructing the robotic lawnmow- Alarm! If the problem remains, the message requires action by an authorized service technician. Remove the object. Next start the robotic lawnmower again. Mower lifted The alarm was activated because the mower was activated because the mower Adjust the mower security settings in the charging station and check that the charging station is not correct. er. If...
... and no action is obstructing the robotic lawnmow- Alarm! If the problem remains, the message requires action by an authorized service technician. Remove the object. Next start the robotic lawnmower again. Mower lifted The alarm was activated because the mower was activated because the mower Adjust the mower security settings in the charging station and check that the charging station is not correct. er. If...
Owner Manual
Page 48
... installed in the mower. Limited cutting height The maximum and minimum position of the three blade positions. Contact your local Husqvarna representative if the same message appears often. Carry out a cutting height calibration. restored to the boun- Unexpected cutting The cutting height adjustment is limited. Connectivity settings The connectivity settings were restored due Please check and change the settings if nee- The guide wire is connected cor- Check that no grass...
... installed in the mower. Limited cutting height The maximum and minimum position of the three blade positions. Contact your local Husqvarna representative if the same message appears often. Carry out a cutting height calibration. restored to the boun- Unexpected cutting The cutting height adjustment is limited. Connectivity settings The connectivity settings were restored due Please check and change the settings if nee- The guide wire is connected cor- Check that no grass...

Owner Manual
Page 51
See Best charging station location on page 43. The How often? Note: Not ap- See Replace the blades on page 12. Increase the cutting height and then successively lower it actually has. See Maintenance on a surface that the lawn has been mowed more detailed answers to the instructions in Laying the boundary wire on a slope. Contact your robotic lawnmower does not work as...
See Best charging station location on page 43. The How often? Note: Not ap- See Replace the blades on page 12. Increase the cutting height and then successively lower it actually has. See Maintenance on a surface that the lawn has been mowed more detailed answers to the instructions in Laying the boundary wire on a slope. Contact your robotic lawnmower does not work as...

Owner Manual
Page 52
... charges. The robotic lawnmower searches for shorter disc. disc does not rotate. See Clean er mows for the er runs, but the blade charging station. See Battery on page 27. go to the insulation may have occurred until the desired cutting height has been reached. mower. A wire break can damage wire insulation. Troubleshooting 362 - 002 - 06.02.2018 Replace the battery. Both the mowing and The battery...
... charges. The robotic lawnmower searches for shorter disc. disc does not rotate. See Clean er mows for the er runs, but the blade charging station. See Battery on page 27. go to the insulation may have occurred until the desired cutting height has been reached. mower. A wire break can damage wire insulation. Troubleshooting 362 - 002 - 06.02.2018 Replace the battery. Both the mowing and The battery...
Owner Manual
Page 57
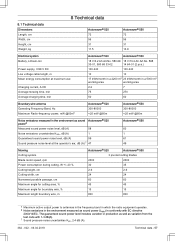
..., cm Width, cm Height, cm Weight, kg 8 Technical data Automower® 520 72 56 31 11.5 Automower® 550 72 56 31 13.9 Electrical system Battery, Lithium-Ion Power supply, V/28 V DC Low voltage cable length, m Mean energy consumption at maximum use Charging current, A DC Average mowing time, min Average charging time, min Automower® 520 Automower® 550 18 V/3.2...in a 2200 m2 23 kWh/month in a 5000 m2 working area working area 2.2 7 75 270 50 60 Boundary wire antenna Operating Frequency Band, Hz Maximum Radio-frequency power, mW @60m5 Automower® 520 300-80000
..., cm Width, cm Height, cm Weight, kg 8 Technical data Automower® 520 72 56 31 11.5 Automower® 550 72 56 31 13.9 Electrical system Battery, Lithium-Ion Power supply, V/28 V DC Low voltage cable length, m Mean energy consumption at maximum use Charging current, A DC Average mowing time, min Average charging time, min Automower® 520 Automower® 550 18 V/3.2...in a 2200 m2 23 kWh/month in a 5000 m2 working area working area 2.2 7 75 270 50 60 Boundary wire antenna Operating Frequency Band, Hz Maximum Radio-frequency power, mW @60m5 Automower® 520 300-80000


