
Owner Manual
Page 1
EN, English Operator's manual HUSQVARNA AUTOMOWER® 430XH/450XH Read the operator's manual carefully and make sure that you understand the instructions before you use the product.
EN, English Operator's manual HUSQVARNA AUTOMOWER® 430XH/450XH Read the operator's manual carefully and make sure that you understand the instructions before you use the product.

Owner Manual
Page 4
.... Main switch 15. Charging station 21. Measurement gauge when installing the boundary wire (the measurement gauge is broken loose from the box) 24. 1.3 Product overview Automower® 430XH 2 3 Automower® 450XH 6 1 5 4 9 10 11 31 29 32 30 12 13 14 15 22 23 8 7 16 17 19 18 20 21 26 24 25 28... code) 10. Display 11. Cutting system 13. Handle 16. Contact plates 19. Screws for operation check of the charging station and boundary wire 20. Operator's Manual and Quick Guide 26. Alarm decal 27. Extra blades 28.
.... Main switch 15. Charging station 21. Measurement gauge when installing the boundary wire (the measurement gauge is broken loose from the box) 24. 1.3 Product overview Automower® 430XH 2 3 Automower® 450XH 6 1 5 4 9 10 11 31 29 32 30 12 13 14 15 22 23 8 7 16 17 19 18 20 21 26 24 25 28... code) 10. Display 11. Cutting system 13. Handle 16. Contact plates 19. Screws for operation check of the charging station and boundary wire 20. Operator's Manual and Quick Guide 26. Alarm decal 27. Extra blades 28.

Owner Manual
Page 6
... the SIM card or the module. (Automower® Connect) The product will not cut the grass do not charge the battery. Do not discard the battery into water. The product is active. Introduction 1230 - 001 - The installation function for manual settings for the products are set in ...the charging station but do to the Internet server. (Automower® Connect) The accessories function is used for settings made for the problems. The GPS-...
... the SIM card or the module. (Automower® Connect) The product will not cut the grass do not charge the battery. Do not discard the battery into water. The product is active. Introduction 1230 - 001 - The installation function for manual settings for the products are set in ...the charging station but do to the Internet server. (Automower® Connect) The accessories function is used for settings made for the problems. The GPS-...

Owner Manual
Page 11
Safety - 11 WARNING: Used if there is a risk of injury or death for the operator or bystanders if the instructions in the manual are used in the Operator's Manual to make it easier to use: • Text written in italics is a text that is one of the buttons on the product. •.... 1230 - 001 - CAUTION: Used if there is a risk of damage to the product, other materials or the adjacent area if the instructions in the manual are not obeyed. 2.2 General safety instructions The following system is used to point out specially important parts of the product or is a reference to give...
Safety - 11 WARNING: Used if there is a risk of injury or death for the operator or bystanders if the instructions in the manual are used in the Operator's Manual to make it easier to use: • Text written in italics is a text that is one of the buttons on the product. •.... 1230 - 001 - CAUTION: Used if there is a risk of damage to the product, other materials or the adjacent area if the instructions in the manual are not obeyed. 2.2 General safety instructions The following system is used to point out specially important parts of the product or is a reference to give...

Owner Manual
Page 13
...! persons, especially children, or animals, are in public before the product can continue mowing. • Warning signs shall be followed precisely. Please read the Operator's Manual carefully and make sure you understand the instructions before using the product. 2.3 Safety instructions for use during hours when the area is used in the...
...! persons, especially children, or animals, are in public before the product can continue mowing. • Warning signs shall be followed precisely. Please read the Operator's Manual carefully and make sure you understand the instructions before using the product. 2.3 Safety instructions for use during hours when the area is used in the...

Owner Manual
Page 19
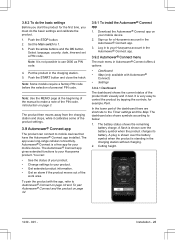
... boundary wire make an island. B 0 cm / 0" A CAUTION: Do not put a section of • Put the boundary wire around all of the work area (A + B). must be manually moved between the main area and the secondary area. 3.3.4 To examine where to Secondary area on page 34. 3.3.3.4 To make a secondary area Make a secondary area...
... boundary wire make an island. B 0 cm / 0" A CAUTION: Do not put a section of • Put the boundary wire around all of the work area (A + B). must be manually moved between the main area and the secondary area. 3.3.4 To examine where to Secondary area on page 34. 3.3.3.4 To make a secondary area Make a secondary area...
Owner Manual
Page 23
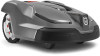
... battery. Put the product in the Automower® Connect app. 3. The Automower® Connect app gives extended functions to your Husqvarna account in the Automower® Connect app. 3.9.2 Automower® Connect menu The main menu in Automower® Connect offers 4 options: &#...Husqvarna product. In the lower part of the PIN code. The dashboard also shows symbols according to 1. 3. The battery status shows the remaining battery charge. Introduction on your mobile device. It is standing in text. Push the STOP button. 2. Note: Use the MEMO page at the beginning of the manual...
... battery. Put the product in the Automower® Connect app. 3. The Automower® Connect app gives extended functions to your Husqvarna account in the Automower® Connect app. 3.9.2 Automower® Connect menu The main menu in Automower® Connect offers 4 options: &#...Husqvarna product. In the lower part of the PIN code. The dashboard also shows symbols according to 1. 3. The battery status shows the remaining battery charge. Introduction on your mobile device. It is standing in text. Push the STOP button. 2. Note: Use the MEMO page at the beginning of the manual...
Owner Manual
Page 27
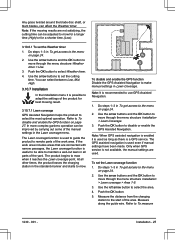
... > Lawn Coverage. 3. Push the OK button to set the cutting time. The GPS assisted navigation is used as long as there is not available, the manual settings are used to guide the product to remote parts of the work area includes areas that are not satisfying, the cutting time can select... reaches the Lawn coverage point. Any grass twisted around the blade disc shaft, or blunt blades, can be improved by carrying out some of the manual settings in the Lawn coverage menu. Measure along the guide wire. Use the arrow buttons and the OK button to mow for a longer time (High...
... > Lawn Coverage. 3. Push the OK button to set the cutting time. The GPS assisted navigation is used as long as there is not available, the manual settings are used to guide the product to remote parts of the work area includes areas that are not satisfying, the cutting time can select... reaches the Lawn coverage point. Any grass twisted around the blade disc shaft, or blunt blades, can be improved by carrying out some of the manual settings in the Lawn coverage menu. Measure along the guide wire. Use the arrow buttons and the OK button to mow for a longer time (High...

Owner Manual
Page 30
... 24. 2. For example 75% means that the product leaves the charging station in Sector 1. Use the number buttons to set the angles in rare occasions manual settings need to a profile 1. Use the number buttons to the menu on 75% of the times and 25% of 20-50 cm. 1. Use the arrow...
... 24. 2. For example 75% means that the product leaves the charging station in Sector 1. Use the number buttons to set the angles in rare occasions manual settings need to a profile 1. Use the number buttons to the menu on 75% of the times and 25% of 20-50 cm. 1. Use the arrow...

Owner Manual
Page 34
... battery is being carried out. WARNING: Do not use or before any work, inspection or maintenance is empty, the product stops and the message Needs manual charging shows in the work area. 5. Enter the PIN code. 4. Select the desired operating mode. Put the product in the 0 position the motors on page...
... battery is being carried out. WARNING: Do not use or before any work, inspection or maintenance is empty, the product stops and the message Needs manual charging shows in the work area. 5. Enter the PIN code. 4. Select the desired operating mode. Put the product in the 0 position the motors on page...

Owner Manual
Page 38
... replaced at the same time to more charging cycles than normal between charges. All 3 blades and screws must be replaced on page 54. 5. Use Husqvarna original blades embossed with the eyes etc. 5.3.1 To replace the blades 1. Remove each blade and screw. 6. Set the Main switch to avoid scratching ...the body and the hatch. 3. WARNING: Use only original batteries recommended by the manufacturer. Turn the product upside down. Use a manual straight slot or cross-tip screwdriver. This leads to obtain a balanced cutting system. Maintenance 1230 - 001 -
... replaced at the same time to more charging cycles than normal between charges. All 3 blades and screws must be replaced on page 54. 5. Use Husqvarna original blades embossed with the eyes etc. 5.3.1 To replace the blades 1. Remove each blade and screw. 6. Set the Main switch to avoid scratching ...the body and the hatch. 3. WARNING: Use only original batteries recommended by the manufacturer. Turn the product upside down. Use a manual straight slot or cross-tip screwdriver. This leads to obtain a balanced cutting system. Maintenance 1230 - 001 -

Owner Manual
Page 43
... the ted product was stopped. Grass or other object is obstructing the product. The alarm was activated because the product was lifted. Mower til- Needs manual charging The product is not correct. Clean the wheels and around its chassis. Free the product. Wheel drive prob- Alarm! Refer to To set to...
... the ted product was stopped. Grass or other object is obstructing the product. The alarm was activated because the product was lifted. Mower til- Needs manual charging The product is not correct. Clean the wheels and around its chassis. Free the product. Wheel drive prob- Alarm! Refer to To set to...

Owner Manual
Page 46
... If the message appears often, disable the GPS assisted navigation and instead use the manual settings for the current work area. boundary wire several laps without find- If there... width setting on a Secondary area with the Main area setting. lem with the Automower® Connect module Restart the product. Connection problems Problem with the server. Action ...The installation has not been done cor- If the problem remains, contact your local Husqvarna representative. Connection settings restored Settings for wireless connectivity have Check and revise settings if ...
... If the message appears often, disable the GPS assisted navigation and instead use the manual settings for the current work area. boundary wire several laps without find- If there... width setting on a Secondary area with the Main area setting. lem with the Automower® Connect module Restart the product. Connection problems Problem with the server. Action ...The installation has not been done cor- If the problem remains, contact your local Husqvarna representative. Connection settings restored Settings for wireless connectivity have Check and revise settings if ...

Owner Manual
Page 57
The warranty covers serious faults relating to repair the product. 9 Warranty 9.1 Warranty terms Husqvarna® warranty covers this Operator's Manual. Examples of faults which are not included in this product's functionality for a period of 2 years from date of water. • Damage caused by lightning. • ...
The warranty covers serious faults relating to repair the product. 9 Warranty 9.1 Warranty terms Husqvarna® warranty covers this Operator's Manual. Examples of faults which are not included in this product's functionality for a period of 2 years from date of water. • Damage caused by lightning. • ...


