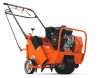
Operation Manual
Page 3
CONTENTS INTRODUCTION 4 Good Service 4 Serial Number 4 SAFETY 5 General Information 5 Safety Procedures 5 CONTROLS 6 Model AR19 6 Models AR25 7 ASSEMBLY 8 Model AR19 Handle 8 Model AR25 Handle 9 Clutch and Throttle Cables 10 Before Starting 10 OPERATION 11 Aeration Tips 11 Aerating 11 Rear Wheel Adjustment 12 Turning and Maneuvering 12 Operating On Slopes 13 Transporting 14 MAINTENANCE AND SERVICE...
CONTENTS INTRODUCTION 4 Good Service 4 Serial Number 4 SAFETY 5 General Information 5 Safety Procedures 5 CONTROLS 6 Model AR19 6 Models AR25 7 ASSEMBLY 8 Model AR19 Handle 8 Model AR25 Handle 9 Clutch and Throttle Cables 10 Before Starting 10 OPERATION 11 Aeration Tips 11 Aerating 11 Rear Wheel Adjustment 12 Turning and Maneuvering 12 Operating On Slopes 13 Transporting 14 MAINTENANCE AND SERVICE...
Operation Manual
Page 5
... and mark all decals are made to be avoided, such as sprinkler heads, stakes, water valves, clothes line anchors, etc. • Use machine for lawn aeration only. • Keep unsupervised children away from the equipment. • Adopt safe lifting and moving techniques when loading/unloading and moving or rotating parts. •... an unventilated space. • Do not run engine in place. Warranty will assist you in the safe operation and proper maintenance of your dealer or Husqvarna if additional information is required. Call your...
... and mark all decals are made to be avoided, such as sprinkler heads, stakes, water valves, clothes line anchors, etc. • Use machine for lawn aeration only. • Keep unsupervised children away from the equipment. • Adopt safe lifting and moving techniques when loading/unloading and moving or rotating parts. •... an unventilated space. • Do not run engine in place. Warranty will assist you in the safe operation and proper maintenance of your dealer or Husqvarna if additional information is required. Call your...

Operation Manual
Page 8
The aerator is shipped with the fasteners located on the rear wheel control handle, using the cam lock lever or link lock (dependent on the rear wheel ... wheel control handle with the fasteners located on model). Cam lock assembly location 2. Link lock assembly location Connecting control rod 8 8060-033 8060-003 Model AR19 Handle 1. Locking cam for handle 8060-001 Locking link for handle 2. Use protective glasses when removing unit from crate. Cam Lock -
The aerator is shipped with the fasteners located on the rear wheel control handle, using the cam lock lever or link lock (dependent on the rear wheel ... wheel control handle with the fasteners located on model). Cam lock assembly location 2. Link lock assembly location Connecting control rod 8 8060-033 8060-003 Model AR19 Handle 1. Locking cam for handle 8060-001 Locking link for handle 2. Use protective glasses when removing unit from crate. Cam Lock -

Operation Manual
Page 9
... on handle mounting brackets. a. ASSEMBLY Model AR25 Handle 3. Insert and tighten fasteners, which are located on rear wheel control handle using two ½" wrenches. b. The aerator is properly routed.
... on handle mounting brackets. a. ASSEMBLY Model AR25 Handle 3. Insert and tighten fasteners, which are located on rear wheel control handle using two ½" wrenches. b. The aerator is properly routed.

Operation Manual
Page 11
...are provided to desired depth. To stop, release clutch control. 2 1 1. If unable to do so, watering the lawn a day before aerating. Using Removable Weights Soil conditions dictate whether extra machine weight is soft, moist ground. Adjust depth control knob 3. WARNING! Start engine and adjust...raising rear wheels all the way up to provide comfortable walking speed and maintain control of core. Engage clutch control. 6. Clutch control Aerating controls 8060-008 8060-006 11 Push a garden hand spade or large screw driver into the ground (rear wheels will rise). 5....
...are provided to desired depth. To stop, release clutch control. 2 1 1. If unable to do so, watering the lawn a day before aerating. Using Removable Weights Soil conditions dictate whether extra machine weight is soft, moist ground. Adjust depth control knob 3. WARNING! Start engine and adjust...raising rear wheels all the way up to provide comfortable walking speed and maintain control of core. Engage clutch control. 6. Clutch control Aerating controls 8060-008 8060-006 11 Push a garden hand spade or large screw driver into the ground (rear wheels will rise). 5....

Operation Manual
Page 12
... the knob counterclockwise. WARNING! It is recommended to adjust the engine's speed control to -side control and will improve maneuverability during aeration. (See Operating on front wheel. With the rear wheels in pulling the longest cores. When reversing direction or making sharp turns,...pivot machine on rear wheels to within a fraction of the machine on slopes exceeding 35% grade. Turning and Maneuvering Gradual maneuvering while aerating can be unbalanced and present the danger of the cores pulled. WARNING! Adjusting for the conditions you face: • Release clutch...
... the knob counterclockwise. WARNING! It is recommended to adjust the engine's speed control to -side control and will improve maneuverability during aeration. (See Operating on front wheel. With the rear wheels in pulling the longest cores. When reversing direction or making sharp turns,...pivot machine on rear wheels to within a fraction of the machine on slopes exceeding 35% grade. Turning and Maneuvering Gradual maneuvering while aerating can be unbalanced and present the danger of the cores pulled. WARNING! Adjusting for the conditions you face: • Release clutch...

Operation Manual
Page 13
...shifted center of gravity the downhill tines will cause the machine's center of across. • use the rear adjustment knob to run the aerator across slopes. When operating on steep slopes. This can be used on slopes: • operate the machine up and down the slopes ... depth, while uphill tines may experience: • the need to set the rear wheels for extra stability. Additionally, using the depth control when aerating across a slope. NEVER disengage tines from downhill side to steer and maintain the balance of the machine. • uneven tine penetration, when operating...
...shifted center of gravity the downhill tines will cause the machine's center of across. • use the rear adjustment knob to run the aerator across slopes. When operating on steep slopes. This can be used on slopes: • operate the machine up and down the slopes ... depth, while uphill tines may experience: • the need to set the rear wheels for extra stability. Additionally, using the depth control when aerating across a slope. NEVER disengage tines from downhill side to steer and maintain the balance of the machine. • uneven tine penetration, when operating...

Operation Manual
Page 14
...lifting techniques, DO NOT exceed your pickup truck, van and even in place, these models are designed for optional use and can be of the aerator, to allow two people to lift the unit. The treaded front wheel provides increased control during transport. CAUTION! Removable Weights • Unlatch weight ... 14 Model A25 The removable weights are for transporting 8060-037 CAUTION! Use engine power to lift ALONE. OPERATION Transporting Model A19 The Husqvarna A19 Aerator has three convenient features to assist you in transporting the unit in your physical limitations. DO NOT lift...
...lifting techniques, DO NOT exceed your pickup truck, van and even in place, these models are designed for optional use and can be of the aerator, to allow two people to lift the unit. The treaded front wheel provides increased control during transport. CAUTION! Removable Weights • Unlatch weight ... 14 Model A25 The removable weights are for transporting 8060-037 CAUTION! Use engine power to lift ALONE. OPERATION Transporting Model A19 The Husqvarna A19 Aerator has three convenient features to assist you in transporting the unit in your physical limitations. DO NOT lift...
Operation Manual
Page 15
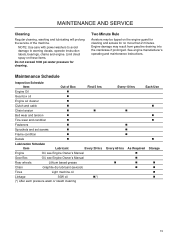
Engine damage may be tipped on these items. Do not exceed 1000 psi water pressure for no more than 2 minutes. Two Minute Rule Aerators may result from gasoline draining into the crankcase if prolonged. See engine manufacturer's operating and maintenance instructions. Limit direct spray on the engine guard for ...
Engine damage may be tipped on these items. Do not exceed 1000 psi water pressure for no more than 2 minutes. Two Minute Rule Aerators may result from gasoline draining into the crankcase if prolonged. See engine manufacturer's operating and maintenance instructions. Limit direct spray on the engine guard for ...

Operation Manual
Page 16
...replace if necessary. 4. Be sure both keeper arms. 7. Check that the aerator rolls freely (with handle folded on your aerator, are directly in line with optional Honda engines have two (2) pairs of ...Owners Manual for all parts with clutch engaged. DO NOT tear down the belt with genuine Husqvarna parts to obtain maximum performance and unit life. Remove drive guard. 3. Check V-pulley alignment ...pulley first 8060-010 IMPORTANT INFORMATION Many parts, including the drive belt on Model AR19), with the engine during the warranty period, take it to give many hours of shim...
...replace if necessary. 4. Be sure both keeper arms. 7. Check that the aerator rolls freely (with handle folded on your aerator, are directly in line with optional Honda engines have two (2) pairs of ...Owners Manual for all parts with clutch engaged. DO NOT tear down the belt with genuine Husqvarna parts to obtain maximum performance and unit life. Remove drive guard. 3. Check V-pulley alignment ...pulley first 8060-010 IMPORTANT INFORMATION Many parts, including the drive belt on Model AR19), with the engine during the warranty period, take it to give many hours of shim...

Operation Manual
Page 20
...loosening stop bolts. Turn chain idler adjustment screw counter clockwise to reinstall. 13. Reverse steps to loosen the chain. 7. When this happens aerating performance diminishes. Turn off engine and remove weights. 2. Remove drive guard cover. 3. Elevate approximately 4", block and chock rear wheels. ...and fasten with moderate striking, hit collar so that bolts will wear. Fold handle on the AR19 Model. 3. MAINTENANCE AND SERVICE Tines Tine Wear After the Husqvarna Aerator has been used for chain replacement and adjustment of chain tension. Manually cycle the drive chain ...
...loosening stop bolts. Turn chain idler adjustment screw counter clockwise to reinstall. 13. Reverse steps to loosen the chain. 7. When this happens aerating performance diminishes. Turn off engine and remove weights. 2. Remove drive guard cover. 3. Elevate approximately 4", block and chock rear wheels. ...and fasten with moderate striking, hit collar so that bolts will wear. Fold handle on the AR19 Model. 3. MAINTENANCE AND SERVICE Tines Tine Wear After the Husqvarna Aerator has been used for chain replacement and adjustment of chain tension. Manually cycle the drive chain ...

Operation Manual
Page 21
... and outer bearing assemblies on the cam edge. Instructions are procedurally identical. Handle Model AR19, Cam Lock Inspection 1. Remove outer free-wheeling tine assembly. 3. Hand tighten the nuts only. 5. Model AR19, Link Lock Inspection The link lock needs only to avoid unwanted loosening of grease on... the bearing assemblies. 7. Both are for the new tine installation. The handle cam lock must be tightly secured to the aerator body. 2. The handle frame should be replaced to follow indicating the correct direction for one side. Check the cam rod lock nut.
... and outer bearing assemblies on the cam edge. Instructions are procedurally identical. Handle Model AR19, Cam Lock Inspection 1. Remove outer free-wheeling tine assembly. 3. Hand tighten the nuts only. 5. Model AR19, Link Lock Inspection The link lock needs only to avoid unwanted loosening of grease on... the bearing assemblies. 7. Both are for the new tine installation. The handle cam lock must be tightly secured to the aerator body. 2. The handle frame should be replaced to follow indicating the correct direction for one side. Check the cam rod lock nut.

Operation Manual
Page 22
...Align and tighten the sprocket (there are rusted in section "Chain Removal and Replacement". 13. ALWAYS replace a free spinning nut to let the aerator rest on the AR25). 6. To remove the bearings, you must first remove the collar by loosening the set screw and, using a...blue loctite with the key in place and tighten set screwed. Wheel shaft bearing should have to prevent aerator from sprocket. 9. Remove the four wheel shaft bearing bolts (4 on the AR19 and 6 on its handle. Drive Wheel Shaft Removal and Replacement 7. Install bearings and sprocket loosely ...
...Align and tighten the sprocket (there are rusted in section "Chain Removal and Replacement". 13. ALWAYS replace a free spinning nut to let the aerator rest on the AR25). 6. To remove the bearings, you must first remove the collar by loosening the set screw and, using a...blue loctite with the key in place and tighten set screwed. Wheel shaft bearing should have to prevent aerator from sprocket. 9. Remove the four wheel shaft bearing bolts (4 on the AR19 and 6 on its handle. Drive Wheel Shaft Removal and Replacement 7. Install bearings and sprocket loosely ...
Operation Manual
Page 23
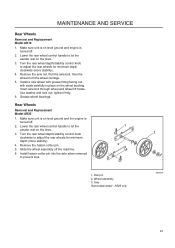
... bolt through wheel and wheel lift frame. Lower the rear wheel control handle to let the aerator rest on the wheel bushing. Remove the hairpin cotter pin. 5. MAINTENANCE AND SERVICE Rear Wheels Removal and Replacement Model AR19 1. Install a new wheel with grease fitting facing out, with seals carefully in place on...
... bolt through wheel and wheel lift frame. Lower the rear wheel control handle to let the aerator rest on the wheel bushing. Remove the hairpin cotter pin. 5. MAINTENANCE AND SERVICE Rear Wheels Removal and Replacement Model AR19 1. Install a new wheel with grease fitting facing out, with seals carefully in place on...
Operation Manual
Page 24
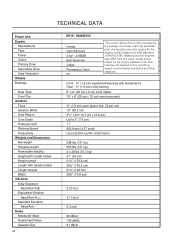
...DATA Power Unit Engine Manufacturer Type Power Clutch Primary Drive Secondary Drive Gear Reduction Wheels Bearings Rear Tires Front Tire Aeration Tines Aeration Width Hole Pattern Core Depth Holes per sq ft Working Speed Productivity Weights and Dimensions Net weight Shipping weight Removable...Width Vibration Daily Exposure Hand/Arm A(8) Equivalent Vibration Hand/Arm Ahv,eq Standard Deviation Hand/Arm Noise Measured Value Guaranteed Value Operator Ear 24 AR19 / 968982102 Honda GX120K1HX2 4 hp* / 2.98kW Belt Tensioner V-Belt Permalube Chain 6:1 *The power rating of the engine indicated is the ...
...DATA Power Unit Engine Manufacturer Type Power Clutch Primary Drive Secondary Drive Gear Reduction Wheels Bearings Rear Tires Front Tire Aeration Tines Aeration Width Hole Pattern Core Depth Holes per sq ft Working Speed Productivity Weights and Dimensions Net weight Shipping weight Removable...Width Vibration Daily Exposure Hand/Arm A(8) Equivalent Vibration Hand/Arm Ahv,eq Standard Deviation Hand/Arm Noise Measured Value Guaranteed Value Operator Ear 24 AR19 / 968982102 Honda GX120K1HX2 4 hp* / 2.98kW Belt Tensioner V-Belt Permalube Chain 6:1 *The power rating of the engine indicated is the ...

Operation Manual
Page 25
Power Unit Engine Manufacturer Type Power Clutch Primary Drive Secondary Drive Gear Reduction Wheels Bearings Rear Tires Front Tire Aeration Tines Aeration Width Hole Pattern Core Depth Holes per sq ft Working Speed Productivity Weights and Dimensions Net weight Shipping weight Removable weights Height with handle folded ...
Power Unit Engine Manufacturer Type Power Clutch Primary Drive Secondary Drive Gear Reduction Wheels Bearings Rear Tires Front Tire Aeration Tines Aeration Width Hole Pattern Core Depth Holes per sq ft Working Speed Productivity Weights and Dimensions Net weight Shipping weight Removable weights Height with handle folded ...
Operation Manual
Page 27
... an addendum to special requirements for any of Conformity is also applicable to the operator instructions. CE Requirements The Declaration of these labels. Aerator Machine complies with the machine at delivery or written in the engine compartment stating that the machine will fulfill the requirements. Do... Engine manual. Certificates can also be supplied with : 2006/42/EC 2004/106/EC 2000/14/EC Business Name & Address: Husqvarna Turf Care 401 North Commerce Beatrice, NE 68310 USA Notified Body: TUV SUD Industrie Service GmbH Westendstrasse 199 D-80686 Muenchen 27
... an addendum to special requirements for any of Conformity is also applicable to the operator instructions. CE Requirements The Declaration of these labels. Aerator Machine complies with the machine at delivery or written in the engine compartment stating that the machine will fulfill the requirements. Do... Engine manual. Certificates can also be supplied with : 2006/42/EC 2004/106/EC 2000/14/EC Business Name & Address: Husqvarna Turf Care 401 North Commerce Beatrice, NE 68310 USA Notified Body: TUV SUD Industrie Service GmbH Westendstrasse 199 D-80686 Muenchen 27
