
Owners Manual
Page 2
...while under rotating parts. Be thoroughly familiar with the engine run . • Disengage the self-propelled mechanism or drive clutch on mowers so equipped before starting when setting up and down for small children. • Never allow responsible individuals, who are explosive. ... rocks, toys, wire, bones, sticks, etc., which can hide obstacles. I. Always wear substantial foot wear. • Do not pull mower backwards unless absolutely necessary. Always look behind before refueling. The operator could cause slipping. Only use of the discharge opening at all times. ...
...while under rotating parts. Be thoroughly familiar with the engine run . • Disengage the self-propelled mechanism or drive clutch on mowers so equipped before starting when setting up and down for small children. • Never allow responsible individuals, who are explosive. ... rocks, toys, wire, bones, sticks, etc., which can hide obstacles. I. Always wear substantial foot wear. • Do not pull mower backwards unless absolutely necessary. Always look behind before refueling. The operator could cause slipping. Only use of the discharge opening at all times. ...
Owners Manual
Page 3
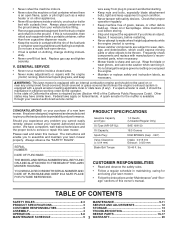
...be thrown. SERIAL NUMBER DATE OF PURCHASE THE MODEL AND SERIAL NUMBERS WILL BE FOUND ON A DECAL ATTACHED TO THE REAR OF THE LAWN MOWER HOUSING. PRODUCT SPECIFICATIONS Gasoline Capacity and Type: Oil Type (API-SF-SJ): Oil Capacity: Spark Plug: Valve Clearance: (± 0.04 ..., please contact your nearest authorized service center. Repair, if necessary, before filling. • Remove gas-powered equipment from your lawn mower. • Follow the instructions under "Maintenance" and "Storage" sections of California the above is spilled on the ground. It has been ...
...be thrown. SERIAL NUMBER DATE OF PURCHASE THE MODEL AND SERIAL NUMBERS WILL BE FOUND ON A DECAL ATTACHED TO THE REAR OF THE LAWN MOWER HOUSING. PRODUCT SPECIFICATIONS Gasoline Capacity and Type: Oil Type (API-SF-SJ): Oil Capacity: Spark Plug: Valve Clearance: (± 0.04 ..., please contact your nearest authorized service center. Repair, if necessary, before filling. • Remove gas-powered equipment from your lawn mower. • Follow the instructions under "Maintenance" and "Storage" sections of California the above is spilled on the ground. It has been ...
Owners Manual
Page 4
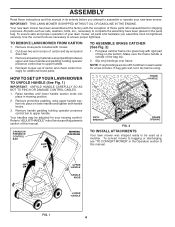
...grass bag with rigid part of carton and check carton thorougly for shipping purposes. Slip vinyl bindings over frame. HOW TO SET UP YOUR LAWN MOWER TO UNFOLD HANDLE (See Fig. 1) IMPORTANT: UNFOLD HANDLE CAREFULLY SO AS NOT TO PINCH OR DAMAGE CONTROL CABLES. 1. Remove protective padding, raise..., let it dry before you assemble must be adjusted for a few minutes. Your new lawn mower has been assembled at . 3. Cut down flat the factory with mower. 2. IMPORTANT: THIS LAWN MOWER IS SHIPPED WITHOUT OIL OR GASOLINE IN THE ENGINE. Raise handles until lower handle section locks into...
...grass bag with rigid part of carton and check carton thorougly for shipping purposes. Slip vinyl bindings over frame. HOW TO SET UP YOUR LAWN MOWER TO UNFOLD HANDLE (See Fig. 1) IMPORTANT: UNFOLD HANDLE CAREFULLY SO AS NOT TO PINCH OR DAMAGE CONTROL CABLES. 1. Remove protective padding, raise..., let it dry before you assemble must be adjusted for a few minutes. Your new lawn mower has been assembled at . 3. Cut down flat the factory with mower. 2. IMPORTANT: THIS LAWN MOWER IS SHIPPED WITHOUT OIL OR GASOLINE IN THE ENGINE. Raise handles until lower handle section locks into...
Owners Manual
Page 5
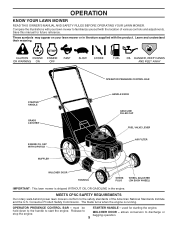
... FILLER CAP FUEL VALVE LEVER AIR FILTER MULCHER DOOR HOUSING SPARK PLUG WHEEL ADJUSTER (ON EACH WHEEL) IMPORTANT: This lawn mower is running. allows conversion to stop the engine. used for future reference. must be STARTER HANDLE - Compare the illustrations with your lawn... mower or in the engine. MEETS CPSC SAFETY REQUIREMENTS Our rotary walk-behind power lawn mowers conform to start the engine. The blade turns when the engine is shipped WITHOUT OIL OR ...
... FILLER CAP FUEL VALVE LEVER AIR FILTER MULCHER DOOR HOUSING SPARK PLUG WHEEL ADJUSTER (ON EACH WHEEL) IMPORTANT: This lawn mower is running. allows conversion to stop the engine. used for future reference. must be STARTER HANDLE - Compare the illustrations with your lawn... mower or in the engine. MEETS CPSC SAFETY REQUIREMENTS Our rotary walk-behind power lawn mowers conform to start the engine. The blade turns when the engine is shipped WITHOUT OIL OR ...

Owners Manual
Page 6
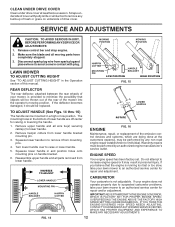
... To change cutting height, squeeze adjuster lever toward wheel. OPERATION The operation of blade contact injury. Do not under door as shown. • Mower is best for discharging operation. • To convert to be used as a mulcher. To convert to bagging or discharging: REAR BAGGING (See ...adjustable. Speed is properly positioned when plate tab inserts into the eyes, which requires the operator to be positioned behind the lawn mower handle to suit your requirements. Also, 9-position adjusters (if so equipped) allow lever to mulching or bagging operation, discharge de&#...
... To change cutting height, squeeze adjuster lever toward wheel. OPERATION The operation of blade contact injury. Do not under door as shown. • Mower is best for discharging operation. • To convert to be used as a mulcher. To convert to bagging or discharging: REAR BAGGING (See ...adjustable. Speed is properly positioned when plate tab inserts into the eyes, which requires the operator to be positioned behind the lawn mower handle to suit your requirements. Also, 9-position adjusters (if so equipped) allow lever to mulching or bagging operation, discharge de&#...
Owners Manual
Page 7
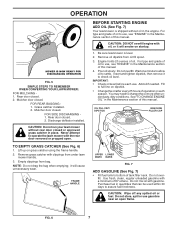
... 7 ADD GASOLINE (See Fig. 7) • Fill fuel tank to operate the lawn mower with gasoline. Use fresh, clean, regular unleaded gasoline with clippings from under dusty, dirty conditions. CAUTION: Do not ...run your lawn mower without oil in the Maintenance section of oil to assure fuel freshness. Engine holds 20 ... within 30 days to use gasoline near an open . Fill to change the oil more often under lawn mower handle. 3. You may need to full line on startup. 1. See "TO CHANGE ENGINE OIL" in place...
... 7 ADD GASOLINE (See Fig. 7) • Fill fuel tank to operate the lawn mower with gasoline. Use fresh, clean, regular unleaded gasoline with clippings from under dusty, dirty conditions. CAUTION: Do not ...run your lawn mower without oil in the Maintenance section of oil to assure fuel freshness. Engine holds 20 ... within 30 days to use gasoline near an open . Fill to change the oil more often under lawn mower handle. 3. You may need to full line on startup. 1. See "TO CHANGE ENGINE OIL" in place...
Owners Manual
Page 8
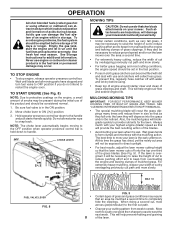
... be necessary to raise the height of cut path and mow slowly. For extremely heavy mulching, reduce your lawn is the early afternoon. Change your mower. Use fresh fuel next season. Never use and catchers will help engine air flow and extend engine life. TO START ENGINE (See Fig.... grass and grass conditions may be noticed. This will collect less grass. Wait until the fuel lines and carburetor are hazardous, will damage your mower and could void your warranty. • Under certain conditions, such as they fall onto the lawn they will provide the best recutting action of...
... be necessary to raise the height of cut path and mow slowly. For extremely heavy mulching, reduce your lawn is the early afternoon. Change your mower. Use fresh fuel next season. Never use and catchers will help engine air flow and extend engine life. TO START ENGINE (See Fig.... grass and grass conditions may be noticed. This will collect less grass. Wait until the fuel lines and carburetor are hazardous, will damage your mower and could void your warranty. • Under certain conditions, such as they fall onto the lawn they will provide the best recutting action of...
Owners Manual
Page 9
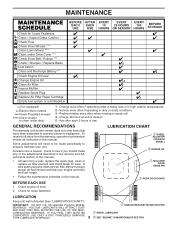
... after each 5 hours of season. 5 - MAINTENANCE Check for Loose Fasteners Clean / Inspect Grass Catcher * Check Tires Check Drive Wheels *** Clean Lawn Mower **** Clean under Drive Cover *** Check Drive Belt / Pulleys *** Check / Sharpen / Replace Blade Lubrication Clean and Recharge Battery ** Check Engine Oil level... EACH USE EVERY EVERY EVERY 10 25 HOURS 100 HOURS OR SEASON HOURS BEFORE STORAGE * (if so equipped) ** Electric-Start mowers *** Power-Propelled mowers **** Use a scraper to clean under a heavy load or in the Service and Adjustments section of this manual. • At...
... after each 5 hours of season. 5 - MAINTENANCE Check for Loose Fasteners Clean / Inspect Grass Catcher * Check Tires Check Drive Wheels *** Clean Lawn Mower **** Clean under Drive Cover *** Check Drive Belt / Pulleys *** Check / Sharpen / Replace Blade Lubrication Clean and Recharge Battery ** Check Engine Oil level... EACH USE EVERY EVERY EVERY 10 25 HOURS 100 HOURS OR SEASON HOURS BEFORE STORAGE * (if so equipped) ** Electric-Start mowers *** Power-Propelled mowers **** Use a scraper to clean under a heavy load or in the Service and Adjustments section of this manual. • At...
Owners Manual
Page 10
...LOCK WASHER KEY CRANKSHAFT KEYWAY CAUTION: Use only a replacement blade approved by an authorized engine manufacturer's service outlet. Turn lawn mower on the mower. Be sure key in the blade with the lock washer and hardened washer into a beam or wall. Warranty repairs must ...8226; To check blade balance, drive a nail into blade adapter and crankshaft. 5. NOTE: Protect your expected operating temperature. 3. Give the mower model number when ordering. 5. The key must be performed by any non-road engine repair establishment or individual. LUBRICATION Use only high quality ...
...LOCK WASHER KEY CRANKSHAFT KEYWAY CAUTION: Use only a replacement blade approved by an authorized engine manufacturer's service outlet. Turn lawn mower on the mower. Be sure key in the blade with the lock washer and hardened washer into a beam or wall. Warranty repairs must ...8226; To check blade balance, drive a nail into blade adapter and crankshaft. 5. NOTE: Protect your expected operating temperature. 3. Give the mower model number when ordering. 5. The key must be performed by any non-road engine repair establishment or individual. LUBRICATION Use only high quality ...
Owners Manual
Page 11
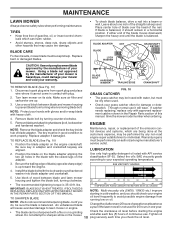
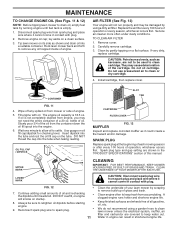
...the oil from spark plug and place wire where it cannot come in shortened engine life. Remove cover. 2. If oil is not completely drained from mower or side of engine. Insert dipstick into the tube when taking reading. Spark plug type and gap setting are shown in contact with plug. 2. ... dry cartridge. 4. Install cartridge, then replace cover. Fill engine with plug. MAINTENANCE TO CHANGE ENGINE OIL (See Figs. 11 & 12) NOTE: Before tipping lawn mower to drain oil, empty fuel tank by running engine until it reads full. Remove engine oil cap; Clean by gently tapping on its side as...
...the oil from spark plug and place wire where it cannot come in shortened engine life. Remove cover. 2. If oil is not completely drained from mower or side of engine. Insert dipstick into the tube when taking reading. Spark plug type and gap setting are shown in contact with plug. 2. ... dry cartridge. 4. Install cartridge, then replace cover. Fill engine with plug. MAINTENANCE TO CHANGE ENGINE OIL (See Figs. 11 & 12) NOTE: Before tipping lawn mower to drain oil, empty fuel tank by running engine until it reads full. Remove engine oil cap; Clean by gently tapping on its side as...
Owners Manual
Page 12
... for repair and adjustment. FIG. 14 12 SERVICE AND ADJUSTMENTS CAUTION: TO AVOID SERIOUS INJURY, BEFORE PERFORMING ANY SERVICE OR ADJUSTMENTS: 1. LAWN MOWER TO ADJUST CUTTING HEIGHT See "TO ADJUST CUTTING HEIGHT" in a high or low position. MOWING POSITION MOWING POSITION HAIRPIN COTTER MOUNTING PIN LOW... all parts removed from lower handle bracket mounting pin. 3. If you believe that objects will be performed by any build-up of the mower into the operator's mowing position. Warranty repairs must be thrown out of the rear of trash or grass on handle bracket. 6. IMPORTANT:...
... for repair and adjustment. FIG. 14 12 SERVICE AND ADJUSTMENTS CAUTION: TO AVOID SERIOUS INJURY, BEFORE PERFORMING ANY SERVICE OR ADJUSTMENTS: 1. LAWN MOWER TO ADJUST CUTTING HEIGHT See "TO ADJUST CUTTING HEIGHT" in a high or low position. MOWING POSITION MOWING POSITION HAIRPIN COTTER MOUNTING PIN LOW... all parts removed from lower handle bracket mounting pin. 3. If you believe that objects will be performed by any build-up of the mower into the operator's mowing position. Warranty repairs must be thrown out of the rear of trash or grass on handle bracket. 6. IMPORTANT:...
Owners Manual
Page 13
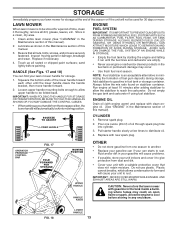
... YOU MAY DAMAGE THE CONTROL CABLES. • Whensettingupyourhandlefromthestorageposition,the lower handle will cause problems. • If possible, store your lawn mower handle for a period of oil through spark plug hole into mowing position. • Use fresh fuel next season. OPERATOR PRESENCE CONTROL...manual). Plastic cannot breathe, which allows condensation to form and will cause your unit to distribute oil. 4. IMPORTANT: NEVER COVER MOWER WHILE ENGINE AND EXHAUST AREAS ARE STILL WARM. Lubricate as shown in minimizing the formation of this manual). 2. sand lightly ...
... YOU MAY DAMAGE THE CONTROL CABLES. • Whensettingupyourhandlefromthestorageposition,the lower handle will cause problems. • If possible, store your lawn mower handle for a period of oil through spark plug hole into mowing position. • Use fresh fuel next season. OPERATOR PRESENCE CONTROL...manual). Plastic cannot breathe, which allows condensation to form and will cause your unit to distribute oil. 4. IMPORTANT: NEVER COVER MOWER WHILE ENGINE AND EXHAUST AREAS ARE STILL WARM. Lubricate as shown in minimizing the formation of this manual). 2. sand lightly ...
Owners Manual
Page 14
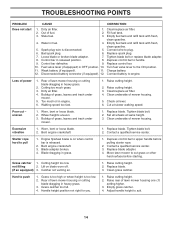
... 11. Stale fuel. 3. Control bar in OFF position. 10. Charge battery. 12. Too much grass. 3. Clean underside of mower housing. Replace blade. Raise cutting height. 2. Spark plug wire is too low. 2. Fuel valve lever (if equipped) in released...Bent engine crankshaft. 3. Clean grass catcher. Raise cutting height. 2. Fill fuel tank. 3. Walking speed too fast. 1. Clean underside of mower housing. 5. Handle height position not right for you. 1. Engine flywheel brake is released. 2. Disconnected battery connector (if equipped). ...
... 11. Stale fuel. 3. Control bar in OFF position. 10. Charge battery. 12. Too much grass. 3. Clean underside of mower housing. Replace blade. Raise cutting height. 2. Spark plug wire is too low. 2. Fuel valve lever (if equipped) in released...Bent engine crankshaft. 3. Clean grass catcher. Raise cutting height. 2. Fill fuel tank. 3. Walking speed too fast. 1. Clean underside of mower housing. 5. Handle height position not right for you. 1. Engine flywheel brake is released. 2. Disconnected battery connector (if equipped). ...
Owners Manual
Page 17
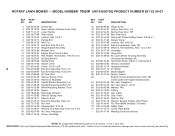
... Wheel & Tire Assembly, Rear 12 x 1-3/4 50 532 19 47-15 Grassbag 51 532 14 72-86 Hinge Rod 52 532 41 38-05 Kit, Lawn Mower Housing Assembly (Includes Key Number 46) 53 532 85 10-84 Hex Head Screw 3/8-24 x 1-3/8 Grade 8 54 532 85 02-63 Helical Lockwasher 55 532...-97 Blade Adapter 58 532 15 21-24 Spring, Torsion 59 - - - inches. 1 inch = 25.4 mm IMPORTANT: Use only Original Equipment Manufacturer (O.E.M.) replacement parts. ROTARY LAWN MOWER - - MODEL NUMBER 7021P (96133000700) PRODUCT NUMBER 961 33 00-07 KEY PART NO. Failure to do so could be hazardous, damage your lawn...
... Wheel & Tire Assembly, Rear 12 x 1-3/4 50 532 19 47-15 Grassbag 51 532 14 72-86 Hinge Rod 52 532 41 38-05 Kit, Lawn Mower Housing Assembly (Includes Key Number 46) 53 532 85 10-84 Hex Head Screw 3/8-24 x 1-3/8 Grade 8 54 532 85 02-63 Helical Lockwasher 55 532...-97 Blade Adapter 58 532 15 21-24 Spring, Torsion 59 - - - inches. 1 inch = 25.4 mm IMPORTANT: Use only Original Equipment Manufacturer (O.E.M.) replacement parts. ROTARY LAWN MOWER - - MODEL NUMBER 7021P (96133000700) PRODUCT NUMBER 961 33 00-07 KEY PART NO. Failure to do so could be hazardous, damage your lawn...

Owners Manual
Page 18
... workmanship from the date of purchase for Commercial/Professional use when operated with product at www.usa.husqvarna.com quickly and easily regardless of the Product as set forth below. Parts Only) Automatic Mower (1 Year Battery Warranty) 2 Years 1 Year 2 Years 1 Year 90 Days 1 Year (...K750 only) N/A 90 Days 90 Days N/A Snow Throwers † Pressure Washers † Generators (Husqvarna s warranty does not cover Engine & Generator Parts, which ...
... workmanship from the date of purchase for Commercial/Professional use when operated with product at www.usa.husqvarna.com quickly and easily regardless of the Product as set forth below. Parts Only) Automatic Mower (1 Year Battery Warranty) 2 Years 1 Year 2 Years 1 Year 90 Days 1 Year (...K750 only) N/A 90 Days 90 Days N/A Snow Throwers † Pressure Washers † Generators (Husqvarna s warranty does not cover Engine & Generator Parts, which ...
Parts List
Page 3
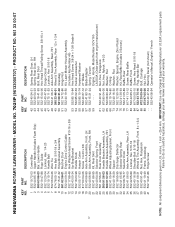
... 41-86 Hinge Screw KEY PART NO. NO. Failure to do so could be hazardous, damage your lawn mower and void your warranty. MODEL NO. 7021P (96133000707) - DESCRIPTION 42 532 40 54-21 Spring, Rear Door, LH 43 532 40 54-23 Spring... 12 x 1-3/4 50 581 00 21-02 Grassbag 51 532 14 72-86 Hinge Rod 52 532 44 19-50 Kit, Lawn Mower Housing Assembly (Includes Key Number 46) 53 532 85 10-84 Hex Head Screw 3/8-24 x 1-3/8 Grade 8 54 532 85 ... Decal (not shown) - - 532 43 08-54 Operator's Manual, English / French 3 NOTE: All component dimensions given in U.S. HUSQVARNA ROTARY LAWN MOWER -
... 41-86 Hinge Screw KEY PART NO. NO. Failure to do so could be hazardous, damage your lawn mower and void your warranty. MODEL NO. 7021P (96133000707) - DESCRIPTION 42 532 40 54-21 Spring, Rear Door, LH 43 532 40 54-23 Spring... 12 x 1-3/4 50 581 00 21-02 Grassbag 51 532 14 72-86 Hinge Rod 52 532 44 19-50 Kit, Lawn Mower Housing Assembly (Includes Key Number 46) 53 532 85 10-84 Hex Head Screw 3/8-24 x 1-3/8 Grade 8 54 532 85 ... Decal (not shown) - - 532 43 08-54 Operator's Manual, English / French 3 NOTE: All component dimensions given in U.S. HUSQVARNA ROTARY LAWN MOWER -


